
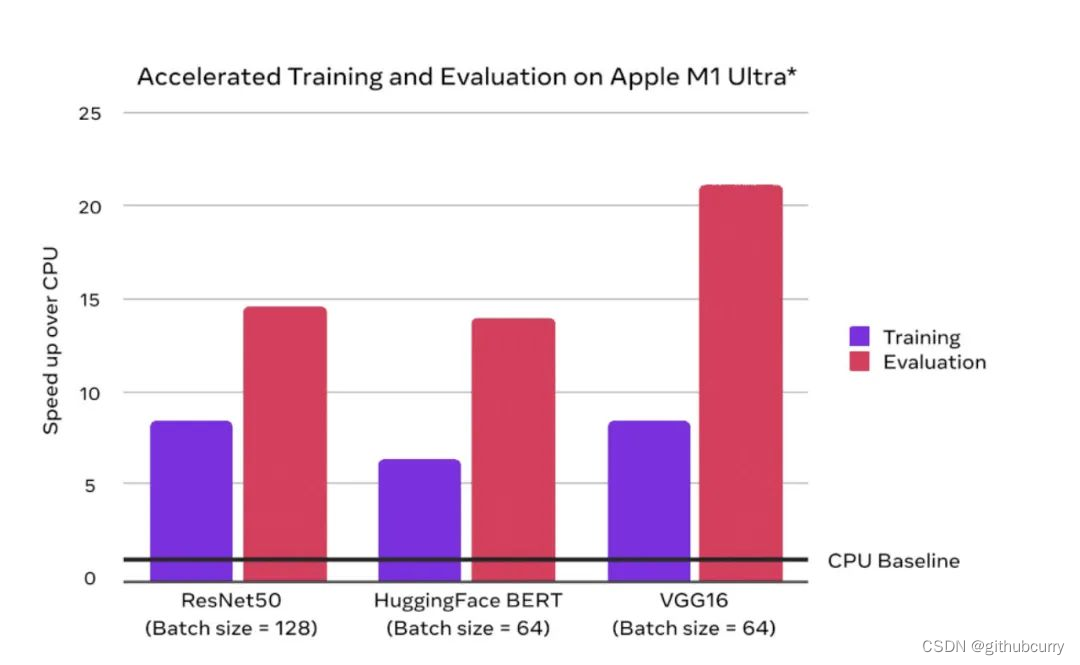
In May 2022, PyTorch officially announced that it has officially supported model acceleration on the M1 chip version of Mac. The official comparative data shows that compared with the CPU, the alchemy speed on the M1 can be accelerated by an average of 7 times.
1. Acceleration principle
Question1: Why can the Mac M1 chip be used to accelerate pytorch?
Because the Mac M1 chip is not a simple CPU chip, but an integrated chip including many components such as CPU (central processing unit), GPU (graphics processing unit), NPU (neural network engine), and unified memory unit. Since the Mac M1 chip integrates GPU components, it can be used to accelerate pytorch
Question2: How big is the video memory of the GPU on the Mac M1 chip?
The CPU and GPU of the Mac M1 chip use a unified memory unit. Therefore, the memory size that can be used by the Mac M1 chip is the memory size of the Mac computer.
Question3: Do I need to install the cuda backend to accelerate pytorch using the Mac M1 chip?
No, cuda is adapted to nvidia's GPU. The acceleration backend adapted to the GPU in the Mac M1 chip is mps, which is already available in the corresponding Mac operating system and does not need to be installed separately. Just need to install the adapted pytorch
Question4: Why some software that can be installed on a Mac Intel chip computer cannot be installed on a Mac M1 chip computer?
In order to pursue high performance and energy saving, the Mac M1 chip uses a simplified instruction set called arm architecture in its underlying design, which is different from the complete instruction set of x86 architecture used by commonly used CPU chips such as Intel. Therefore, some software developed based on the x86 instruction set cannot be directly used on the Mac M1 chip computer.
2. Environment configuration
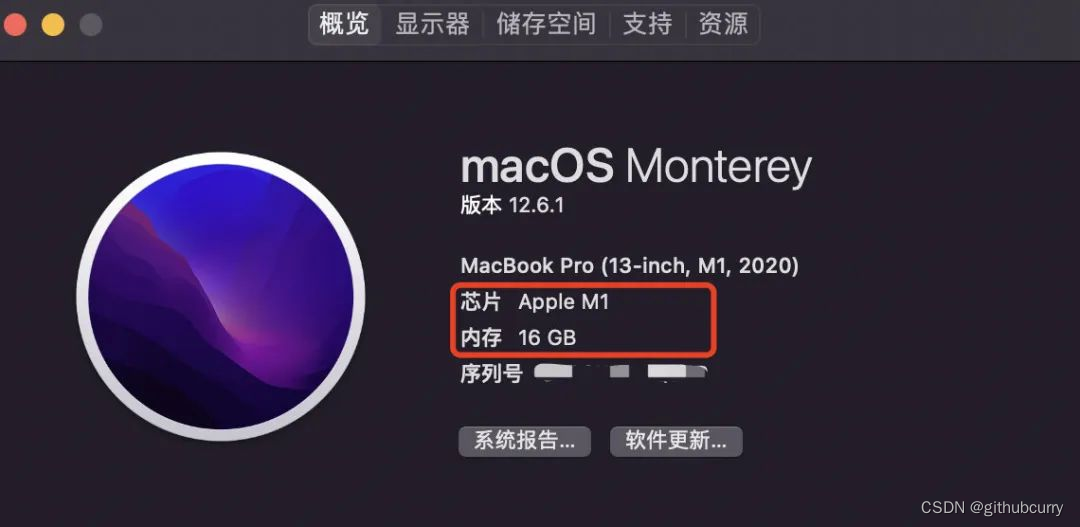
First, check the mac model
Click the mac icon in the upper left corner of the desktop -----About this machine, make sure it is the m1 chip, and make sure the memory size (it is better to have more than 16G, 8G may not be enough).
2.1 Download miniforge3
miniforge3 can be understood as the community version of miniconda/annoconda, which provides more stable support for M1 chips
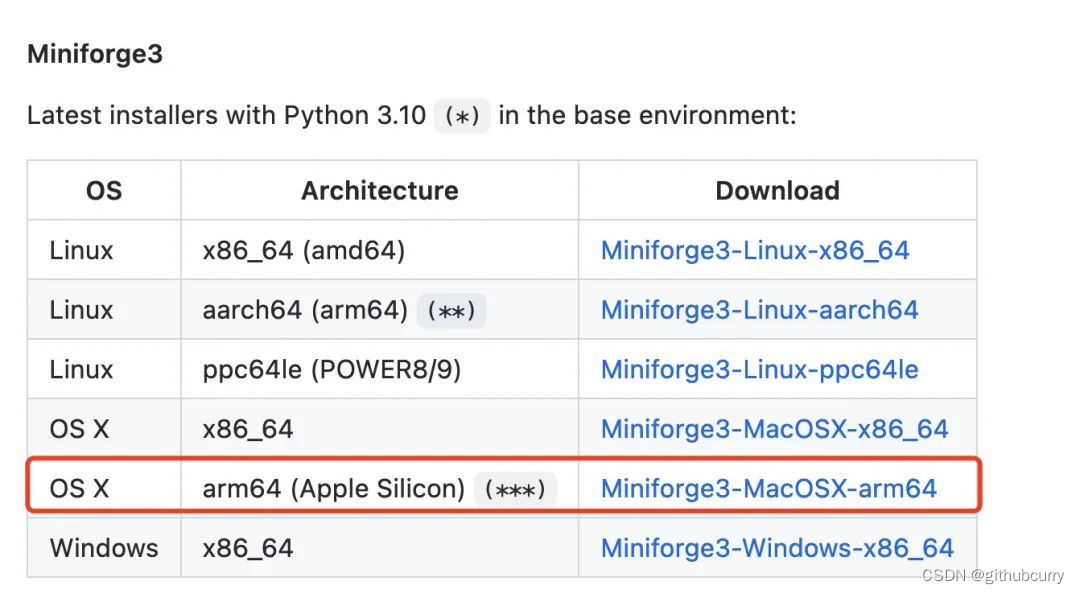
Annoconda also released official support for the mac m1 chip starting in May 2022, but it still recommends miniforge3 released by the community, which is open source and more stable.
2.2 Install miniforge3
chmod +x ~/Downloads/Miniforge3-MacOSX-arm64.sh
sh ~/Downloads/Miniforge3-MacOSX-arm64.sh
source ~/miniforge3/bin/activate
2.3 Install pytorch (v1.12 version has officially supported the mps backend for mac m1 chip gpu acceleration.)
pip install torch>=1.12 -i https://pypi.tuna.tsinghua.edu.cn/simple
2.4 Test environment
import torch
print(torch.backends.mps.is_available())
print(torch.backends.mps.is_built())
If the output is True, then congratulations, your configuration is successful.
3. Sample code
The following takes mnist handwritten digit recognition as an example to demonstrate the complete process of using the mps backend of the mac M1 chip GPU to accelerate pytorch.
The core operation is very simple, similar to using cuda, just move the model and data to torch.device("mps") before training.
import torch
from torch import nn
import torchvision
from torchvision import transforms
import torch.nn.functional as F import os,sys,time
import numpy as np
import pandas as pd
import datetime
from tqdm import tqdm
from copy import deepcopy
from torchmetrics import Accuracydef printlog(info):nowtime = datetime.datetime.now().strftime('%Y-%m-%d %H:%M:%S')print("\n"+"=========="*8 + "%s"%nowtime)print(str(info)+"\n")

# 一,准备数据
transform = transforms.Compose([transforms.ToTensor()])ds_train = torchvision.datasets.MNIST(root="mnist/",train=True,download=True,transform=transform)
ds_val = torchvision.datasets.MNIST(root="mnist/",train=False,download=True,transform=transform)dl_train =  torch.utils.data.DataLoader(ds_train, batch_size=128, shuffle=True, num_workers=2)
dl_val =  torch.utils.data.DataLoader(ds_val, batch_size=128, shuffle=False, num_workers=2)

# 二,定义模型
def create_net():net = nn.Sequential()net.add_module("conv1",nn.Conv2d(in_channels=1,out_channels=64,kernel_size = 3))net.add_module("pool1",nn.MaxPool2d(kernel_size = 2,stride = 2))net.add_module("conv2",nn.Conv2d(in_channels=64,out_channels=512,kernel_size = 3))net.add_module("pool2",nn.MaxPool2d(kernel_size = 2,stride = 2))net.add_module("dropout",nn.Dropout2d(p = 0.1))net.add_module("adaptive_pool",nn.AdaptiveMaxPool2d((1,1)))net.add_module("flatten",nn.Flatten())net.add_module("linear1",nn.Linear(512,1024))net.add_module("relu",nn.ReLU())net.add_module("linear2",nn.Linear(1024,10))return netnet = create_net()
print(net)# 评估指标
class Accuracy(nn.Module):def __init__(self):super().__init__()self.correct = nn.Parameter(torch.tensor(0.0),requires_grad=False)self.total = nn.Parameter(torch.tensor(0.0),requires_grad=False)def forward(self, preds: torch.Tensor, targets: torch.Tensor):preds = preds.argmax(dim=-1)m = (preds == targets).sum()n = targets.shape[0] self.correct += m self.total += nreturn m/ndef compute(self):return self.correct.float() / self.total def reset(self):self.correct -= self.correctself.total -= self.tota

# 三,训练模型
loss_fn = nn.CrossEntropyLoss()
optimizer= torch.optim.Adam(net.parameters(),lr = 0.01)
metrics_dict = nn.ModuleDict({

    "acc":Accuracy()})

device = torch.device("mps" if torch.backends.mps.is_available() else "cpu")
net.to(device)
loss_fn.to(device)
metrics_dict.to(device)
epochs = 20
ckpt_path='checkpoint.pt'#early_stopping相关设置
monitor="val_acc"
patience=5
mode="max"history = {

    }for epoch in range(1, epochs+1):printlog("Epoch {0} / {1}".format(epoch, epochs))

net.train()total_loss,step = 0,0loop = tqdm(enumerate(dl_train), total =len(dl_train),ncols=100)train_metrics_dict = deepcopy(metrics_dict) for i, batch in loop: features,labels = batch
features = features.to(device)labels = labels.to(device)
forwardpreds = net(features)loss = loss_fn(preds,labels)
backwardloss.backward()optimizer.step()optimizer.zero_grad()
metricsstep_metrics = {

    "train_"+name:metric_fn(preds, labels).item() for name,metric_fn in train_metrics_dict.items()}step_log = dict({

    "train_loss":loss.item()},**step_metrics)total_loss += loss.item()step+=1if i!=len(dl_train)-1:loop.set_postfix(**step_log)else:epoch_loss = total_loss/stepepoch_metrics = {

    "train_"+name:metric_fn.compute().item() for name,metric_fn in train_metrics_dict.items()}epoch_log = dict({

    "train_loss":epoch_loss},**epoch_metrics)loop.set_postfix(**epoch_log)for name,metric_fn in train_metrics_dict.items():metric_fn.reset()for name, metric in epoch_log.items():history[name] = history.get(name, []) + [metric]

net.eval()total_loss,step = 0,0loop = tqdm(enumerate(dl_val), total =len(dl_val),ncols=100)val_metrics_dict = deepcopy(metrics_dict) with torch.no_grad():for i, batch in loop: features,labels = batch
features = features.to(device)labels = labels.to(device)
forwardpreds = net(features)loss = loss_fn(preds,labels)
metricsstep_metrics = {

    "val_"+name:metric_fn(preds, labels).item() for name,metric_fn in val_metrics_dict.items()}step_log = dict({

    "val_loss":loss.item()},**step_metrics)total_loss += loss.item()step+=1if i!=len(dl_val)-1:loop.set_postfix(**step_log)else:epoch_loss = (total_loss/step)epoch_metrics = {

    "val_"+name:metric_fn.compute().item() for name,metric_fn in val_metrics_dict.items()}epoch_log = dict({

    "val_loss":epoch_loss},**epoch_metrics)loop.set_postfix(**epoch_log)for name,metric_fn in val_metrics_dict.items():metric_fn.reset()epoch_log["epoch"] = epoch           for name, metric in epoch_log.items():history[name] = history.get(name, []) + [metric]
arr_scores = history[monitor]best_score_idx = np.argmax(arr_scores) if mode=="max" else np.argmin(arr_scores)if best_score_idx==len(arr_scores)-1:torch.save(net.state_dict(),ckpt_path)print("<<<<<< reach best {0} : {1} >>>>>>".format(monitor,arr_scores[best_score_idx]),file=sys.stderr)if len(arr_scores)-best_score_idx>patience:print("<<<<<< {} without improvement in {} epoch, early stopping >>>>>>".format(monitor,patience),file=sys.stderr)break net.load_state_dict(torch.load(ckpt_path))dfhistory = pd.DataFrame(history)
4. Use torchkeras to support Mac M1 chip acceleration
I introduced support for mac m1 chips in the latest 3.3.0 torchkeras version. When there are mac m1 chips/GPUs available, they will be used for acceleration by default without any configuration.
The usage example is as follows
!pip install torchkeras>=3.3.0
import numpy as np
import pandas as pd
from matplotlib import pyplot as plt
import torch
from torch import nn
import torch.nn.functional as F
from torch.utils.data import Dataset,DataLoader
import torchkeras
import torchvision
from torchvision import transforms

transform = transforms.Compose([transforms.ToTensor()])
ds_train = torchvision.datasets.MNIST(root="mnist/",train=True,download=True,transform=transform)
ds_val = torchvision.datasets.MNIST(root="mnist/",train=False,download=True,transform=transform)
dl_train =  torch.utils.data.DataLoader(ds_train, batch_size=128, shuffle=True, num_workers=2)
dl_val =  torch.utils.data.DataLoader(ds_val, batch_size=128, shuffle=False, num_workers=2)for features,labels in dl_train:break

def create_net():net = nn.Sequential()net.add_module("conv1",nn.Conv2d(in_channels=1,out_channels=64,kernel_size = 3))net.add_module("pool1",nn.MaxPool2d(kernel_size = 2,stride = 2))net.add_module("conv2",nn.Conv2d(in_channels=64,out_channels=512,kernel_size = 3))net.add_module("pool2",nn.MaxPool2d(kernel_size = 2,stride = 2))net.add_module("dropout",nn.Dropout2d(p = 0.1))net.add_module("adaptive_pool",nn.AdaptiveMaxPool2d((1,1)))net.add_module("flatten",nn.Flatten())net.add_module("linear1",nn.Linear(512,1024))net.add_module("relu",nn.ReLU())net.add_module("linear2",nn.Linear(1024,10))return netnet = create_net()
print(net)# 评估指标
class Accuracy(nn.Module):def __init__(self):super().__init__()self.correct = nn.Parameter(torch.tensor(0.0),requires_grad=False)self.total = nn.Parameter(torch.tensor(0.0),requires_grad=False)def forward(self, preds: torch.Tensor, targets: torch.Tensor):preds = preds.argmax(dim=-1)m = (preds == targets).sum()n = targets.shape[0] self.correct += m self.total += nreturn m/ndef compute(self):return self.correct.float() / self.total def reset(self):self.correct -= self.correctself.total -= self.total

model = torchkeras.KerasModel(net,loss_fn = nn.CrossEntropyLoss(),optimizer= torch.optim.Adam(net.parameters(),lr=0.001),metrics_dict = {

    "acc":Accuracy()})from torchkeras import summary
summary(model,input_data=features);

used.dfhistory=model.fit(train_data=dl_train, val_data=dl_val, epochs=15, patience=5, monitor="val_acc",mode="max",ckpt_path='checkpoint.pt')

model.evaluate(dl_val)

model.predict(dl_val)[0:10]


net_clone = create_net()
net_clone.load_state_dict(torch.load("checkpoint.pt"))
5. Speed comparison of M1 chip with CPU and Nvidia GPU
Use the above code as an example to run on CPU, mac m1 chip, and Nvidia GPU.
The obtained running speed screenshot is as follows:
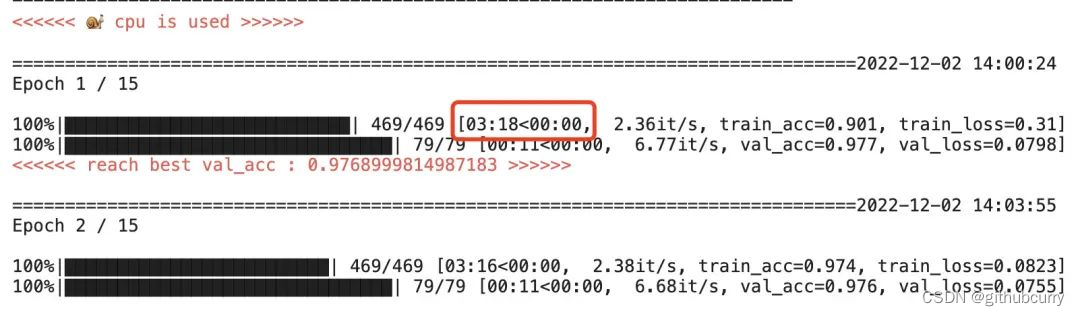
Pure CPU running effect
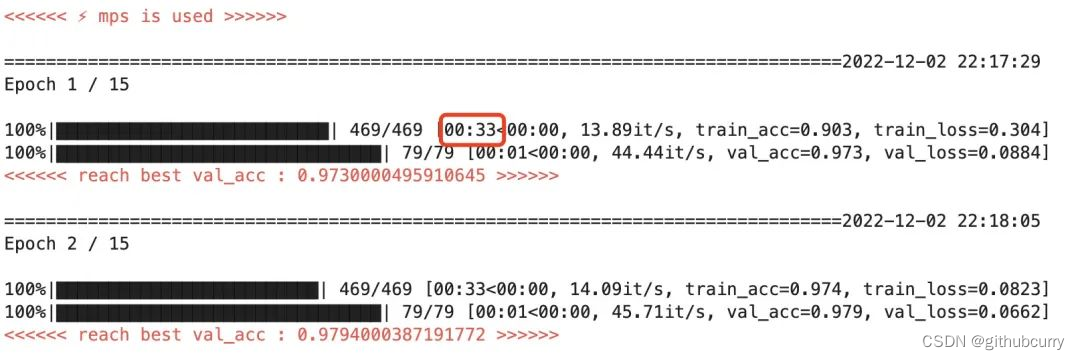
Mac M1 chip acceleration effect
Tesla P100 GPU accelerated effect
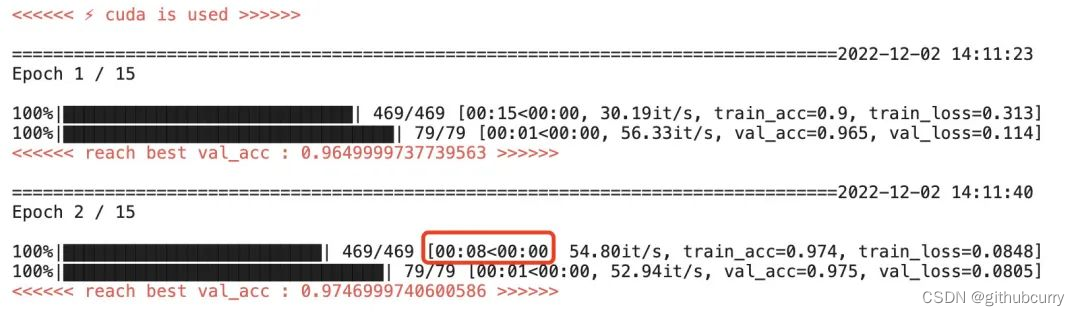
Pure CPU runs an epoch for about 3min 18s.
Using the mac m1 chip to accelerate, an epoch is about 33 s, which is about 6 times faster than CPU running.
This is equivalent to the average acceleration of the training process displayed by pytorch's official website by 7 times.
Using Nvidia Tesla P100 GPU acceleration, an epoch is about 8s, which is about 25 times faster than CPU running.
Overall, the acceleration of the Mac M1 chip to the deep learning training process is still very significant, usually reaching about 5 to 7 times.
However, compared with the high-end Tesla P100 GPU most commonly used in enterprises, there is still a difference in training speed of 2 to 4 times. It can be regarded as a mini version of the GPU.
Therefore, the Mac M1 chip is more suitable for local training of some small and medium-scale models, rapid iteration of ideas, and it is quite fragrant to use.
Especially for those who originally planned to change computers, it is much easier to use mac for development than windows