Recently, I encountered the form of writing a calendar in the project.
After looking at react and antd, I found a big pit when using it. It is recommended to look at the API of antd. Must see, or you will be devastated.
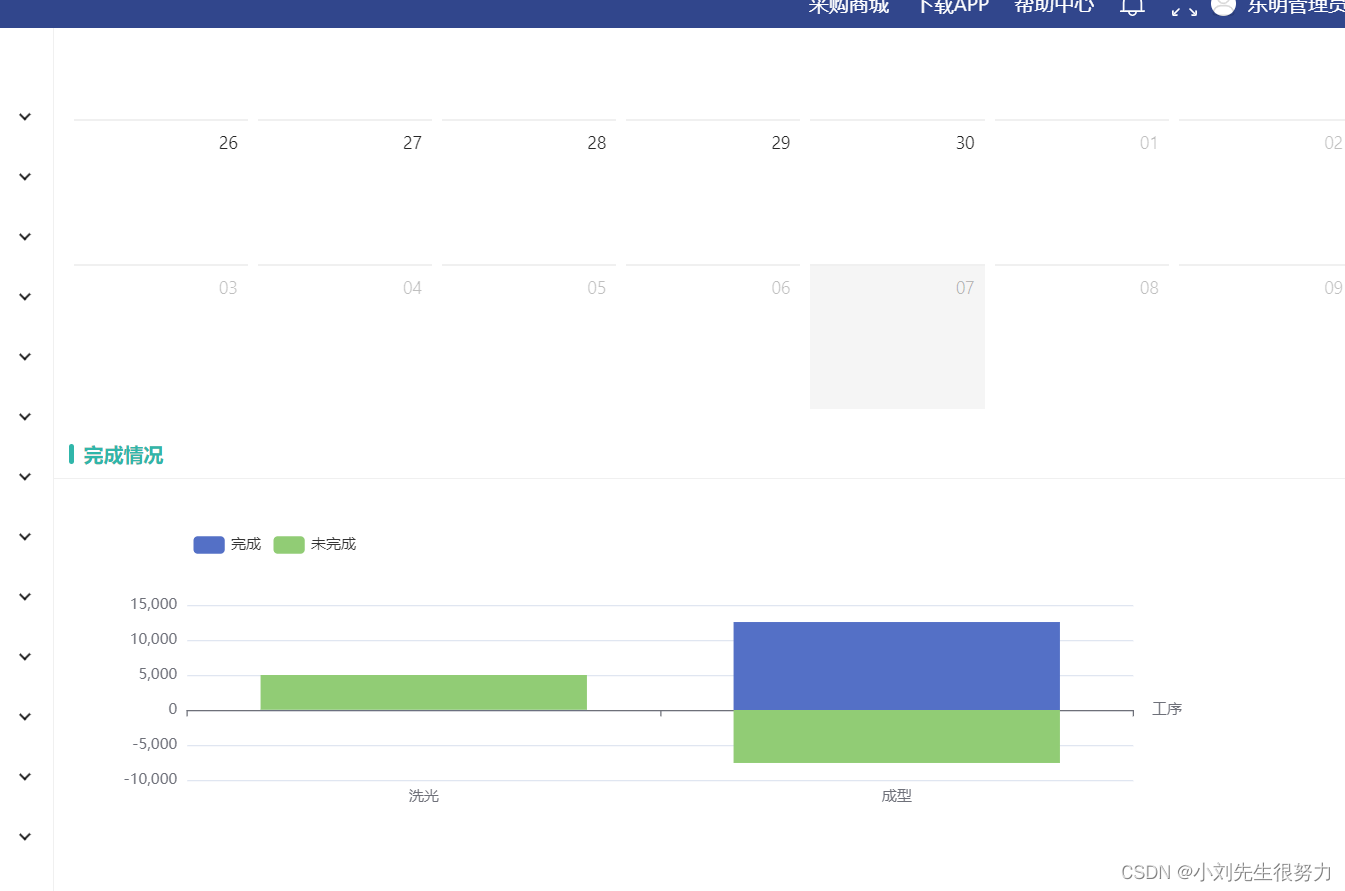
Well, let’s take a look at the style graph exhibition after the layout.

You need to agree with the backend on how to return the data.
Otherwise, if there is a problem with the data, the front end will have to deal with it in trouble.
As can be seen from the figure above, this is the detailed data, retrieved through the id. Write the interface yourself, I won’t show it here.
The agreement is: When the data is created, a time and specific items must be passed. But if you want to display it in the form of strips in the calendar, it must be the best way to handle it.
Let's simulate the scenario.
When creating data: the data transmitted to the backend (how to pass it to the frontend, how to store it in the backend, and just return it when needed)
Let's simulate the data returned by the backend:
parasm = [
	{
		fitTime: '2022-09-01 00:00:00' // 这个时间最好是带着 时分秒,但是不用实时获取当前时间的时分秒,你可以去看 days 或者	moment  当然也可以只到年月日就行,看你们需求。
		data : [
			{工序:1.....}
			{工序:2.....}
			{工序:3.....}
			{工序:4.....}
		]
	},
	{
		fitTime: '2022-09-02 00:00:00' // 这个时间最好是带着 时分秒,但是不用实时获取当前时间的时分秒,你可以去看 days 或者	moment  当然也可以只到年月日就行,看你们需求。
		data : [
			{工序:1.....}
			{工序:2.....}
		]
	},
	{
		fitTime: '2022-09-03 00:00:00' // 这个时间最好是带着 时分秒,但是不用实时获取当前时间的时分秒,你可以去看 days 或者	moment  当然也可以只到年月日就行,看你们需求。
		data : [
			{工序:1.....}
			{工序:2.....}
			{工序:3.....}
		]
	}
]
alright. This is the data format we agreed upon
, leave the rest to me.
look at antd
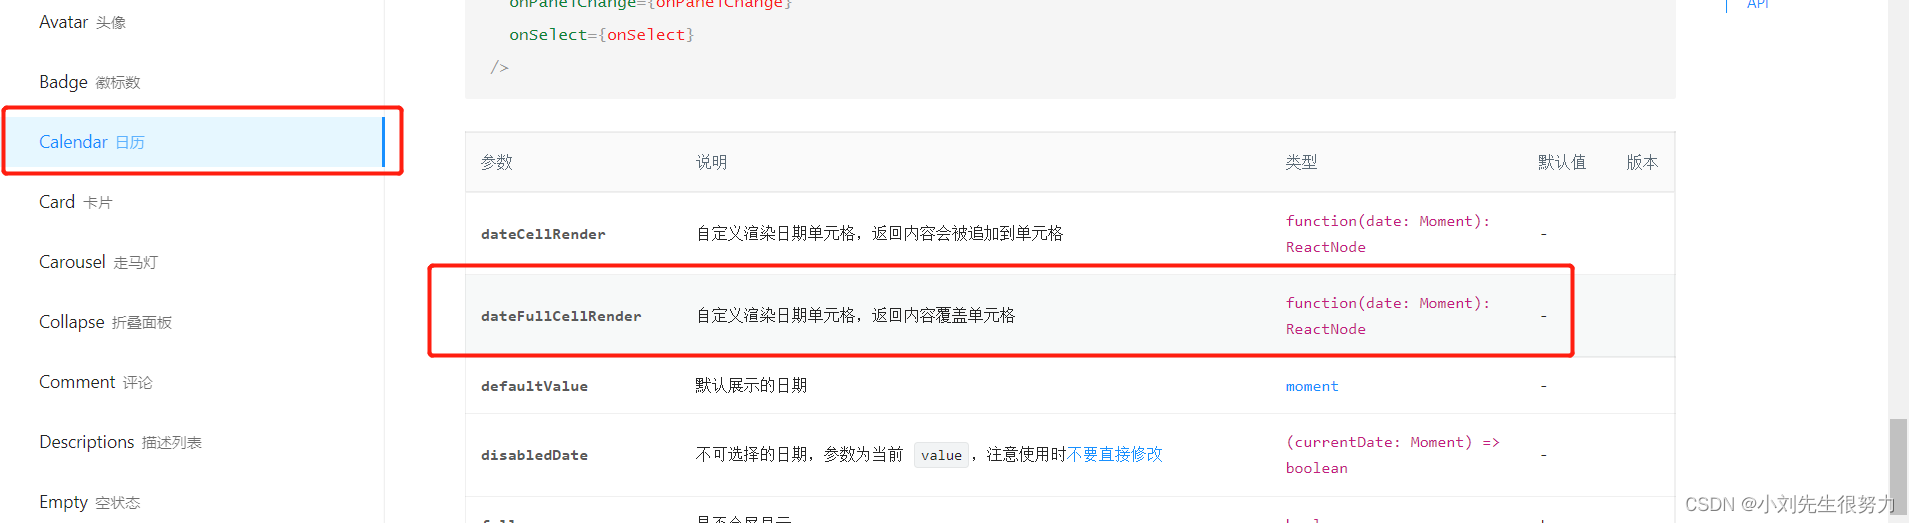

Note:
dateFullCellRender custom renders the date cell, and the returned content overrides the cell function(date: Moment): ReactNode.
headerRender custom header content function(object:{value: Moment, type: string, onChange: f(), onTypeChange: f()})
After you lay out the code and display it on the page, you can find that it takes a lot of time to print through the log, because the antd component itself has been encapsulated. Nothing can be changed over time.
The only difference is that you compare the time returned by the backend with the time of antd and then render the page. .
Look at the code operation. Analysis is placed in the code
In addition to adding an echart picture after making a calendar,
if you don't need it, you can ignore this.complete(); // echart display picture method
import React from 'react';
import { ElNotification, ElCard } from '@/components/el';
import { Spin, Button } from 'antd';
import dayjs from 'dayjs';
import { ElRowContainer } from '@/components/el';
import * as service from './service'; // 接口封装的文件 ,这里不做展示,一般项目里都会有自己的接口封装方法,直接用你们的接口替换就行
import MultiTabMobx from '@/store/multiTab';
import { Badge, Calendar, Select, Row, Col } from 'antd'; // antd 里面的 图标和组件引用
import type { Moment } from 'moment'; // 这个是要用的,可以直接用,一般项目里面都会有
import 'moment/locale/zh-cn'; // 这个也是必须的,不然你会发现引用了之后转义的都是英文时间
import './index.less'; // 样式
import moment from 'moment'; // 也必须的,直接用
import EditModal from './EditModal/index';
import * as echarts from 'echarts'; // echarts 的引用
import { statusMap } from '@/utils'; // 这个是展示出日历后,对每一条 li 做的颜色展示,不同的需求展示不同的颜色
interface Props {
match: any;
push?: any;
location: any; // 这个是其他页面传回的数据 这里用了 react 中state 的路由传参方式
}
interface State {
loading: boolean;
RenderData: any;
modalVisible: Boolean;
mark: String;
data: any;
formRef: any; //表单的ref
locationState: any; // 定义的接收传参的处理
}
class PurcBuyerLook extends React.Component<Props, State> {
modalRef: any;
multiTabStore: any;
constructor(props) {
super(props);
this.multiTabStore = MultiTabMobx;
this.state = {
loading: false,
RenderData: [], // 前端定义的接收后端数据做展示的
modalVisible: false,
formRef: null, //表单的ref
mark: 'create',
data: null, // 这个是弹框要用的,需要就用
locationState: this.props.location // 接收传参
};
}
async componentDidMount() {
let params = this.state?.locationState?.state.params; // 接收state传参 的处理。
if (params) {
this.getCalendDetail(params); // 日历接口方法
this.complete(); // echart 展示图方法
}
}
// 获取详情 日历看板数据
getCalendDetail = async (params) => {
this.setState({
loading: true
});
const res = await service.QueryCalendar(params); // 接口调取处理结果
this.setState({
loading: false
});
if (res.success) {
// 请求成功的返回的数据;
let details = res.data.map((item) => {
return item;
});
this.setState({
RenderData: details // 直接赋值,
});
}
};
// 这个是改变年 月 的事件操作。(需要当前接收的id,因为我们看的是特定某条的明细,所以主单的id是唯一的,直接用就行。
这里的时间是你实时变化的,不管是点击年的时候还是月的时候,这里展示的是选中年或月的当前月的第一天,因为要展示一月,所以不用管哪天。)
getData = async (data) => {
const capaBoardId = this.state?.locationState?.state?.params?.capaBoardId;
const calendarDate = dayjs(data)
.startOf('month')
.format('YYYY-MM-DD 00:00:00');
let params = {
capaBoardId,
calendarDate // // 选中时间的当前月第一天
};
this.getCalendDetail(params);
};
// 返回到主单,直接放路由就行了
onBack = () => {
const { push } = this.props;
push('/Capacity/manage/Capacitykan/list', () => false);
};
// antd 自定义渲染日期单元格,返回内容会被追加到单元格 dateCellRender
dateFullCellRender = (value: Moment) => { // 这里的 value 就是好多的时间,antd 返的
const listData = this.getListData(value); // 这里就是数据的处理展示 ,因为是数组,展示的话用 li 做合适。
return (
<ul className='events'>
{listData.map((item) => (
<li
key={item.itemId}
onClick={() => this.handleClick(item)} // 每一个 li 的点击事件
style={
{ // 么个数据的样式肯定要加的 ,不然放不下怎么办,所以 溢出隐藏
width: '100px',
marginLeft: '-30px',
whiteSpace: 'nowrap',
overflow: 'hidden',
textOverflow: 'ellipsis',
// 报工时间 reportTime 大于排产时间 scheduleTime 已逾期-红色, 已报工数量 reportQty 为0 未开始-黄色 ,已报工数量小于任务数量 scheduleQty 已开始-蓝色 ,已报工数量大于等于任务数量已完成-绿色,
color: statusMap.get(
`QTY_${
item.reportTime > item.scheduleTime
? 3
: item.reportQty == 0
? 0
: item.reportQty < item.scheduleQty
? 1
: item.reportQty > item.scheduleQty
? 2
: 0 || item.reportQty == item.scheduleQty
? 2
: 0
}`
)
}}
>
{item.itemName}
{item.itemCode}
{item.equiProcName}
{item.techName}
</li>
))}
</ul>
);
};
// 数据的展示处理,主要的就是这里了
// 解析 这里的value 还是 antd 的时间 ,
我们要做的就是拿接口返回的数据时间和这个时间做对比。只要有时间数据一样的就把数据展示到对应的那一天
getListData = (value: Moment) => {
let listData;
this.state.RenderData.map((item) => { // 拿到处理后的后端数据,前边已经state了
// 判断一下 后端返回的数据时间 == 通过moment处理的value 时间 (我们是到年月日时分秒了。如果你们不用时分秒就不用处理 直接 [value] 或者 [value.data()] 或者 value )
if (item.scheduleTime == moment(value).format('YYYY-MM-DD 00:00:00')) {
listData = [...item.details];
}
});
// 这里把对应的时间数据返回后return 出去。上边有接收处理的 ul --li
return listData || [];
};
// 这是点击每一个li 的事件弹框处理,你们怎么用就怎么改
handleClick = async (item) => {
const dataForm = {
...item
};
this.setState({
modalVisible: true,
mark: 'edit',
data: dataForm
});
};
// 关闭弹窗
closeModal = () => {
this.setState({ modalVisible: false });
this.state.formRef.resetFields(); // 清空数据
};
// form表单ref
formRef = (ref) => {
this.setState({
formRef: ref
});
};
// 弹框保存 有新增有编辑 if判断
save = async () => {
const { formRef } = this.state;
// 表单验证
await formRef.validateFields().catch(() => {
ElNotification({
type: 'warning',
message: '请检查基础信息'
});
return Promise.reject();
});
const fieldsValue = formRef.getFieldsValue();
let reportId = this.state.data.id;
let reportQty = fieldsValue.EditReportQty;
const res = await service.saveEdit(reportId, reportQty);
if (res.success) {
ElNotification({ type: 'success', message: res.msg });
this.setState({
modalVisible: false
});
formRef.resetFields(); // 清空数据
let params = this.state?.locationState?.state.params;
this.getCalendDetail(params); // 日历接口方法
} else {
ElNotification({
type: 'error',
message: res.msg || res.data || '操作失败!'
});
}
};
// 完成情况 echart
complete = async () => {
var chartDom = document.getElementById('mainStatus');
var myChart = echarts.init(chartDom);
var option;
let id = this.state?.locationState?.state.params?.capaBoardId;
const echartData = await service.echartDetail(id);
if (echartData.success) {
let data1 = []; // 完成工序占比
let data2 = []; // 未完成工序占比
// 展示n个工序名称
let equiProcName = echartData.data.map((item) => {
return item.equiProcName; // 工序名称
});
let itemEquiProc = echartData.data.map((item) => {
return {
totalQty: item.totalQty, // 总数
finishQty: item.finishQty, // 完成数量
Quantity: item.totalQty - item.finishQty // 未完成数量
};
});
for (let i = 0; i < echartData.data.length; i++) {
itemEquiProc.forEach((item) => {
data1.push(item.finishQty); // 完成工序占比
data2.push(item.Quantity); // 未完成工序占比
});
}
var emphasisStyle = {
itemStyle: {
shadowBlur: 10,
shadowColor: 'rgba(0,0,0,0.3)'
}
};
option = {
legend: {
data: ['完成', '未完成'], // 头长度
left: '10%'
},
tooltip: {},
xAxis: {
data: equiProcName,
name: '工序',
axisLine: { onZero: true },
splitLine: { show: false },
splitArea: { show: false }
},
yAxis: {},
grid: {
bottom: 100
},
series: [
{
name: '完成',
type: 'bar',
stack: 'one',
emphasis: emphasisStyle,
data: data1
},
{
name: '未完成',
type: 'bar',
stack: 'one',
emphasis: emphasisStyle,
data: data2
}
]
};
myChart.on('brushSelected', function (params) {
var brushed = [];
myChart.setOption({
title: {
backgroundColor: '#333',
text: 'SELECTED DATA INDICES: \n' + brushed.join('\n'),
bottom: 0,
right: '10%',
width: 100,
textStyle: {
fontSize: 12,
color: '#fff'
}
}
});
});
option && myChart.setOption(option);
} else {
ElNotification({
type: 'error',
message: echartData.msg || '操作失败'
});
}
};
// 页面的渲染
render() {
const { modalVisible, loading, data, mark } = this.state;
return (
<div>
<Spin spinning={loading}>
<ElRowContainer blocks={[]} position='top' onBack={this.onBack} />
<ElCard title='产能看板详情'>
<Calendar
dateCellRender={this.dateFullCellRender}
headerRender={({ value, type, onChange, onTypeChange }) => {
const start = 0;
const end = 12;
const monthOptions = [];
const current = value.clone();
const localeData = value.localeData();
const months = [];
for (let i = 0; i < 12; i++) {
current.month(i);
months.push(localeData.monthsShort(current));
}
for (let i = start; i < end; i++) {
monthOptions.push(
<Select.Option key={i} value={i} className='month-item'>
{months[i]}
</Select.Option>
);
}
const year = value.year();
const month = value.month();
const options = [];
for (let i = year - 10; i < year + 10; i += 1) {
options.push(
<Select.Option key={i} value={i} className='year-item'>
{i}
</Select.Option>
);
}
return (
<div style={
{ padding: 8 }}>
<Row gutter={8}>
<Col>
<Select
size='small'
dropdownMatchSelectWidth={false}
className='my-year-select'
value={year}
onChange={(newYear) => {
const now = value.clone().year(newYear);
onChange(now);
// 可以在这里打印一下 now 看你需要什么样的时间格式就处理什么格式,然后传到方法里面
this.getData(now.format('YYYY-MM-DD'));
}}
>
{options}
</Select>
</Col>
<Col>
<Select
size='small'
dropdownMatchSelectWidth={false}
value={month}
onChange={(newMonth) => {
const now = value.clone().month(newMonth);
onChange(now);
this.getData(now.format('YYYY-MM-DD'));
}}
>
{monthOptions}
</Select>
</Col>
</Row>
</div>
);
}}
/>
</ElCard>
// echarts 展示图
<ElCard title='完成情况'>
<div
id='mainStatus'
style={
{ height: '300px', marginTop: '30px' }}
></div>
</ElCard>
</Spin>
<EditModal
title={mark === 'create' ? '新增报工' : '编辑报工'}
modalVisible={modalVisible}
closeModal={this.closeModal}
save={this.save}
onRef={this.formRef}
data={data}
mark={mark}
></EditModal>
</div>
);
}
}
export default PurcBuyerLook;
That's all for now. is it easy