1st cube manager
Official website: https://kubernetes.io/zh-cn/docs/reference/setup-tools/kubeadm/
In order to Kubernetessimplify the deployment of , a Kubernetestool specially used to install in the cluster appeared in the community. The name is called kubeadm, which means Kubernetesadministrator .
kubeadm, the principle is minikubesimilar to , which uses containers and images to Kubernetesencapsulate various components of , but its goal is not to deploy on a single machine, but to be able to easily deploy in a cluster environment Kubernetes, and make the cluster close to or even reach production-level quality.
2. Cluster Architecture
There are a total of 3 hosts in the picture, let me explain in detail below:
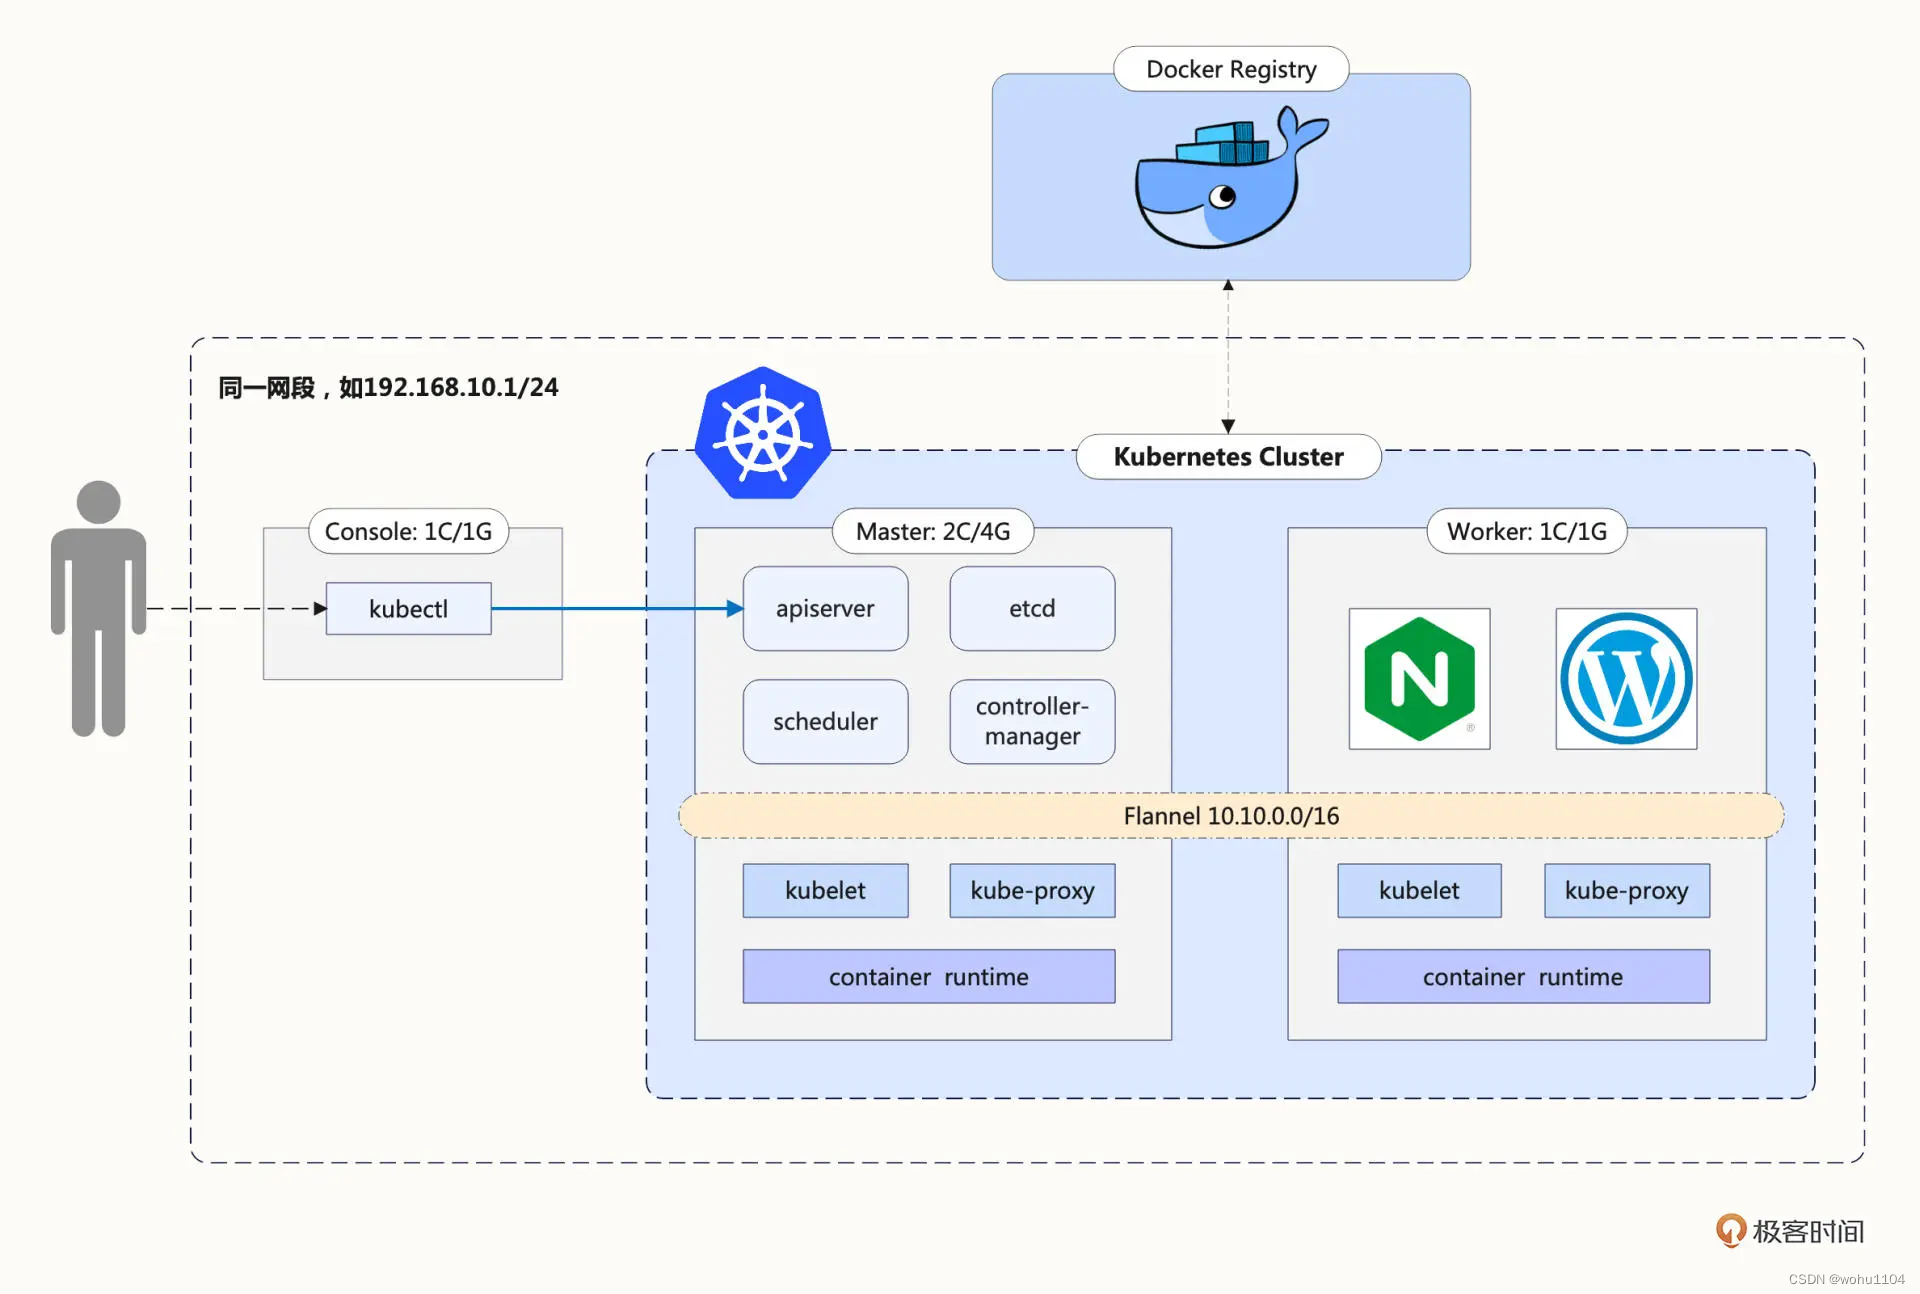
The so-called multi-node cluster requires that there should be two or more servers. In order to simplify, we only take the minimum value, so this Kubernetescluster two hosts, one is Masterthe node (managing the entire cluster), and the other is Workerthe node (no administrative work, only running business applications). Of course, after fully mastering the usage kubeadmof , you can add more nodes to this cluster.
Based on the consideration of simulating the production environment, there needs to be an auxiliary server outside Kubernetesthe cluster . Its name Consoleis console, and we need to install command-line tools on it kubectl. All management commands for Kubernetesthe cluster are sent from this host. This is also more in line with the actual situation. For security reasons, after the hosts in the cluster are deployed, they should log in as little as possible to operate directly. I want to remind you that Consolethis host is only a logical concept and does not have to be independent. You can completely reuse the minikubeprevious , or directly use Master/Workerthe node as the console.
3. Preparations
Because has some special requirements Kubernetesfor the system, we must also make some preparations on the Masterand Workernodes .
3.1 Modify the host name
Since the hostname Kubernetesis used to distinguish the nodes in the cluster, each node hostnamemust not have the same name. You need to modify /etc/hostnamethis file and change it to an easily recognizable name, for example, Masternode is called master, and Workernode is called worker:
sudo vi /etc/hostname
In this experimental environment:
Masterhost nametest6Workerhost namedev-pc
3.2 Install Docker
Although Kubernetesit currently supports multiple container runtimes, Dockerit is still the most convenient and easy to use, so we still continue to use it Dockeras Kubernetesthe underlying support of and use aptto install Docker Engine.
After the installation is complete, you need to make some changes to the configuration Dockerof , cgroupchange the driver of in "/etc/docker/daemon.json" systemd, and then Dockerrestart the daemon process of , the specific operations are listed below:
cat <<EOF | sudo tee /etc/docker/daemon.json
{
  "exec-opts": ["native.cgroupdriver=systemd"],
  "log-driver": "json-file",
  "log-opts": {
    "max-size": "100m"
  },
  "storage-driver": "overlay2"
}
EOF

sudo systemctl enable docker
sudo systemctl daemon-reload
sudo systemctl restart docker
3.3 Modify network settings
In order for to Kubernetesbe able to inspect and forward network traffic, you need to modify iptablesthe configuration of and enable br_netfilterthe module :
cat <<EOF | sudo tee /etc/modules-load.d/k8s.conf
br_netfilter
EOF

cat <<EOF | sudo tee /etc/sysctl.d/k8s.conf
net.bridge.bridge-nf-call-ip6tables = 1
net.bridge.bridge-nf-call-iptables = 1
net.ipv4.ip_forward=1 # better than modify /etc/sysctl.conf
EOF

sudo sysctl --system
3.4 Modify the swap partition
It needs to be modified /etc/fstabto Linuxclose swapthe partition of and improve the performance Kubernetesof :
sudo swapoff -a
sudo sed -ri '/\sswap\s/s/^#?/#/' /etc/fstab
Finally restart the system.
4. Install kubeadm
This step needs to be done on both node and node kubeadmwhen installing .MasterWorker
kubeadmYou can download and install directly from Googleyour own software warehouse, but the domestic network is unstable and it is difficult to download successfully. You need to use other software sources. Here I chose a domestic cloud vendor:
sudo apt install -y apt-transport-https ca-certificates curl

curl https://mirrors.aliyun.com/kubernetes/apt/doc/apt-key.gpg | sudo apt-key add -

cat <<EOF | sudo tee /etc/apt/sources.list.d/kubernetes.list
deb https://mirrors.aliyun.com/kubernetes/apt/ kubernetes-xenial main
EOF

sudo apt update
aptThe latest version will be downloaded by default, but we can also specify the version number, such as using minikubethe same "1.23.3" as :
sudo apt install -y kubeadm=1.23.3-00 kubelet=1.23.3-00 kubectl=1.23.3-00
After the installation is complete, you can use kubeadm versionto kubectl versionverify that the version is correct:
test6@test6:~$ kubeadm version
kubeadm version: &version.Info{

    Major:"1", Minor:"23", GitVersion:"v1.23.3", GitCommit:"816c97ab8cff8a1c72eccca1026f7820e93e0d25", GitTreeState:"clean", BuildDate:"2022-01-25T21:24:08Z", GoVersion:"go1.17.6", Compiler:"gc", Platform:"linux/amd64"}
test6@test6:~$ kubectl version --short
Client Version: v1.23.3
In addition, according to the requirements of Kubernetesthe official website, we'd better use the command apt-mark holdto lock the versions of these three softwares to avoid accidental upgrades and cause version errors:
sudo apt-mark hold kubeadm kubelet kubectl
5. Download the Kubernetes component image
As I said before, components kubeadmsuch as apiserver, etcd, schedulerand so on are packaged into images and started as containers Kubernetes, but these images are not placed Docker Hubon , but on Googleits own mirror warehouse website gcr.io, and it is difficult to access in China. Pulling mirrors is nearly impossible.
Use the command kubeadm config images listto view Kubernetesthe mirror list required for installation, and the parameter --kubernetes-versioncan specify the version number:
$ kubeadm config images list --kubernetes-version v1.23.3
k8s.gcr.io/kube-apiserver:v1.23.3
k8s.gcr.io/kube-controller-manager:v1.23.3
k8s.gcr.io/kube-scheduler:v1.23.3
k8s.gcr.io/kube-proxy:v1.23.3
k8s.gcr.io/pause:3.6
k8s.gcr.io/etcd:3.5.1-0
k8s.gcr.io/coredns/coredns:v1.8.6
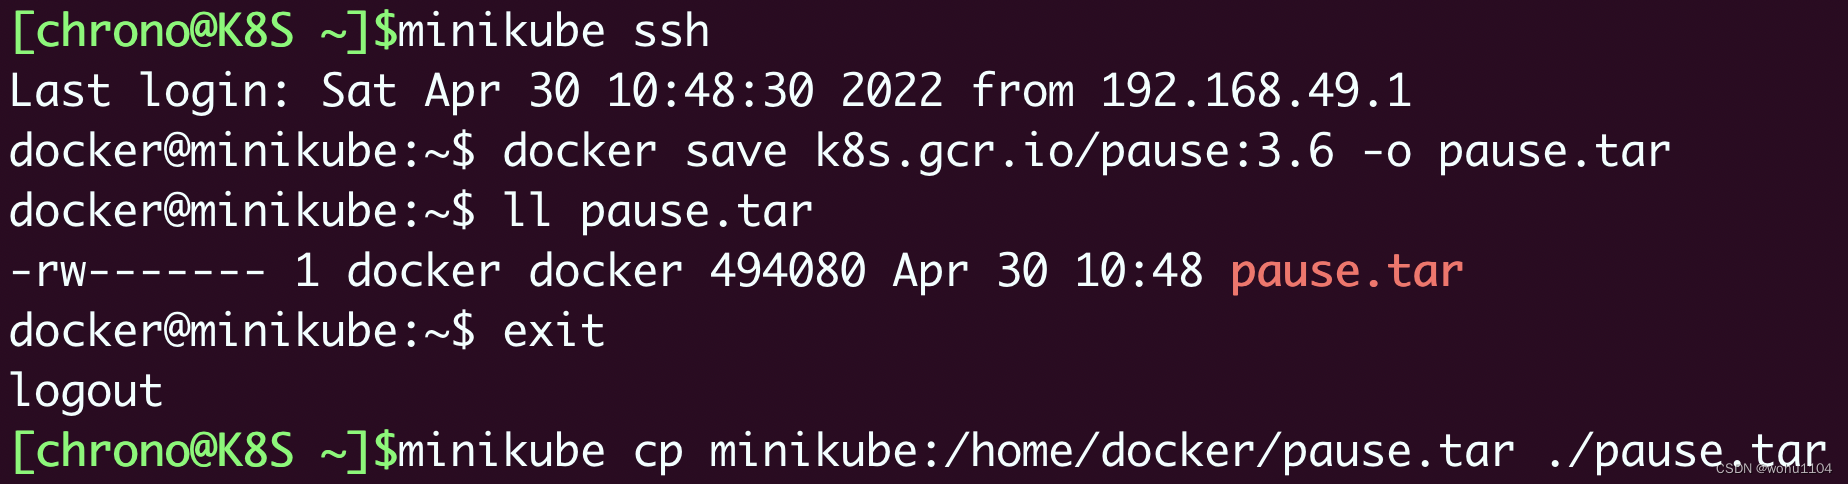
use minikube. Because minikubeit also packages Kubernetesthe component images of , it is completely possible to export these images from its nodes and then copy them.
The specific method is also very simple. Start it first minikube, then minikube sshlog in to the virtual node, use docker save -othe command to save the corresponding version of the image, and then use minikube cpto copy it to the local.
6. Install the Master node
kubeadmThe usage of is very simple, only one command kubeadm initis to Masterrun the component on the node, but it also has many parameters to adjust the configuration of the cluster.
sudo kubeadm init \
--apiserver-advertise-address=172.16.19.134 \
--image-repository registry.aliyuncs.com/google_containers \
--kubernetes-version v1.23.3 \
--pod-network-cidr=10.10.0.0/16
Parameter meaning:
--pod-network-cidr, set the address segmentPodinIP.--apiserver-advertise-address,apiserversetIPthe address of the , whichMasterisIPthe address of the machine.--kubernetes-version, specifying the version numberKubernetesof .--image-repository, to specify the image source, with this parameter, the process of downloading the component image in step 5 can be omitted.
kubeadm initapiserverThe specified at the time ipneeds to be the address of masterthe node ip. If you specify an error, you can sudo kubeadm resetreset it.
The execution results are as follows:
Your Kubernetes control-plane has initialized successfully!

To start using your cluster, you need to run the following as a regular user:

  mkdir -p $HOME/.kube
  sudo cp -i /etc/kubernetes/admin.conf $HOME/.kube/config
  sudo chown $(id -u):$(id -g) $HOME/.kube/config
Execute the relevant commands according to the above prompts.
# 初始话失败再重新尝试需要清空环境
#重置
sudo kubeadm reset
#干掉kubelet进程
ps -ef|grep kubelet
sudo kill -9 进程id
#删掉配置目录
sudo rm -rf  /etc/kubernetes/manifests/
In addition, there is a very important kubeadm joinreminder that other nodes must use tokenthe and cacertificates in the command to join the cluster, so this command must be copied and saved:
Then you can join any number of worker nodes by running the following on each as root:

kubeadm join 172.16.19.134:6443 --token h8dabp.4o6nlvw4h51p2uu3 \
        --discovery-token-ca-cert-hash sha256:b92bfc46494e236b5287ffb5be88ed0580de54abaa28873e116374805e118b6d
Check version and cluster node status
test6@test6:~$ kubectl version --short
Client Version: v1.23.3
Server Version: v1.23.3

test6@test6:~$ kubectl get node
NAME    STATUS     ROLES                  AGE   VERSION
test6   NotReady   control-plane,master   11m   v1.23.3
test6@test6:~$
You'll notice that the status of Masterthe nodes NotReadyis that the cluster's internal network is not yet functioning due to a missing network plugin.
7. Install the Flannel network plugin
KubernetesCNIThe standard is defined , and there are many network plug-ins. Here I choose the most commonly used ones, and related documents Flannelcan be found in its warehouse ( https://github.com/flannel-io/flannel/ ).
wget https://raw.githubusercontent.com/flannel-io/flannel/v0.20.2/Documentation/kube-flannel.yml
You need to modify the "net-conf.json" field in the file, and Networkchange to the address segment set bykubeadm the parameter just now.--pod-network-cidr
  net-conf.json: |
    {
      "Network": "10.10.0.0/16",
      "Backend": {
        "Type": "vxlan"
      }
    }
Then execute the following command to install Flannelthe network .
kubectl apply -f kube-flannel.yml
Wait for a while, you can execute kubectl get nodeto see the node status:
$ kubectl get node
NAME    STATUS   ROLES                  AGE   VERSION
test6   Ready    control-plane,master   28m   v1.23.3
At this point you should be able to see the status of Masterthe node is Ready, indicating that the node network is also working normally.
8. Install the Worker node
WorkerThe installation of the node is much simpler, you only need to use the copied kubeadm joincommand , remember to use sudoto execute:
sudo \
kubeadm join 172.16.19.134:6443 --token h8dabp.4o6nlvw4h51p2uu3      \
--discovery-token-ca-cert-hash sha256:b92bfc46494e236b5287ffb5be88ed0580de54abaa28873e116374805e118b6d
The token here is valid for 24 hours by default. If you forget or time out, you can kubeadm token create --print-join-commandcreate a new token.
WorkerAfter the node is installed, execute it on Masterthe machine kubectl get node, and you will see that both nodes are in Readythe state:
$ kubectl get node
NAME     STATUS   ROLES                  AGE    VERSION
dev-pc   Ready    <none>                 70s    v1.23.3
test6    Ready    control-plane,master   133m   v1.23.3
Execute the following command on Masterthe machine to check whether it is normal.
kubectl run ngx --image=nginx:alpine
kubectl get pod -o wide
Results of the:
$ kubectl run ngx --image=nginx:alpine
pod/ngx created
test6@test6:~/k8s$ kubectl get pod -o wide
NAME   READY   STATUS    RESTARTS   AGE   IP          NODE     NOMINATED NODE   READINESS GATES
ngx    1/1     Running   0          16s   10.10.1.2   dev-pc   <none>           <none>
You will see Podthat running Workeron the node (dev-pc), IPthe address is "10.10.1.2", indicating that our Kubernetescluster deployment is successful.
9. Deploy the Console node
ConsoleThe deployment of the node is simpler, it only needs to install one kubectl,
# 下载:
curl -LO https://dl.k8s.io/release/v1.23.3/bin/linux/amd64/kubectl

# 安装
sudo install kubectl /usr/local/bin/kubectl

#
mkdir -p $HOME/.kube
Then just copy configthe file , you can Masteruse scpremote , where [email protected] is the address of the console machine.
scp ~/.kube/config [email protected]:~/.kube/
Then under Consolemachine test,
$ kubectl get nodes
NAME     STATUS   ROLES                  AGE    VERSION
dev-pc   Ready    <none>                 41m    v1.23.3
test6    Ready    control-plane,master   173m   v1.23.3
$ kubectl version --short
Client Version: v1.23.3
Server Version: v1.23.3
At this point, the environmentkubeadm setup is complete.master + worker + console
ConsoleIt is a "console" that sends commands to Kubernetesthe cluster . In theory Kubernetes, it has nothing to do with it. As long as it is installed kubectland corresponding config, it can communicate with Kubernetesthe cluster . Any computer kubectlthat owns can be used as a node console, Kubernetesso as long as there are nodes masterin the cluster , it can be considered as a node . It is a logical role that can overlap with existing machines.nodekubectlconsole
Note that
kubectlthe andKubernetesclusters are actually independent of each other. You can't take it for granted thatKubernetesthe cluster nodes can be usedkubectl. You can take a look at the network structure diagram of the cluster.