Article Directory
-
- 1. Cluster planning and structure
- 2. System initialization preparation (synchronous operation of all nodes)
- 3. Install kubeadm (synchronous operation of all nodes)
- 4. Installation and configuration of highly available components
- 5. Initialize the Master cluster
- 6. Expansion of K8S cluster
- 7. Install the network component Calico
- 8. Deploy Tomcat to test cluster availability
1. Cluster planning and structure
Environmental planning:
-
Pod network segment: 10.244.0.0/16
-
service network segment: 10.10.0.0/16
-
Note: The pod and service network segments cannot conflict. If there is a conflict, the K8S cluster installation will fail.
| CPU name | IP address | operating system | Remark |
|---|---|---|---|
| master-1 | 16.32.15.200 | CentOS7.8 | Install keepalived and nginx to achieve high availability |
| master-2 | 16.32.15.201 | CentOS7.8 | Install keepalived and nginx to achieve high availability |
| node-1 | 16.32.15.202 | CentOS7.8 | |
| \ | 16.32.15.100 | \ | VIP address |
The structure diagram of this experiment:
![[External link image transfer failed, the source site may have an anti-leeching mechanism, it is recommended to save the image and upload it directly (img-RM0f9fpQ-1682091920642) (D:\MD Archives\IMG\image-20230420102649063.png)]](https://img-blog.csdnimg.cn/3a7d87c135e14fb4b4ddda3971dcaf37.png)
2. System initialization preparation (synchronous operation of all nodes)
1. Turn off the firewall
systemctl disable firewalld --now
setenforce 0
sed  -i -r 's/SELINUX=[ep].*/SELINUX=disabled/g' /etc/selinux/config
2. Configure domain name resolution
cat  >> /etc/hosts << EOF
16.32.15.200 master-1
16.32.15.201 master-2
16.32.15.202 node-1
EOF
Modify the hostname on the specified host
hostnamectl set-hostname master-1 && bash
hostnamectl set-hostname master-2 && bash
hostnamectl set-hostname node-1 && bash
3. Configure server time to be consistent
yum -y install ntpdate
ntpdate ntp1.aliyun.com
Add timing synchronization to automatically synchronize time at 1 am every day
echo "0 1 * * * ntpdate ntp1.aliyun.com" >> /var/spool/cron/root
crontab -l
4. Disable the swap partition (kubernetes is mandatory to disable)
swapoff --all
Prohibit booting from the boot swap swap partition
sed -i -r '/swap/ s/^/#/' /etc/fstab
5. Modify Linux kernel parameters, add bridge filter and address forwarding function
cat >> /etc/sysctl.d/kubernetes.conf <<EOF
net.bridge.bridge-nf-call-ip6tables = 1
net.bridge.bridge-nf-call-iptables = 1
net.ipv4.ip_forward = 1
EOF

sysctl -p /etc/sysctl.d/kubernetes.conf
Load the bridge filter module
modprobe br_netfilter
lsmod | grep br_netfilter # 验证是否生效
6. Configure ipvs function
Service has two proxy models in kubernetes, one is based on iptables, the other is based on ipvs, the performance of the two is higher than that of ipvs, if you want to use the ipvs model, you need to manually load the ipvs module
yum -y install ipset ipvsadm

cat > /etc/sysconfig/modules/ipvs.modules <<EOF
modprobe -- ip_vs
modprobe -- ip_vs_rr
modprobe -- ip_vs_wrr
modprobe -- ip_vs_sh
modprobe -- nf_conntrack_ipv4
EOF

chmod +x /etc/sysconfig/modules/ipvs.modules
# 执行脚本
/etc/sysconfig/modules/ipvs.modules

# 验证ipvs模块
lsmod | grep -e ip_vs -e nf_conntrack_ipv4
7. Install Docker container components
curl -o /etc/yum.repos.d/CentOS-Base.repo https://mirrors.aliyun.com/repo/Centos-7.repo
wget -O /etc/yum.repos.d/epel.repo http://mirrors.aliyun.com/repo/epel-7.repo
yum makecache

# yum-utils软件用于提供yum-config-manager程序
yum install -y yum-utils

# 使用yum-config-manager创建docker阿里存储库
yum-config-manager --add-repo http://mirrors.aliyun.com/docker-ce/linux/centos/docker-ce.repo

yum install docker-ce-20.10.6 docker-ce-cli-20.10.6 -y
The default Cgroup Driver used by Docker is the default file driver, while the default file driver used by k8s is systemd, and k8s requires that the driver type must be consistent, so it is necessary to change the docker file driver to systemd and configure a domestic accelerator.
mkdir /etc/docker
cat <<EOF > /etc/docker/daemon.json
{
  "registry-mirrors": ["https://aoewjvel.mirror.aliyuncs.com"],
  "exec-opts": ["native.cgroupdriver=systemd"]
}
EOF

# 启动docker并设置开机自启
systemctl enable docker --now
systemctl status docker
8. You can skip restarting the server
reboot
3. Install kubeadm (synchronous operation of all nodes)
Configure domestic yum source, install kubeadm, kubelet, kubectl with one click
cat <<EOF > /etc/yum.repos.d/kubernetes.repo
[kubernetes]
name=Kubernetes
baseurl=https://mirrors.aliyun.com/kubernetes/yum/repos/kubernetes-el7-x86_64/
enabled=1
gpgcheck=0
EOF

yum -y install --setopt=obsoletes=0 kubeadm-1.23.0 kubelet-1.23.0 kubectl-1.23.0
kubeadm will use the kubelet service to deploy the main services of kubernetes in a container, so you need to start the kubelet service first
systemctl enable kubelet.service --now
4. Installation and configuration of highly available components
Operate on master-1 and master-2 hosts
1. Install Nginx and configure it
The master-1 and master-2 hosts execute synchronously, and the Nginx configuration is consistent
wget -O /etc/yum.repos.d/epel.repo https://mirrors.aliyun.com/repo/epel-7.repo
yum -y install nginx*
Configure the content of the Nginx file as follows: If the host names are the same, then copy the Nginx configuration file directly. If the host names are inconsistent, you need to change the upstream k8s-apiserver to the corresponding host name or IP address.
mv /etc/nginx/nginx.conf{

    ,.bak}
cat >> /etc/nginx/nginx.conf << EOF

user nginx;
worker_processes auto;
error_log /var/log/nginx/error.log;
pid /run/nginx.pid;

include /usr/share/nginx/modules/*.conf;

events {
    worker_connections 1024;
}

stream {

    log_format  main  '$remote_addr $upstream_addr - [$time_local] $status $upstream_bytes_sent';

    access_log  /var/log/nginx/k8s-access.log  main;

    upstream k8s-apiserver {
       server master-1:6443;
       server master-2:6443;
    }

server {
       listen 16443;
       proxy_pass k8s-apiserver;
    }
}


http {
    log_format  main  '$remote_addr - $remote_user [$time_local] "$request" '
                      '$status $body_bytes_sent "$http_referer" '
                      '"$http_user_agent" "$http_x_forwarded_for"';

    access_log  /var/log/nginx/access.log  main;

    sendfile            on;
    tcp_nopush          on;
    tcp_nodelay         on;
    keepalive_timeout   65;
    types_hash_max_size 2048;

    include             /etc/nginx/mime.types;
    default_type        application/octet-stream;
server {
        listen       80 default_server;
        server_name  _;

        location / {
        }
    }
}
EOF
Start Nginx and add boot self-start
nginx -t
systemctl start nginx
systemctl enable nginx
The port of our agent apiservice is 16443, verify whether the port is started
netstat -anput |grep 16443
2. Install keepalived and configure
The master-1 and master-2 hosts are executed synchronously, but the configuration files are inconsistent!
yum -y install keepalived
Add a script file to stop keepalived when Nginx is down, and the VIP address will drift to another node, so as to achieve high availability of apiservice.
vim /etc/keepalived/checkNginx.sh

#!/bin/bash
# egrep -cv "grep|$$" 过滤掉包含grep 或者 $$ 表示的当前Shell进程ID
count=$(ps -ef |grep nginx | grep sbin | egrep -cv "grep|$$")
if [ $count -eq 0 ];then
    systemctl stop keepalived
fi
grant executable permissions
chmod +x /etc/keepalived/checkNginx.sh
Keepalived master-1 host configuration file content:
mv /etc/keepalived/keepalived.conf{

    ,.default}

vim /etc/keepalived/keepalived.conf
vrrp_script checkNginx {


    script "/etc/keepalived/checkNginx.sh"      # 监控Nginx状态脚本
    interval 2
}

vrrp_instance VI_1 {


    state MASTER
    interface ens33        # 本机网卡名称
    virtual_router_id 51   # VRRP 路由 ID实例,每个实例是唯一的
    priority 100           # 优先级
    advert_int 1           # 指定VRRP 心跳包通告间隔时间,默认1秒
    authentication {


        auth_type PASS
        auth_pass 1111
    }
    virtual_ipaddress {


	16.32.15.100/24
    }

   track_script {


	checkNginx
    }
}
Keepalived master-2 standby machine configuration file content:
mv /etc/keepalived/keepalived.conf{

    ,.default}
vim /etc/keepalived/keepalived.conf

vrrp_script checkNginx {


    script "/etc/keepalived/checkNginx.sh"      # 监控Nginx状态脚本
    interval 2
}

vrrp_instance VI_1 {


    state BACKUP           # 当前角色
    interface ens33
    virtual_router_id 52   # VRRP 路由 ID实例,每个实例是唯一的
    priority 90            # 优先级
    advert_int 1
    authentication {


        auth_type PASS
        auth_pass 1111
    }
    virtual_ipaddress {


	16.32.15.100/24
    }

   track_script {


	checkNginx
    }
}
Restart keepalived (two masters execute synchronously)
systemctl restart keepalived
5. Initialize the Master cluster
Operate on the master-1 host
1. Create an initialization file
vim kubeadm-config.yaml

apiVersion: kubeadm.k8s.io/v1beta2
kind: ClusterConfiguration
kubernetesVersion: v1.23.0
controlPlaneEndpoint: 16.32.15.100:16443
imageRepository: registry.aliyuncs.com/google_containers
apiServer:
 certSANs:
 - 16.32.15.200
 - 16.32.15.201
 - 16.32.15.202
 - 16.32.15.100
networking:
  podSubnet: 10.244.0.0/16
  serviceSubnet: 10.10.0.0/16
---
apiVersion: kubeproxy.config.k8s.io/v1alpha1
kind:  KubeProxyConfiguration
mode: ipvs
- controlPlaneEndpoint: Connect the control plane of the cluster to a load balancer (fill in the VIP address)
- imageRepository: Image download address, here we use domestic Alibaba Cloud
- certSANs: Configure DNS, write all the IPs involved in the cluster, including VIP addresses
- podSubnet: Pod network segment
- serviceSubnet: Service network segment
2. Initialize
kubeadm init --config kubeadm-config.yaml --ignore-preflight-errors=SystemVerification
After successful initialization, the output is as follows:
[init] Using Kubernetes version: v1.23.0
[preflight] Running pre-flight checks
[preflight] Pulling images required for setting up a Kubernetes cluster
[preflight] This might take a minute or two, depending on the speed of your internet connection
[preflight] You can also perform this action in beforehand using 'kubeadm config images pull'
[certs] Using certificateDir folder "/etc/kubernetes/pki"
[certs] Generating "ca" certificate and key
[certs] Generating "apiserver" certificate and key
[certs] apiserver serving cert is signed for DNS names [kubernetes kubernetes.default kubernetes.default.svc kubernetes.default.svc.cluster.local master-1] and IPs [10.10.0.1 16.32.15.200 16.32.15.100 16.32.15.201 16.32.15.202]
[certs] Generating "apiserver-kubelet-client" certificate and key
[certs] Generating "front-proxy-ca" certificate and key
[certs] Generating "front-proxy-client" certificate and key
[certs] Generating "etcd/ca" certificate and key
[certs] Generating "etcd/server" certificate and key
[certs] etcd/server serving cert is signed for DNS names [localhost master-1] and IPs [16.32.15.200 127.0.0.1 ::1]
[certs] Generating "etcd/peer" certificate and key
[certs] etcd/peer serving cert is signed for DNS names [localhost master-1] and IPs [16.32.15.200 127.0.0.1 ::1]
[certs] Generating "etcd/healthcheck-client" certificate and key
[certs] Generating "apiserver-etcd-client" certificate and key
[certs] Generating "sa" key and public key
[kubeconfig] Using kubeconfig folder "/etc/kubernetes"
[endpoint] WARNING: port specified in controlPlaneEndpoint overrides bindPort in the controlplane address
[kubeconfig] Writing "admin.conf" kubeconfig file
[endpoint] WARNING: port specified in controlPlaneEndpoint overrides bindPort in the controlplane address
[kubeconfig] Writing "kubelet.conf" kubeconfig file
[endpoint] WARNING: port specified in controlPlaneEndpoint overrides bindPort in the controlplane address
[kubeconfig] Writing "controller-manager.conf" kubeconfig file
[endpoint] WARNING: port specified in controlPlaneEndpoint overrides bindPort in the controlplane address
[kubeconfig] Writing "scheduler.conf" kubeconfig file
[kubelet-start] Writing kubelet environment file with flags to file "/var/lib/kubelet/kubeadm-flags.env"
[kubelet-start] Writing kubelet configuration to file "/var/lib/kubelet/config.yaml"
[kubelet-start] Starting the kubelet
[control-plane] Using manifest folder "/etc/kubernetes/manifests"
[control-plane] Creating static Pod manifest for "kube-apiserver"
[control-plane] Creating static Pod manifest for "kube-controller-manager"
[control-plane] Creating static Pod manifest for "kube-scheduler"
[etcd] Creating static Pod manifest for local etcd in "/etc/kubernetes/manifests"
[wait-control-plane] Waiting for the kubelet to boot up the control plane as static Pods from directory "/etc/kubernetes/manifests". This can take up to 4m0s
[apiclient] All control plane components are healthy after 11.889660 seconds
[upload-config] Storing the configuration used in ConfigMap "kubeadm-config" in the "kube-system" Namespace
[kubelet] Creating a ConfigMap "kubelet-config-1.23" in namespace kube-system with the configuration for the kubelets in the cluster
NOTE: The "kubelet-config-1.23" naming of the kubelet ConfigMap is deprecated. Once the UnversionedKubeletConfigMap feature gate graduates to Beta the default name will become just "kubelet-config". Kubeadm upgrade will handle this transition transparently.
[upload-certs] Skipping phase. Please see --upload-certs
[mark-control-plane] Marking the node master-1 as control-plane by adding the labels: [node-role.kubernetes.io/master(deprecated) node-role.kubernetes.io/control-plane node.kubernetes.io/exclude-from-external-load-balancers]
[mark-control-plane] Marking the node master-1 as control-plane by adding the taints [node-role.kubernetes.io/master:NoSchedule]
[bootstrap-token] Using token: giw3n1.8ys41tcqlvl9xhrk
[bootstrap-token] Configuring bootstrap tokens, cluster-info ConfigMap, RBAC Roles
[bootstrap-token] configured RBAC rules to allow Node Bootstrap tokens to get nodes
[bootstrap-token] configured RBAC rules to allow Node Bootstrap tokens to post CSRs in order for nodes to get long term certificate credentials
[bootstrap-token] configured RBAC rules to allow the csrapprover controller automatically approve CSRs from a Node Bootstrap Token
[bootstrap-token] configured RBAC rules to allow certificate rotation for all node client certificates in the cluster
[bootstrap-token] Creating the "cluster-info" ConfigMap in the "kube-public" namespace
[kubelet-finalize] Updating "/etc/kubernetes/kubelet.conf" to point to a rotatable kubelet client certificate and key
[addons] Applied essential addon: CoreDNS
[endpoint] WARNING: port specified in controlPlaneEndpoint overrides bindPort in the controlplane address
[addons] Applied essential addon: kube-proxy

Your Kubernetes control-plane has initialized successfully!

To start using your cluster, you need to run the following as a regular user:

  mkdir -p $HOME/.kube
  sudo cp -i /etc/kubernetes/admin.conf $HOME/.kube/config
  sudo chown $(id -u):$(id -g) $HOME/.kube/config

Alternatively, if you are the root user, you can run:

  export KUBECONFIG=/etc/kubernetes/admin.conf

You should now deploy a pod network to the cluster.
Run "kubectl apply -f [podnetwork].yaml" with one of the options listed at:
  https://kubernetes.io/docs/concepts/cluster-administration/addons/

You can now join any number of control-plane nodes by copying certificate authorities
and service account keys on each node and then running the following as root:

# 将master节点加入集群中
  kubeadm join 16.32.15.100:16443 --token giw3n1.8ys41tcqlvl9xhrk \
	--discovery-token-ca-cert-hash sha256:2e97fe276dd9a52e91704fbd985f8c57c73c6ca750f07e9eeaf695f7639e0287 \
	--control-plane

Then you can join any number of worker nodes by running the following on each as root:

# 将node节点加入集群中
kubeadm join 16.32.15.100:16443 --token giw3n1.8ys41tcqlvl9xhrk \
	--discovery-token-ca-cert-hash sha256:2e97fe276dd9a52e91704fbd985f8c57c73c6ca750f07e9eeaf695f7639e0287
Configuring the configuration file config of kubectl is equivalent to authorizing kubectl, so that the kubectl command can use this certificate to manage the k8s cluster
mkdir -p $HOME/.kube
sudo cp -i /etc/kubernetes/admin.conf $HOME/.kube/config
sudo chown $(id -u):$(id -g) $HOME/.kube/config
Verify that you can use the kubectl command
kubectl get nodes
6. Expansion of K8S cluster
1. Expand the master node
Copy the certificate file of the master-1 master node to the master-2 host
master-2 host execution
cd /root && mkdir -p /etc/kubernetes/pki/etcd &&mkdir -p ~/.kube/
The master-1 host executes copying certificates and other files to the master-2 host
scp /etc/kubernetes/pki/ca.key master-2:/etc/kubernetes/pki/
scp /etc/kubernetes/pki/ca.crt master-2:/etc/kubernetes/pki/
scp /etc/kubernetes/pki/sa.key master-2:/etc/kubernetes/pki/
scp /etc/kubernetes/pki/sa.pub master-2:/etc/kubernetes/pki/
scp /etc/kubernetes/pki/front-proxy-ca.crt master-2:/etc/kubernetes/pki/
scp /etc/kubernetes/pki/front-proxy-ca.key master-2:/etc/kubernetes/pki/
scp /etc/kubernetes/pki/etcd/ca.crt master-2:/etc/kubernetes/pki/etcd/
scp /etc/kubernetes/pki/etcd/ca.key master-2:/etc/kubernetes/pki/etcd/
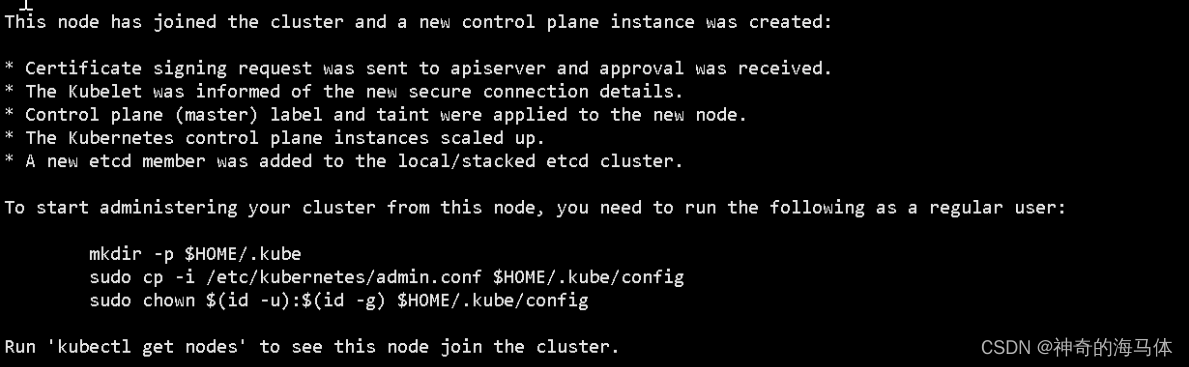
The master-2 host executes to join the cluster
kubeadm join 16.32.15.100:16443 --token giw3n1.8ys41tcqlvl9xhrk \
	--discovery-token-ca-cert-hash sha256:2e97fe276dd9a52e91704fbd985f8c57c73c6ca750f07e9eeaf695f7639e0287 \
	--control-plane
The following figure is displayed to indicate that it has successfully joined the cluster
mkdir -p $HOME/.kube
sudo cp -i /etc/kubernetes/admin.conf $HOME/.kube/config
sudo chown $(id -u):$(id -g) $HOME/.kube/config
The master-1 host executes to view the node status
kubectl get node
2. Expand the node node
Join the cluster on the node-1 host
kubeadm join 16.32.15.100:16443 --token giw3n1.8ys41tcqlvl9xhrk \
	--discovery-token-ca-cert-hash sha256:2e97fe276dd9a52e91704fbd985f8c57c73c6ca750f07e9eeaf695f7639e0287
The following figure is displayed to indicate that it has successfully joined the cluster

The master-1 host executes to view the node status
kubectl get node
![[External link picture transfer failed, the source site may have an anti-leeching mechanism, it is recommended to save the picture and upload it directly (img-Lm0eh3bq-1682091920644) (D:\MD Archives\IMG\image-20230420145132104.png)]](https://img-blog.csdnimg.cn/365fd4283f674f1c8da9effba57b9651.png)
You can see that the ROLES role of node-1 is empty, which means that this node is a working node.
You can change the ROLES of node-1 into work, as follows:
kubectl label node node-1 node-role.kubernetes.io/worker=worker
7. Install the network component Calico
Calico online document address:
1. View the built-in Pod status
kubectl get pods -n kube-system
![[External link picture transfer failed, the source site may have an anti-theft link mechanism, it is recommended to save the picture and upload it directly (img-T7h6kIZD-1682091920645) (D:\MD Archives\IMG\image-20230420145633649.png)]](https://img-blog.csdnimg.cn/534e72709c844e229162f2dfce576ddc.png)
When we check the status of the built-in Pod, coredns is in the pending state. This is because the network plug-in has not been installed. After the network plug-in is installed below, the cordns will become running.
2. Upload the calico.yaml file to the server. The content of the calico.yaml file is provided below:
Execute on master-1 and master-2
kubectl apply -f calico.yaml
3. View the cluster status && view the built-in Pod status
kubectl get nodes
![[External link picture transfer failed, the source site may have an anti-leeching mechanism, it is recommended to save the picture and upload it directly (img-4mZdBnWJ-1682091920645) (D:\MD Archives\IMG\image-20230420151633095.png)]](https://img-blog.csdnimg.cn/82917843388f43609d8d167caa1f2202.png)
kubectl get pods -n kube-system
![[External link picture transfer failed, the source site may have an anti-theft link mechanism, it is recommended to save the picture and upload it directly (img-mqGb4RmX-1682091920645) (D:\MD Archives\IMG\image-20230420151700262.png)]](https://img-blog.csdnimg.cn/5e583723713746d09c4c16321a1367e6.png)
8. Deploy Tomcat to test cluster availability
1. Create the pod resource of tomcat
vim tomcat.yaml

apiVersion: v1  #pod属于k8s核心组v1
kind: Pod  #创建的是一个Pod资源
metadata:  #元数据
  name: demo-pod  #pod名字
  namespace: default  #pod所属的名称空间
  labels:
    app: myapp  #pod具有的标签
    env: dev      #pod具有的标签
spec:
  containers:      #定义一个容器,容器是对象列表,下面可以有多个name
  - name:  tomcat-pod-java  #容器的名字
    ports:
    - containerPort: 8080
    image: tomcat:8.5-jre8-alpine   #容器使用的镜像
    imagePullPolicy: IfNotPresent
Execute the ymal file
kubectl apply -f tomcat.yaml
View pod status
kubectl get pod
2. Create a tomcat service resource
vim tomcat-service.yaml

apiVersion: v1
kind: Service
metadata:
  name: tomcat
spec:
  type: NodePort
  ports:
    - port: 8080
      nodePort: 30080
  selector:
    app: myapp
    env: dev
Execute the ymal file
kubectl apply -f tomcat-service.yaml
View service status
kubectl get svc
3. Browser access test (any node + port 30080)
![[External link picture transfer failed, the source site may have an anti-leeching mechanism, it is recommended to save the picture and upload it directly (img-CH6PT0Iz-1682091920645) (D:\MD Archives\IMG\image-20230420152912125.png)]](https://img-blog.csdnimg.cn/9fb390161d1a4233a9d621dd026aa612.png)
4. Test coredns
kubectl run busybox --image busybox:1.28 --restart=Never --rm -it busybox -- sh

If you don't see a command prompt, try pressing enter.


/ # nslookup kubernetes.default.svc.cluster.local
Server:    10.10.0.10
Address 1: 10.10.0.10 kube-dns.kube-system.svc.cluster.local

Name:      kubernetes.default.svc.cluster.local
Address 1: 10.10.0.1 kubernetes.default.svc.cluster.local

/ # nslookup tomcat.default.svc.cluster.local
Server:    10.10.0.10
Address 1: 10.10.0.10 kube-dns.kube-system.svc.cluster.local

Name:      tomcat.default.svc.cluster.local
Address 1: 10.10.164.81 tomcat.default.svc.cluster.local
- Note: busybox needs to use the specified version 1.28, not the latest version, the latest version, nslookup will not be able to resolve dns and ip