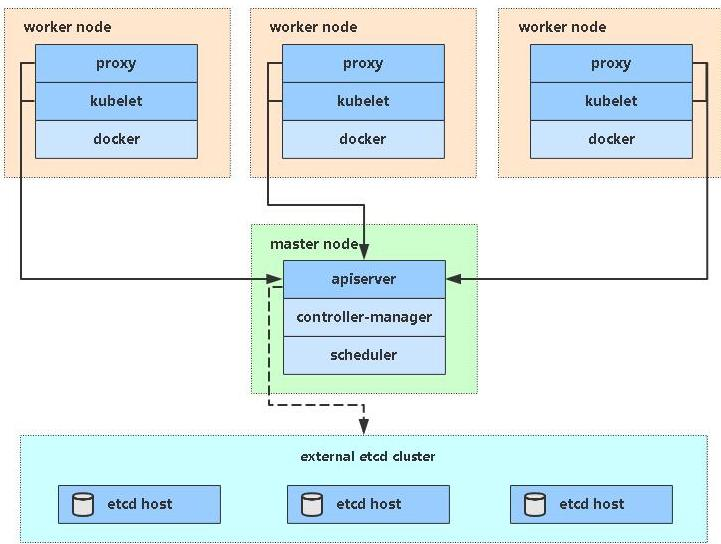
Currently, there are two main ways to deploy Kubernetes clusters in production:
(1)cubeadm
Kubeadm is a command line tool officially provided by Kubernetes, which can be used to deploy and manage Kubernetes clusters. It is mainly used for operations such as initializing the cluster, adding or removing nodes in a new Kubernetes environment.
Kubeadm provides a simple, reliable, and repeatable way to set up a Kubernetes cluster. Deploying a cluster using kubeadm does not require any special configuration. You only need to provide a set of IP addresses, Master nodes and Worker nodes can be created on demand, and all required Kubernetes components will be automatically installed.
Kubeadm supports various Kubernetes deployment scenarios, including single-node, multi-node, and high-availability HA deployments. It also supports multiple operating systems and container runtimes such as Docker and CRI-O, among others.
Official address: https://kubernetes.io/docs/reference/setup-tools/kubeadm/kubeadm/
(2) Binary package
Download the distribution binary package from github and manually deploy each component to form a Kubernetes cluster.
Kubeadm lowers the deployment threshold, but blocks many details, making it difficult to troubleshoot problems. If you want to make it easier and more controllable, it is recommended to use binary packages to deploy Kubernetes clusters. Although manual deployment is troublesome, you can learn a lot of working principles during the process, which is also beneficial to later maintenance.
Introduction to kubeadm deployment method
kubeadm is a tool launched by the official community for rapid deployment of kubernetes clusters. This tool can complete the deployment of a kubernetes cluster through two instructions:
First, create a Master node kubeadm init
Second, add the Node node to the current cluster: kubeadm join
Installation requirements
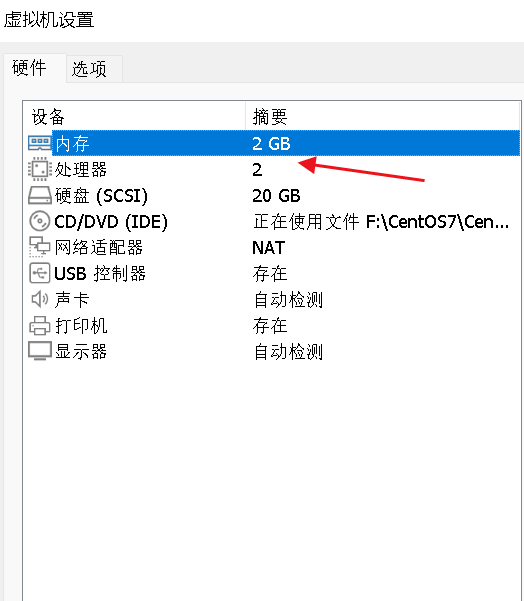
Deployment of Kubernetes cluster machines requires the following conditions:
- One or more machines, operating system CentOS7.x-86_x64
- Hardware configuration: 2GB or more RAM, 2 CPUs or more CPUs, hard drive 30GB or more
- Network communication between all machines in the cluster
- Can access the external network, need to pull the image
- Disable swap partition
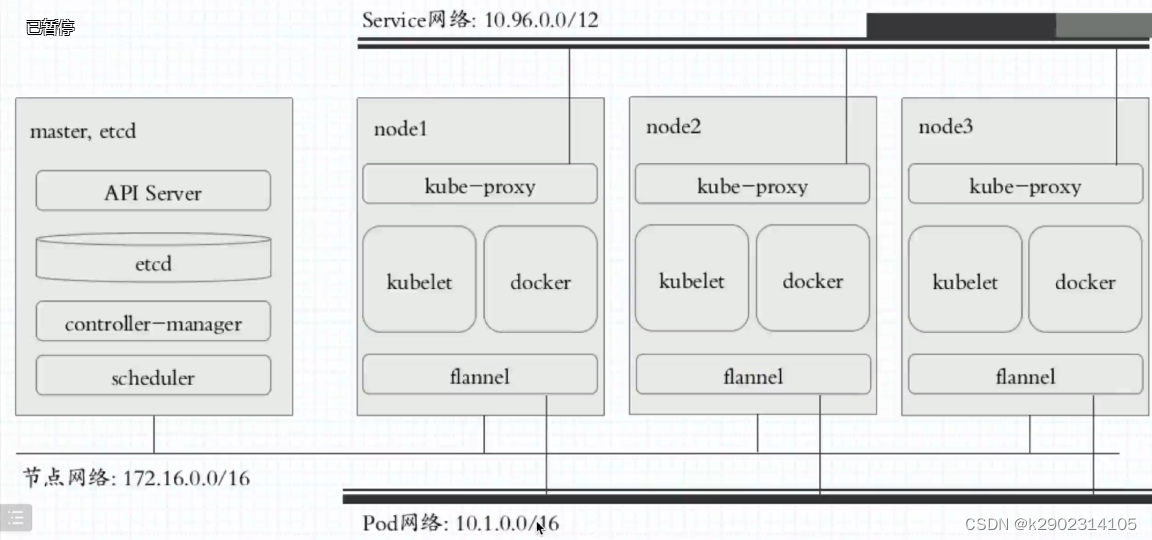
finally realized
- Install Docker and kubeadm on all nodes
- Deploy Kubernetes Master
- Deploy container network plug-in (flannel)
- Deploy Kubernetes Node and add the node to the Kubernetes cluster
- Deployment Kuboard page, visually view Kubernetes resources
Prepare environment
Implement single master node cluster construction
Install three linux systems

| Role | IP |
|---|---|
| k8s-master | 192.168.122.140 |
| k8s-node1 | 192.168.122.141 |
| k8s-node2 | 192.168.122.142 |
System preparation operation
This part is for the operations of three linux systems
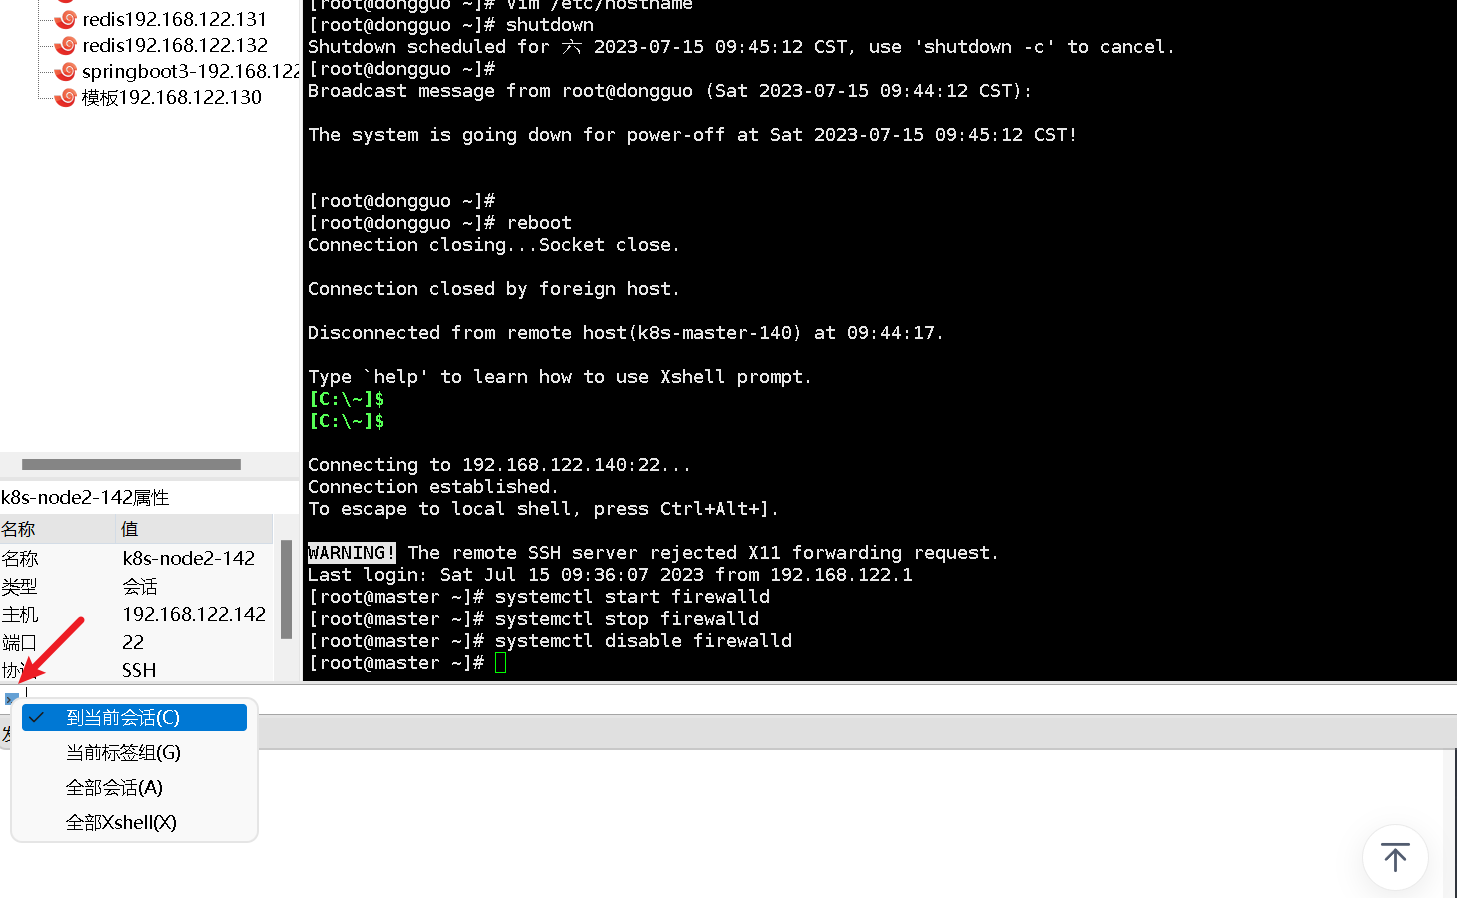
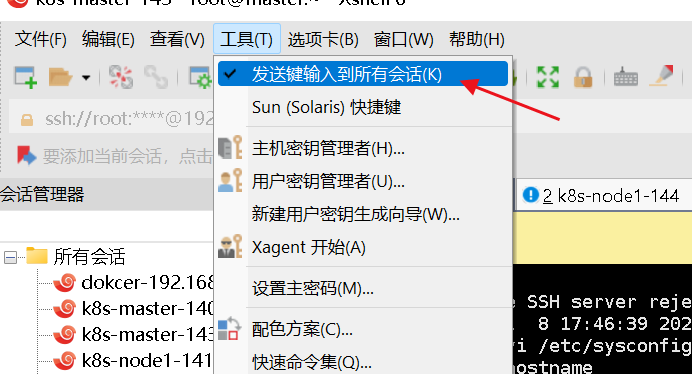
A method to manipulate multiple session connections and execute a command at the same time
"View" -> "Compose" -> "Composition Bar" (bar form) or "Composition Pane".

By default, the "Compose Bar" will only send the commands we enter to the current tab. If you need to execute them in multiple sessions at once, click the small blue icon on the left side of the blank box, and then select the third one as shown below. "All sessions" is enough.
or
1. Turn off the firewall:
Firewalls filter and block network data packets, which may affect communication between Kubernetes cluster nodes. At the same time, Kubernetes itself has a relatively complete network policy mechanism to ensure the network security of the cluster, so turning off the firewall will not affect the security of the Kubernetes cluster.
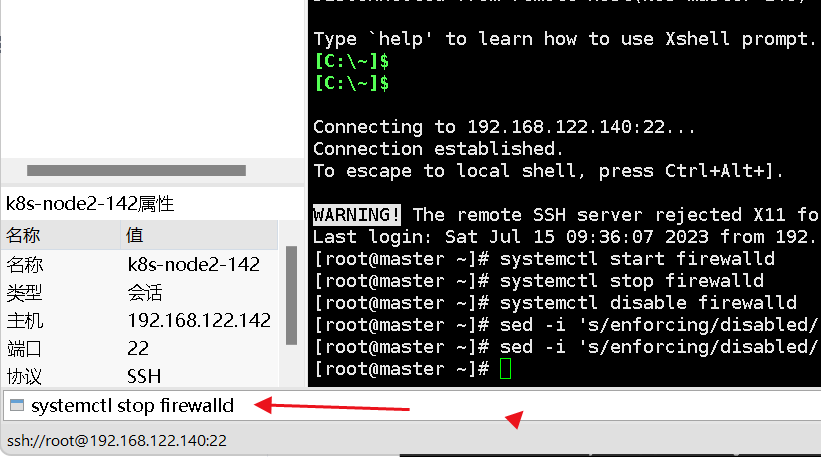
Stop and disable the firewall service
systemctl stop firewalld
systemctl disable firewalld

2. Turn off selinux:
In a Kubernetes cluster, SELinux is an optional security module that provides mandatory access control and access auditing capabilities. However, when building a Kubernetes cluster, in order to simplify configuration and avoid possible problems, many administrators choose to turn off SELinux. This is mainly because:
- SELinux has strict access control for containers, which may cause some applications to fail to work properly or be unable to access necessary resources.
- In some cases, the rules of SELinux do not fit well with the Kubernetes cluster installation configuration, which can cause problems and errors.
- Turning off SELinux can simplify configuration and management work, making cluster deployment and maintenance more convenient. However, turning off SELinux will also reduce the security and reliability of the cluster. SELinux must be re-enabled when necessary.
Therefore, turning off SELinux can make the deployment of a Kubernetes cluster simpler and more reliable, but it can also reduce the security and reliability of the cluster. In actual applications, it is necessary to determine whether SELinux needs to be turned on or off based on specific circumstances.
sed -i ‘s/enforcing/disabled/’ /etc/selinux/config # 永久
setenforce 0 # temporary

3. Close swap:
Kubernetes uses cgroups to manage container resources. A swap partition may prevent the container from using expected memory resources and may cause the application to crash or have other issues inside the container.
Kubernetes itself does not use swap. At the same time, because the use of containers and the mechanism of swapping memory are different, if an application needs to use a large amount of memory, the container will automatically apply for more memory instead of using swap, avoiding performance loss and inability to Predicted behavior. Turning off the swap partition can better protect the stability and performance of the Kubernetes cluster and ensure consistent memory usage and performance of the container.
swapoff -a # 临时

sed -ri 's/.*swap.*/#&/' /etc/fstab # 永久

4. Set the host name according to the plan:
In a kubernetes cluster, the host name of a node is a very important identifier, which is used to uniquely identify each node in the cluster. Setting the correct hostname makes it easier to manage and diagnose problems in your cluster.
hostnamectl set-hostname


5. Add hosts to the master node:
Adding the hosts item to the Master node can map the IP address and host name of each node to the /etc/hosts file so that each node can identify and access each other. Doing so makes the Kubernetes cluster more stable and reliable between nodes, and enables faster discovery of newly joined nodes.
cat >> /etc/hosts << EOF
192.168.122.140 master
192.168.122.141 node1
192.168.122.142 node2
EOF

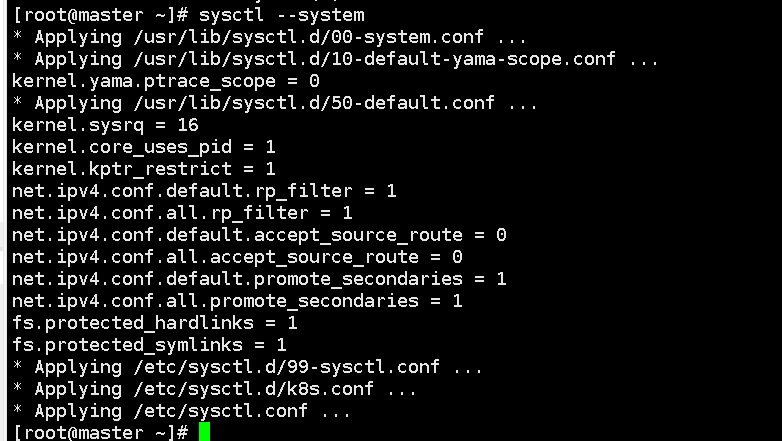
6 Pass bridged IPv4 traffic to the iptables chain:
In a Kubernetes cluster, each Pod is assigned an IP address, and the containers within the Pod are also assigned a virtual network card and IP address. When two Pods need to communicate with each other, they communicate using these IP addresses.
However, when containers within a Pod try to communicate with another Pod, they do not send packets directly using its IP address, but instead use a bridge to communicate. This means that packets will be transmitted through the bridge device in the Linux kernel instead of being sent through the network interface.
In order to ensure that these bridged packets can be routed and forwarded correctly, they need to be passed to the iptables chain for processing. Iptables can be used to define network rules so that packets can be routed correctly to their destination. By passing bridged IPv4 traffic into the iptables chain, you can ensure that Pods in the Kubernetes cluster can communicate correctly, and you can implement some advanced network functions, such as network policy and load balancing.
cat > /etc/sysctl.d/k8s.conf << EOF
net.bridge.bridge-nf-call-ip6tables = 1
net.bridge.bridge-nf-call-iptables = 1
EOF

sysctl --system # take effect
7. Time synchronization:
Each node in the Kubernetes cluster needs to communicate with each other and collaborate, so their time needs to be synchronized to ensure that they can accurately coordinate their work when planning and scheduling. If the nodes' times are out of sync, the following issues may occur:
- Unpredictable errors occur in container operation.
- The scheduler cannot accurately calculate the completion time of tasks, causing tasks to time out or be scheduled on inappropriate nodes.
- Monitoring and log collection systems may be time misaligned, resulting in inaccurate data analysis results.
Therefore, in order to ensure the normal operation of the cluster, the time needs to be synchronized on each node in the cluster.
yum install ntpdate -y
ntpdate time.windows.com

Note: After configuring the above commands, it is best to restart Linux to ensure that the configuration takes effect.
Install Docker/kubeadm/kubelet on all nodes
The default CRI (container runtime) of Kubernetes is Docker, so Docker is installed on the node.
(1) Install Docker
Install wget command
yum install wget
Download Docker's yum source configuration file from the Alibaba Cloud mirror station to your local machine, and replace the original configuration file. Among them, /etc/yum.repos.d/docker-ce.repo is the default location of Docker’s yum source configuration file.
The -O parameter means to rename the downloaded file to the specified file name, here it is docker-ce.repo.
wget https://mirrors.aliyun.com/docker-ce/linux/centos/docker-ce.repo -O/etc/yum.repos.d/docker-ce.repo
Install Docker CE -y means automatically answer yes.
yum -y install docker-ce
Set default startup and start docker
systemctl enable docker && systemctl start docker
Check docker version
docker --version

tips: The Kubernetes version in the Kubernetes cluster is specified as 1.18.0.
The Docker version range that Kubernetes 1.18.0 is compatible with is Docker 1.13.1 to Docker 19.03.x. It is recommended to use the latest revision of Docker 18.09.x or 19.03.x version for best performance and security.
The currently used Docker version is 18.06.1-ce. As a long-term support version, Docker 18.06.1-ce is also an option.
(2) Add Alibaba Cloud YUM software source
Set image accelerator address
Specify the address of an Alibaba Cloud mirror site used to accelerate Docker image downloads, so that when the Docker image is downloaded, it will be downloaded from the mirror site first, and the download speed will be faster.
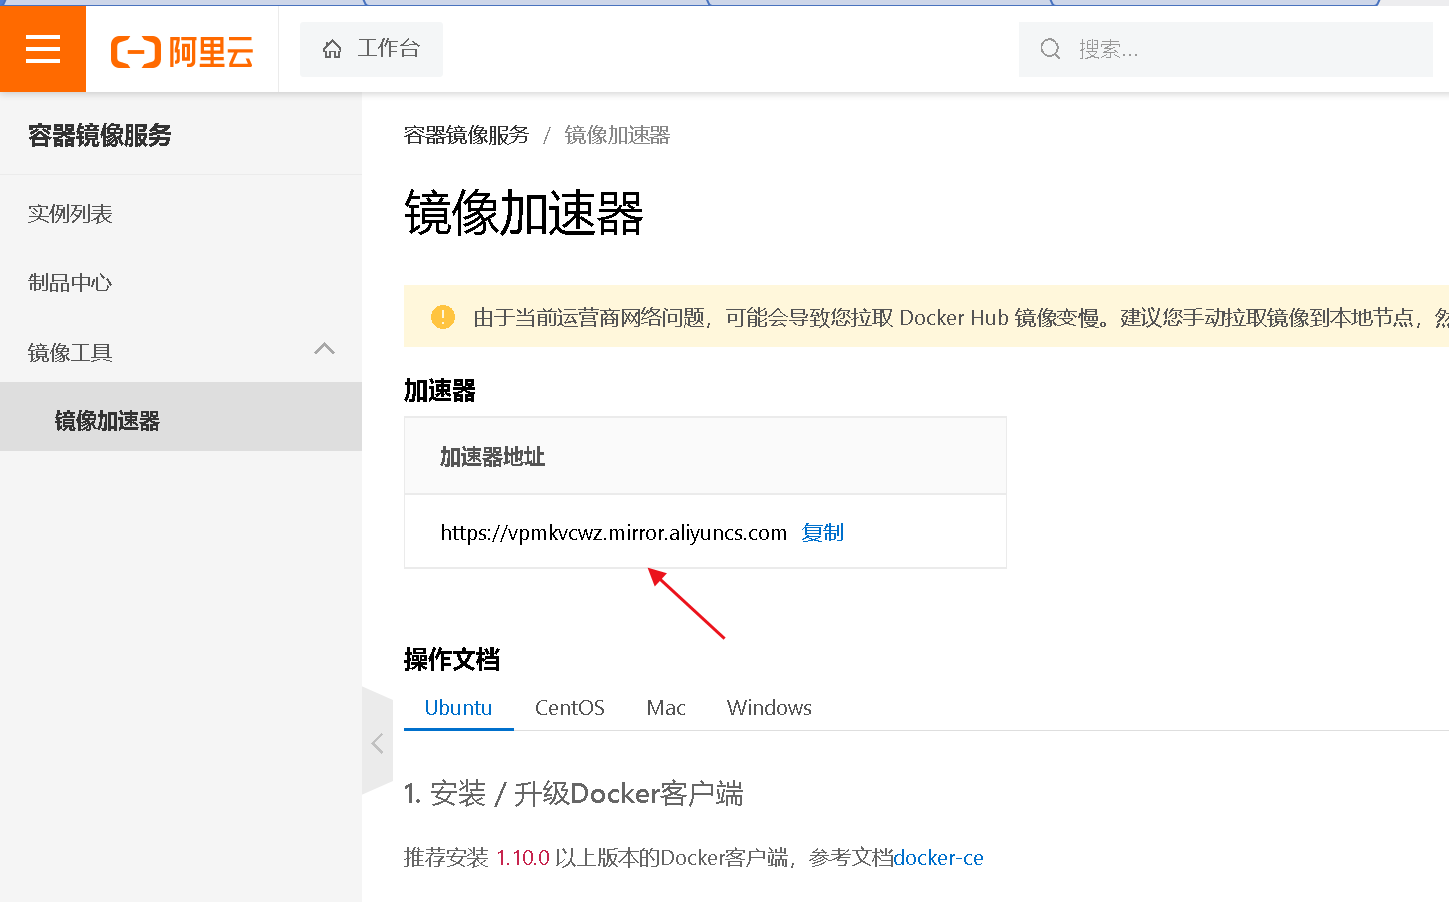
cat > /etc/docker/daemon.json << EOF
{
“registry-mirrors”: [“https://vpmkvcwz.mirror.aliyuncs.com”]
}
EOF

Restart docker
systemctl restart docker
Add yum source
Add the Kubernetes YUM repository to the YUM repository list of CentOS 7 so that you can use the YUM command to install Kubernetes related packages on CentOS 7.
Among them, baseurl specifies the Kubernetes warehouse address provided by Alibaba Cloud. gpgcheck is 0, which means no GPG check is performed, and the import of GPG keys can be omitted.
cat > /etc/yum.repos.d/kubernetes.repo << EOF
[kubernetes]
name=Kubernetes
baseurl=https://mirrors.aliyun.com/kubernetes/yum/repos/kubernetes-el7-x86_64
enabled=1
gpgcheck=0
repo_gpgcheck=0
gpgkey=https://mirrors.aliyun.com/kubernetes/yum/doc/yum-key.gpg https://mirrors.aliyun.com/kubernetes/yum/doc/rpm-package-key.gpg
EOF

(3) Install kubeadm, kubelet and kubectl
Normally, the Kubeadm, Kubelet and Kubectl versions need to be consistent with the Kubernetes version on the Kubernetes Master and Node nodes. In order to avoid version compatibility issues, we recommend that before installing Kubernetes, you first check the version compatibility relationships listed in the official documentation and set up according to the officially recommended Docker version.
Version 1.18.0 is specified here
yum install -y kubelet-1.18.0 kubeadm-1.18.0 kubectl-1.18.0
Set up startup
systemctl enable kubelet

Deploy Kubernetes Master
(1) Executed at 192.168.122.140 (Master)
Create a Kubernetes cluster and configure network-related parameters.
kubeadm hot \
–apiserver-advertise-address=192.168.122.140 \
–image-repository registry.aliyuncs.com/google_containers \
–kubernetes-version v1.18.0 \
–service-cidr=10.96.0.0/12 \
–pod-network-cidr=10.244.0.0/16
Since the default pull image address k8s.gcr.io is not accessible in China, the Alibaba Cloud image warehouse address is specified here.
- –apiserver-advertise-address: Specify the address of the Kubernetes API server, here it is 192.168.122.140.
- –image-repository: Specify the container image repository to be used, here is the Alibaba Cloud image repository.
- –kubernetes-version: Specify the Kubernetes version number to be installed, here it is v1.18.0.
- –service-cidr: Specify the IP address segment of the service, here it is 10.96.0.0/12.
- –pod-network-cidr: Specify the IP address segment of the Pod network, here it is 10.244.0.0/16.
Related errors
1. Memory or processor settings:
If the master memory or processor does not meet the minimum configuration, an error will be reported.
ERROR: [preflight] Some fatal errors occurred:
[ERROR NumCPU]: the number of available CPUs 1 is less than the required 2
[ERROR Mem]: the system RAM (996637696) is less than the minimum 1700 MB
2. If the prompt is that the version is incorrect
ERROR KubeletVersion]: the kubelet version is higher than the control plane version. This is not a supported version skew and may lead to a malfunctional cluster. Kubelet version: "1.18.0" Control plane version: "1.17.0"
Please use the corresponding version
3. If the following error occurs during execution:
[ERROR FileContent--proc-sys-net-bridge-bridge-nf-call-iptables]: /proc/sys/net/bridge/bridge-nf-call-iptables contents are not set to 1
[preflight] If you know what you are doing, you can make a check non-fatal with --ignore-preflight-errors=... To see the stack trace of this error execute with --v=5 or higher
implement
echo “1” >/proc/sys/net/bridge/bridge-nf-call-iptables
4. Reference for other questions
https://blog.csdn.net/weixin_46560589/article/details/127459973
Results of the:
[root@master system]# kubeadm init \
>  --apiserver-advertise-address=192.168.122.140 \
> --image-repository registry.aliyuncs.com/google_containers \
> --kubernetes-version v1.18.0 \
> --service-cidr=10.96.0.0/12 \
> --pod-network-cidr=10.244.0.0/16
W0715 23:30:23.712998   17728 configset.go:202] WARNING: kubeadm cannot validate component configs for API groups [kubelet.config.k8s.io kubeproxy.config.k8s.io]
[init] Using Kubernetes version: v1.18.0
[preflight] Running pre-flight checks
    [WARNING IsDockerSystemdCheck]: detected "cgroupfs" as the Docker cgroup driver. The recommended driver is "systemd". Please follow the guide at https://kubernetes.io/docs/setup/cri/
    [WARNING SystemVerification]: this Docker version is not on the list of validated versions: 24.0.4. Latest validated version: 19.03
[preflight] Pulling images required for setting up a Kubernetes cluster
[preflight] This might take a minute or two, depending on the speed of your internet connection
[preflight] You can also perform this action in beforehand using 'kubeadm config images pull'
[kubelet-start] Writing kubelet environment file with flags to file "/var/lib/kubelet/kubeadm-flags.env"
[kubelet-start] Writing kubelet configuration to file "/var/lib/kubelet/config.yaml"
[kubelet-start] Starting the kubelet
[certs] Using certificateDir folder "/etc/kubernetes/pki"
[certs] Generating "ca" certificate and key
[certs] Generating "apiserver" certificate and key
[certs] apiserver serving cert is signed for DNS names [master kubernetes kubernetes.default kubernetes.default.svc kubernetes.default.svc.cluster.local] and IPs [10.96.0.1 192.168.122.140]
[certs] Generating "apiserver-kubelet-client" certificate and key
[certs] Generating "front-proxy-ca" certificate and key
[certs] Generating "front-proxy-client" certificate and key
[certs] Generating "etcd/ca" certificate and key
[certs] Generating "etcd/server" certificate and key
[certs] etcd/server serving cert is signed for DNS names [master localhost] and IPs [192.168.122.140 127.0.0.1 ::1]
[certs] Generating "etcd/peer" certificate and key
[certs] etcd/peer serving cert is signed for DNS names [master localhost] and IPs [192.168.122.140 127.0.0.1 ::1]
[certs] Generating "etcd/healthcheck-client" certificate and key
[certs] Generating "apiserver-etcd-client" certificate and key
[certs] Generating "sa" key and public key
[kubeconfig] Using kubeconfig folder "/etc/kubernetes"
[kubeconfig] Writing "admin.conf" kubeconfig file
[kubeconfig] Writing "kubelet.conf" kubeconfig file
[kubeconfig] Writing "controller-manager.conf" kubeconfig file
[kubeconfig] Writing "scheduler.conf" kubeconfig file
[control-plane] Using manifest folder "/etc/kubernetes/manifests"
[control-plane] Creating static Pod manifest for "kube-apiserver"
[control-plane] Creating static Pod manifest for "kube-controller-manager"
W0715 23:30:25.930910   17728 manifests.go:225] the default kube-apiserver authorization-mode is "Node,RBAC"; using "Node,RBAC"
[control-plane] Creating static Pod manifest for "kube-scheduler"
W0715 23:30:25.932568   17728 manifests.go:225] the default kube-apiserver authorization-mode is "Node,RBAC"; using "Node,RBAC"
[etcd] Creating static Pod manifest for local etcd in "/etc/kubernetes/manifests"
[wait-control-plane] Waiting for the kubelet to boot up the control plane as static Pods from directory "/etc/kubernetes/manifests". This can take up to 4m0s
[apiclient] All control plane components are healthy after 15.002498 seconds
[upload-config] Storing the configuration used in ConfigMap "kubeadm-config" in the "kube-system" Namespace
[kubelet] Creating a ConfigMap "kubelet-config-1.18" in namespace kube-system with the configuration for the kubelets in the cluster
[upload-certs] Skipping phase. Please see --upload-certs
[mark-control-plane] Marking the node master as control-plane by adding the label "node-role.kubernetes.io/master=''"
[mark-control-plane] Marking the node master as control-plane by adding the taints [node-role.kubernetes.io/master:NoSchedule]
[bootstrap-token] Using token: l87fc4.tcsjfloxy25678lz
[bootstrap-token] Configuring bootstrap tokens, cluster-info ConfigMap, RBAC Roles
[bootstrap-token] configured RBAC rules to allow Node Bootstrap tokens to get nodes
[bootstrap-token] configured RBAC rules to allow Node Bootstrap tokens to post CSRs in order for nodes to get long term certificate credentials
[bootstrap-token] configured RBAC rules to allow the csrapprover controller automatically approve CSRs from a Node Bootstrap Token
[bootstrap-token] configured RBAC rules to allow certificate rotation for all node client certificates in the cluster
[bootstrap-token] Creating the "cluster-info" ConfigMap in the "kube-public" namespace
[kubelet-finalize] Updating "/etc/kubernetes/kubelet.conf" to point to a rotatable kubelet client certificate and key
[addons] Applied essential addon: CoreDNS
[addons] Applied essential addon: kube-proxy

Your Kubernetes control-plane has initialized successfully!

To start using your cluster, you need to run the following as a regular user:

  mkdir -p $HOME/.kube
  sudo cp -i /etc/kubernetes/admin.conf $HOME/.kube/config
  sudo chown $(id -u):$(id -g) $HOME/.kube/config

You should now deploy a pod network to the cluster.
Run "kubectl apply -f [podnetwork].yaml" with one of the options listed at:
  https://kubernetes.io/docs/concepts/cluster-administration/addons/

Then you can join any number of worker nodes by running the following on each as root:

kubeadm join 192.168.122.140:6443 --token l87fc4.tcsjfloxy25678lz \
    --discovery-token-ca-cert-hash sha256:7690705ab1c2242036b0bd25c025d597fda79f509a036f68abee2991ef212173
Your Kubernetes control-plane has initialized successfully! The Kubernetes cluster is deployed successfully.
Created successfully, view the pulled image

(2) Use kubectl tool
> mkdir -p $HOME/.kube
>
> sudo cp -i /etc/kubernetes/admin.conf $HOME/.kube/config
>
> sudo chown $(id -u):$(id -g) $HOME/.kube/config
mkdir -p $HOME/.kube creates a directory named .kube, which is used to store Kubernetes cluster configuration files.
sudo cp -i /etc/kubernetes/admin.conf $HOME/.kube/config: Copy the Kubernetes cluster administrator configuration file to the $HOME/.kube/config file. This file is the configuration file used by the Kubernetes command line tool kubectl.
sudo chown $(id -u):$(id -g) $HOME/.kube/config
: Assign ownership of the $HOME/.kube/config file to the current user and user group to ensure users can modify the file.
Get all nodes in the current Kubernetes cluster. It will return each node's name, status, IP address, version information, etc.
kubectl get nodes

NotReady: The Kubernetes cluster node status is not ready or unavailable. Because no nodes have been added to the cluster at this time
If prompted:
Unable to connect to the server: x509: certificate signed by unknown authority (possibly because of "crypto/rsa: verification error" while trying to verify candidate authority certificate "kubernetes")
rm -rf $HOME/.kube command re-execute the previous command
Join Kubernetes Node
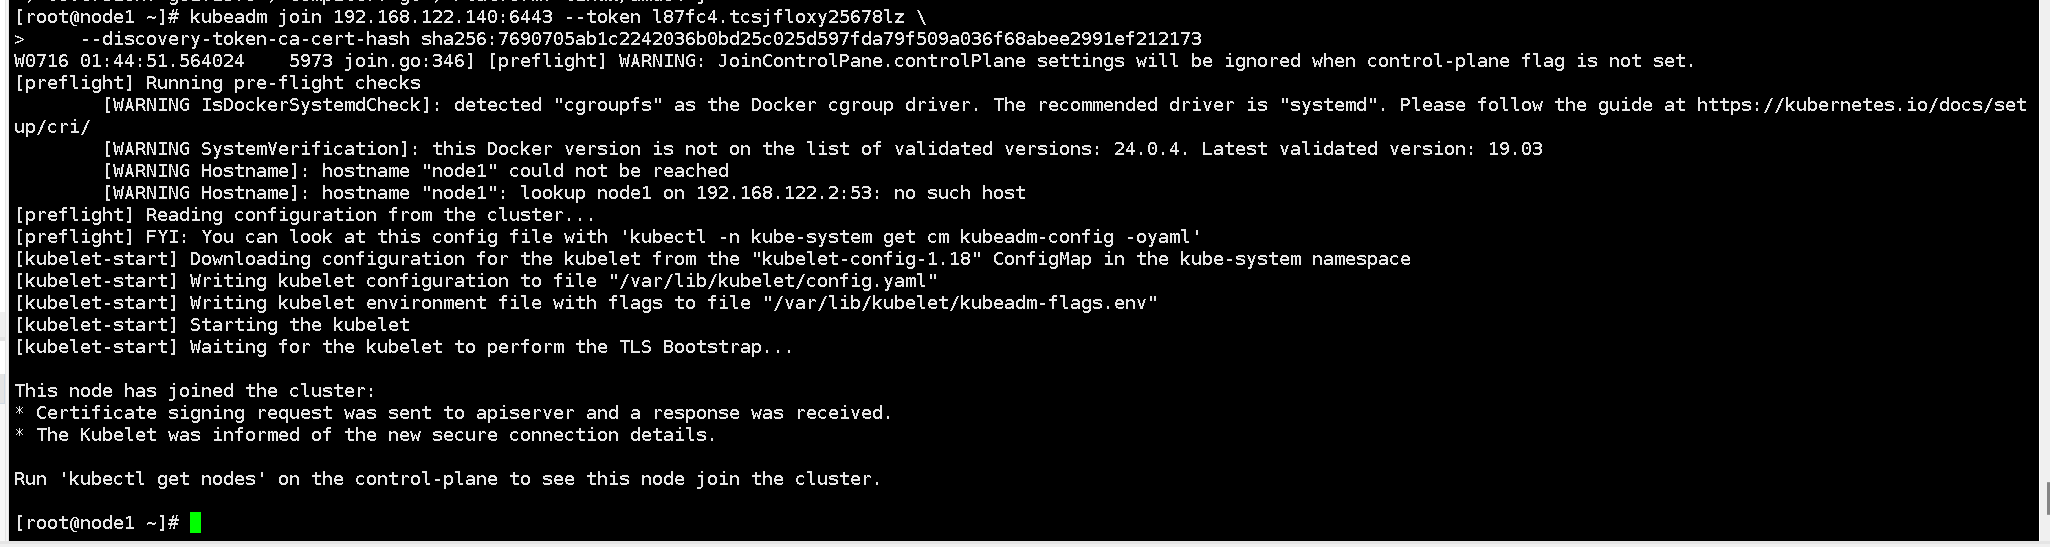
1) Add a new node to the cluster at 192.168.122.141 (Node) and execute the kubeadm join command:
The token required for the command is already given in the last part of the kubeadm init command line on the Master, just copy it:
Add the node node to the Kubernetes cluster
kubeadm join 192.168.122.140:6443 --token l87fc4.tcsjfloxy25678lz \
    --discovery-token-ca-cert-hash sha256:7690705ab1c2242036b0bd25c025d597fda79f509a036f68abee2991ef212173

~~The version does not correspond to the error reinstallation version~~
The Docker version was accidentally upgraded to 24.0.4. Just uninstall Docker and reinstall it.
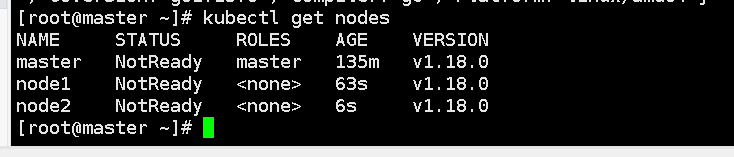
Check the nodes again. The two worker nodes have joined the cluster, but the status is still NotReady because the network components have not been installed yet.
Install the Pod Network Plugin (CNI)
Commonly used pod network plug-ins:
- Flannel: Creates a virtual network for each Pod using the VXLAN module in the Linux kernel.
- Calico: Can provide advanced network policy and security.
- Weave Net: A lightweight network plug-in that can easily manage the network.
- Cilium: Supports multiple network communication models and advanced network policies.
Select flannel here. Deploying the flannel network plug-in allows the pod network to communicate directly without forwarding.
This command applies a YAML file that contains the deployment and configuration of the flannel network plug-in. This plugin can be used to create an overlay network in a Kubernetes cluster, which creates a logical network between different computers, containers, or virtual machines so that they can communicate with each other as if they were on the same physical network. This allows Pods on different nodes to communicate with each other via internal IP addresses. To use this command to deploy flannel, you need to make sure you have kubectl installed and a cluster running Kubernetes.
kubectl apply -f https://raw.githubusercontent.com/flannel-io/flannel/master/Documentation/kube-flannel.yml
Make sure you can access the flannel.io registery. Because this command will download the kube-flannel.yml file from the flannel.io registry and deploy the flannel network plug-in in the Kubernetes cluster. If the flannel.io registry cannot be accessed, the command will fail.
If the Pod image download fails, you can modify the image address
Error reported:
The connection to the server raw.githubusercontent.com was refused - did you specify the right host or port?
Find the ip corresponding to the website raw.githubusercontent.com 185.199.109.133
vim /etc/hosts
Add it to hosts and execute the kubectl apply command again

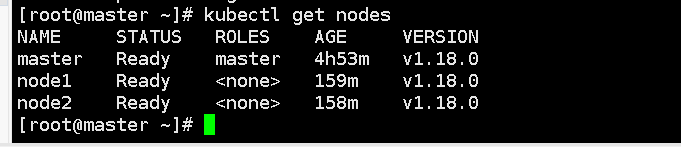
Node has been started
After the pod network plug-in is installed, the hosts configuration can be deleted.
Test kubernetes cluster
Create a pod in the Kubernetes cluster and verify that it is running properly:
Test downloading an nginx
Create a deployment named "nginx" using the specified nginx image
kubectl create deployment nginx --image=nginx
It exposes the Deployment named "nginx" on the NodePort of the cluster, so that the Deployment service can be accessed through the node's IP address and the specified NodePort.
kubectl expose deployment nginx --port=80 --type=NodePort
–port=80 specifies the Service listening port as 80, which is the public port of the service.
–type=NodePort specifies that the Service type is NodePort, which means that the Service will expose a random port on each node to expose the service.
kubectl get pod,svc
List all Pods in the cluster and display their status.
List all Services and display their status

The upper part is the status of the Pod
The lower part is the status of the Service
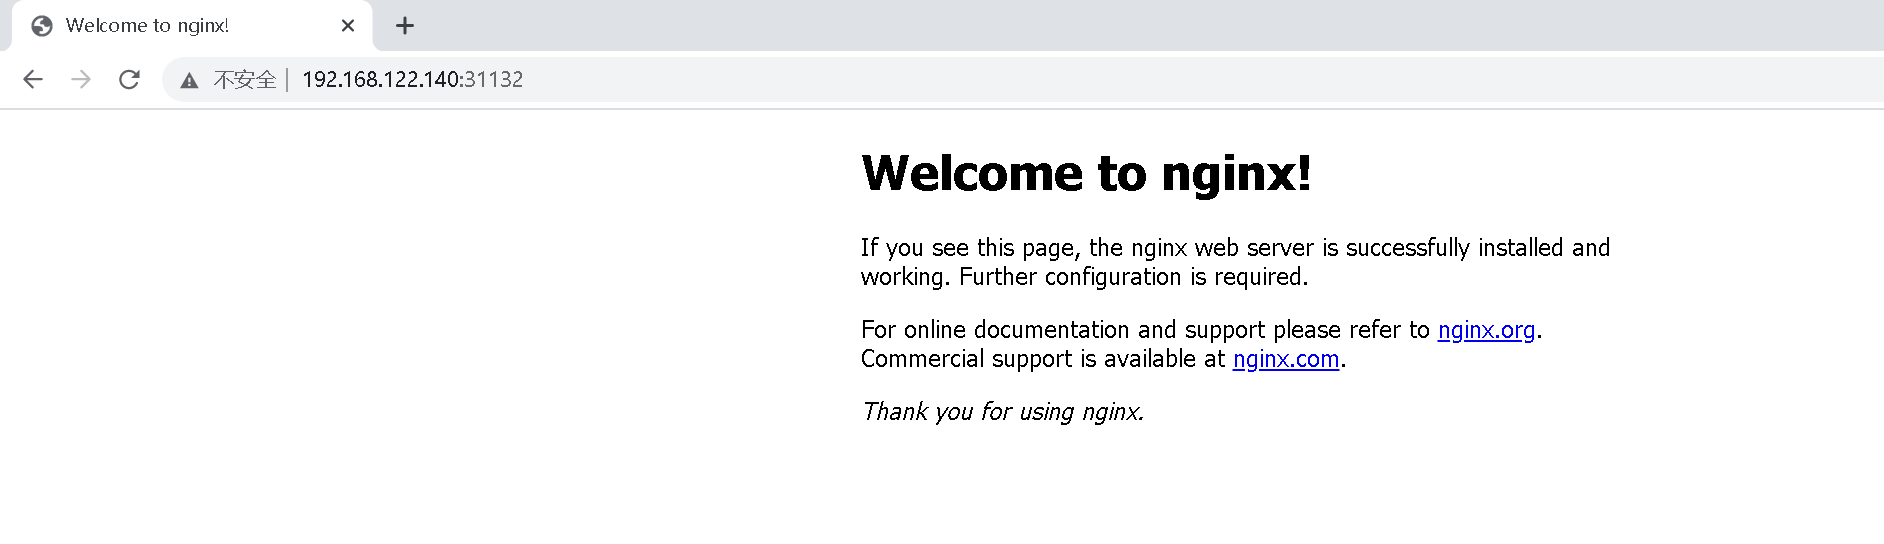
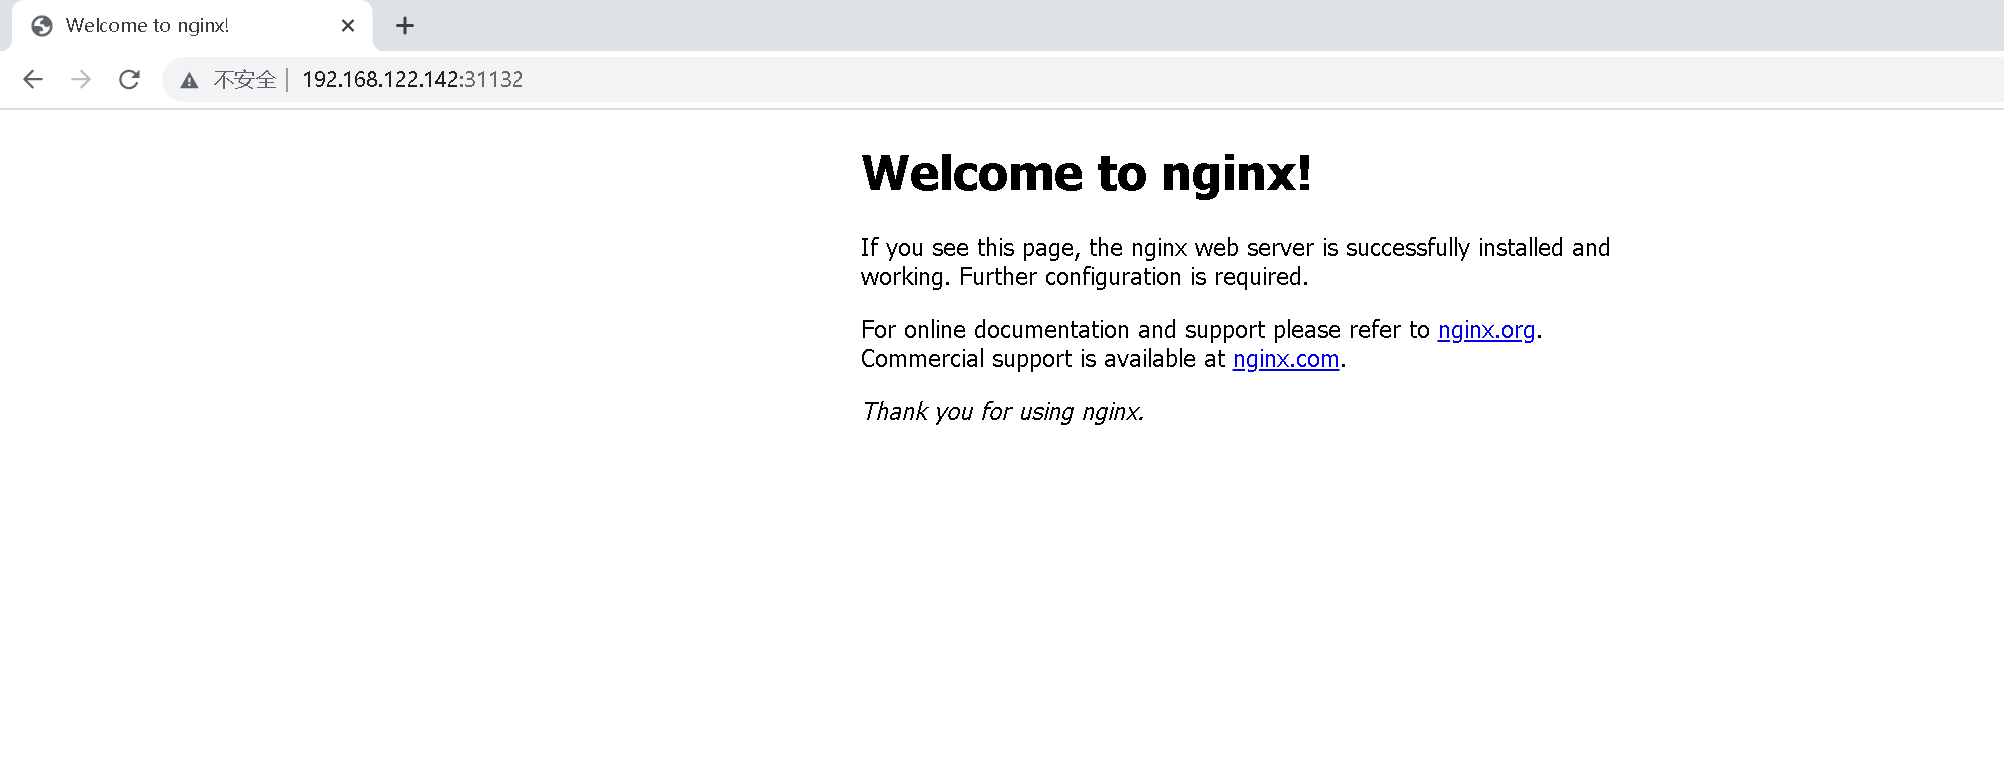
Access address: http://NodeIP:Port, you can see the externally exposed port port: 31132
Any node in the cluster can successfully access this address.
For example, use 192.168.122.140 to access
Use 192.168.122.141 to access

Use 192.168.122.142 to access
Deploy Kuboard visualization module
Official website: https://kuboard.cn/
- Open source address: https://github.com/eip-work/kuboard-press
- Kuboard can use the built-in user library, gitlab/github single sign-on or LDAP user library for authentication, avoiding the trouble caused by administrators distributing ServiceAccount Tokens to ordinary users. When using the built-in user library, administrators can configure security settings such as user password policies and password expiration times.
- Administrators can import multiple Kubernetes clusters into Kuboard and assign permissions of different clusters/namespaces to specified users or user groups through permission control.
- In the namespace summary page of Kuboard, workloads are divided into different layers using the classic microservice layering method to more intuitively display the structure of the microservice architecture, and the namespace layout can be customized for each namespace.
- Kuboard reasonably organizes the historical version of the Deployment, the list of Pods it belongs to, Pod related events, and container information on the same page, which can help users diagnose problems and perform various related operations as quickly as possible.
- Kuboard provides a graphical workload editing interface, allowing users to easily complete container orchestration tasks without getting bogged down in the details of tedious YAML files. Supported Kubernetes object types include: Node, Namespace, Deployment, StatefulSet, DaemonSet, Secret, ConfigMap, Service, Ingress, StorageClass, PersistentVolumeClaim, LimitRange, ResourceQuota, ServiceAccount, Role, RoleBinding, ClusterRole, ClusterRoleBinding, CustomResourceDefinition, CustomResource and other commonly used types. Kubernetes objects.
- In Kuboard, you can easily connect to common storage types such as NFS and CephFS, and support expansion and snapshot operations on CephFS type storage volume claims.
1. Check whether Kuboard is installed. If it is not installed, use the following command to install it:
kubectl apply -f https://addons.kuboard.cn/kuboard/kuboard-v3.yaml

2. Wait for kuboard to start and run. You can check using the following command
kubectl get pods,svc -n kuboard

kuboard-v3.yaml
---
apiVersion: v1
kind: Namespace
metadata:
  name: kuboard

---
apiVersion: v1
kind: ConfigMap
metadata:
  name: kuboard-v3-config
  namespace: kuboard
data:
  # 关于如下参数的解释,请参考文档 https://kuboard.cn/install/v3/install-built-in.html
  # [common]
  KUBOARD_SERVER_NODE_PORT: '30080'
  KUBOARD_AGENT_SERVER_UDP_PORT: '30081'
  KUBOARD_AGENT_SERVER_TCP_PORT: '30081'
  KUBOARD_SERVER_LOGRUS_LEVEL: info  # error / debug / trace
  # KUBOARD_AGENT_KEY 是 Agent 与 Kuboard 通信时的密钥,请修改为一个任意的包含字母、数字的32位字符串,此密钥变更后,需要删除 Kuboard Agent 重新导入。
  KUBOARD_AGENT_KEY: 32b7d6572c6255211b4eec9009e4a816
  KUBOARD_AGENT_IMAG: eipwork/kuboard-agent
  KUBOARD_QUESTDB_IMAGE: questdb/questdb:6.0.5
  KUBOARD_DISABLE_AUDIT: 'false' # 如果要禁用 Kuboard 审计功能,将此参数的值设置为 'true',必须带引号。

  # 关于如下参数的解释,请参考文档 https://kuboard.cn/install/v3/install-gitlab.html
  # [gitlab login]
  # KUBOARD_LOGIN_TYPE: "gitlab"
  # KUBOARD_ROOT_USER: "your-user-name-in-gitlab"
  # GITLAB_BASE_URL: "http://gitlab.mycompany.com"
  # GITLAB_APPLICATION_ID: "7c10882aa46810a0402d17c66103894ac5e43d6130b81c17f7f2d8ae182040b5"
  # GITLAB_CLIENT_SECRET: "77c149bd3a4b6870bffa1a1afaf37cba28a1817f4cf518699065f5a8fe958889"

  # 关于如下参数的解释,请参考文档 https://kuboard.cn/install/v3/install-github.html
  # [github login]
  # KUBOARD_LOGIN_TYPE: "github"
  # KUBOARD_ROOT_USER: "your-user-name-in-github"
  # GITHUB_CLIENT_ID: "17577d45e4de7dad88e0"
  # GITHUB_CLIENT_SECRET: "ff738553a8c7e9ad39569c8d02c1d85ec19115a7"

  # 关于如下参数的解释,请参考文档 https://kuboard.cn/install/v3/install-ldap.html
  # [ldap login]
  # KUBOARD_LOGIN_TYPE: "ldap"
  # KUBOARD_ROOT_USER: "your-user-name-in-ldap"
  # LDAP_HOST: "ldap-ip-address:389"
  # LDAP_BIND_DN: "cn=admin,dc=example,dc=org"
  # LDAP_BIND_PASSWORD: "admin"
  # LDAP_BASE_DN: "dc=example,dc=org"
  # LDAP_FILTER: "(objectClass=posixAccount)"
  # LDAP_ID_ATTRIBUTE: "uid"
  # LDAP_USER_NAME_ATTRIBUTE: "uid"
  # LDAP_EMAIL_ATTRIBUTE: "mail"
  # LDAP_DISPLAY_NAME_ATTRIBUTE: "cn"
  # LDAP_GROUP_SEARCH_BASE_DN: "dc=example,dc=org"
  # LDAP_GROUP_SEARCH_FILTER: "(objectClass=posixGroup)"
  # LDAP_USER_MACHER_USER_ATTRIBUTE: "gidNumber"
  # LDAP_USER_MACHER_GROUP_ATTRIBUTE: "gidNumber"
  # LDAP_GROUP_NAME_ATTRIBUTE: "cn"

---
apiVersion: v1
kind: ServiceAccount
metadata:
  name: kuboard-boostrap
  namespace: kuboard

---
apiVersion: rbac.authorization.k8s.io/v1
kind: ClusterRoleBinding
metadata:
  name: kuboard-boostrap-crb
roleRef:
  apiGroup: rbac.authorization.k8s.io
  kind: ClusterRole
  name: cluster-admin
subjects:
- kind: ServiceAccount
  name: kuboard-boostrap
  namespace: kuboard

---
apiVersion: apps/v1
kind: DaemonSet
metadata:
  labels:
    k8s.kuboard.cn/name: kuboard-etcd
  name: kuboard-etcd
  namespace: kuboard
spec:
  revisionHistoryLimit: 10
  selector:
    matchLabels:
      k8s.kuboard.cn/name: kuboard-etcd
  template:
    metadata:
      labels:
        k8s.kuboard.cn/name: kuboard-etcd
    spec:
      affinity:
        nodeAffinity:
          requiredDuringSchedulingIgnoredDuringExecution:
            nodeSelectorTerms:
              - matchExpressions:
                  - key: node-role.kubernetes.io/master
                    operator: Exists
              - matchExpressions:
                  - key: node-role.kubernetes.io/control-plane
                    operator: Exists
              - matchExpressions:
                  - key: k8s.kuboard.cn/role
                    operator: In
                    values:
                      - etcd
      containers:
        - env:
            - name: HOSTNAME
              valueFrom:
                fieldRef:
                  apiVersion: v1
                  fieldPath: spec.nodeName
            - name: HOSTIP
              valueFrom:
                fieldRef:
                  apiVersion: v1
                  fieldPath: status.hostIP
          image: 'eipwork/etcd-host:3.4.16-2'
          imagePullPolicy: Always
          name: etcd
          ports:
            - containerPort: 2381
              hostPort: 2381
              name: server
              protocol: TCP
            - containerPort: 2382
              hostPort: 2382
              name: peer
              protocol: TCP
          livenessProbe:
            failureThreshold: 3
            httpGet:
              path: /health
              port: 2381
              scheme: HTTP
            initialDelaySeconds: 30
            periodSeconds: 10
            successThreshold: 1
            timeoutSeconds: 1
          volumeMounts:
            - mountPath: /data
              name: data
      dnsPolicy: ClusterFirst
      hostNetwork: true
      restartPolicy: Always
      serviceAccount: kuboard-boostrap
      serviceAccountName: kuboard-boostrap
      tolerations:
        - key: node-role.kubernetes.io/master
          operator: Exists
        - key: node-role.kubernetes.io/control-plane
          operator: Exists
      volumes:
        - hostPath:
            path: /usr/share/kuboard/etcd
          name: data
  updateStrategy:
    rollingUpdate:
      maxUnavailable: 1
    type: RollingUpdate


---
apiVersion: apps/v1
kind: Deployment
metadata:
  annotations: {

    }
  labels:
    k8s.kuboard.cn/name: kuboard-v3
  name: kuboard-v3
  namespace: kuboard
spec:
  replicas: 1
  revisionHistoryLimit: 10
  selector:
    matchLabels:
      k8s.kuboard.cn/name: kuboard-v3
  template:
    metadata:
      labels:
        k8s.kuboard.cn/name: kuboard-v3
    spec:
      affinity:
        nodeAffinity:
          preferredDuringSchedulingIgnoredDuringExecution:
            - preference:
                matchExpressions:
                  - key: node-role.kubernetes.io/master
                    operator: Exists
              weight: 100
            - preference:
                matchExpressions:
                  - key: node-role.kubernetes.io/control-plane
                    operator: Exists
              weight: 100
      containers:
        - env:
            - name: HOSTIP
              valueFrom:
                fieldRef:
                  apiVersion: v1
                  fieldPath: status.hostIP
            - name: HOSTNAME
              valueFrom:
                fieldRef:
                  apiVersion: v1
                  fieldPath: spec.nodeName
          envFrom:
            - configMapRef:
                name: kuboard-v3-config
          image: 'eipwork/kuboard:v3'
          imagePullPolicy: Always
          livenessProbe:
            failureThreshold: 3
            httpGet:
              path: /kuboard-resources/version.json
              port: 80
              scheme: HTTP
            initialDelaySeconds: 30
            periodSeconds: 10
            successThreshold: 1
            timeoutSeconds: 1
          name: kuboard
          ports:
            - containerPort: 80
              name: web
              protocol: TCP
            - containerPort: 443
              name: https
              protocol: TCP
            - containerPort: 10081
              name: peer
              protocol: TCP
            - containerPort: 10081
              name: peer-u
              protocol: UDP
          readinessProbe:
            failureThreshold: 3
            httpGet:
              path: /kuboard-resources/version.json
              port: 80
              scheme: HTTP
            initialDelaySeconds: 30
            periodSeconds: 10
            successThreshold: 1
            timeoutSeconds: 1
          resources: {

    }
          # startupProbe:
          #   failureThreshold: 20
          #   httpGet:
          #     path: /kuboard-resources/version.json
          #     port: 80
          #     scheme: HTTP
          #   initialDelaySeconds: 5
          #   periodSeconds: 10
          #   successThreshold: 1
          #   timeoutSeconds: 1
      dnsPolicy: ClusterFirst
      restartPolicy: Always
      serviceAccount: kuboard-boostrap
      serviceAccountName: kuboard-boostrap
      tolerations:
        - key: node-role.kubernetes.io/master
          operator: Exists

---
apiVersion: v1
kind: Service
metadata:
  annotations: {

    }
  labels:
    k8s.kuboard.cn/name: kuboard-v3
  name: kuboard-v3
  namespace: kuboard
spec:
  ports:
    - name: web
      nodePort: 30080
      port: 80
      protocol: TCP
      targetPort: 80
    - name: tcp
      nodePort: 30081
      port: 10081
      protocol: TCP
      targetPort: 10081
    - name: udp
      nodePort: 30081
      port: 10081
      protocol: UDP
      targetPort: 10081
  selector:
    k8s.kuboard.cn/name: kuboard-v3
  sessionAffinity: None
  type: NodePort
Display web exposed to the outside world 30080
Visit Kuboard

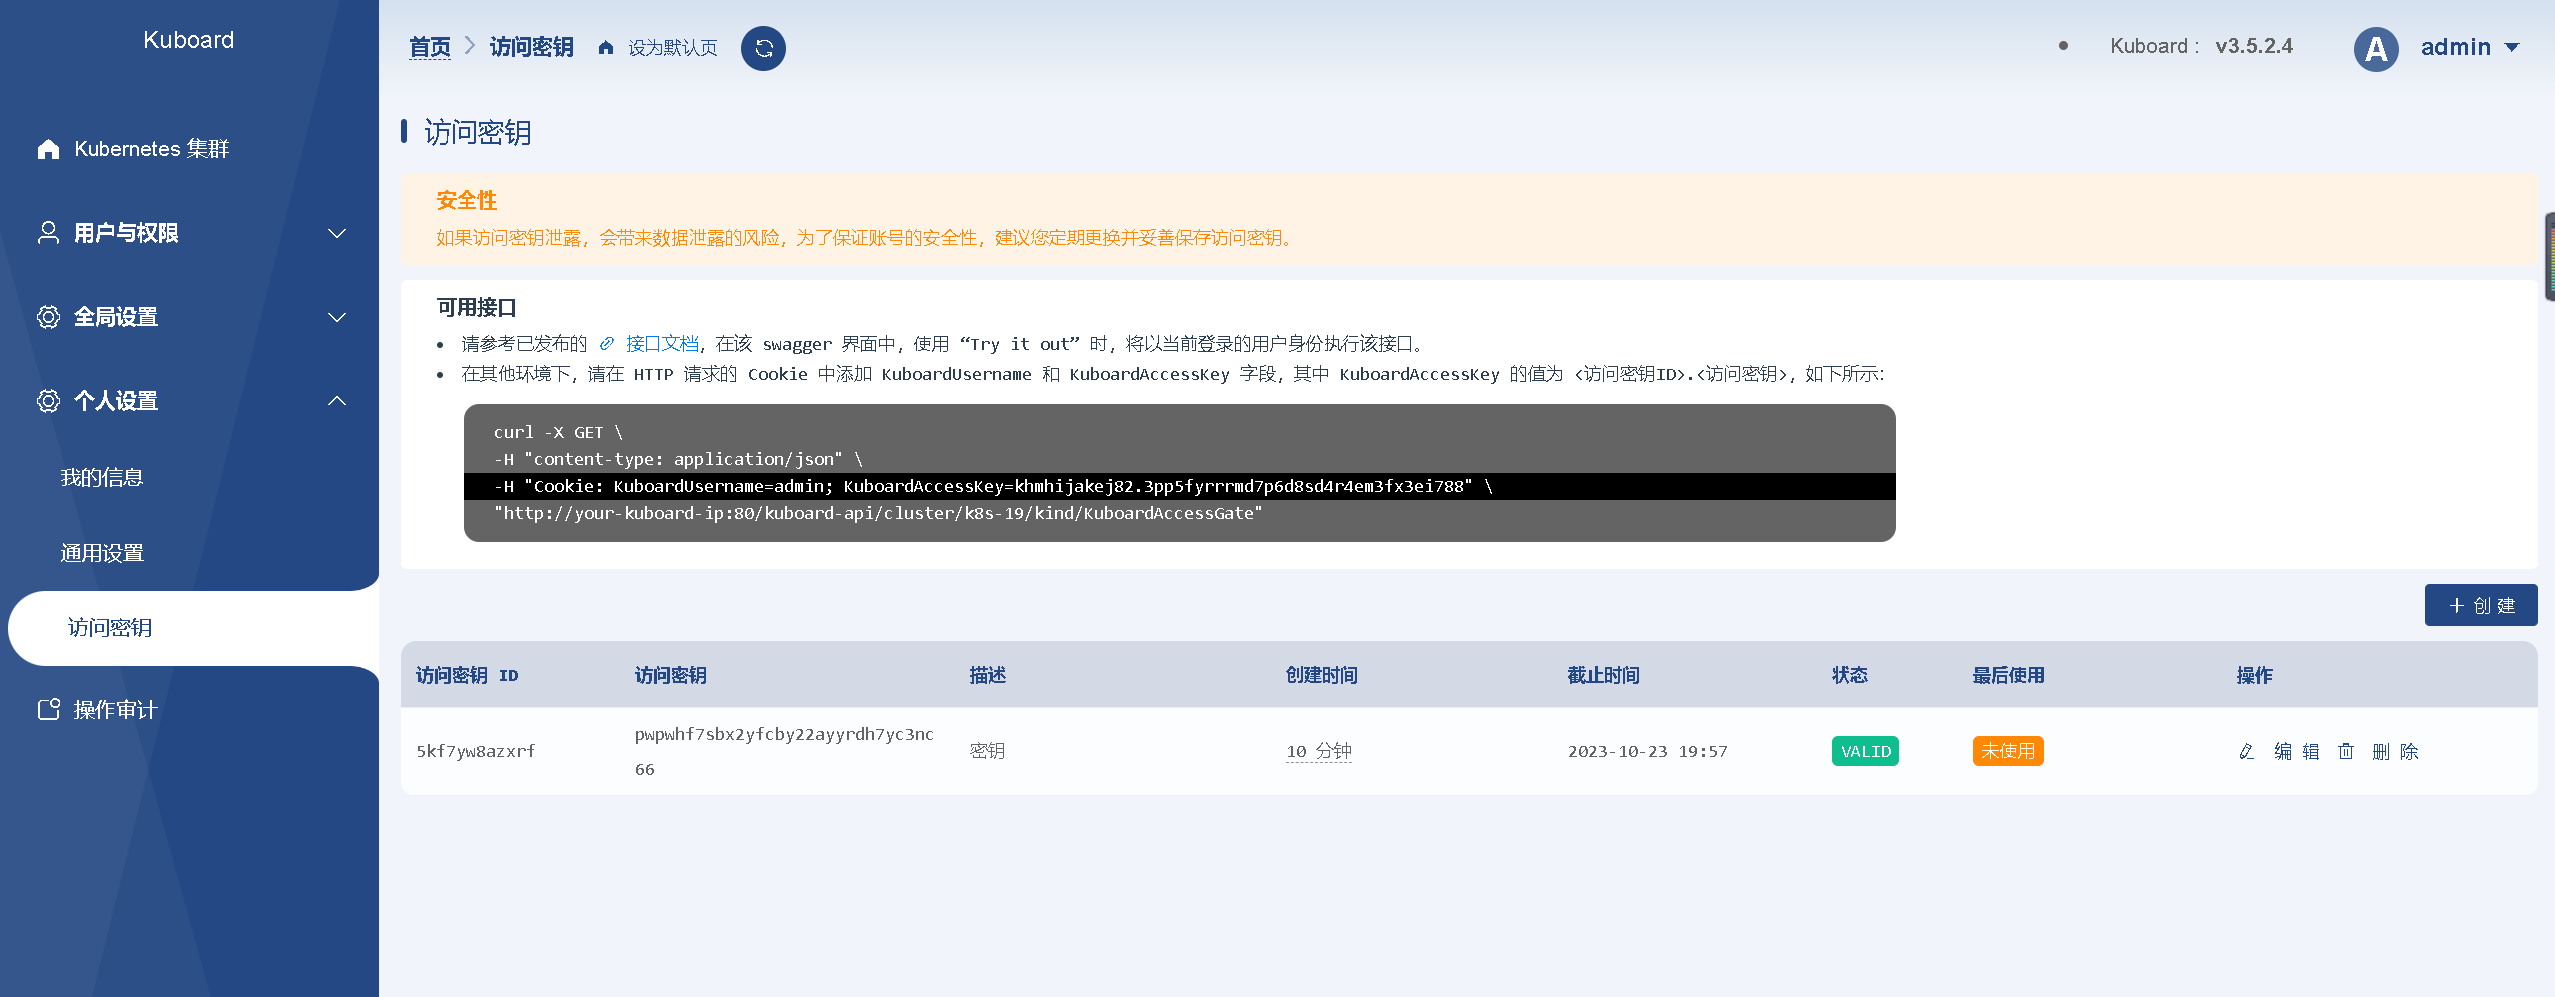
- Enter the initial username and password and log in
Username: admin
Password: Kuboard123
Cluster information

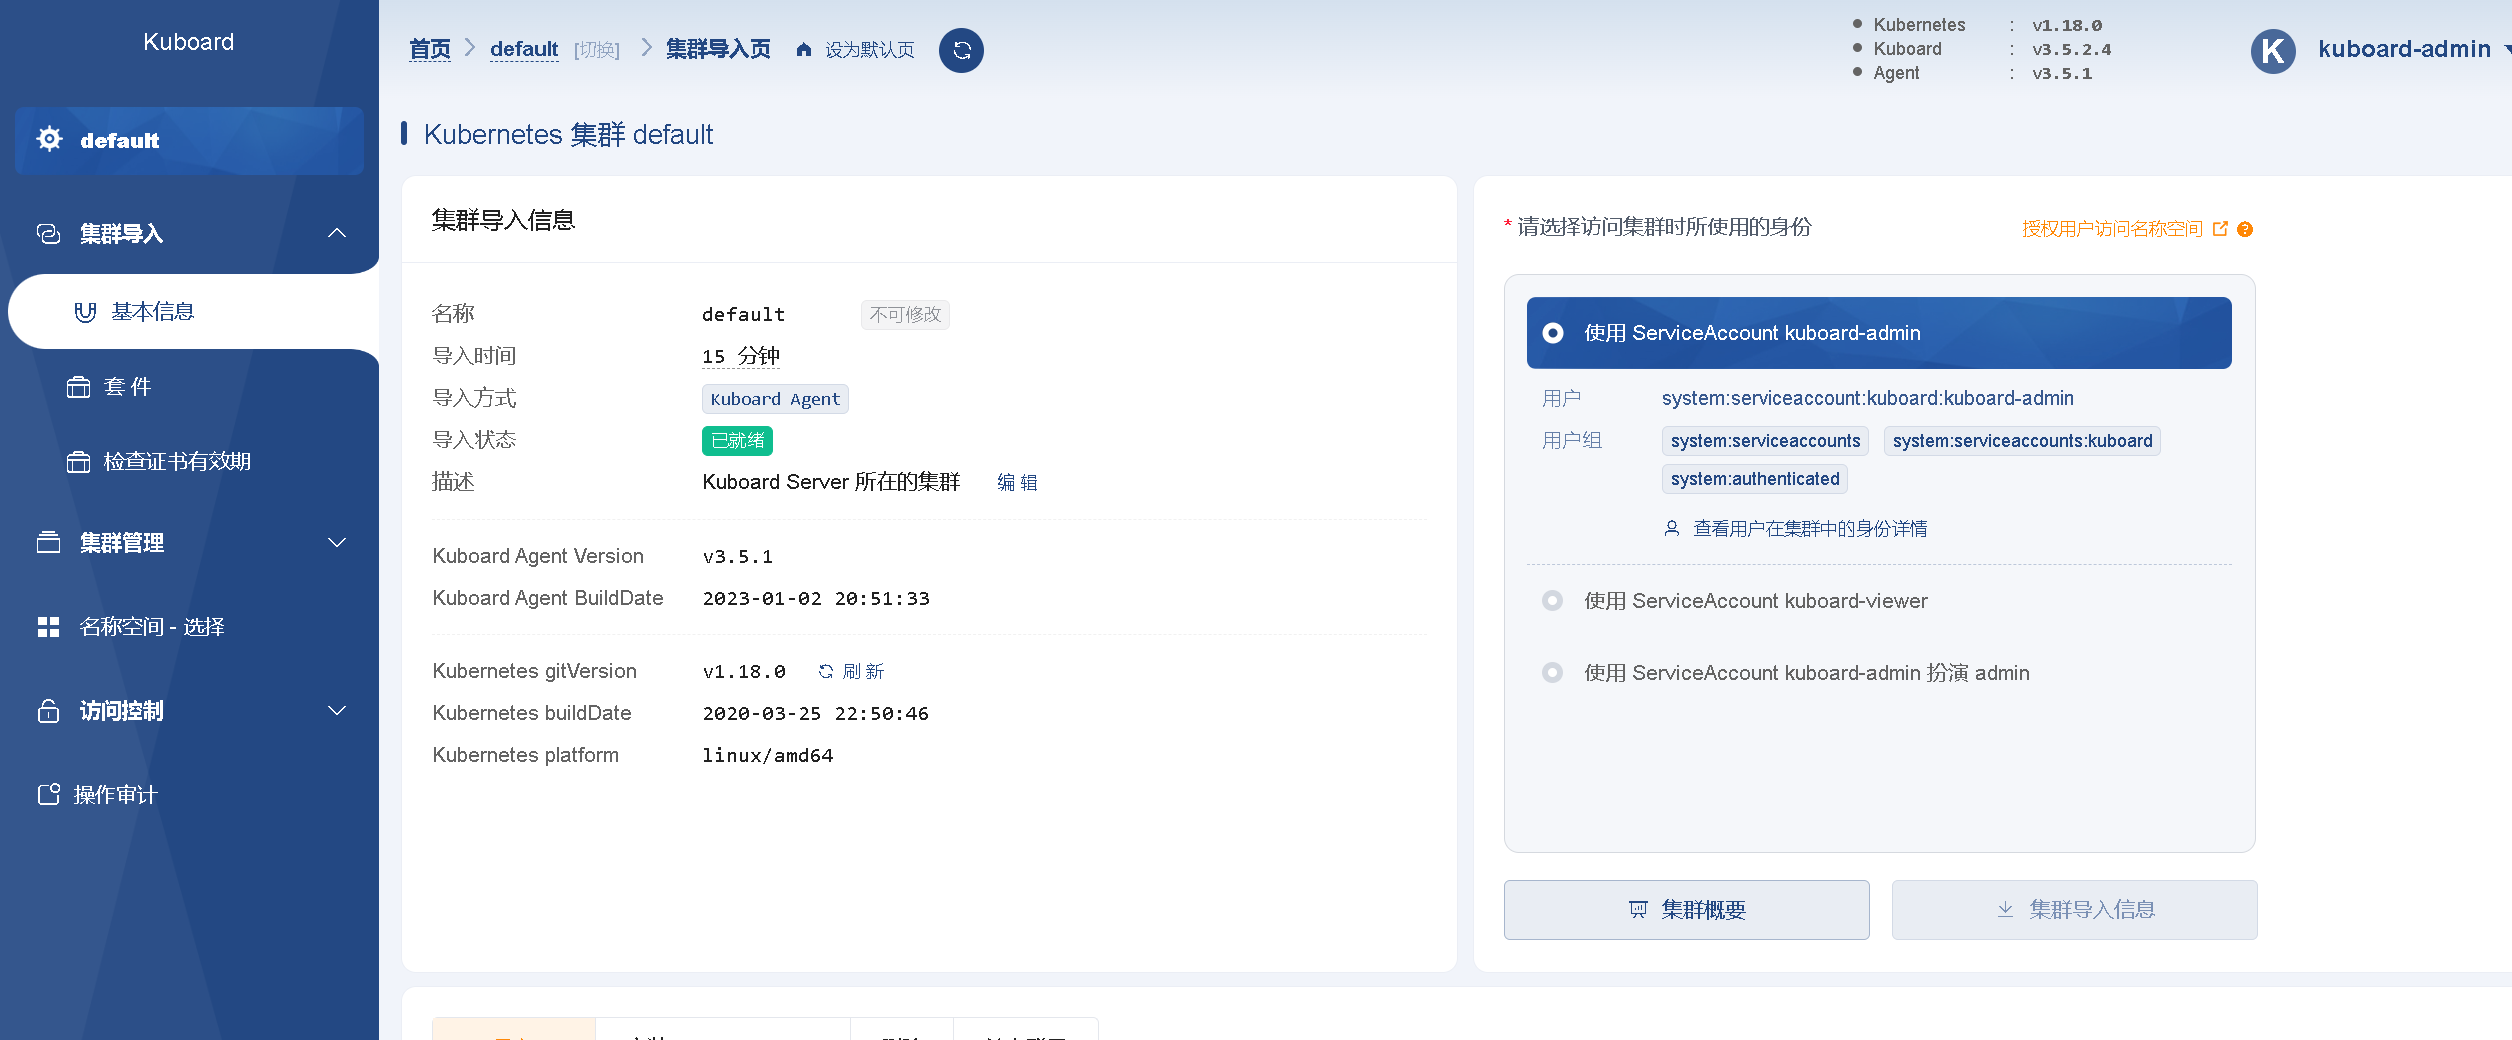
Click the default cluster and select the role used to access the cluster. Use admin directly here.
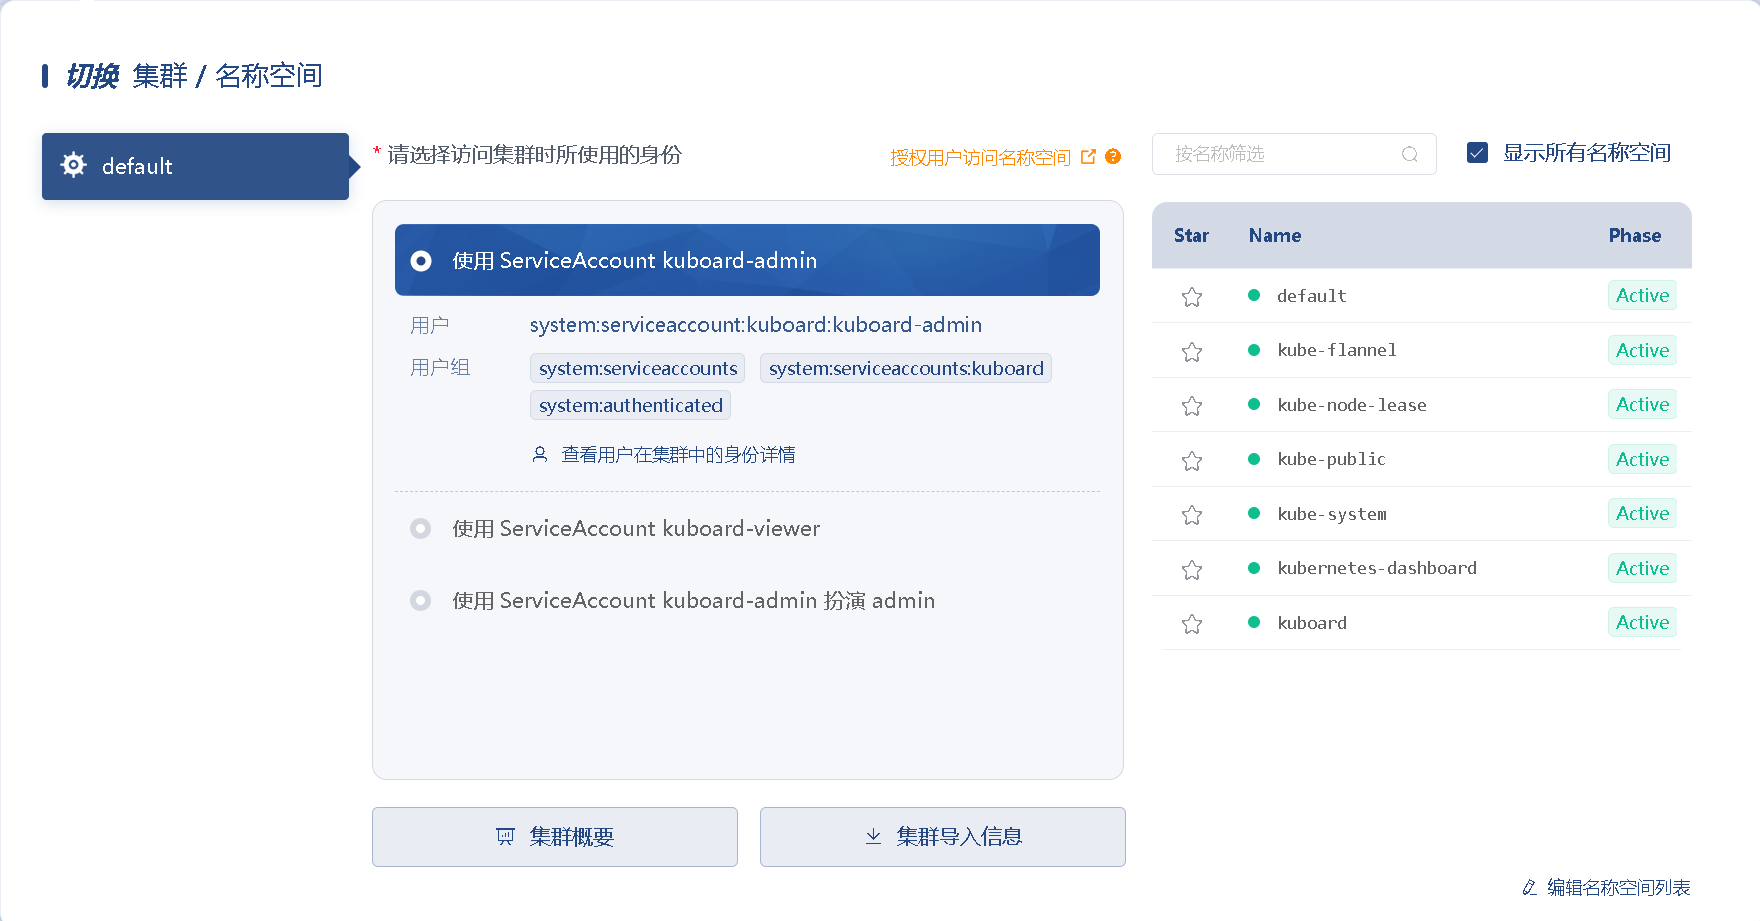
Cluster import information
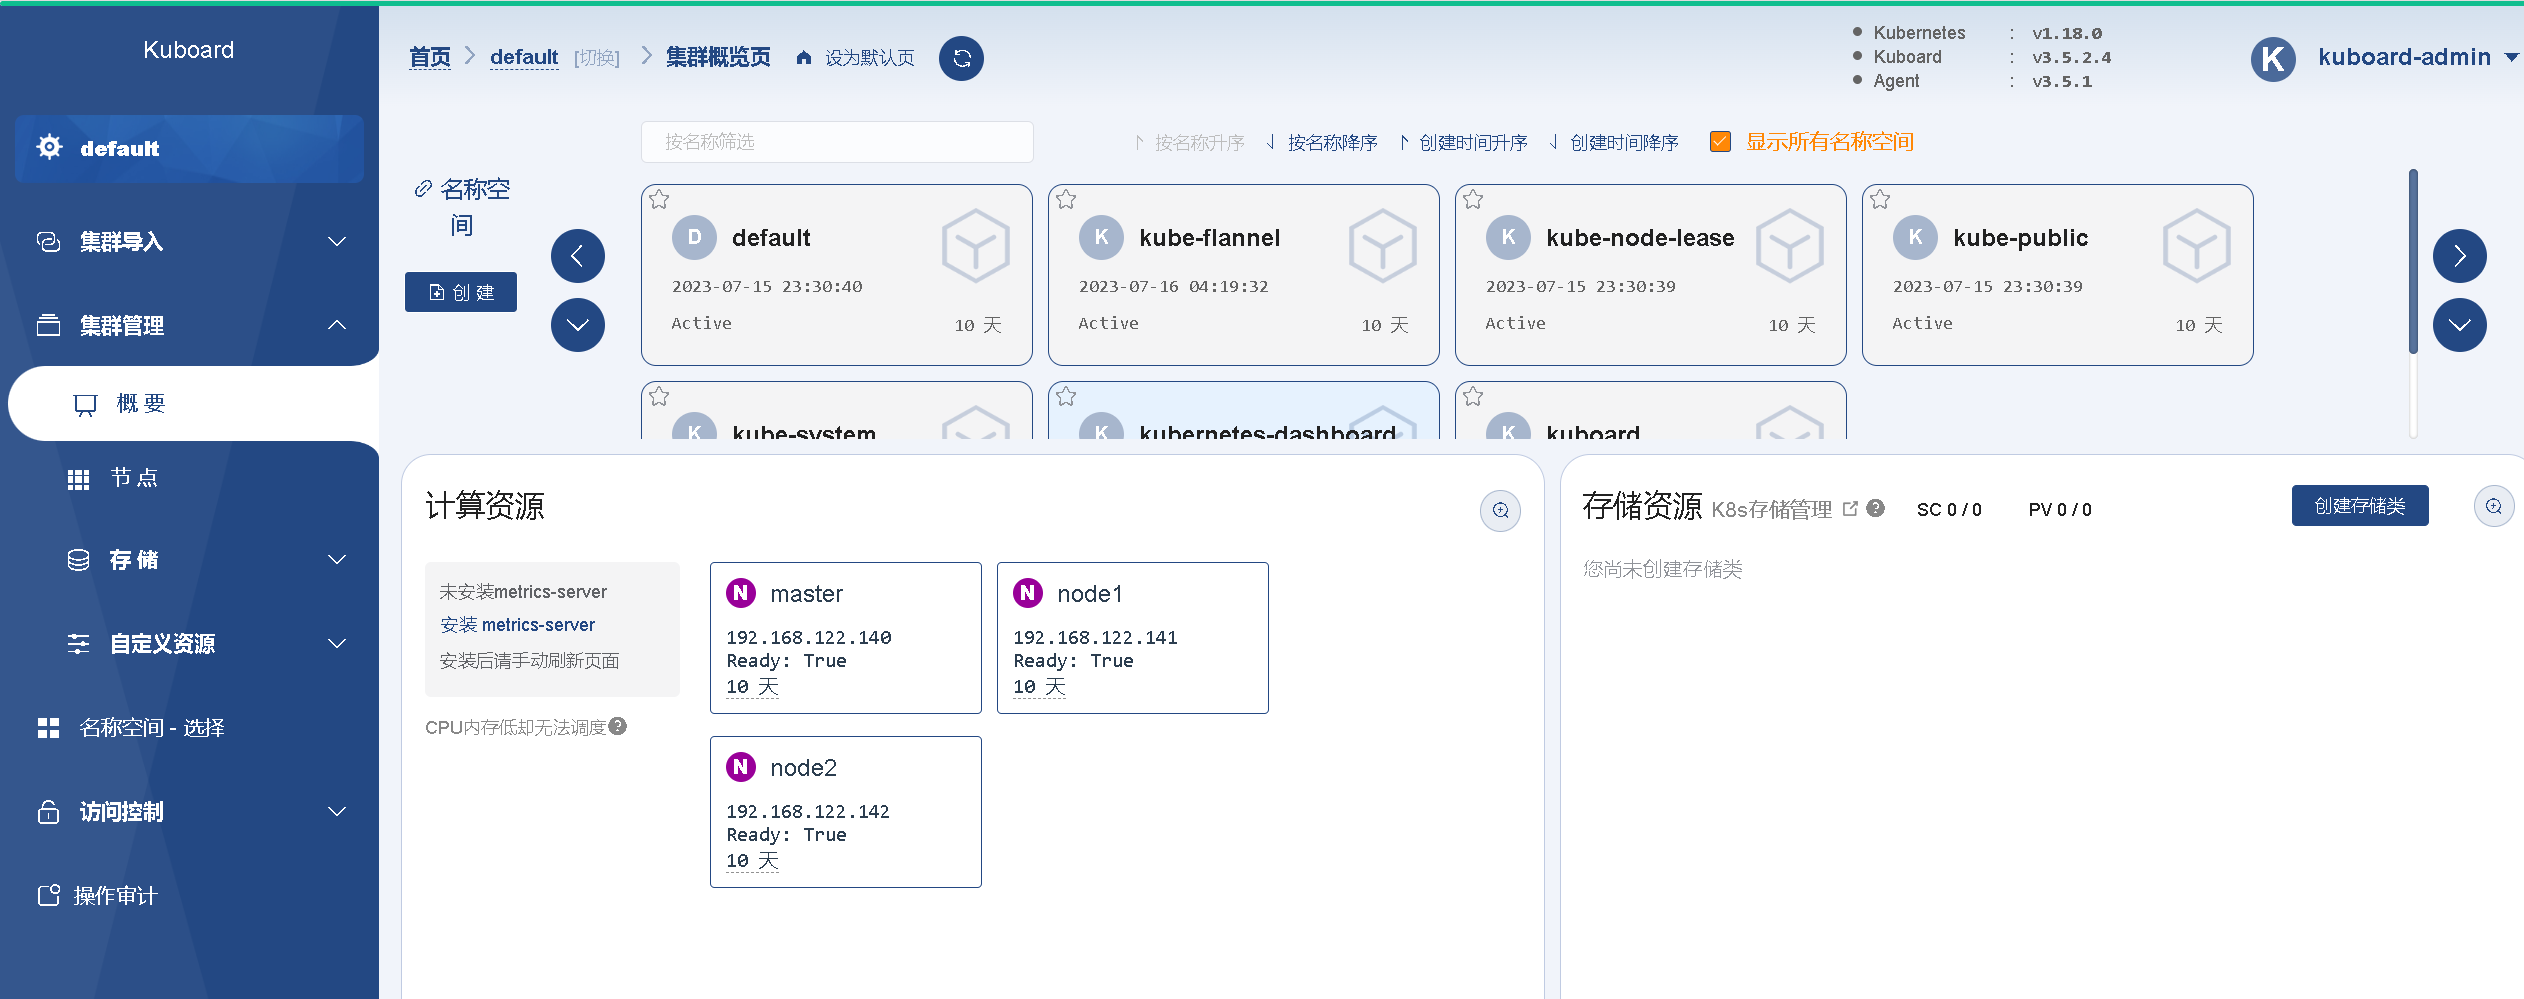
overview
View nodes
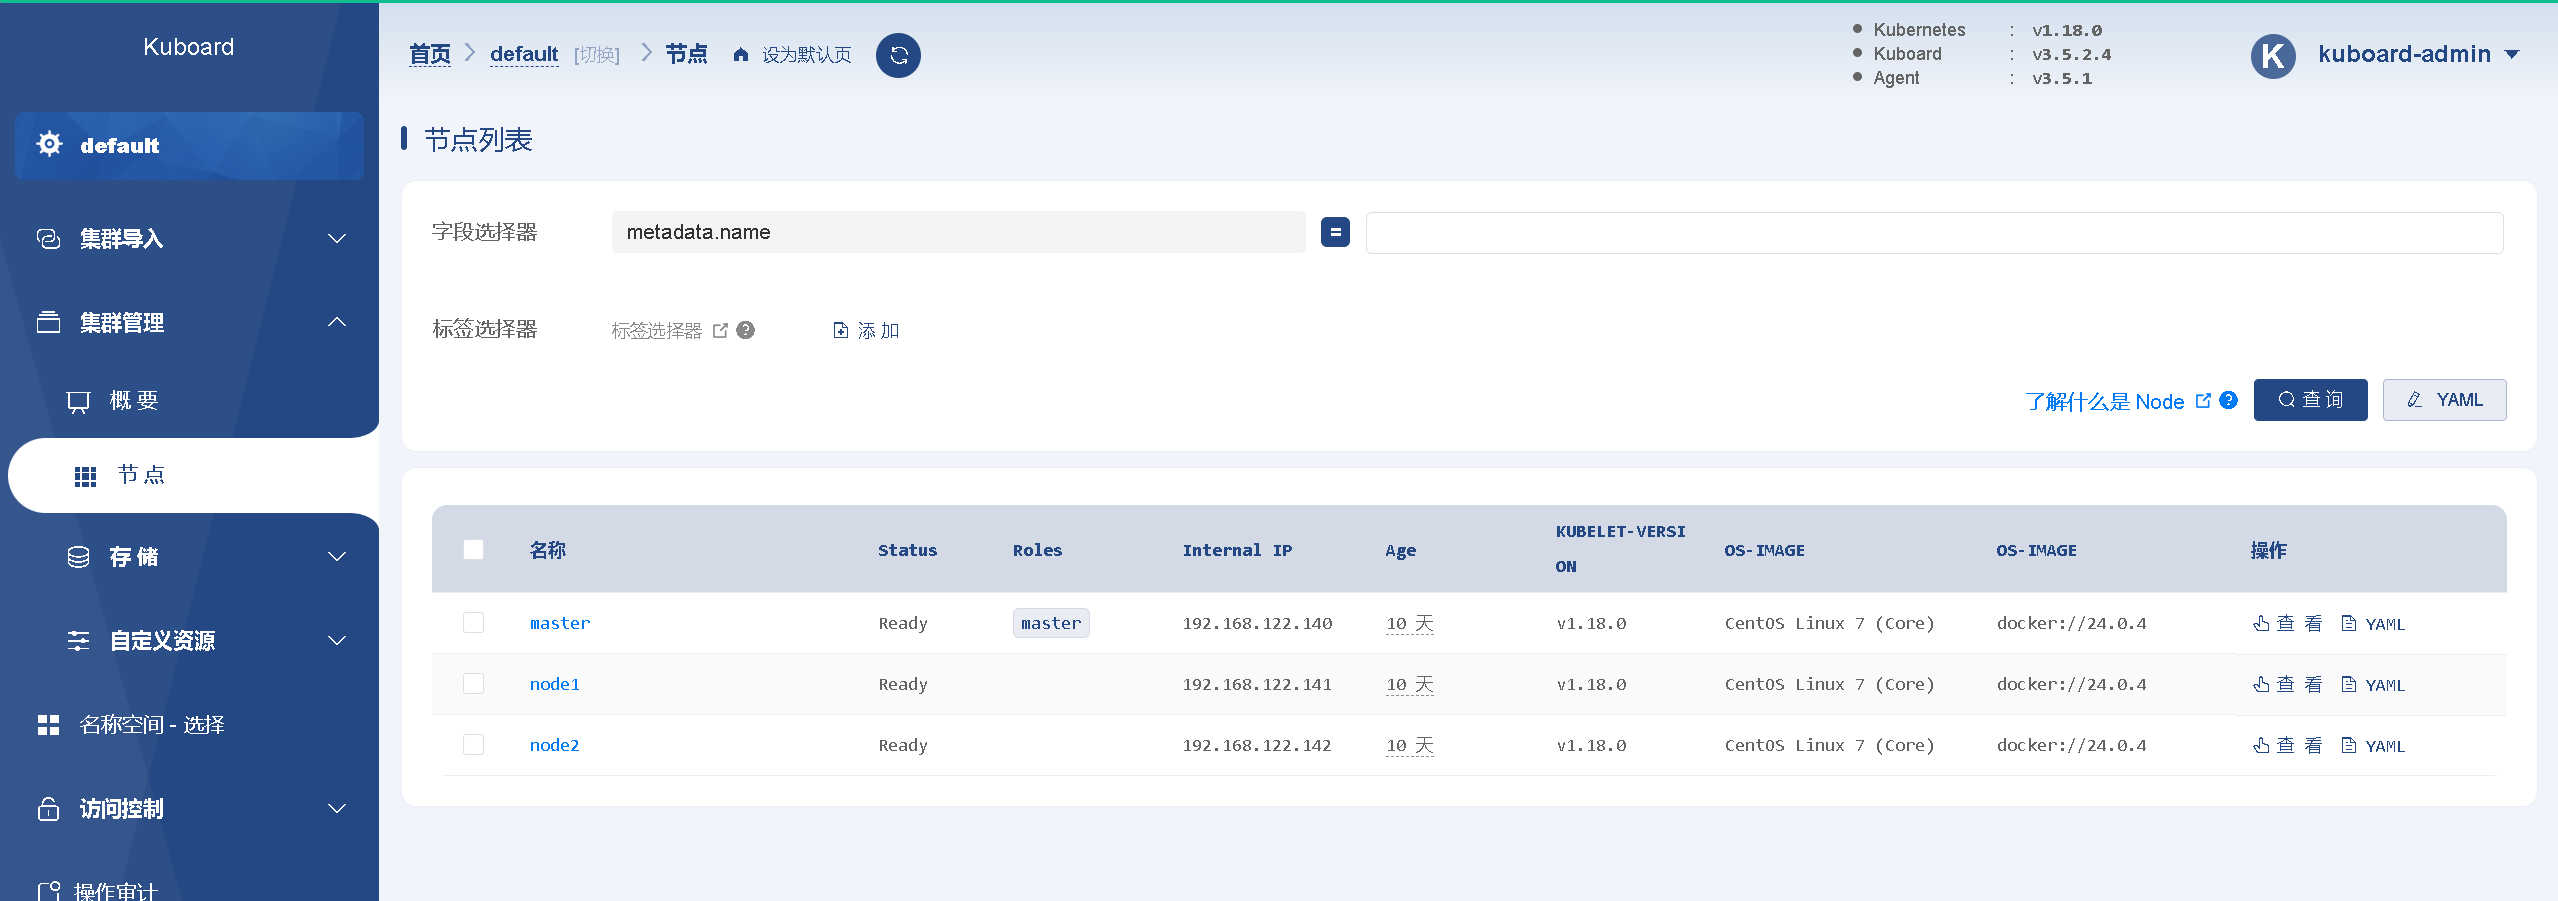
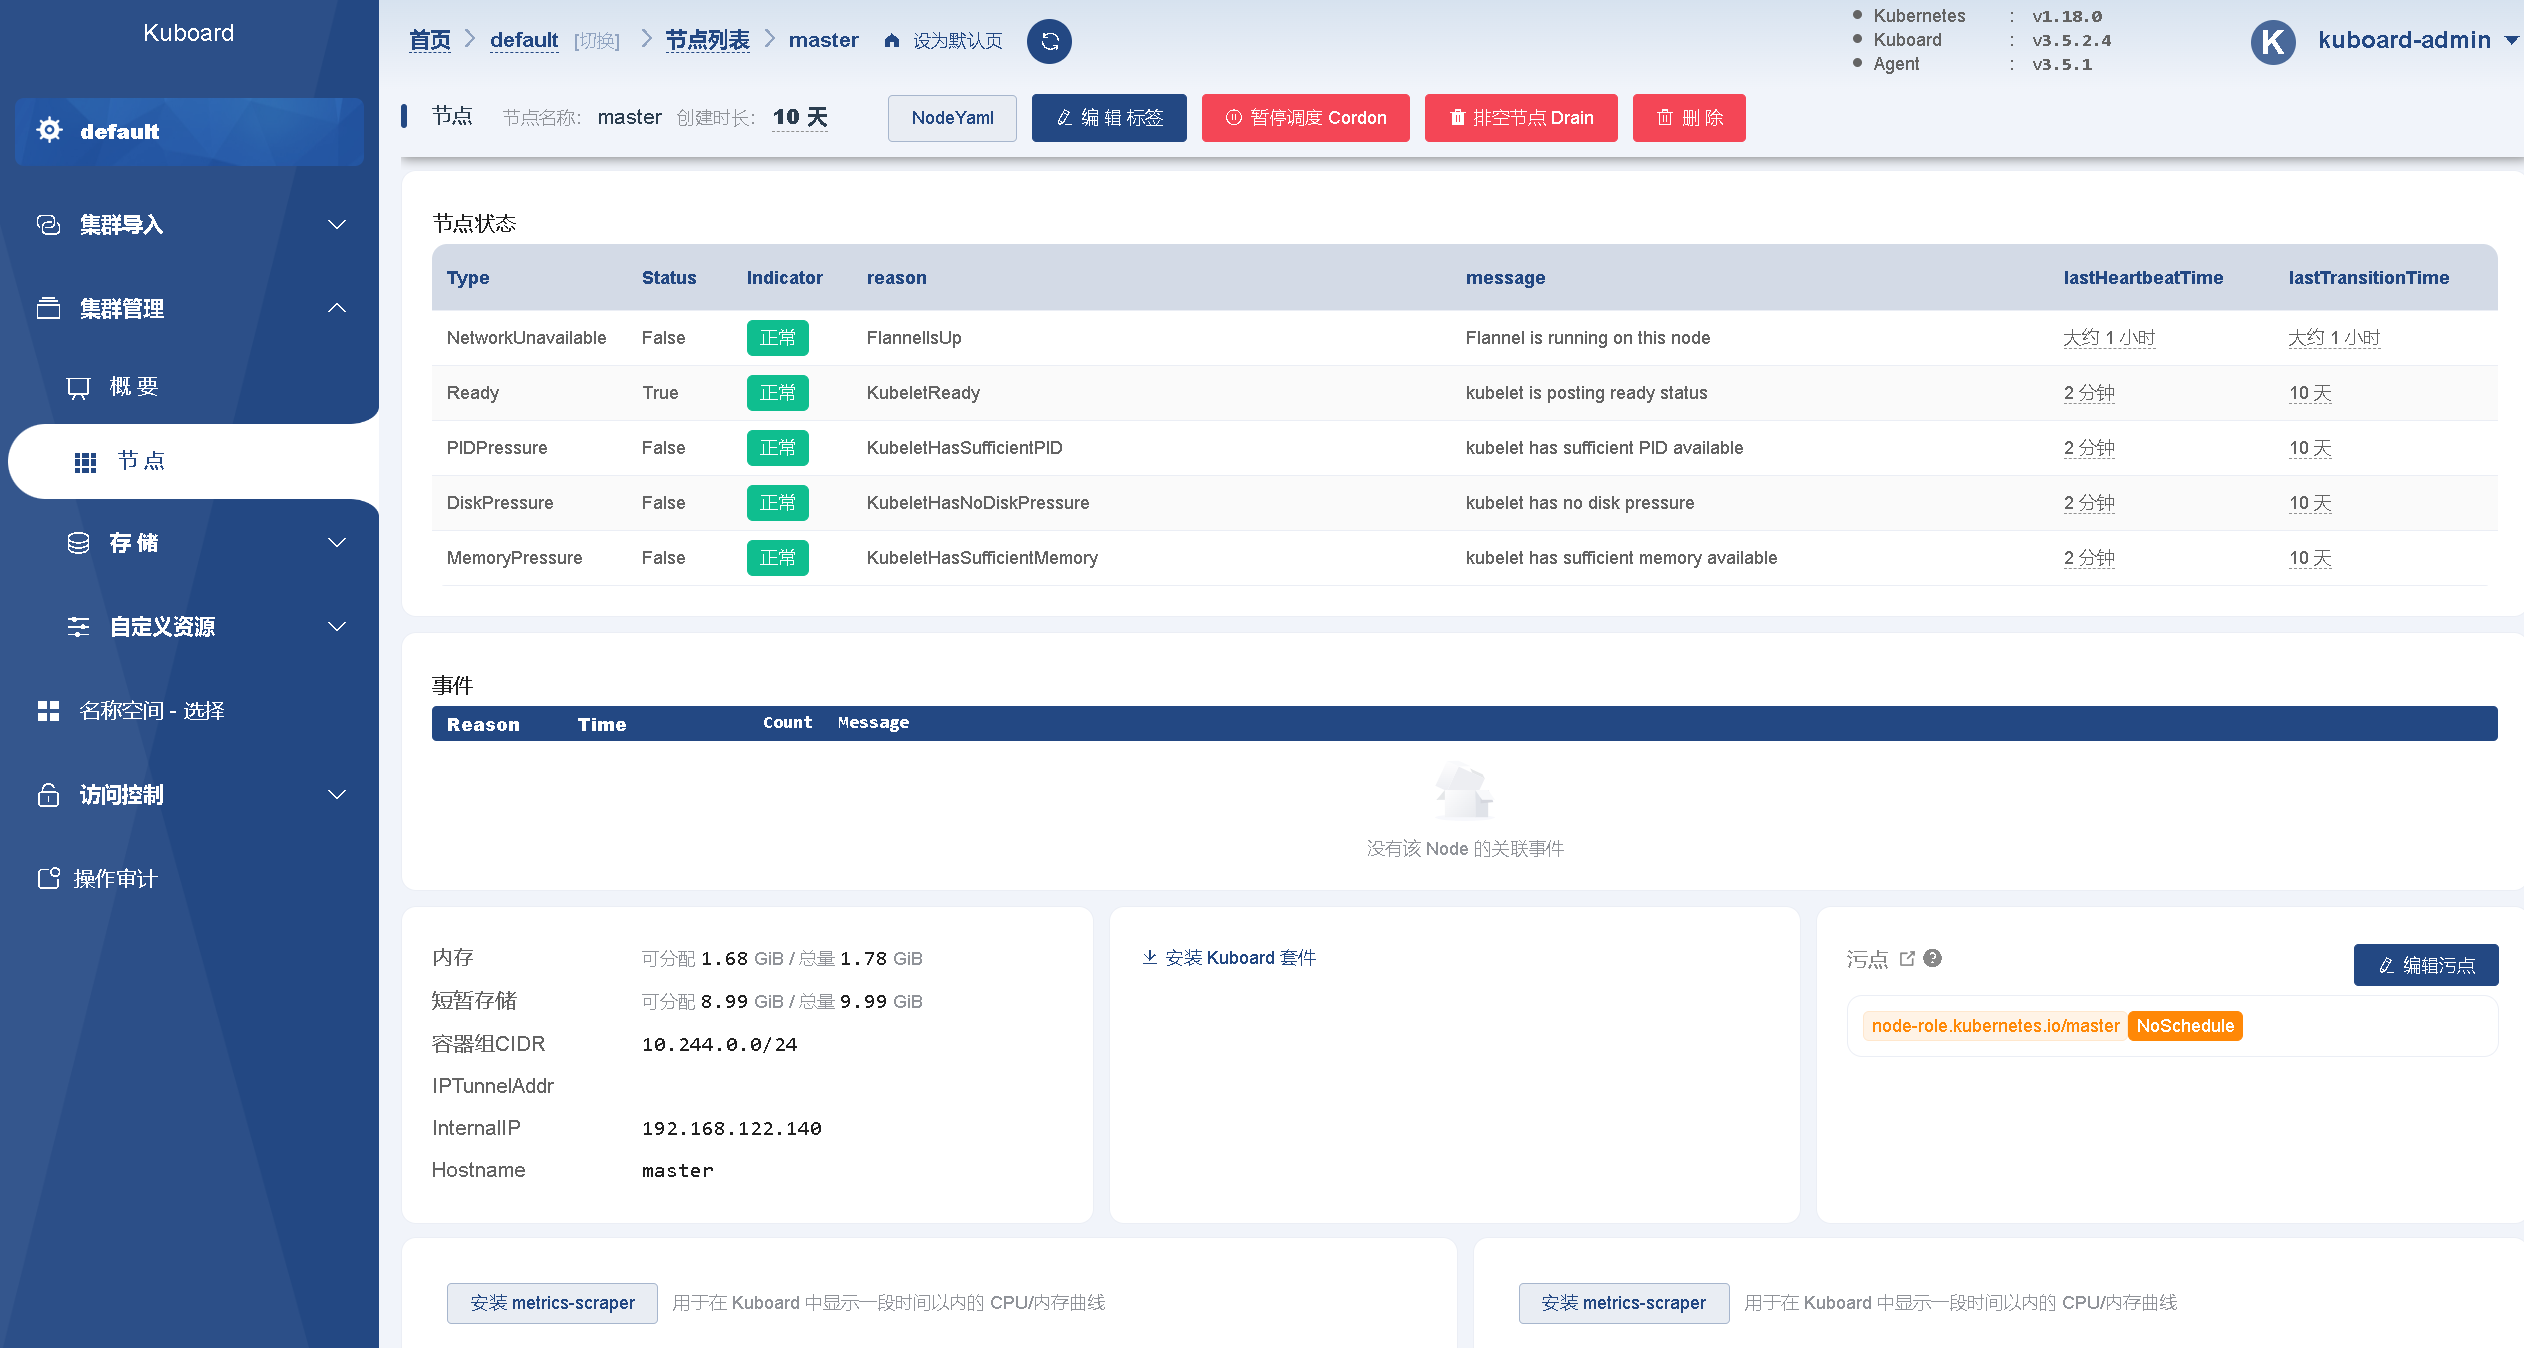
View master node