Getting started with K8s from scratch | In-depth analysis of Linux containers
https://www.kubernetes.org.cn/6202.html
Author | Tang Huamin (Huamin) Alibaba Cloud Container Platform Technical Expert
This article is compiled from Lecture 15 of "CNCF x Alibaba Cloud Native Technology Open Class".
Follow the "Alibaba Cloud Native" public account and reply to the keyword "Getting Started" to download the PPT of the K8s series of articles from scratch.
Introduction: Linux container is a lightweight virtualization technology, based on shared kernel, based on namespace and cgroup technology to achieve process resource isolation and limitation. This article will take docker as an example to introduce the basic knowledge of container images and container engines.
container
Containers are a lightweight virtualization technology because it has one less hypervisor layer than virtual machines. First look at the following picture, this picture briefly describes the startup process of a container.
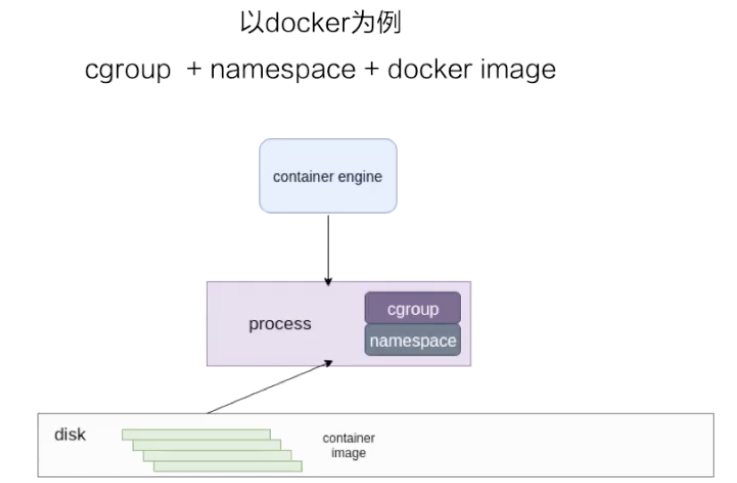
At the bottom is a disk, the container image is stored on the disk. The upper layer is a container engine. The container engine can be docker or other container engines. The engine sends a request, for example, to create a container, at this time it runs the container image on the disk as a process on the host machine.
For containers, the most important thing is how to ensure that the resources used by this process are isolated and restricted. On the Linux kernel, these two technologies are guaranteed by cgroup and namespace. Next, take docker as an example to introduce the content of resource isolation and container mirroring in detail.
1. Resource isolation and limitation
namespace
Namespace is used for resource isolation. There are seven types of namespace on the Linux kernel, and the first six types are used in docker. The seventh cgroup namespace is not used in docker itself, but the cgroup namespace is implemented in the runC implementation.

Let's take a look at it from the beginning:
- The first one is mout namespace. The mout namespace is to ensure that the file system view seen by the container is a file system provided by the container image, that is to say, it cannot see other files on the host machine, except for the mode that is bound by the -v parameter, it can be used Make some directories and files on the host visible in the container;
- The second one is uts namespace, which mainly isolates hostname and domain;
- The third is the pid namespace. This namespace ensures that the init process of the container is started by process No. 1.
- The fourth is the network namespace. In addition to the container network mode, all other network modes have their own network namespace file;
- The fifth is the user namespace. This namespace is a mapping that controls the user UID and GID inside the container and the host machine, but this namespace is used less;
- The sixth is the IPC namespace. This namespace is something that controls the process and communication, such as the semaphore;
- The seventh is the cgroup namespace. There are two schematic diagrams on the right side of the above figure, which are to open and close the cgroup namespace. One of the benefits of using cgroup namespace is that the cgroup view seen in the container is presented in the form of root. In this case, it is the same as the view of the cgroup namespace seen by the process on the host machine; another benefit is It will be safer to use cgroups inside the container.
Here we simply use unshare to sample the process of creating a namespace. The creation of the namespace in the container is actually created using the unshare system call.
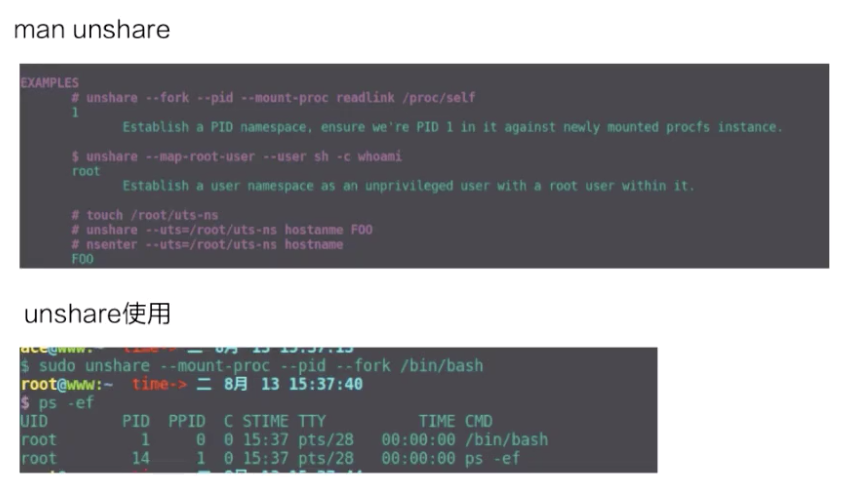
The upper part of the figure above is an example of the use of unshare, and the lower part is a pid namespace that I actually created with the unshare command. You can see that the bash process is already in a new pid namespace, and then ps sees that the bash pid is now 1, indicating that it is a new pid namespace.
cgroup
Two cgroup drivers
The cgroup is mainly used for resource limitation. The docker container has two cgroup drivers: one is systemd and the other is cgroupfs.

- cgroupfs is easier to understand. For example, how much memory should be limited and how much CPU share should be used? In fact, directly write the pid to a corresponding cgroup file, and then write the corresponding resources that need to be restricted to the corresponding memory cgroup file and CPU cgroup file.
- The other is a cgroup driver of systemd. This driver is because systemd itself can provide a cgroup management method. Therefore, if systemd is used as the cgroup driver, all cgroup write operations must be completed through the systemd interface, and the cgroup files cannot be changed manually.
Commonly used cgroups in containers
Next, take a look at the cgroups commonly used in containers. The Linux kernel itself provides a variety of cgroups, but the docker container uses only the following six types:
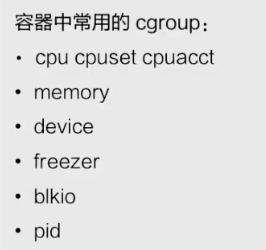
- The first is the CPU. The CPU generally sets cpu share and cupset to control the CPU usage;
- The second is memory, which controls the amount of process memory used;
- The third device, device controls the device device you can see in the container;
- The fourth freezer. It and the third cgroup (device) are for security. When you stop the container, freezer will write all the current processes to the cgroup, and then freeze all the processes. The purpose of this is to prevent you from doing forks when you stop. In this case, it is equivalent to prevent the process from escaping to the host machine, for security reasons;
- The fifth is blkio. Blkio mainly restricts some IOPS and bps rate limits of the disk used by the container. Because cgroup is not unique, blkio can only limit synchronous io, docker io has no way to limit;
- The sixth is the pid cgroup, which limits the maximum number of processes that can be used in the container.
Unused cgroup
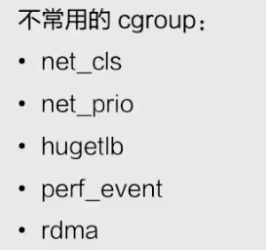
There is also a part of cgroups that are not used by docker containers. Containers are commonly used and not commonly used. This difference is for docker, because for runC, except for the bottom rdma, all cgroups are actually supported in runC, but docker does not enable this part of support , So the docker container does not support these cgroups as shown below.
Second, the container image
docker images
Next, let's talk about the container image. Take the docker image as an example to talk about the composition of the container image.
The docker image is based on the joint file system. Briefly describe the joint file system, which roughly means: it allows files to be stored at different levels, but in the end, you can see all files above these levels through a unified view.
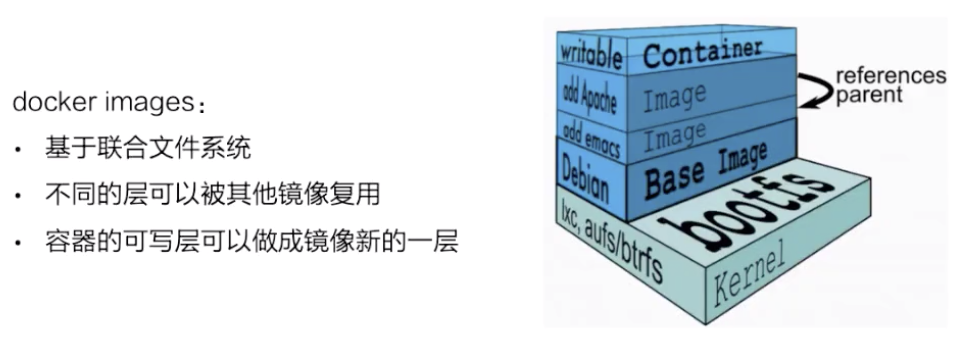
As shown in the figure above, the right side is a structural diagram of the container storage taken from the docker official website.
This picture very vividly shows the storage of docker, which is based on the joint file system and is layered. Each layer is a layer. These layers are composed of different files, which can be reused by other mirrors. As you can see, when the image is run as a container, the top layer will be a container's read-write layer. The read-write layer of this container can also use commit to turn it into the latest layer on the top level of a mirror.
The storage of the docker image is based on different file systems, so its storage driver is also customized for different file systems, such as AUFS, btrfs, devicemapper, and overlay. Docker makes some corresponding graph driver drivers for these file systems, and stores the image on the disk through these drivers.
Take overlay as an example
Storage process
Next, we take the overlay file system as an example to see how the docker image is stored on the disk.
First look at the following picture, which briefly describes the working principle of the overlay file system.

- The bottom layer is a lower layer, that is, the mirror layer, which is a read-only layer;
- The upper right layer is an upper layer. The upper layer is the read-write layer of the container. The upper layer uses a realistic copy mechanism, which means that only when certain files need to be modified, this file will be copied from the lower layer. The modification operation will modify the copy of the upper layer;
- There is a workdir in parallel, and its role is to act as an intermediate layer. In other words, when the copy in the upper layer is modified, it will be placed in the workdir first, and then moved from the workdir to the upper. This is the working mechanism of the overlay;
- At the top is mergedir, which is a unified view layer. From mergedir, you can see the integration of all data in upper and lower, and then we docker exec into the container, and see that a file system is actually a unified view layer of mergedir.
File operations
Next, we talk about how to operate on the files in the container based on the overlay storage.

First look at the read operation. When the container was first created, the upper part was actually empty. If you read it at this time, all the data is read from the lower layer.
As mentioned above, the upper layer of the overlay has a mechanism for realizing data. When some files need to be operated, the overlay will do a copy up action, and then the files will be copied from the lower layer. Some write changes will operate on this part.
Then look at the delete operation, there is no real delete operation in the overlay. Its so-called deletion is actually by marking the file, and then looking at the uppermost unified view layer. If you see this file if it is marked, it will display the file, and then think that the file is deleted. There are two ways to mark this:
- One is the whiteout method;
- The second is to delete the directory by setting an extended permission of the directory and setting extended parameters.
Steps
Next, let's take a look at the container that actually uses docker run to start the busybox. What does the overlay mount point look like?
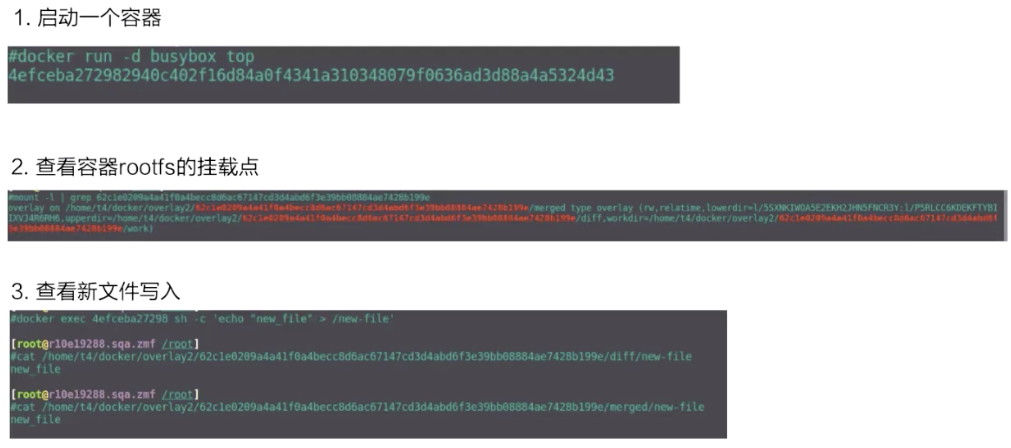
The second picture is mount, you can see a mount of the container rootfs, it is an overlay type as the mount. It includes three levels of upper, lower and workdir.
Then look at the writing of new files in the container. docker exec to create a new file, diff can be seen from above, it is an upperdir of it. Look at this file in the upperdir, and the contents of the file are also written by docker exec.
Finally, take a look at the bottom is mergedir, the contents of upperdir and lowerdir integrated in mergedir, you can also see the data we wrote.
3. Container Engine
Detailed containerd container architecture
Next, based on the containerd on a container engine of CNCF, let's talk about the general composition of the container engine. The following figure is an architecture diagram taken from the official website of containerd. Based on this architecture diagram, a brief introduction to the architecture of containerd is first introduced.

If the above picture is divided into left and right sides, containerd can be considered to provide two major functions.
The first is the management of the runtime, that is, the life cycle of the container. The storage part on the left is actually the management of an image storage. containerd will be responsible for the storage of pulls and images.
In terms of levels:
- The first layer is GRPC. For the upper layer, containerd provides services to the upper layer through GRPC serve. Metrics This section mainly provides some content of cgroup Metrics;
- The left side of the layer below is a storage of the container image. The midline images and containers are below Metadata. This part of Metadata is stored on the disk through bootfs. The Tasks on the right is the container structure that manages the container. Events is that some operations on the container will have an Event sent to the upper layer, and then the upper layer can subscribe to this Event, thus knowing what has changed in the container state;
- The bottom layer is the Runtimes layer. The Runtimes can be distinguished by type, such as runC or a secure container.
What is shim v1 / v2
Next, let's talk about the general architecture of containerd on the runtime side. The following picture is taken from the kata official website, the upper part is the original picture, and some expanded examples are added in the lower part. Based on this picture, let's take a look at the architecture of containerd at runtime.
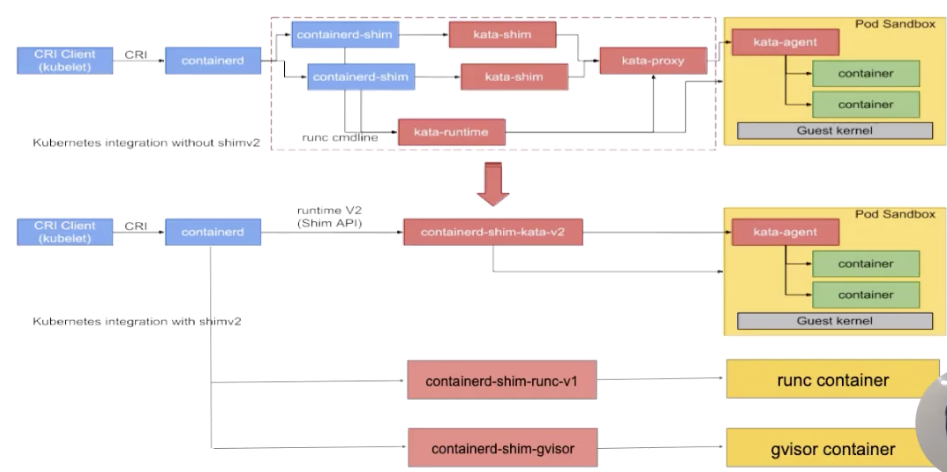
As shown in the figure: according to a sequence from left to right, a process running from the upper layer to the final runtime.
Let's take a look at the far left first, which is a CRI Client. Generally, kubelet sends a request to containerd through a CRI request. After containerd receives the container request, it will go through a containerd shim. The containerd shim manages the container life cycle, it is mainly responsible for two aspects:
- The first is that it will forward io;
- The second is that it passes signals.
The upper part of the figure draws a secure container, that is, a process of kata, this will not be expanded in detail. In the second half, you can see that there are different kinds of shim. The following introduces the structure of containerd shim.
At the beginning, there was only one shim in containerd, which is the containerd-shim framed by the blue box. What this process means is that whether it is a kata container, a runc container or a gvisor container, the shim used above is all containerd.
Later on, containerd made an extension for different types of runtime. This extension is done through the shim-v2 interface, which means that as long as the shim-v2 interface is implemented, different shim can be customized for different runtimes. For example: runC can make a shim by itself, called shim-runc; gvisor can make a shim by itself called shim-gvisor; like kata above, you can also make a shim-kata shim by yourself. These shim can replace the containerd-shim in the blue box above.
There are many advantages to doing so, give a more vivid example. You can take a look at this picture of kata. If it used shim-v1, there are actually three components. The reason why there are three components is because of a limitation of kata itself, but after using the shim-v2 architecture, the three components It can be made into a binary, that is, the original three components, and now it can be turned into a shim-kata component, which can reflect a benefit of shim-v2.
Detailed explanation of containerd container architecture-container process example
Next, we use two examples to explain in detail how the container process works. The following two figures are a container workflow based on the containerd architecture.
start process
First look at the process of container start:
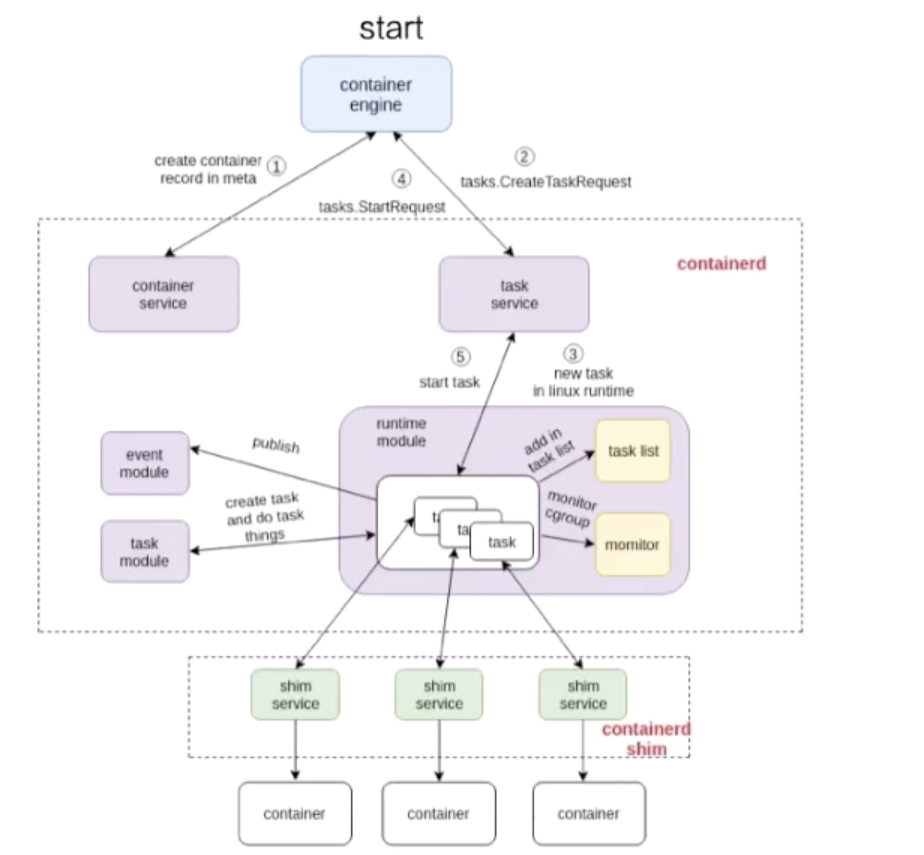
This picture consists of three parts:
- The first part is the container engine part. The container engine can be docker or other;
- Containerd and containerd-shim framed by two dashed boxes, both of which are part of the containerd architecture;
- The bottom part is the container part. This part is pulled up by a runtime, which can be considered as a container created by shim to operate the runC command.
Let's take a look at how this process works. The figures also indicate 1, 2, 3, and 4. This 1, 2, 3, 4 is how containerd creates a container.
First, it will create a matadata, and then it will send a request to the task service to create a container. Through a series of components in the middle, the request is finally sent to a shim. The interaction between containerd and shim is actually through GRPC. After containerd sends the creation request to shim, shim will call runtime to create a container. The above is an example of container start.
exec process
Next, see how this picture goes to exec a container.
It is very similar to the start process, and the structure is probably the same. The different part is actually how containerd handles this part of the process. Like the above figure, I also marked 1, 2, 3, 4 in the figure, these steps represent a sequence of containerd to do exec.
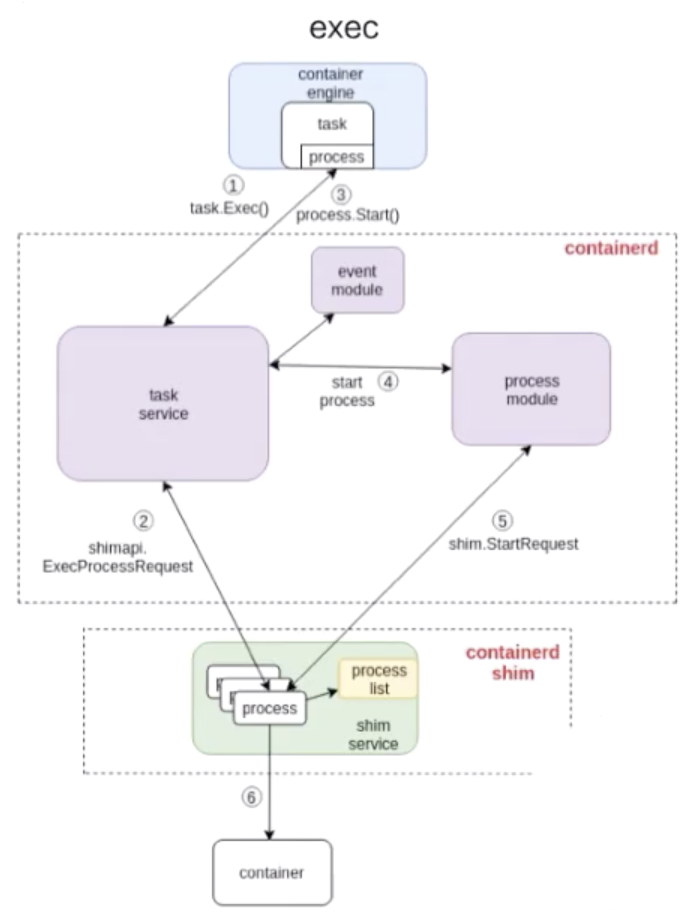
As can be seen from the above figure: the operation of exec is still sent to containerd-shim. For containers, there is no essential difference between starting a container and exec a container.
The final difference is nothing more than whether to create a namespace for the processes running in the container.
- When exec, you need to add this process to an existing namespace;
- When starting, the namespace of the container process needs to be created specifically.
This article summarizes
Finally, I hope that after reading this article, you will have a deeper understanding of Linux containers. Here is a brief summary for everyone:
- How containers use namespace for resource isolation and cgroup for resource limitation;
- Briefly introduced the container image storage based on the overlay file system;
- Take docker + containerd as an example to introduce how the container engine works.
"Alibaba Cloud Native WeChat Public Account (ID: Alicloudnative) focuses on the technical fields of microservices, serverless, containers, service mesh, etc., focuses on cloud native popular technology trends, and cloud native large-scale landing practices. Technical public account. "