Black Synology driver installation tool download:
Link: https://pan.baidu.com/s/1CMLl6waOuW-Ys2gKZx7Jgg?pwd=chct
Extraction code: chct
1. Enable NVME cache
Check the "Enable SSH" function in Synology->Control Panel->Terminal and SNMP->Terminal, and click Apply;
Download and install Putty, download link: https://www.putty.org/, or download it from the link at the beginning of this article. Open the software Host Name and enter your Qunhui IP (without ":5000"), if the Port has not been modified, the default is 22. Then click open.

The first time you open it, a window will pop up and click accept, then enter your Qunhui user name in the window "login as" that appears, and then enter your password in "password:", which is invisible here After inputting the result, press Enter after inputting.
Check the name of nvme:
ls /dev/nvme*If one is inserted, it will generally display /dev/nvme0n1, and if there are two, it will also display /dev/nvme1n1.
View the ID of the nvme hard disk:
udevadm info /dev/nvme0n1At this time, on the first line, it will display P:/devices/pci0000:00/0000:00:1b:0/..., where 0000:00:1b:0 after pci0000:00 is the location of the nvme hard disk. This string of location data needs to be recorded. If there are two hard disks, change /dev/nvme0n1 in the above command to /dev/nvme1n1 to get the location of another nvme hard disk.
Back up the original file:
sudo -i
cp /lib64/libsynonvme.so.1 /lib64/libsynonvme.so.1.bak
Copy the original file to the downloadable storage space ( where XXX is any folder in your volume1 ):
cp /lib64/libsynonvme.so.1 /volume1/XXX/libsynonvme.so.1Access the NAS with a computer and download libsynonvme.so.1 from the XXX folder . Use winhex to open the downloaded libsynonvme.so.1, click crtl+F to search for DS918, as shown in the figure:

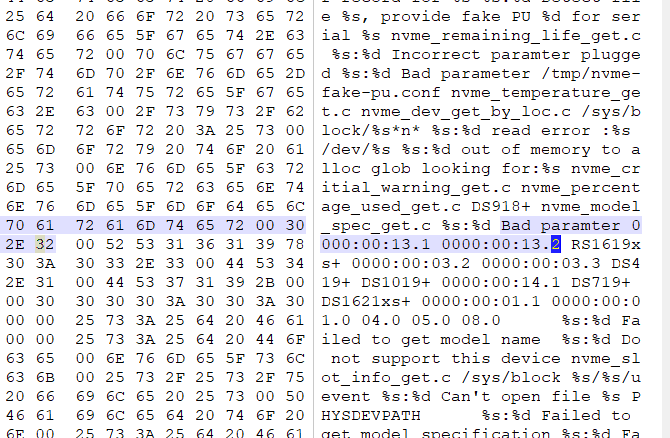
bad paramter后面的0000:00:13:1和0000:0013.2就是对应记录nvme硬盘位置的数据,两个位置可以将其改为你记录的nvme硬盘位置信息,如果只插了一个nvme只修改其中之一即可。
删除群晖系统原文件:
rm /lib64/libsynonvme.so.1把修改好的文件复制到系统:
cp /volume1/Download/libsynonvme.so.1 /lib64/libsynonvme.so.1修改文件权限:
chmod 644 /lib64/libsynonvme.so.1重启系统,在存储管理器就可以看到nvme硬盘了。
二、NVME硬盘做存储
在存储管理器可以看到nvme的硬盘信息后,进行如下操作,以使nvme硬盘作为存储盘。
查看Nvme信息:
ls /dev/nvme*查看磁盘信息,下面以第一个nvme硬盘为例:
sudo -i
fdisk -l /dev/nvme0n1
创建分区:
synopartition --part /dev/nvme0n1 12查看创建的分区布局:
fdisk -l /dev/nvme0n1应该为/dev/nvme0n1p1、/dev/nvme0n1p2、/dev/nvme0n1p3三个分区,查看最大内存分区的名称,一般为/dev/nvme0n1p3。
查看当前存储池:
cat /proc/mdstat其中md0是系统分区,而md1是系统交换,如果你现在已经有存储池,那么可能还有md2...。
比如我现在有一个存储池那么这里最大的就是md2,则接下来nvme创建的存储池应该为md2+1,即md3。
为nvme创建basic的磁盘阵列:
mdadm --create /dev/md3 --level=1 --raid-devices=1 --force /dev/nvme0n1p3输入y后,再继续格式化存储池为btrfs
mkfs.btrfs -f /dev/md3如果想格式化为ext4,则进行命令为:mkfs.ext4 -F /dev/md3
重启群晖系统,打开存储管理器,点击在线重组即可。