The original text was first published on the WeChat public account: Gongxingzhi (jzman-blog)
The use of cache in Android is relatively common. Using the corresponding caching strategy can reduce the consumption of traffic, and can also improve the performance of the application to a certain extent. For example, when loading network pictures, you should not load pictures from the network every time. It is cached in memory and disk, and it will be directly obtained from memory or disk next time. The cache strategy generally uses the LRU (Least Recently Used) algorithm, which is the least recently used algorithm. The following will take pictures from memory cache and disk cache. The example shows how to use cache in Android. Before reading this article, please read the previous article:
Memory cache
LruCache is a cache class provided by Android 3.1. Through this class, you can quickly access the cached Bitmap object. A LinkedHashMap is used internally to store the Bitmap object that needs to be cached by a strong reference. When the cache exceeds the specified size, the recently used rarely released The memory occupied by the object.
Note : Before Android 3.1, a common memory cache was a SoftReference or WeakReference bitmap cache, which is no longer recommended. After Android 3.1, the garbage collector pays more attention to the recovery of SoftWeakference / WeakReference, which makes the use of this way to achieve cache to a great extent invalid, using LruCache in the support-v4 compatibility package can be compatible with versions before Android 3.1.
Use of LruCache
- Initialize LruCache
First calculate the required cache size, as follows:
//第一种方式:
ActivityManager manager = (ActivityManager) getSystemService(ACTIVITY_SERVICE);
//获取当前硬件条件下应用所占的大致内存大小,单位为M
int memorySize = manager.getMemoryClass();//M
int cacheSize = memorySize/ 8;
//第二种方式(比较常用)
int memorySize = (int) Runtime.getRuntime().maxMemory();//bytes
int cacheSize = memorySize / 8;
Then, initialize LruCache as follows:
//初始化 LruCache 且设置了缓存大小
LruCache<String, Bitmap> lruCache = new LruCache<String, Bitmap>(cacheSize){
    @Override
    protected int sizeOf(String key, Bitmap value) {
        //计算每一个缓存Bitmap的所占内存的大小,内存单位应该和 cacheSize 的单位保持一致
        return value.getByteCount();
    }
};
- Add Bitmap object to LruCache
//参数put(String key,Bitmap bitmap)
lruCache.put(key,bitmap)
- Get the picture in the cache and display it
//参数get(String key)
Bitmap bitmap = lruCache.get(key);
imageView.setImageBitmap(bitmap);
The following uses LruCache to load a network picture to demonstrate the simple use of LruCache.
Load web image
Create a simple ImageLoader, which encapsulates the methods of obtaining the cached Bitmap, adding the Bitmap to the cache, and removing the Bitmap from the cache, as follows:
//ImageLoader
public class ImageLoader {
    private LruCache<String , Bitmap> lruCache;
    public ImageLoader() {
        int memorySize = (int) Runtime.getRuntime().maxMemory() / 1024;

        int cacheSize = memorySize / 8;
        lruCache = new LruCache<String, Bitmap>(cacheSize){
            @Override
            protected int sizeOf(String key, Bitmap value) {
                //计算每一个缓存Bitmap的所占内存的大小
                return value.getByteCount()/1024;
            }
        };
    }

    /**
     * 添加Bitmapd到LruCache中
     * @param key
     * @param bitmap
     */
    public void addBitmapToLruCache(String key, Bitmap bitmap){
        if (getBitmapFromLruCache(key)==null){
            lruCache.put(key,bitmap);
        }
    }

    /**
     * 获取缓存的Bitmap
     * @param key
     */
    public Bitmap getBitmapFromLruCache(String key){
        if (key!=null){
            return lruCache.get(key);
        }
        return null;
    }

    /**
     * 移出缓存
     * @param key
     */
    public void removeBitmapFromLruCache(String key){
        if (key!=null){
            lruCache.remove(key);
        }
    }
}
Then create a thread class for loading pictures, as follows:
//加载图片的线程
public class LoadImageThread extends Thread {
    private Activity mActivity;
    private String mImageUrl;
    private ImageLoader mImageLoader;
    private ImageView mImageView;

    public LoadImageThread(Activity activity,ImageLoader imageLoader, ImageView imageView,String imageUrl) {
        this.mActivity = activity;
        this.mImageLoader = imageLoader;
        this.mImageView = imageView;
        this.mImageUrl = imageUrl;
    }

    @Override
    public void run() {
        HttpURLConnection connection = null;
        InputStream is = null;
        try {
            URL url = new URL(mImageUrl);
            connection = (HttpURLConnection) url.openConnection();
            is = connection.getInputStream();
            if (connection.getResponseCode() == HttpURLConnection.HTTP_OK){
                final Bitmap bitmap = BitmapFactory.decodeStream(is);
                mImageLoader.addBitmapToLruCache("bitmap",bitmap);
                mActivity.runOnUiThread(new Runnable() {
                    @Override
                    public void run() {
                        mImageView.setImageBitmap(bitmap);
                    }
                });
            }
        } catch (IOException e) {
            e.printStackTrace();
        } finally {
            if (connection!=null){
                connection.disconnect();
            }
            if (is!=null){
                try {
                    is.close();
                } catch (IOException e) {
                    e.printStackTrace();
                }
            }
        }
    }
}
Then, use ImageLoader in MainActivity to load and cache the network image into the memory, first get it from the memory, if there is no needed Bitmap in the cache, then get the image from the network and add it to the cache, once you exit the application during use, the system The memory will be released, the key methods are as follows:
//获取图片
private void loadImage(){
    Bitmap bitmap = imageLoader.getBitmapFromLruCache("bitmap");
   if (bitmap==null){
       Log.i(TAG,"从网络获取图片");
       new LoadImageThread(this,imageLoader,imageView,url).start();
   }else{
       Log.i(TAG,"从缓存中获取图片");
       imageView.setImageBitmap(bitmap);
   }
}

// 移出缓存
private void removeBitmapFromL(String key){
    imageLoader.removeBitmapFromLruCache(key);
}
Then call the above method to get the picture and remove it from the cache in the corresponding event, as follows:
@Override
public void onClick(View v) {
    switch (v.getId()){
        case R.id.btnLoadLruCache:
            loadImage();
            break;
        case R.id.btnRemoveBitmapL:
            removeBitmapFromL("bitmap");
            break;
    }
}
The following is a log screenshot to illustrate the implementation:
Disk cache
Disk caching refers to writing cache objects to the file system. Using disk caching can help reduce loading time when the memory cache is unavailable. Obtaining pictures from the disk cache is slower than fetching from the cache. Processing; Disk Cache uses a DiskLruCache class to implement disk caching. DiskLruCache has been officially recommended by Google. DiskLruCache is not part of the Android SDK. First, paste a DiskLruCache source link to the
DiskLruCache source address .
Creation of DiskLruCache
The construction method of DiskLruCache is private, so it cannot be used to create DiskLruCache. It provides an open method for creating itself, as follows:
/**
 * 返回相应目录中的缓存,如果不存在则创建
 * @param directory 缓存目录
 * @param appVersion 表示应用的版本号,一般设为1
 * @param valueCount 每个Key所对应的Value的数量,一般设为1
 * @param maxSize 缓存大小
 * @throws IOException if reading or writing the cache directory fails
 */
public static DiskLruCache open(File directory, int appVersion, int valueCount, long maxSize)
        throws IOException {
    ...
    // 创建DiskLruCache
    DiskLruCache cache = new DiskLruCache(directory, appVersion, valueCount, maxSize);
    if (cache.journalFile.exists()) {
        ...
        return cache;
    }
    //如果缓存目录不存在,创建缓存目录以及DiskLruCache
    directory.mkdirs();
    cache = new DiskLruCache(directory, appVersion, valueCount, maxSize);
    ...
    return cache;
}
Note : The cache directory can select the cache directory on the SD card, and / sdcard / Android / data / application package name / cache directory, you can also select the cache directory under the current application data, of course, you can specify another directory, if the application is uninstalled If you want to delete the cache file, select the cache directory on the SD card. If you want to keep the data, please choose another directory. If there is a memory cache, the cache will be cleared after exiting the application.
DiskLruCache cache addition
The addition of the DiskLruCache cache is done through the Editor. The Editor represents an edited object of the cache object. You can obtain the corresponding Editor object through its edit (String key) method. If the Editor is using the edit (String key) method, it returns null. That is, DiskLruCache is not allowed to operate the same cache object at the same time. Of course, the cache is added through a unique key, so what is more convenient as a key, taking the picture as an example, generally speaking, the MD5 value of the url is used as the key, and the calculation method is as follows:
//计算url的MD5值作为key
private String hashKeyForDisk(String url) {
    String cacheKey;
    try {
        final MessageDigest mDigest = MessageDigest.getInstance("MD5");
        mDigest.update(url.getBytes());
        cacheKey = bytesToHexString(mDigest.digest());
    } catch (NoSuchAlgorithmException e) {
        cacheKey = String.valueOf(url.hashCode());
    }
    return cacheKey;
}

private String bytesToHexString(byte[] bytes) {
    StringBuilder sb = new StringBuilder();
    for (int i = 0; i < bytes.length; i++) {
        String hex = Integer.toHexString(0xFF & bytes[i]);
        if (hex.length() == 1) {
            sb.append('0');
        }
        sb.append(hex);
    }
    return sb.toString();
}
After obtaining the key through the MD5 value of the url, you can obtain the Editor object through the Edit (String key) method of the DiskLruCache object, and then through the commit method of the Editor object, which roughly means to release the Editir object, and then you can perform other operations through the key Slightly.
Of course, after obtaining the key, you can add something to be cached to DiskLruCache. To load a network image into the cache, obviously you write the thing to be cached into the file system by downloading, then you need an output stream There are two main ways to write things in it:
- Create an OutputStream to write the data to be cached, obtain the Editor object through the Edit (String key) method of DiskLruCache, then convert it to Birmap through OutputStream, write the Bitmap into the OutputStream created by the Editor object, and finally call the commit method of the Editor object to submit ;
- First obtain the Editor object, create an OutputStream based on the Editor object and directly write the data to be cached, and finally call the commit method of the Editor object to submit;
Taking the first method as an example here, the network image will be added to the disk cache according to the url, and also added to the memory cache, as follows:
//添加网络图片到内存缓存和磁盘缓存
public void putCache(final String url, final CallBack callBack){
    Log.i(TAG,"putCache...");
    new AsyncTask<String,Void,Bitmap>(){
        @Override
        protected Bitmap doInBackground(String... params) {
            String key = hashKeyForDisk(params[0]);
            DiskLruCache.Editor editor = null;
            Bitmap bitmap = null;
            try {
                URL url = new URL(params[0]);
                HttpURLConnection conn = (HttpURLConnection) url.openConnection();
                conn.setReadTimeout(1000 * 30);
                conn.setConnectTimeout(1000 * 30);
                ByteArrayOutputStream baos = null;
                if(conn.getResponseCode()==HttpURLConnection.HTTP_OK){
                    BufferedInputStream bis = new BufferedInputStream(conn.getInputStream());
                    baos = new ByteArrayOutputStream();
                    byte[] bytes = new byte[1024];
                    int len = -1;
                    while((len=bis.read(bytes))!=-1){
                        baos.write(bytes,0,len);
                    }
                    bis.close();
                    baos.close();
                    conn.disconnect();
                }
                if (baos!=null){
                    bitmap = decodeSampledBitmapFromStream(baos.toByteArray(),300,200);
                    addBitmapToCache(params[0],bitmap);//添加到内存缓存
                    editor = diskLruCache.edit(key);
                    //关键
                    bitmap.compress(Bitmap.CompressFormat.JPEG, 100, editor.newOutputStream(0));
                    editor.commit();//提交
                }
            } catch (IOException e) {
                try {
                    editor.abort();//放弃写入
                } catch (IOException e1) {
                    e1.printStackTrace();
                }
            }
            return bitmap;
        }

        @Override
        protected void onPostExecute(Bitmap bitmap) {
            super.onPostExecute(bitmap);
            callBack.response(bitmap);
        }
    }.execute(url);
}
Obtaining DiskLruCache cache
Once you understand how to obtain the key, get the key, get Snapshot object via the get method DiskLruCache object and then get InputStream according Snapshot objects, and finally through the InputStream can get Bitmap add DiskLruCache cache, of course, you can use the articles in Properly adjust the sampling method of Bitmap, you can also compress and then cache before caching. The method of obtaining InputStream is as follows:
//获取磁盘缓存
public InputStream getDiskCache(String url) {
    Log.i(TAG,"getDiskCache...");
    String key = hashKeyForDisk(url);
    try {
        DiskLruCache.Snapshot snapshot = diskLruCache.get(key);
        if (snapshot!=null){
            return snapshot.getInputStream(0);
        }
    } catch (IOException e) {
        e.printStackTrace();
    }
    return null;
}
The main parts of DiskLruCache are roughly as above. The following implements a simple three-level cache to illustrate the specific use of LruCache and DiskLruCache. The MainActivity code is as follows:
//MainActivity.java
public class MainActivity extends AppCompatActivity {
    private static final String TAG = "cache_test";
    public static String CACHE_DIR = "diskCache";  //缓存目录
    public static int CACHE_SIZE = 1024 * 1024 * 10; //缓存大小
    private ImageView imageView;
    private LruCache<String, String> lruCache;
    private LruCacheUtils cacheUtils;
    private String url = "http://img06.tooopen.com/images/20161012/tooopen_sy_181713275376.jpg";
    @Override
    protected void onCreate(Bundle savedInstanceState) {
        super.onCreate(savedInstanceState);
        setContentView(R.layout.activity_main);
        imageView = (ImageView) findViewById(R.id.imageView);
    }

    @Override
    protected void onResume() {
        super.onResume();
        cacheUtils = LruCacheUtils.getInstance();
        //创建内存缓存和磁盘缓存
        cacheUtils.createCache(this,CACHE_DIR,CACHE_SIZE);
    }

    @Override
    protected void onPause() {
        super.onPause();
        cacheUtils.flush();
    }

    @Override
    protected void onStop() {
        super.onStop();
        cacheUtils.close();
    }

    public void loadImage(View view){
        load(url,imageView);
    }

    public void removeLruCache(View view){
        Log.i(TAG, "移出内存缓存...");
        cacheUtils.removeLruCache(url);
    }

    public void removeDiskLruCache(View view){
        Log.i(TAG, "移出磁盘缓存...");
        cacheUtils.removeDiskLruCache(url);
    }

    private void load(String url, final ImageView imageView){
        //从内存中获取图片
        Bitmap bitmap = cacheUtils.getBitmapFromCache(url);
        if (bitmap == null){
            //从磁盘中获取图片
            InputStream is = cacheUtils.getDiskCache(url);
            if (is == null){
                //从网络上获取图片
                cacheUtils.putCache(url, new LruCacheUtils.CallBack<Bitmap>() {
                    @Override
                    public void response(Bitmap bitmap1) {
                        Log.i(TAG, "从网络中获取图片...");
                        Log.i(TAG, "正在从网络中下载图片...");
                        imageView.setImageBitmap(bitmap1);
                        Log.i(TAG, "从网络中获取图片成功...");
                    }
                });
            }else{
                Log.i(TAG, "从磁盘中获取图片...");
                bitmap = BitmapFactory.decodeStream(is);
                imageView.setImageBitmap(bitmap);
            }
        }else{
            Log.i(TAG, "从内存中获取图片...");
            imageView.setImageBitmap(bitmap);
        }
    }
}
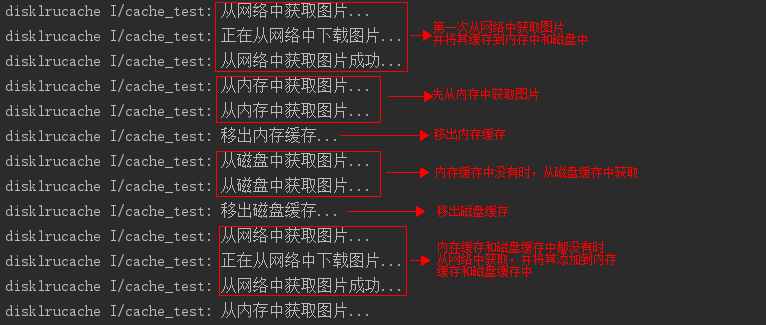
The layout file is relatively simple and the code is not posted. The following is a screenshot of the log running to illustrate the implementation, as shown in the following figure:
This article records the basic usage of LruCache and DiskLruCache. At least you should have a certain understanding of these two cache auxiliary classes. For its specific implementation, please refer to the source code.
[Code in the article]: Portal
You can pay attention to the public number: jzman-blog, exchange learning together.