login page
1. For convenience, first change the use of element-ui to global import. Modify the main.js file as follows:
import Vue from 'vue'
import App from './App.vue'
import ElementUI from 'element-ui'
import 'element-ui/lib/theme-chalk/index.css'
//这个是局部引入,前面的文章有讲过
// import '../plugins/element'
import 'font-awesome/css/font-awesome.min.css'
import axios from 'axios'
import router from './router/index'
Vue.config.productionTip = false
Vue.prototype.axios = axios
Vue.use(ElementUI)
new Vue({
  router,
  render: h => h(App),
}).$mount('#app')
2. Write the landing page:
2.1. Create a new Login.vue under the components folder
2.2. Find the required components from the official website of element-ui![]() : +
: +![]()
2.3. After modifying the code (including data and form binding) integration:
<template>
  <div class="login">
    <el-card class="box-card">
      <div slot="header" class="clearfix">
        <span>疫起健康后台管理系统</span>
      </div>
      <el-form
        :model="loginForm"
        ref="loginForm"
        label-width="100px"
      >
        <el-form-item label="用户名" prop="username">
          <el-input
            v-model="loginForm.username"
            autocomplete="off"
          ></el-input>
        </el-form-item>
        <el-form-item label="密码" prop="password">
          <el-input
            type="password"
            v-model="loginForm.password"
            autocomplete="off"
          ></el-input>
        </el-form-item>
        <el-form-item>
          <el-button type="primary" @click="submitForm('loginForm')"
            >登录</el-button>
          <el-button @click="resetForm('loginForm')">重置</el-button>
        </el-form-item>
      </el-form>
    </el-card>
  </div>
</template>

<script>
export default {
  data() {
    return{
        loginForm:{
            username:'',
            password:''
    }
    }
  },
};
</script>

<style lang="scss">
.login{
    width: 100%;
    height: 100%;
    position:absolute;
    background: #88b2dc;
    .box-card{
        width: 450px;
        margin: 160px auto;
        .el-card__header{
            font-size: 34px;
        }
        .el-button{
            width: 30%;
        }
    }
}
</style>
3. Modify the route: start the project (use redirection) and enter http://localhost/login, the pages entered are all login pages
import Vue from 'vue'
import Router from 'vue-router'
//import Home from '../components/Home.vue'

Vue.use(Router)

export default new Router({
    routes: [
        {
            path: '/',
            // component: Home
            redirect:'/login',
            component: () => import('@/components/Login') //路由懒加载
            //component: resolve => require(['@/components/Home'], resolve) //异步加载
        },
        {
            path: '/login',
            name:'Login',
            component: () => import('@/components/Login') //路由懒加载
            //component: resolve => require(['@/components/Home'], resolve) //异步加载
        },
        {
            path: '/home',
            // component: Home
            component: () => import('@/components/Home') //路由懒加载
            //component: resolve => require(['@/components/Home'], resolve) //异步加载
        }
    ],
    mode: 'history'
})
operation result: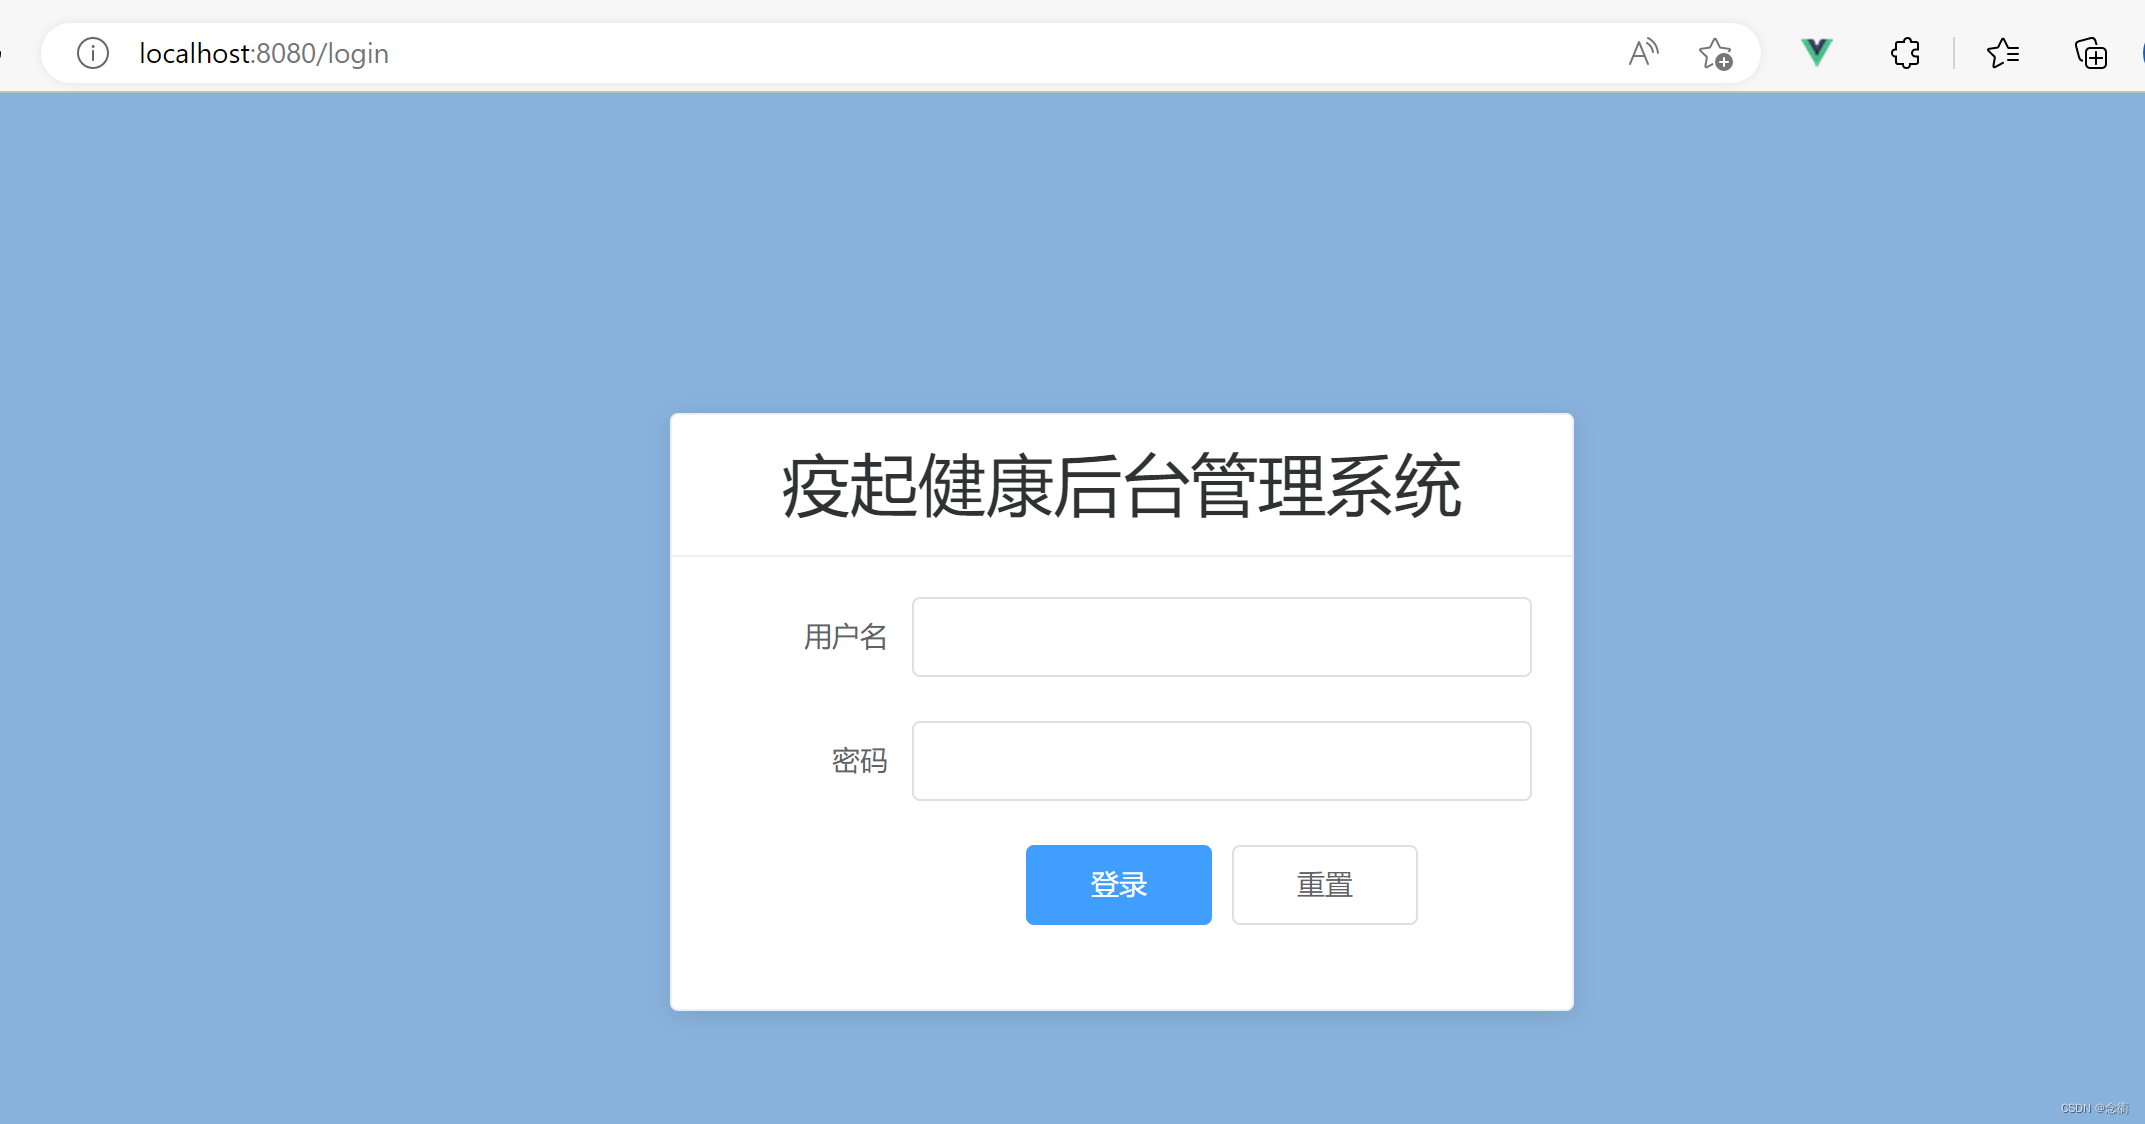
4. Login verification
4.1 Simple version, suitable for small projects and simple validation rules, implementation: write the validation rules directly in html
<template>
  <div class="login">
    <el-card class="box-card">
      <div slot="header" class="clearfix">
        <span>疫起健康后台管理系统</span>
      </div>
      <el-form :model="loginForm" ref="loginForm" label-width="100px">
        <el-form-item
          label="用户名"
          prop="username"
          :rules="[
            { required: true, message: '请输入用户名', trigger: 'blur' },
            {
              min: 4,
              max: 10,
              message: '长度在4-10位字符之间',
              trigger: 'blur',
            },
          ]"
        >
          <el-input v-model="loginForm.username" autocomplete="off"></el-input>
        </el-form-item>
        <el-form-item
          label="密码"
          prop="password"
          :rules="[
            { required: true, message: '请输入密码', trigger: 'blur' },
            {
              min: 6,
              max: 12,
              message: '长度在6-12位字符之间',
              trigger: 'blur',
            },
          ]"
        >
          <el-input
            type="password"
            v-model="loginForm.password"
            autocomplete="off"
          ></el-input>
        </el-form-item>
        <el-form-item>
          <el-button type="primary" @click="login('loginForm')"
            >登录</el-button
          >
          <el-button @click="resetForm('loginForm')">重置</el-button>
        </el-form-item>
      </el-form>
    </el-card>
  </div>
</template>
When the input box loses focus, the form validation will be performed automatically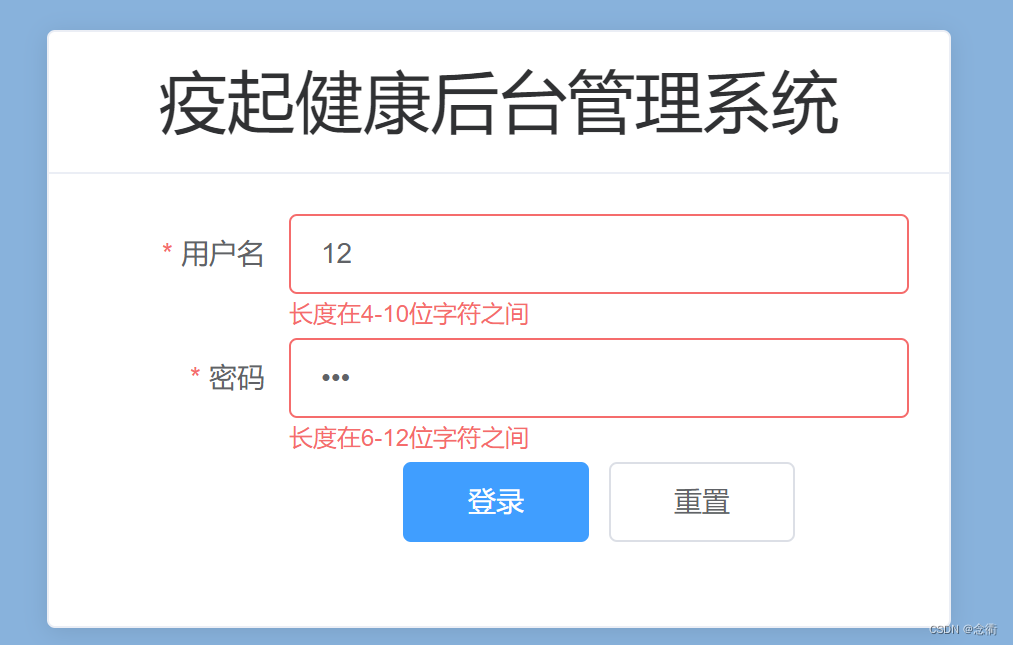
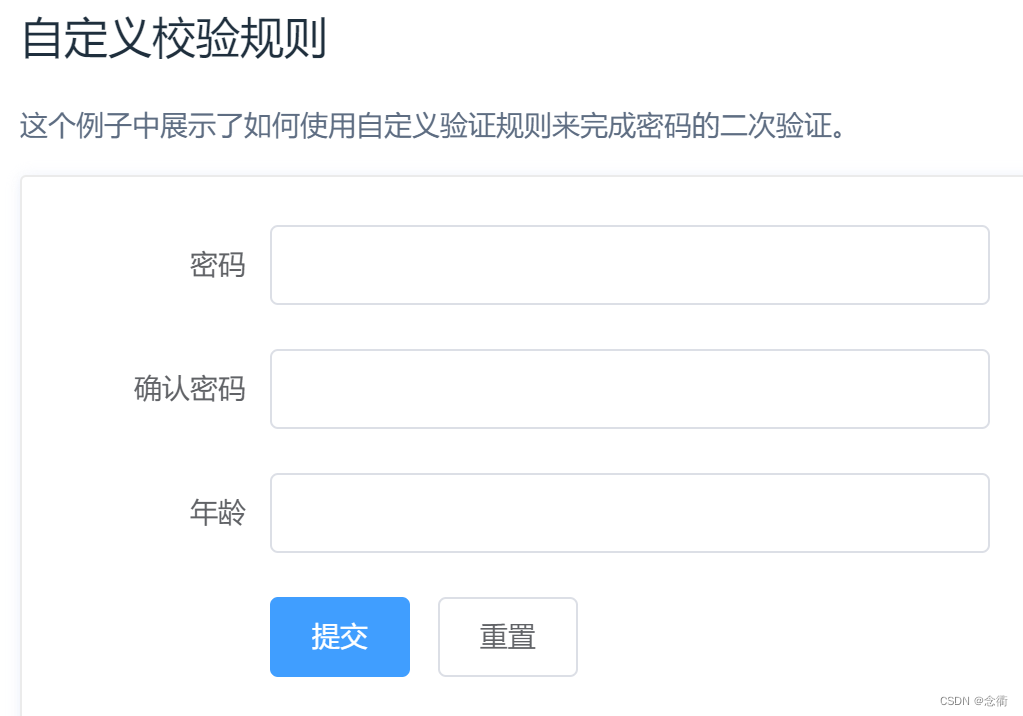
4.2 Advanced version of login verification
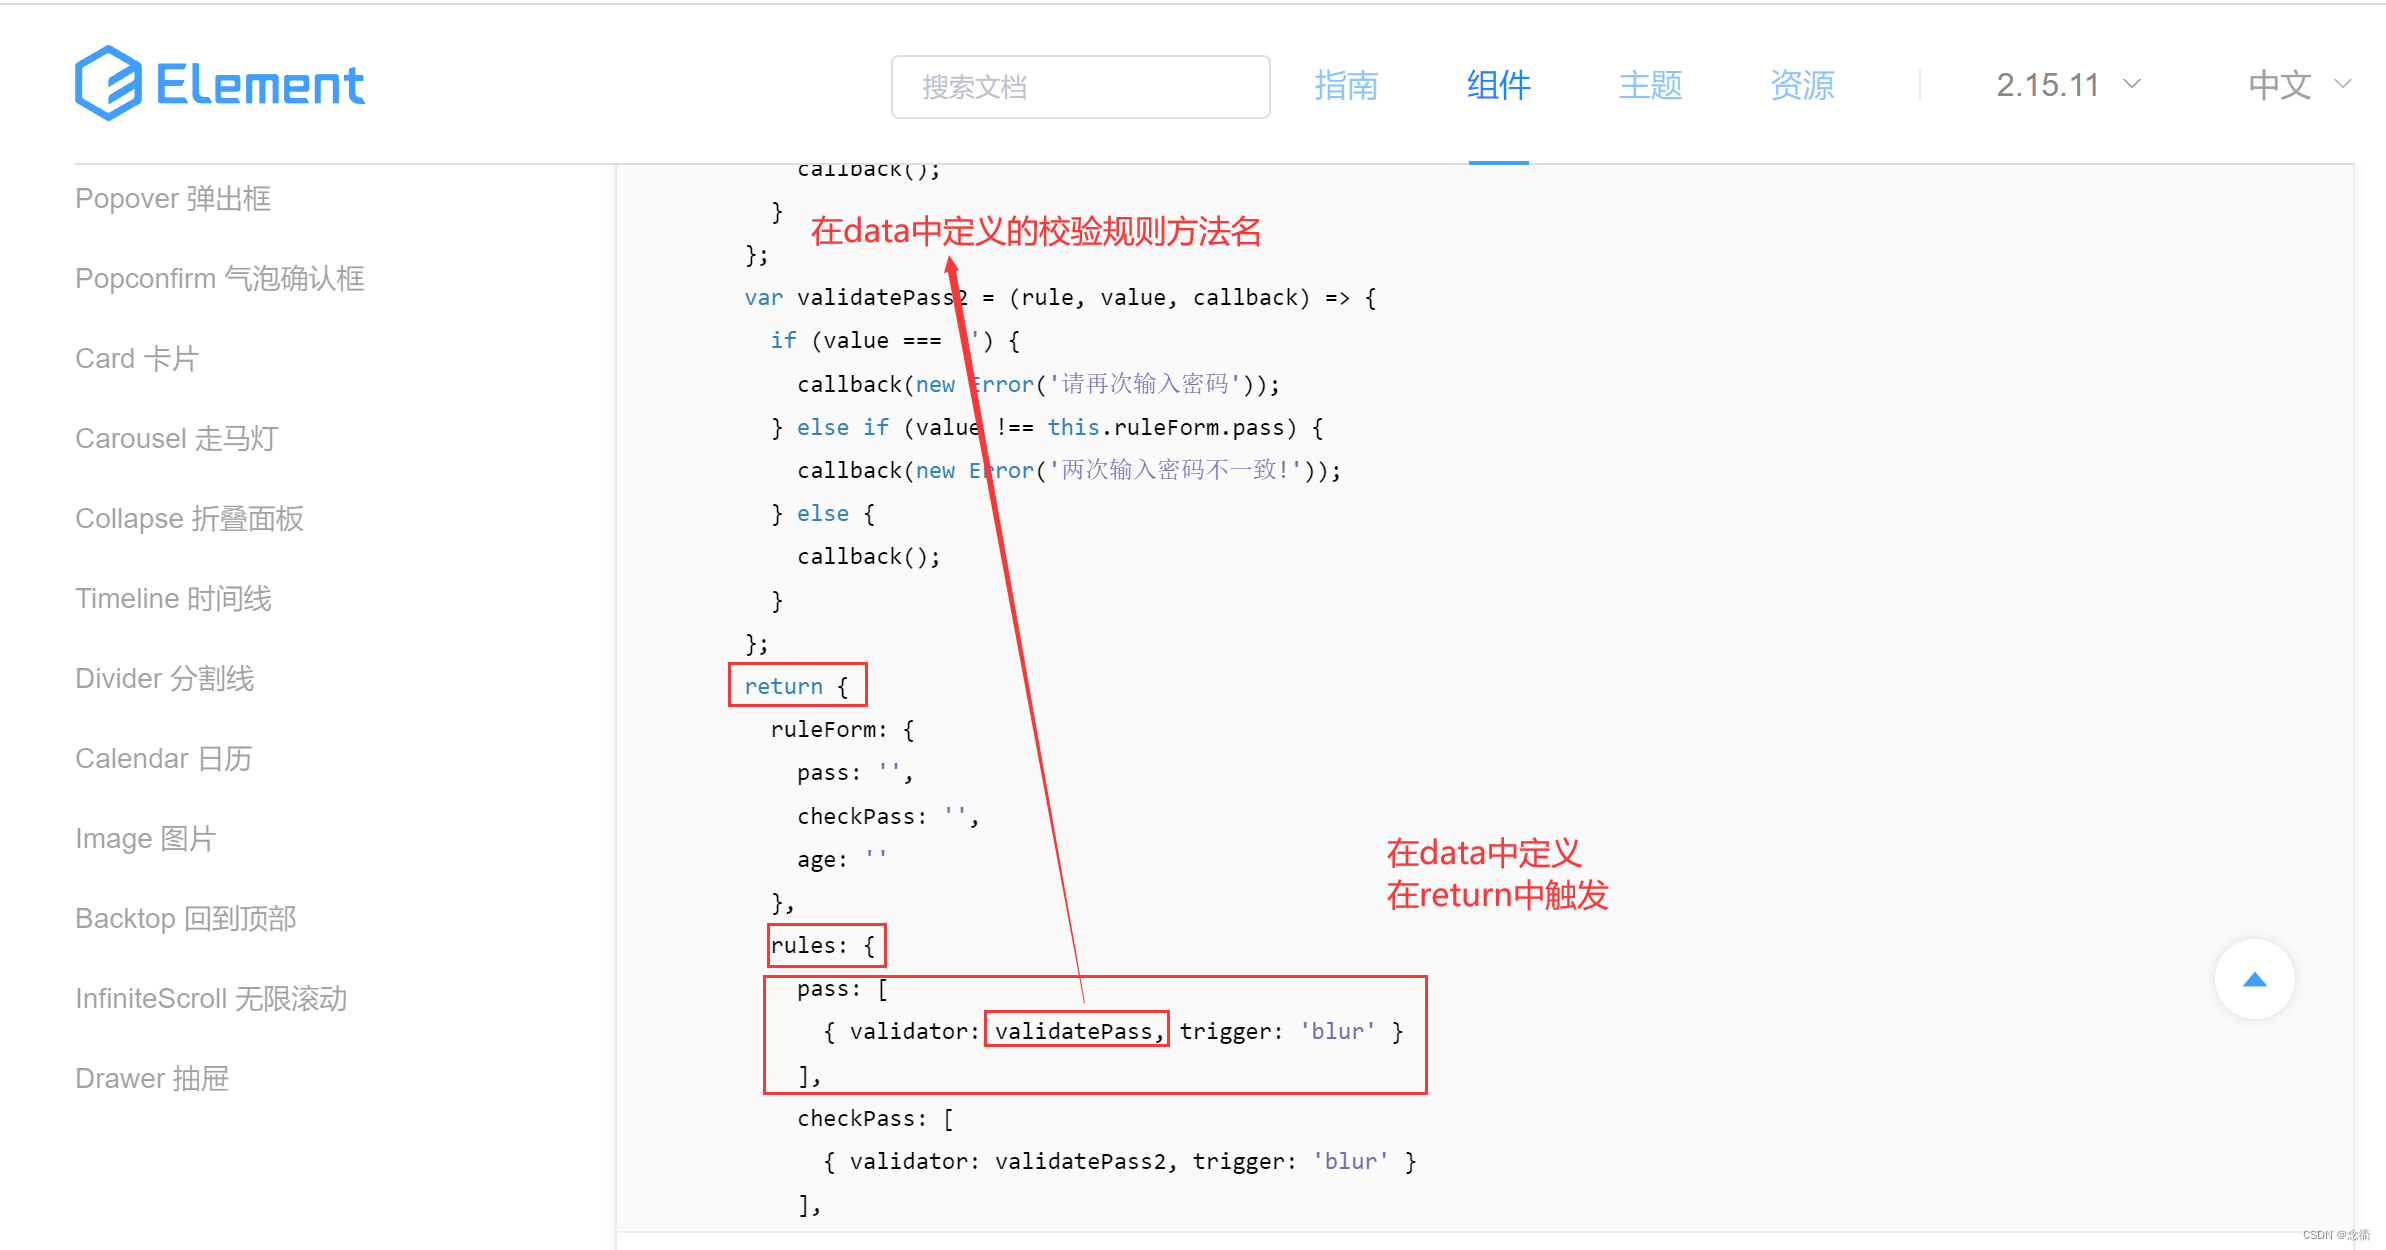
① Bind rules in the form, write the verification rules directly in the data of the Login.vue page, and refer to the form form of element-ui for the writing method
<template>
<div class="login">
<el-card class="box-card">
<div slot="header" class="clearfix">
<span>疫起健康后台管理系统</span>
</div>
<el-form
:model="loginForm"
ref="loginForm"
label-width="100px"
:rules="rules"
>
<el-form-item label="用户名" prop="username">
<el-input v-model="loginForm.username" autocomplete="off"></el-input>
</el-form-item>
<el-form-item label="密码" prop="password">
<el-input
type="password"
v-model="loginForm.password"
autocomplete="off"
></el-input>
</el-form-item>
<el-form-item>
<el-button type="primary" @click="login('loginForm')">登录</el-button>
<el-button @click="resetForm('loginForm')">重置</el-button>
</el-form-item>
</el-form>
</el-card>
</div>
</template>
<script>
export default {
data() {
// rule 是校验规则,value是input用户输入的值,callback是回调函数 参考element-ui的api文档
const validateName = (rule, value, callback) => {
// 请输入4-10位昵称
let reg = /(^[a-zA-Z0-9]{4,10}$)/;
if (value === "") {
callback(new Error("请输入用户名"));
} else if (!reg.test(value)) {
callback(new Error("请输入4-10位用户名"));
} else {
callback();
}
};
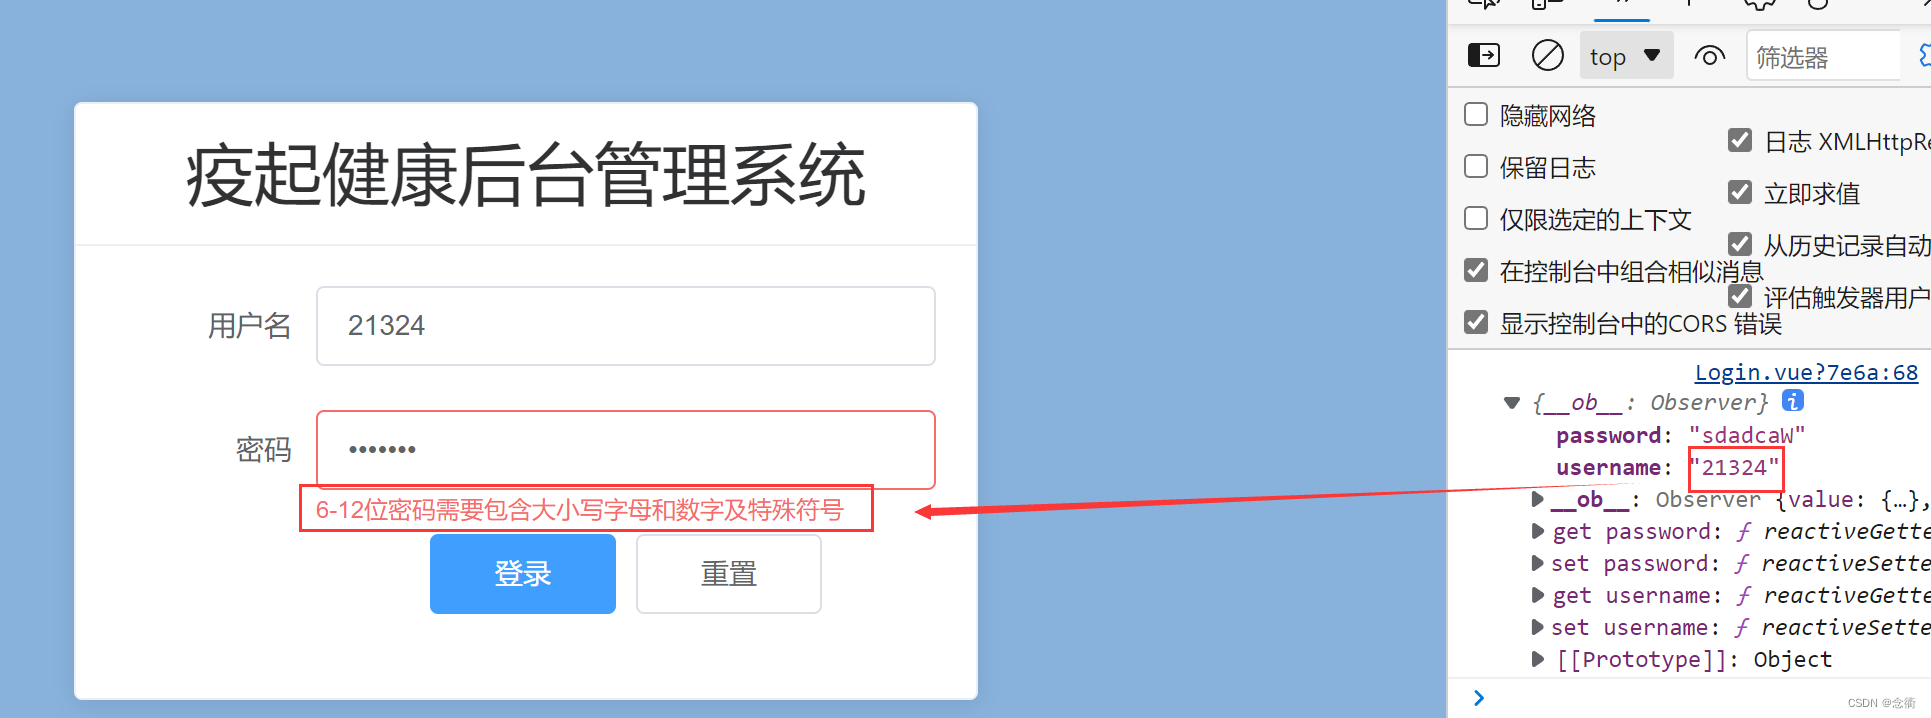
const validatePass = (rule, value, callback) => {
// 6-12位密码需要包含大小写字母和数字以及特殊符号
let pass =
/^\S*(?=\S{6,12})(?=\S*\d)(?=\S*[A-Z])(?=\S*[a-z])(?=\S*[!@#$%^&*? ])\S*$/;
if (value === "") {
callback(new Error("请输入密码"));
} else if (!pass.test(value)) {
callback(new Error("6-12位密码需要包含大小写字母和数字及特殊符号"));
} else {
callback();
}
};
return {
loginForm: {
username: "",
password: "",
},
rules: {
username: [{ validator: validateName, trigger: "blur" }],
password: [{ validator: validatePass, trigger: "blur" }],
},
};
},
methods: {
login(loginForm) {
this.$refs[loginForm].validate((valid) => {
if (valid) {
console.log(this.loginForm);
} else {
console.log(this.loginForm);
}
});
},
resetForm(loginForm) {
this.$refs[loginForm].resetFields();
},
},
};
</script>
<style lang="scss">
.login {
width: 100%;
height: 100%;
position: absolute;
background: #88b2dc;
.box-card {
width: 450px;
margin: 160px auto;
.el-card__header {
font-size: 34px;
}
.el-button {
width: 30%;
}
}
}
</style>
Effect: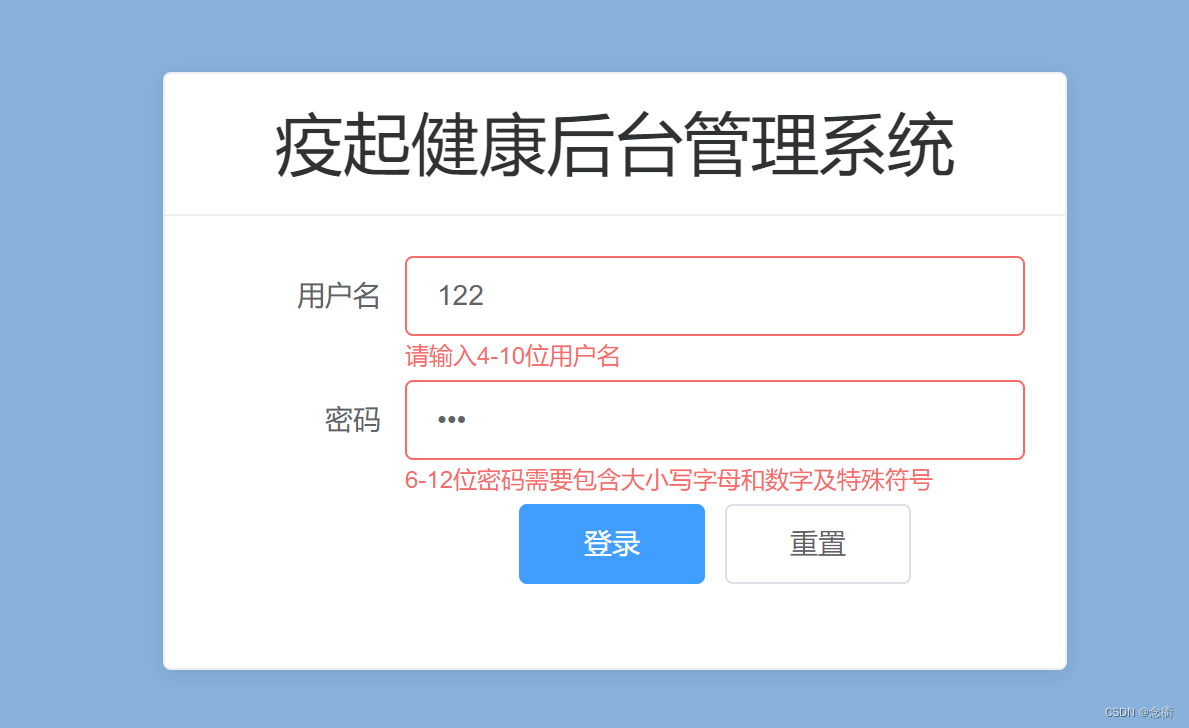
Tip : Use the write verification rule plugin
To use: press f1 (my laptop needs to press Fn+f1)
② Bind rules in the form, after the verification rules are encapsulated, then import the verification rules on the Login.vue page (more recommended)
Create a new utlis folder under src, create a new validate.js file ![]() , and modify the validation rules in the data on the Login.vue page as follows:
, and modify the validation rules in the data on the Login.vue page as follows:
// 用户名匹配
export function nameRule(rule, value, callback) {
    //  请输入4-10位昵称
    let reg = /(^[a-zA-Z0-9]{4,10}$)/;
    if (value === "") {
        callback(new Error("请输入用户名"));
    } else if (!reg.test(value)) {
        callback(new Error("请输入4-10位用户名"));
    } else {
        callback();
    }
}

// 密码正则匹配
export function passRule(rule, value, callback) {
    //   6-12位密码需要包含大小写字母和数字以及特殊符号
    let pass = /^\S*(?=\S{6,12})(?=\S*\d)(?=\S*[A-Z])(?=\S*[a-z])(?=\S*[!@#$%^&*? ])\S*$/;
    if (value === "") {
        callback(new Error("请输入密码"));
    } else if (!pass.test(value)) {
        callback(new Error("6-12位密码需要包含大小写字母和数字及特殊符号"));
    } else {
        callback();
    }
}
On the Login.vue page, modify it to: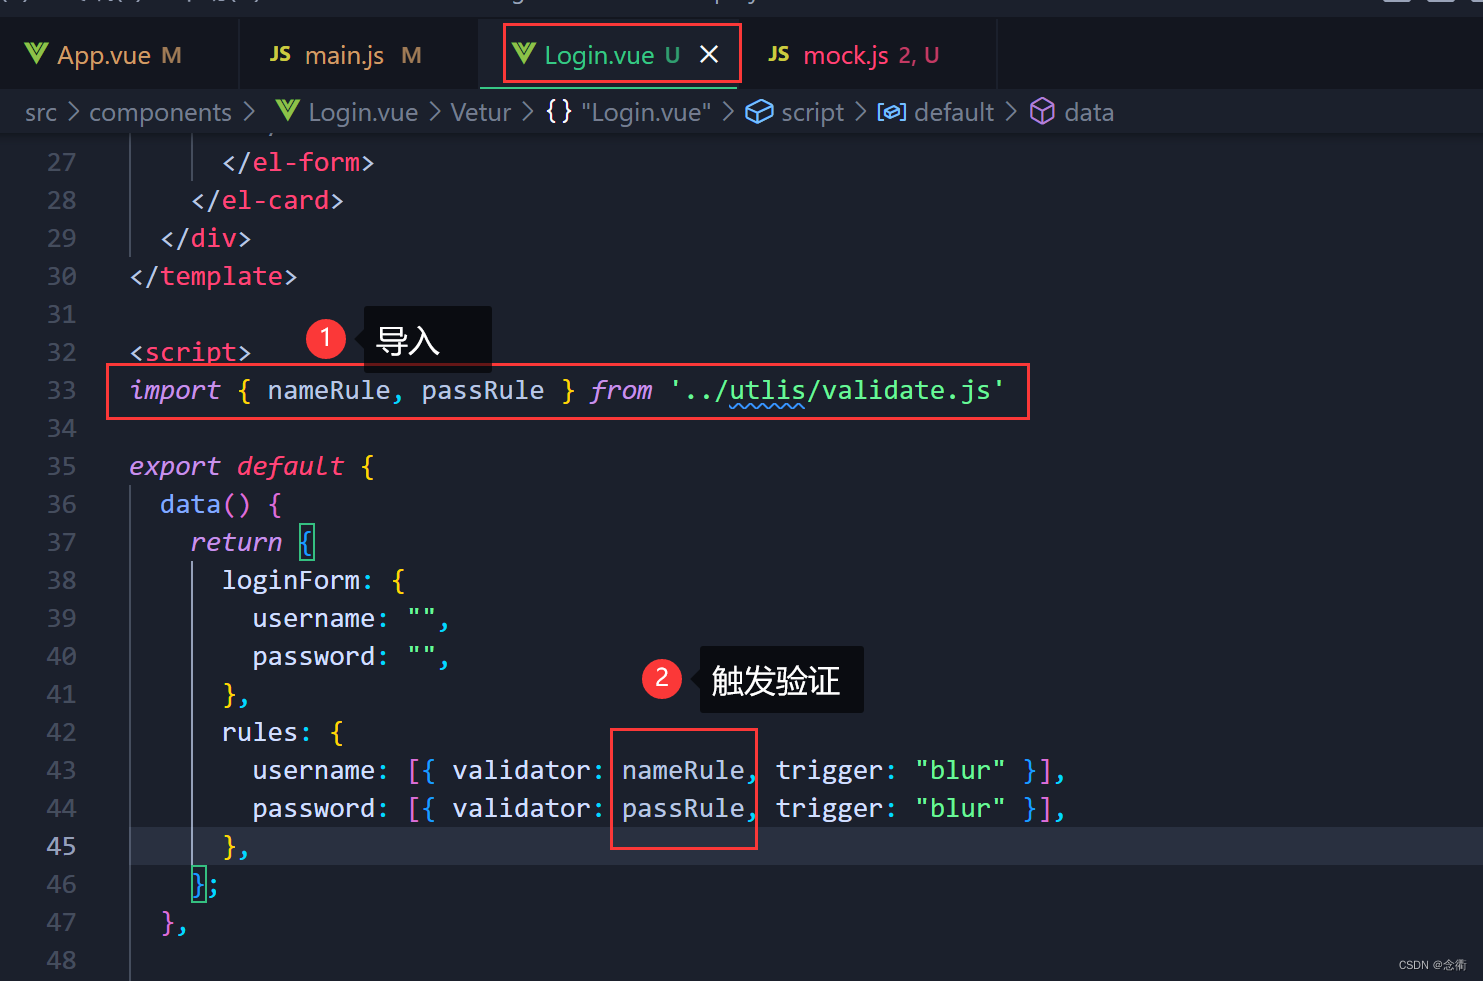
<template>
  <div class="login">
    <el-card class="box-card">
      <div slot="header" class="clearfix">
        <span>疫起健康后台管理系统</span>
      </div>
      <el-form
        :model="loginForm"
        ref="loginForm"
        label-width="100px"
        :rules="rules"
      >
        <el-form-item label="用户名" prop="username">
          <el-input v-model="loginForm.username" autocomplete="off"></el-input>
        </el-form-item>
        <el-form-item label="密码" prop="password">
          <el-input
            type="password"
            v-model="loginForm.password"
            autocomplete="off"
          ></el-input>
        </el-form-item>
        <el-form-item>
          <el-button type="primary" @click="login('loginForm')">登录</el-button>
          <el-button @click="resetForm('loginForm')">重置</el-button>
        </el-form-item>
      </el-form>
    </el-card>
  </div>
</template>

<script>
import { nameRule, passRule } from '../utils/validate.js'

export default {
  data() {
    return {
      loginForm: {
        username: "",
        password: "",
      },
      rules: {
        username: [{ validator: nameRule, trigger: "blur" }],
        password: [{ validator: passRule, trigger: "blur" }],
      },
    };
  },

  methods: {
    login(loginForm) {
      this.$refs[loginForm].validate((valid) => {
        if (valid) {
          console.log(this.loginForm);
          this.axios
            .post("http://1.116.64.64:5004/api2/login", this.loginForm)
            .then((res) => {
              console.log(res);
              if (res.data.status === 200) {
                localStorage.setItem("username", res.data.username);
                this.$message({ message: res.data.message, type: "success" });
                this.$router.push("/home");
              }
            })
            .catch((err) => {
              console.error(err);
            });
        } else {
          console.log(this.loginForm);
        }
      });
    },
    resetForm(loginForm) {
      this.$refs[loginForm].resetFields();
    },
  },
};
</script>

<style lang="scss">
.login {
  width: 100%;
  height: 100%;
  position: absolute;
  background: #88b2dc;
  .box-card {
    width: 450px;
    margin: 160px auto;
    .el-card__header {
      font-size: 34px;
    }
    .el-button {
      width: 30%;
    }
  }
}
</style>
Effect: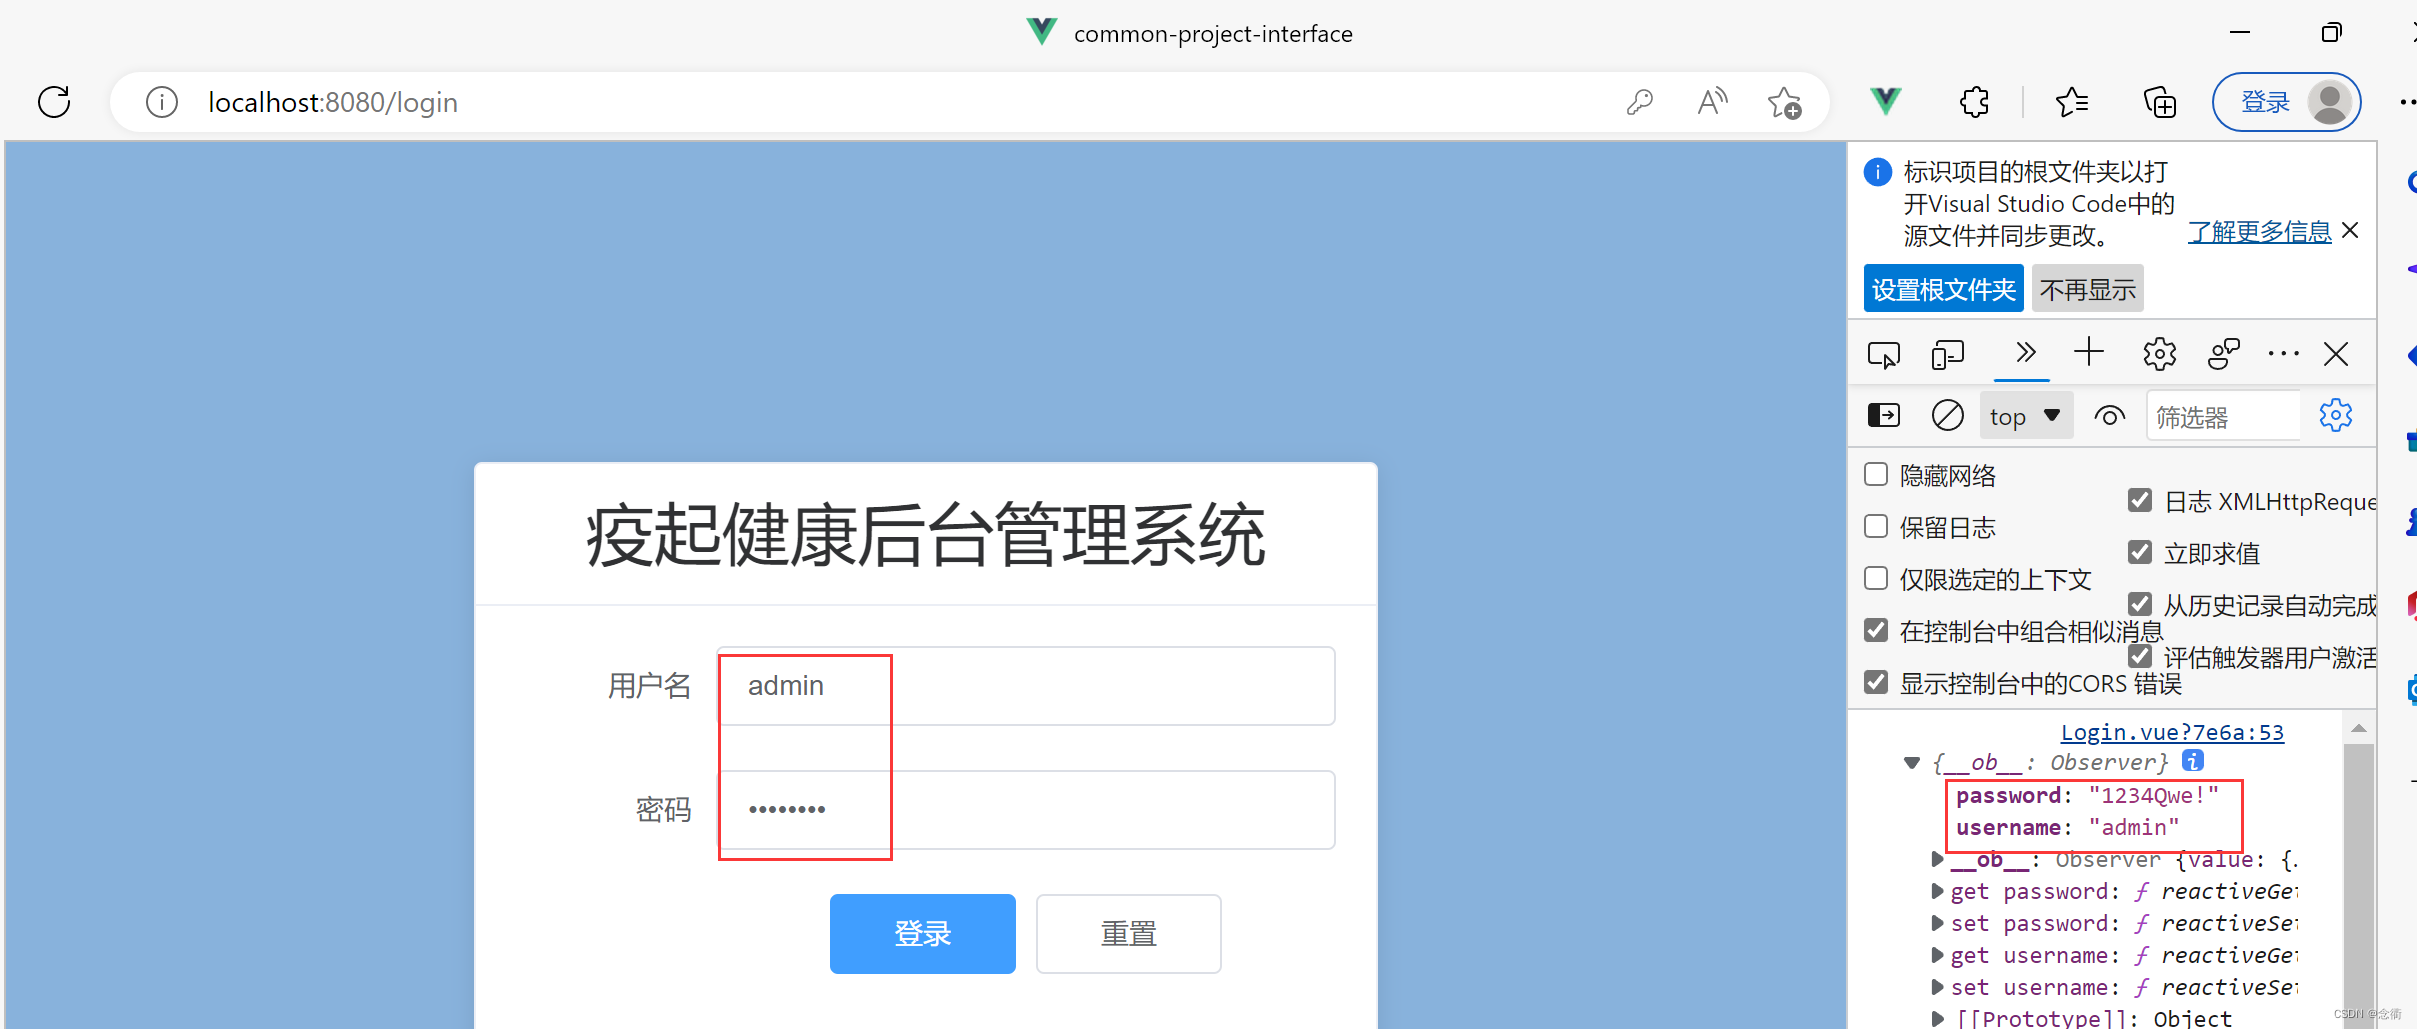
5. The login page connects to the backend
The first
First of all: use mock to prepare to simulate the network request backend interface:
① Enter in the vscode terminal, ctrl+c to end the running project, then download the mock plug-in, enter
npm i @shymean/mock-server -g
② After the plug-in is installed, create a folder anywhere on the disk and name it mock; create a mock.js empty file in the mock file;![]()
Enter the mock folder in the terminal, enter the command mock, start the local mock server, the default port is 7654
mock>mock server listen at 7654
The operation steps are as follows: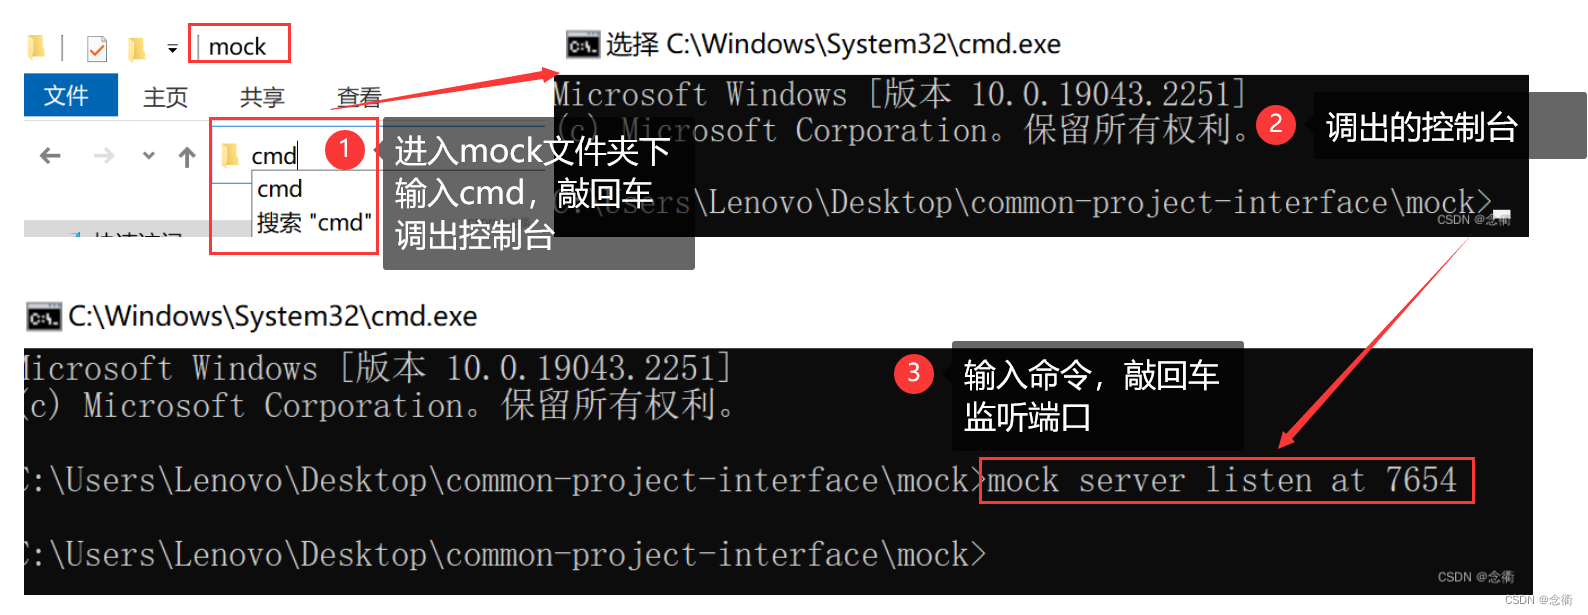
Open the mock.js file and write some test data yourself as follows:
//登录接口
Mock.mock(/login/, {
    code: 200,
    data: {
      access_token: "748_bef_246_test",
      expires_in: 7200,
    }
  })

  //用户信息
  Mock.mock(/userInfo/, {
    code: 200,
    user: {
     userName:'admin',
     password:'123456',
     role:'admim',
    }
  })
the second
Find a back-end interface written by yourself or someone else, there are many in Bilibili, just find it and use it directly
encapsulation token
Create a new setToken.js file under the utils folder with the following content:
export function setToken(tokenKey, token) {
    return localStorage.setItem(tokenKey, token)
}

export function getToken(tokenKey) {
    return localStorage.getItem(tokenKey)
}

export function removeToken(tokenKey) {
    return localStorage.removeItem(tokenKey)
}
Import and use in Login.vue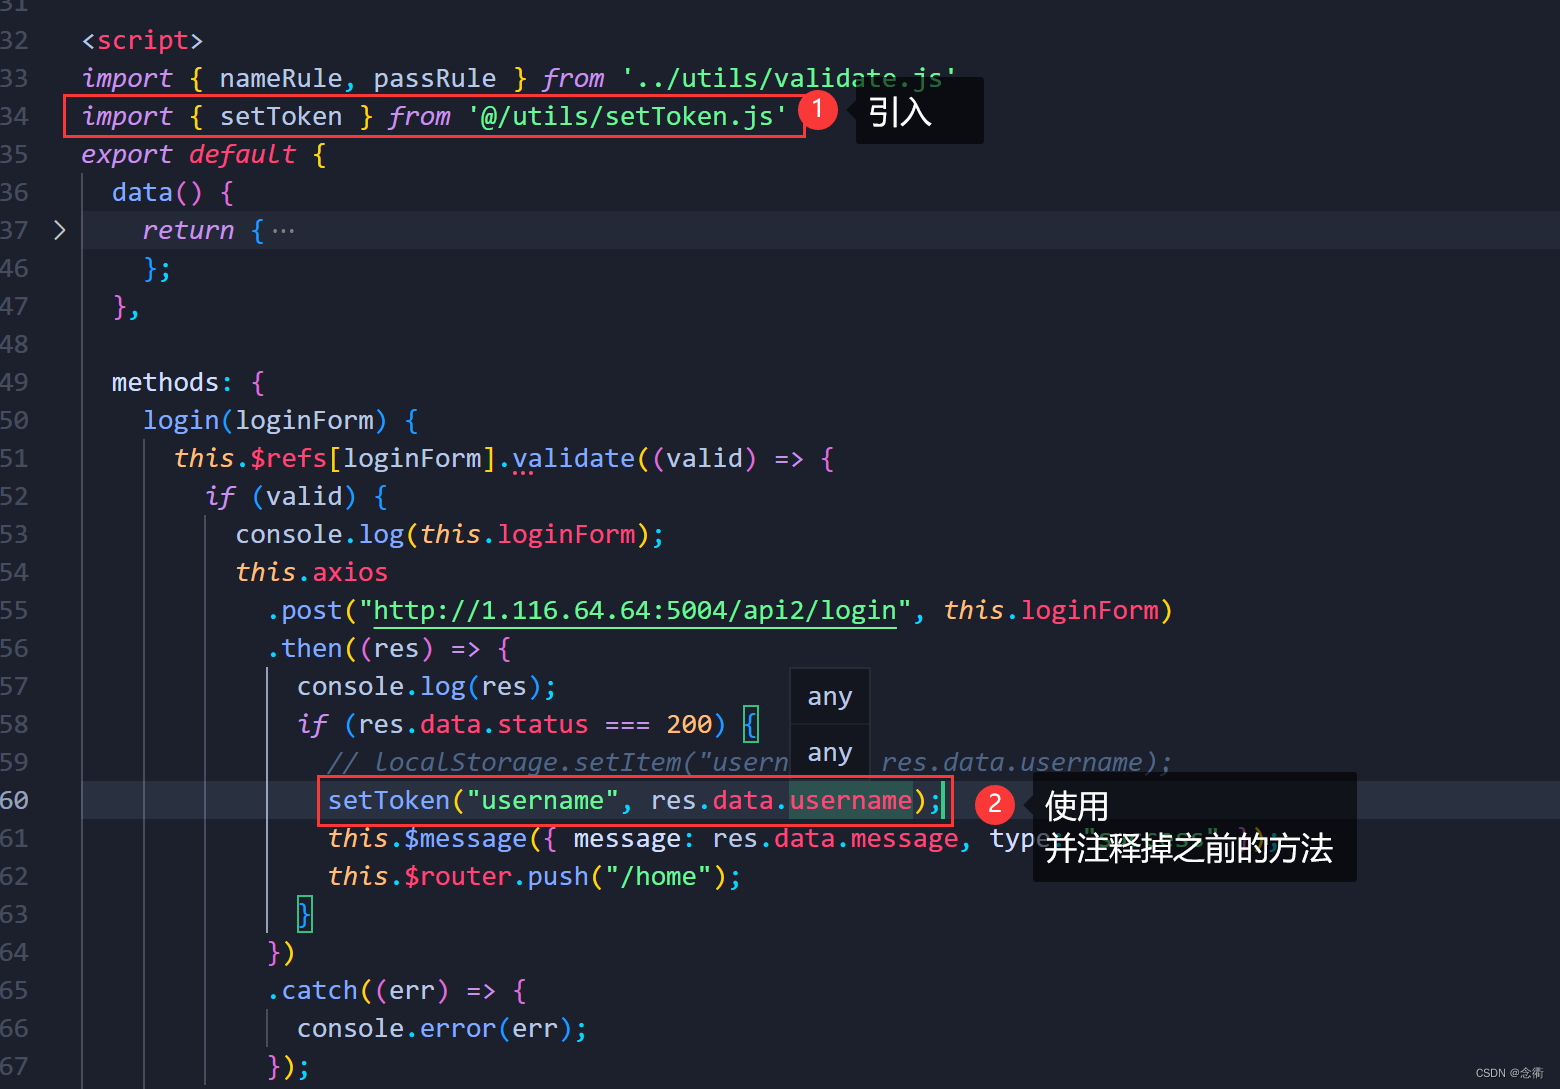
<template>
  <div class="login">
    <el-card class="box-card">
      <div slot="header" class="clearfix">
        <span>疫起健康后台管理系统</span>
      </div>
      <el-form
        :model="loginForm"
        ref="loginForm"
        label-width="100px"
        :rules="rules"
      >
        <el-form-item label="用户名" prop="username">
          <el-input v-model="loginForm.username" autocomplete="off"></el-input>
        </el-form-item>
        <el-form-item label="密码" prop="password">
          <el-input
            type="password"
            v-model="loginForm.password"
            autocomplete="off"
          ></el-input>
        </el-form-item>
        <el-form-item>
          <el-button type="primary" @click="login('loginForm')">登录</el-button>
          <el-button @click="resetForm('loginForm')">重置</el-button>
        </el-form-item>
      </el-form>
    </el-card>
  </div>
</template>

<script>
import { nameRule, passRule } from '../utils/validate.js'
import { setToken } from '@/utils/setToken.js'
export default {
  data() {
    return {
      loginForm: {
        username: "",
        password: "",
      },
      rules: {
        username: [{ validator: nameRule, trigger: "blur" }],
        password: [{ validator: passRule, trigger: "blur" }],
      },
    };
  },

  methods: {
    login(loginForm) {
      this.$refs[loginForm].validate((valid) => {
        if (valid) {
          console.log(this.loginForm);
          this.axios
            .post("http://1.116.64.64:5004/api2/login", this.loginForm)
            .then((res) => {
              console.log(res);
              if (res.data.status === 200) {
                // localStorage.setItem("username", res.data.username);
                setToken("username", res.data.username);
                this.$message({ message: res.data.message, type: "success" });
                this.$router.push("/home");
              }
            })
            .catch((err) => {
              console.error(err);
            });
        } else {
          console.log(this.loginForm);
        }
      });
    },
    resetForm(loginForm) {
      this.$refs[loginForm].resetFields();
    },
  },
};
</script>

<style lang="scss">
.login {
  width: 100%;
  height: 100%;
  position: absolute;
  background: #88b2dc;
  .box-card {
    width: 450px;
    margin: 160px auto;
    .el-card__header {
      font-size: 34px;
    }
    .el-button {
      width: 30%;
    }
  }
}
</style>
Connect to the back-end login interface, and encapsulate axios twice
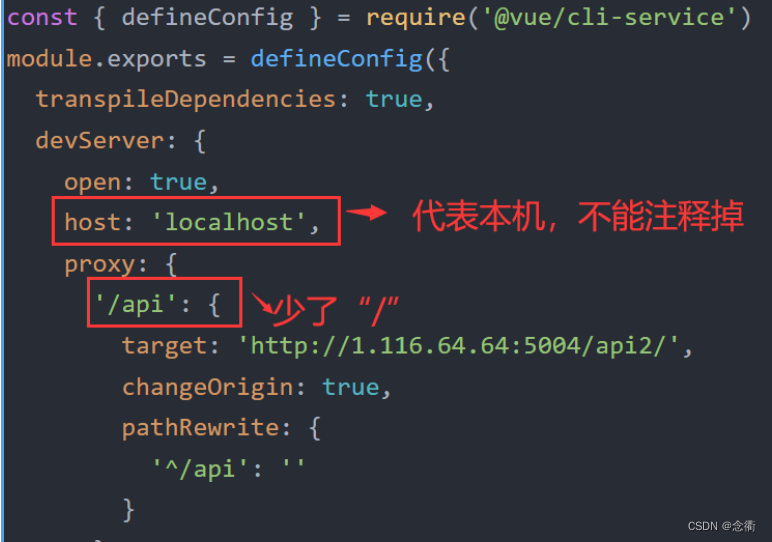
Set the project proxy and modify the vue.config.js file as follows:
const { defineConfig } = require('@vue/cli-service')
module.exports = defineConfig({
  transpileDependencies: true,
  devServer: {
    open: true,
    host: 'localhost',
    proxy: {
      '/api': {
        target: 'http://1.116.64.64:5004/api2/',
        changeOrigin: true,
        pathRewrite: {
          '^/api': ''
        }
      }

    }
  }
})
Create a new service.js file in the root directory of the project to encapsulate axios
import axios from 'axios'
import { getToken } from '@/utils/setToken.js'
import { Message } from 'element-ui'

const service = axios.create({
    baseURL: '/api', // baseURL会自动加在请求地址上
    timeout: 3000
})

// 添加请求拦截器
service.interceptors.request.use((config) => {
    // 在请求之前做些什么(获取并设置token)
    config.headers['token'] = getToken('token')
    return config
}, (error) => {
    return Promise.reject(error)
})

// 添加响应拦截器
service.interceptors.response.use((response) => {
    // 对响应数据做些什么
    let { status, message } = response.data
    if(status !== 200) {
        Message({message: message || 'error', type: 'warning'})
    }
    return response
}, (error) => {
    return Promise.reject(error)
})

export default service
The axios that uses the second package still adopts the global import method, and the main.js file is modified as follows: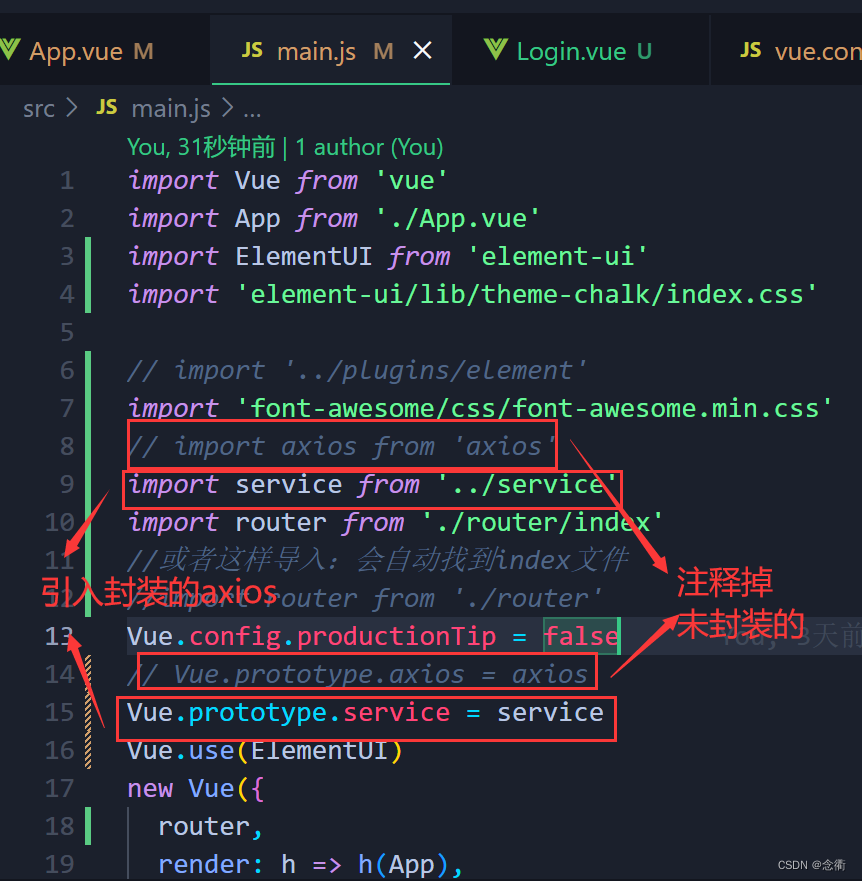
import Vue from 'vue'
import App from './App.vue'
import ElementUI from 'element-ui'
import 'element-ui/lib/theme-chalk/index.css'
// import '../plugins/element'
import 'font-awesome/css/font-awesome.min.css'
// import axios from 'axios'
import service from '../service'
import router from './router/index'
//或者这样导入:会自动找到index文件
//import router from './router'
Vue.config.productionTip = false
// Vue.prototype.axios = axios
Vue.prototype.service = service
Vue.use(ElementUI)
new Vue({
  router,
  render: h => h(App),
}).$mount('#app')
Modify the Login.vue page and comment out the imported setToken file
<template>
  <div class="login">
    <el-card class="box-card">
      <div slot="header" class="clearfix">
        <span>疫起健康后台管理系统</span>
      </div>
      <el-form
        :model="loginForm"
        ref="loginForm"
        label-width="100px"
        :rules="rules"
      >
        <el-form-item label="用户名" prop="username">
          <el-input v-model="loginForm.username" autocomplete="off"></el-input>
        </el-form-item>
        <el-form-item label="密码" prop="password">
          <el-input
            type="password"
            v-model="loginForm.password"
            autocomplete="off"
          ></el-input>
        </el-form-item>
        <el-form-item>
          <el-button type="primary" @click="login('loginForm')">登录</el-button>
          <el-button @click="resetForm('loginForm')">重置</el-button>
        </el-form-item>
      </el-form>
    </el-card>
  </div>
</template>

<script>
import { nameRule, passRule } from '../utils/validate.js'
// import { setToken } from '@/utils/setToken.js'
export default {
  data() {
    return {
      loginForm: {
        username: "",
        password: "",
      },
      rules: {
        username: [{ validator: nameRule, trigger: "blur" }],
        password: [{ validator: passRule, trigger: "blur" }],
      },
    };
  },

  methods: {
    login(loginForm) {
      this.$refs[loginForm].validate((valid) => {
        if (valid) {
          console.log(this.loginForm);
          this.service.post('/login',this.loginForm)
            .then((res) => {
                console.log(res.data)
            })
          } else {
          console.log(this.loginForm);
        }
      });
    },
    resetForm(loginForm) {
      this.$refs[loginForm].resetFields();
    },
  },
};
</script>

<style lang="scss">
.login {
  width: 100%;
  height: 100%;
  position: absolute;
  background: #88b2dc;
  .box-card {
    width: 450px;
    margin: 160px auto;
    .el-card__header {
      font-size: 34px;
    }
    .el-button {
      width: 30%;
    }
  }
}
</style>
ctrl+c to close the currently running project, create a new terminal and input: npm run serve, after modifying the vue.config.js file, the project must be restarted for the configuration to take effect, and then the interface test will be performed, otherwise the error will be reported as follows: the access is still the same It is localhhost:8080 port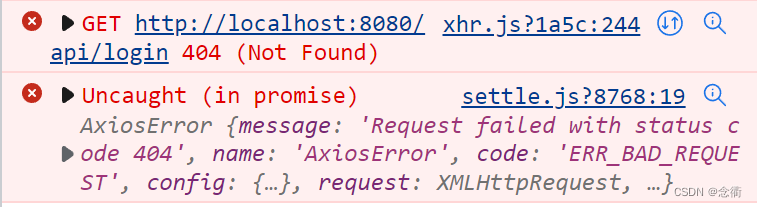
If restarting the service is still useless, then check the grammar one by one, whether the spelling is wrong or missing, the following is what I found during the debugging process:
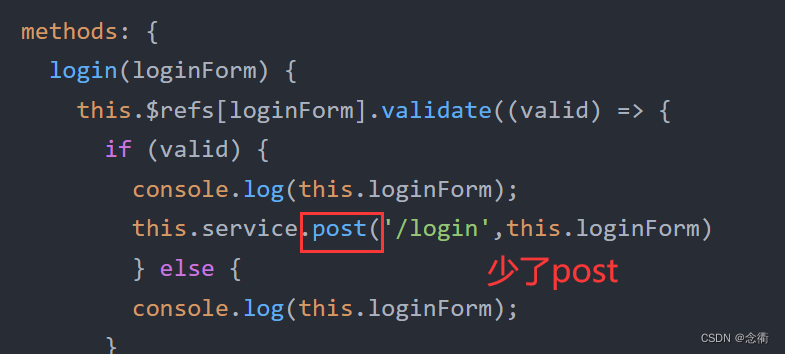
Axios package analysis (in fact, it can be more perfect: the data sent by axios cannot be an object, it can only be in the form of a string, so you can use a unified tool class to process the data sent by axios; and so on, receive the returned request , you can perform different processing by judging different status codes (500 internal server error, 404 access address does not exist, etc.) refer to the blog post ):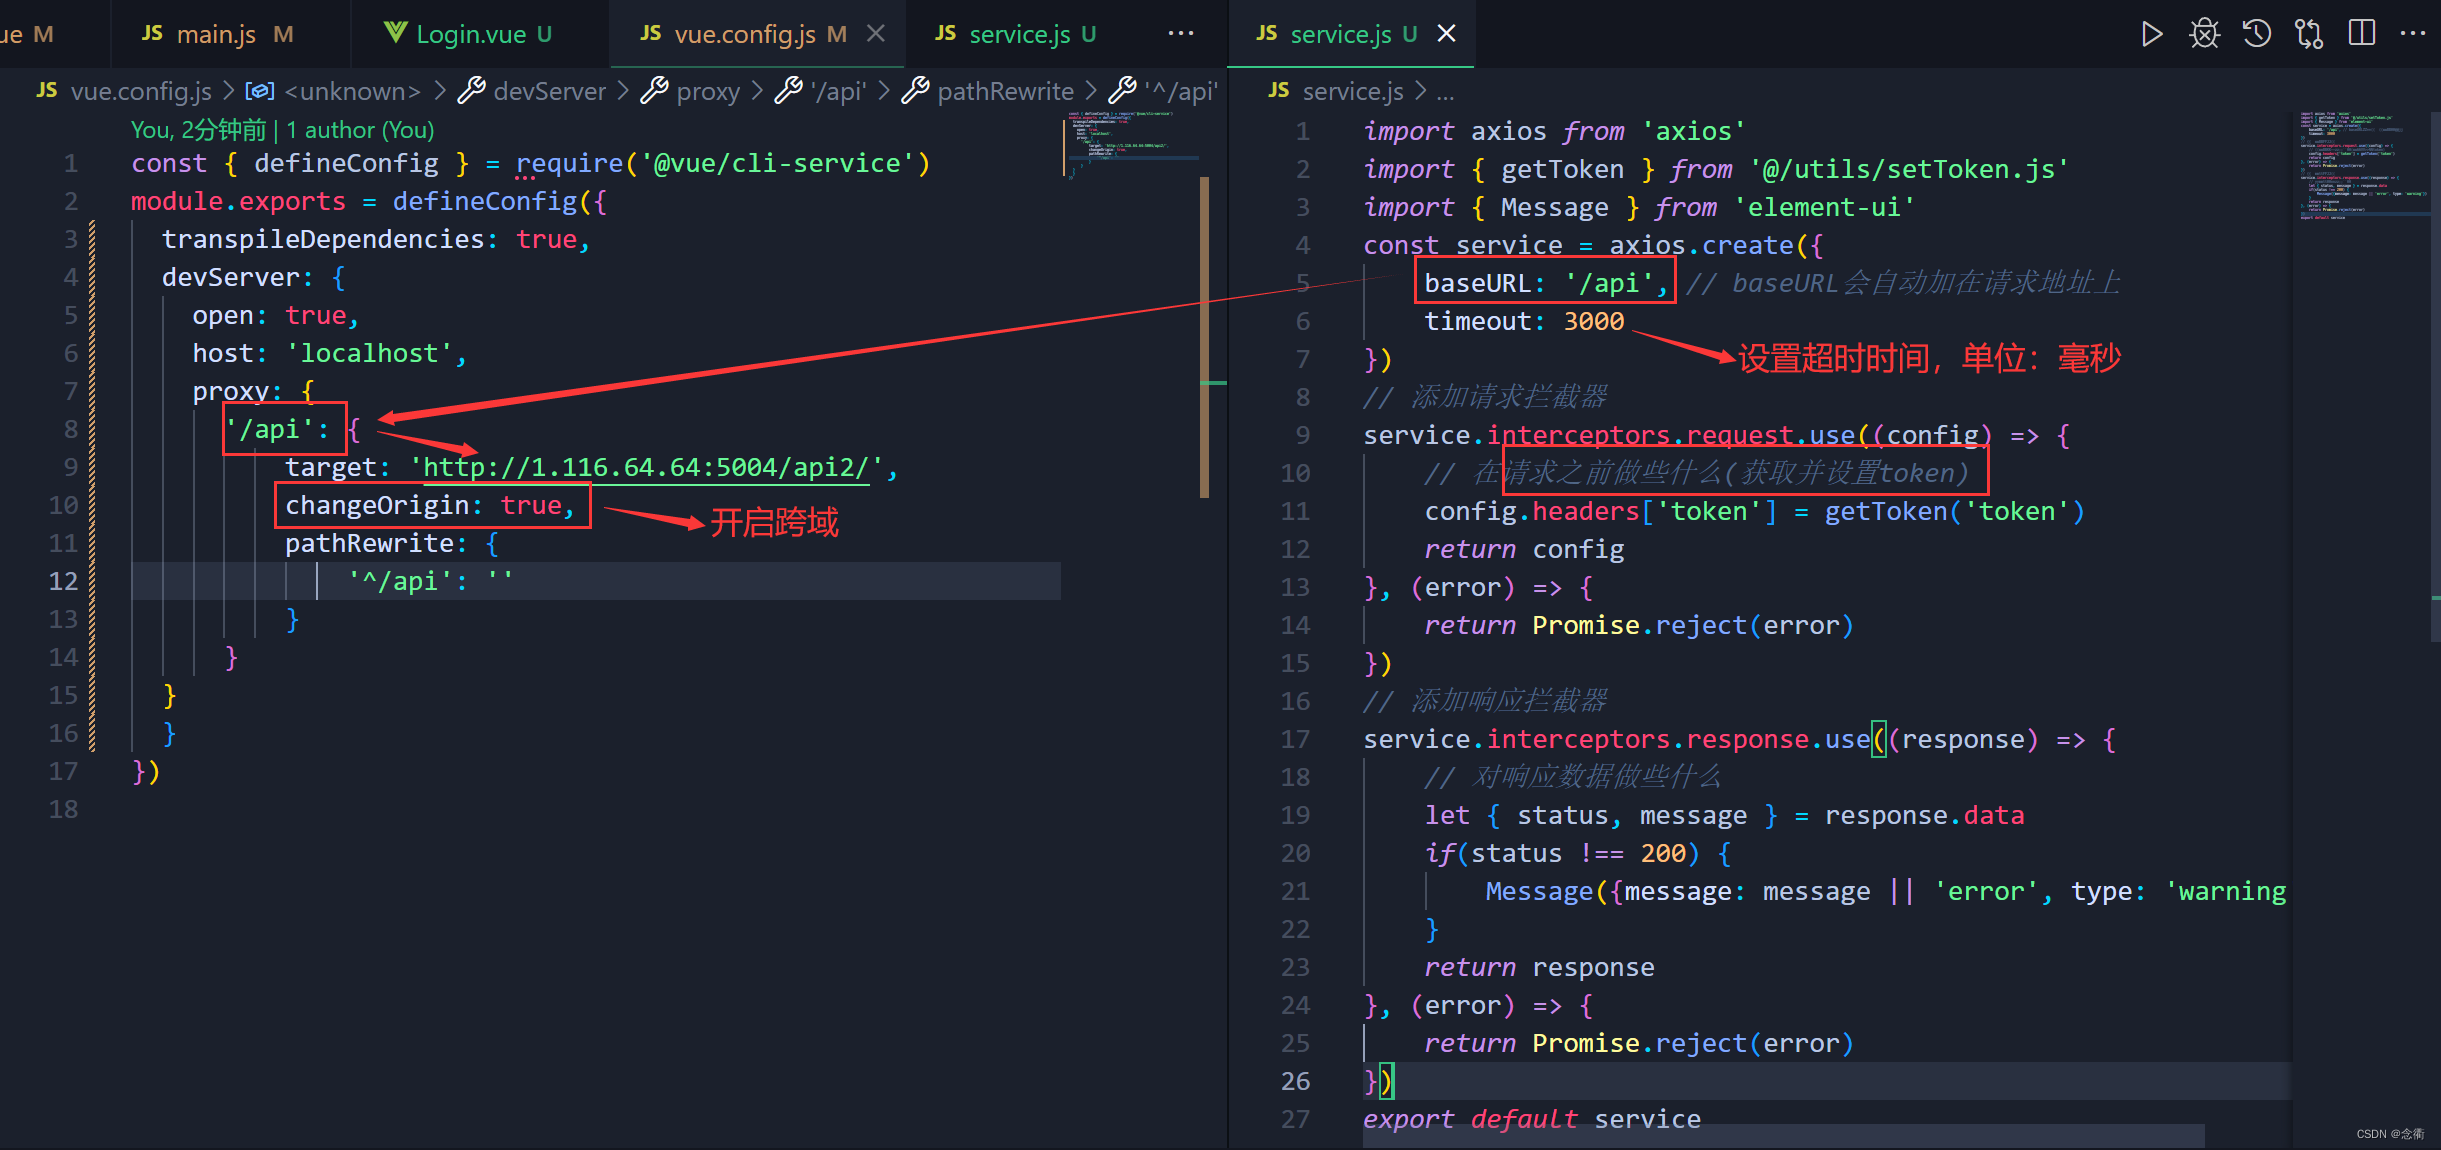
Test Results: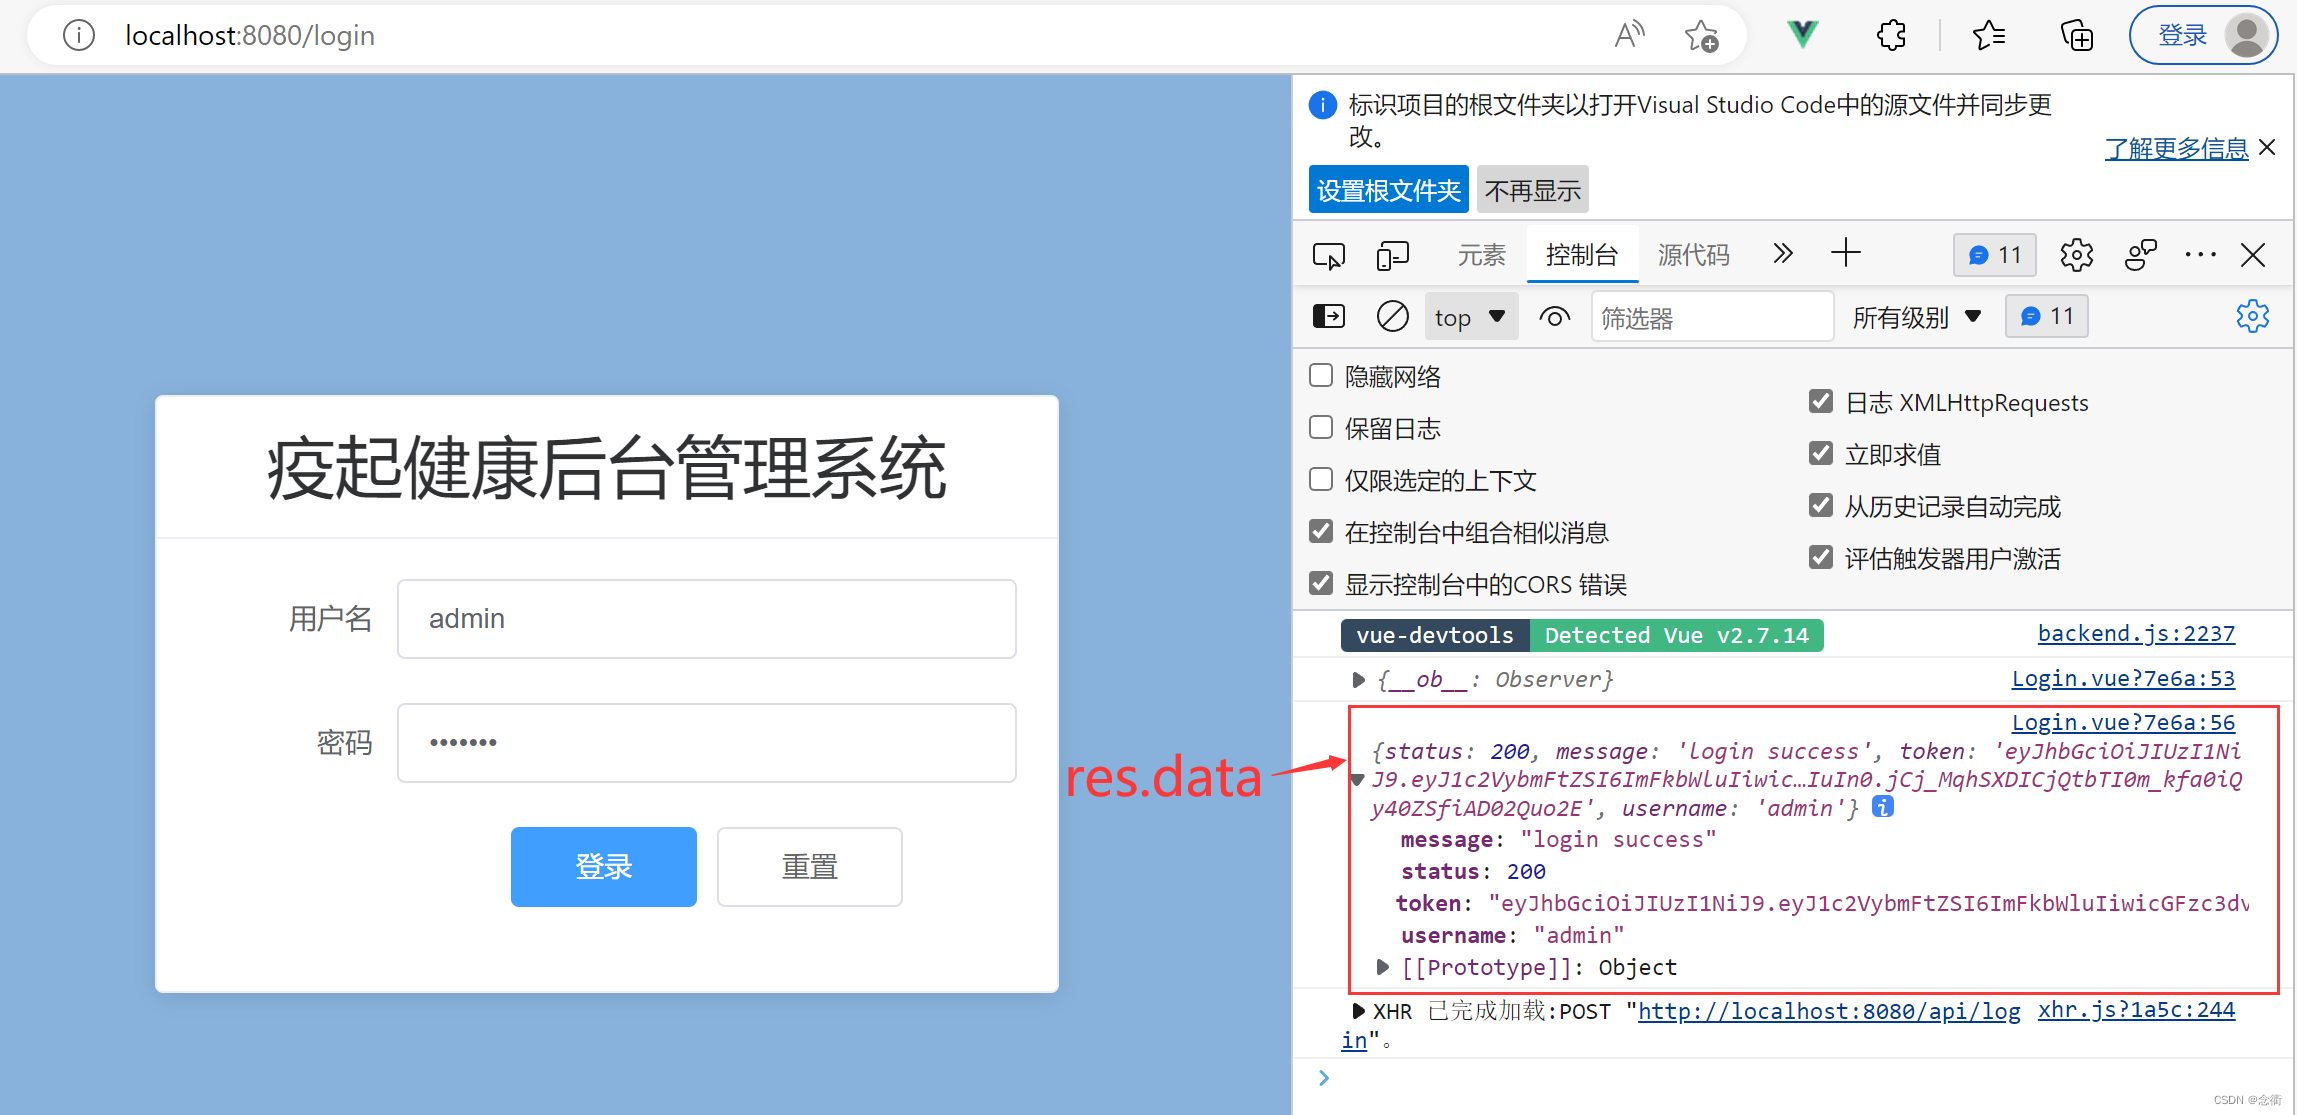
Next, Kangkang thinks about the data returned by the interface, besides the token, what else should be saved === "username ===" When the login is successful and the system home page is entered, the user name needs to be displayed, so: modify Login. The login method of the vue page is as follows: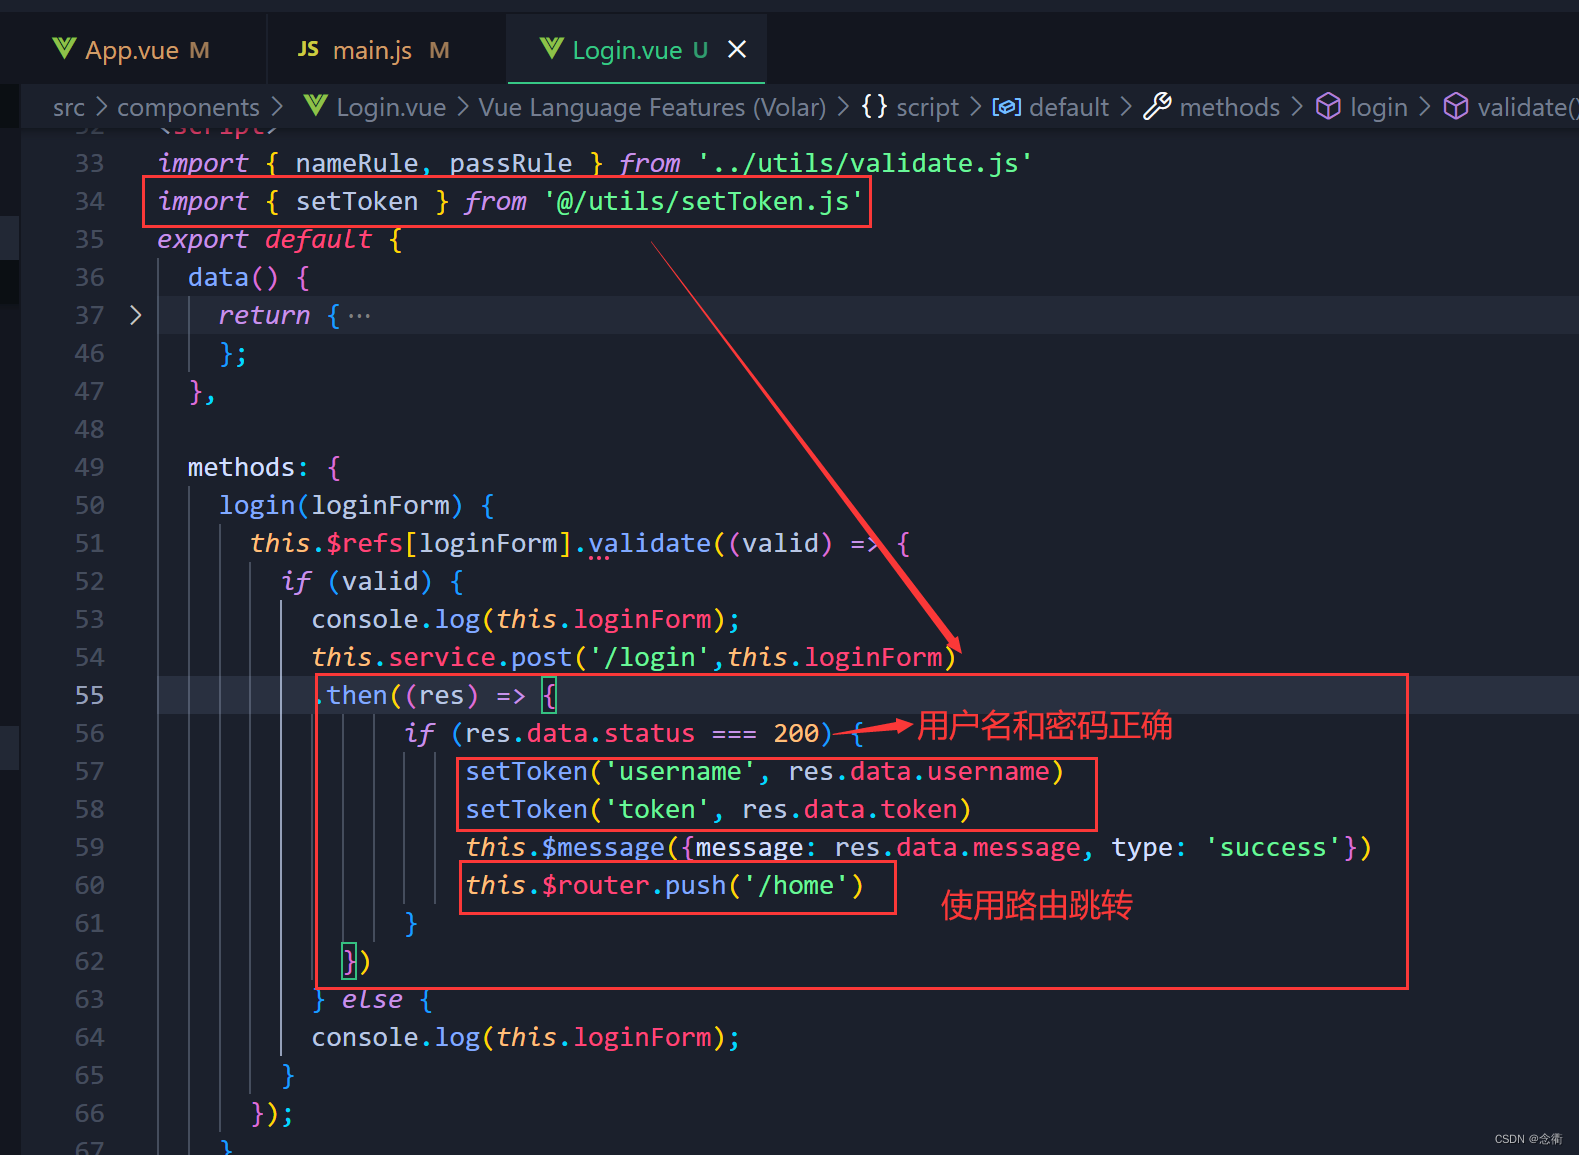
login(loginForm) {
      this.$refs[loginForm].validate((valid) => {
        if (valid) {
          console.log(this.loginForm);
          this.service.post('/login',this.loginForm)
          .then((res) => {
                if (res.data.status === 200) {
                    setToken('username', res.data.username)
                    setToken('token', res.data.token)
                    this.$message({message: res.data.message, type: 'success'})
                    this.$router.push('/home')
                }
            })
          } else {
          console.log(this.loginForm);
        }
      });
    },
After doing this step, I found that there is no problem with the code, but in order to facilitate subsequent project organization and maintenance, management interfaces and methods, ∴ the login method can be repackaged into an API for calling:
Under src, create a new api folder and create a new api.js file![]()
// 把对应的接口请求封装成api来调用
import service from '../service.js'

// 登录接口
export function login(data) {
    return service({
        method: 'post',
        url: '/login',
        data
    })
}
Use it on the Login.vue page:
404 page
Prepare static resources in the project: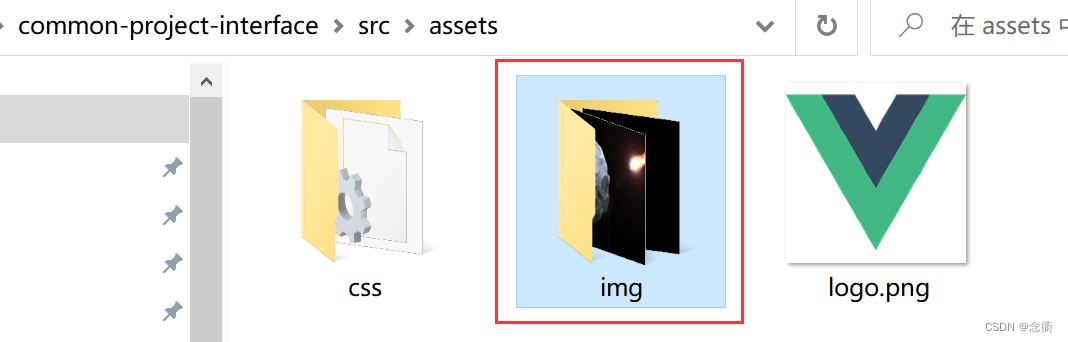
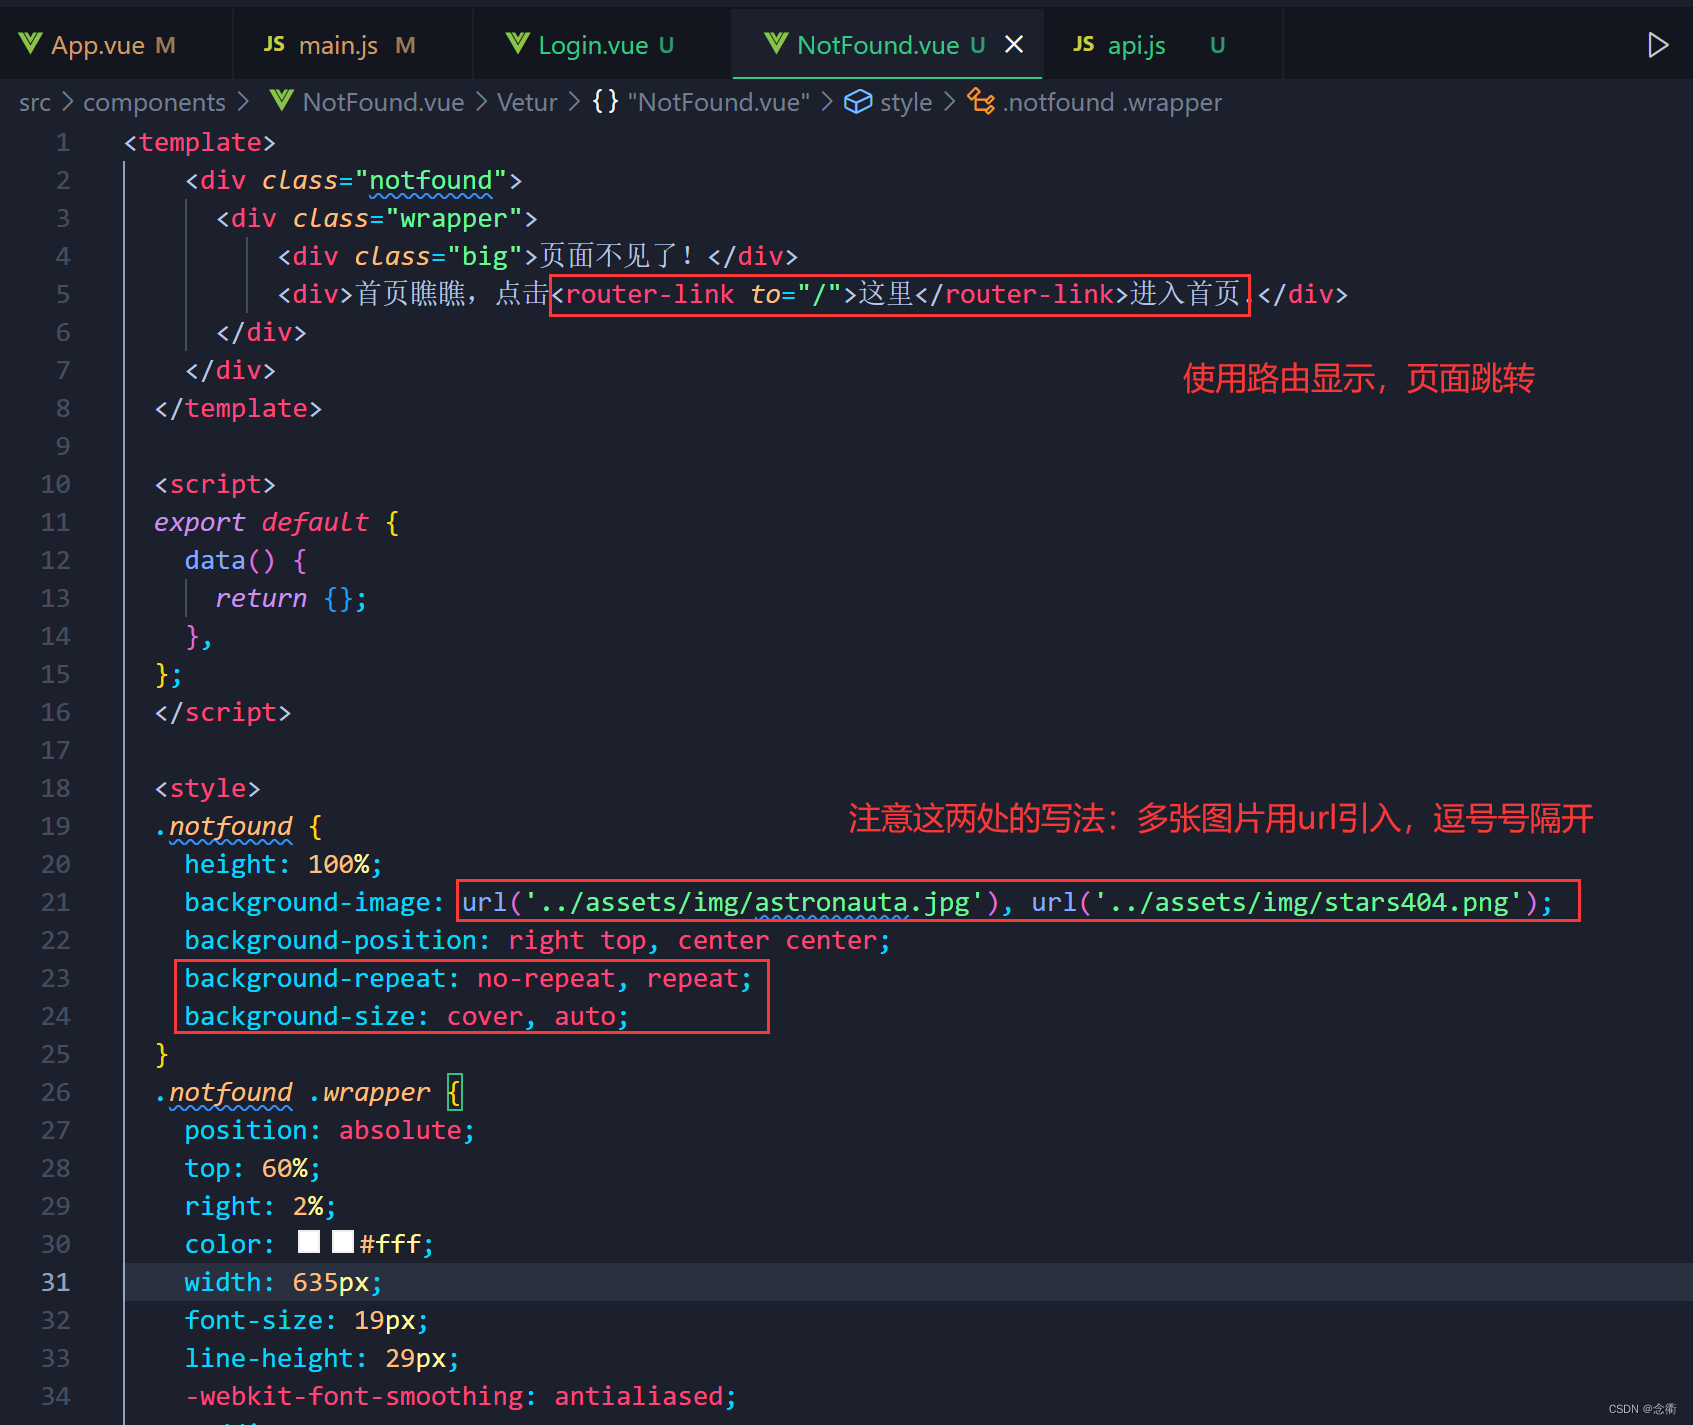
Create a new NotFound.vue under components
<template>
    <div class="notfound">
      <div class="wrapper">
          <div class="big">页面不见了!</div>
          <div>首页瞧瞧,点击<router-link to="/">这里</router-link>进入首页.</div>
      </div>
    </div>
  </template>

  <script>
  export default {
    data() {
      return {};
    },
  };
  </script>

  <style>
  .notfound {
    height: 100%;
    background-image: url('../assets/img/astronauta.jpg'), url('../assets/img/stars404.png');
    background-position: right top, center center;
    background-repeat: no-repeat, repeat;
    background-size: cover, auto;
  }
  .notfound .wrapper {
    position: absolute;
    top: 60%;
    right: 2%;
    color: #fff;
    width: 635px;
    font-size: 19px;
    line-height: 29px;
    -webkit-font-smoothing: antialiased;
    padding: 20px;
    font-family: 'Source Sans Pro', sans-serif;
  }
  .notfound .wrapper .big {
    font-size: 74px;
    font-weight: 700;
    line-height: 68px;
    margin-bottom: 48px;
  }
  .notfound .wrapper a {
    color: #ffcc00;
    text-decoration: none;
    font-weight: 700;
    cursor: pointer;
  }
  @media only screen and (max-width: 666px) {
    .notfound .wrapper {
      left: auto;
      right: 0;
      width: 100%;
      max-width: 450px;
      top: 35%;
    }
    .notfound .wrapper .big {
      font-size: 42px;
      line-height: 50px;
      margin-bottom: 15px;
    }
  }
  </style>
configure routing
Effect:
analyze: