Welcome to [youcans AIGC study notes] original works
GitHub Copilot free registration and installation and use in VS Code
-
- 1. GitHub Copilot Function Introduction
- 2. User registration and application
- 3. Install and use GitHub Copilot in VS Code
-
- 3.1 Install GitHub Copilot in VS Code
- 3.2 Using GitHub Copilot in VS Code
- 3.3 Use cases
- 3.3.1 Javascript: Automatically write functions and call them
- 3.3.2 Python: Automatically write code snippets that process data
- 3.3.3 matplotlib: Automatically write code for plotting and visualization
- 3.3.4 Python: Automatically write code for exception handling and error detection
- 4. Precautions
- 5. Summary
This article introduces in detail the subscription steps of GitHub Copilot (including free tutorials), and how to integrate it with VS Code.
Is this the spring of programmers, or the winter of programmers?
After Microsoft upgraded the Bing search engine, Edge browser, and Office family bucket with GPT-4, *GitHub released the Copilot X plan to introduce ChatGPT into the IDE. Copilot X is an upgraded version of GitHub Copilot that deeply integrates "AI support" into all stages and parts of the development process. In GitHub Copilot X, as long as the requirements are raised, CopilotX can write codes, explain unintelligible codes, and directly help us with Debug.
GitHub Copilot X is currently in beta for developers and requires a GitHub Copilot subscription to apply for waitlist status.
1. GitHub Copilot Function Introduction
GitHub Copilot, jointly developed by GitHub and OpenAI in 2021, is used through plug-in integration, supports VS Code, Visual Studio and JetBrains, and supports more than a dozen mainstream programming languages such as Python, JavaScript, TypeScript, Ruby and Go. Provides inline advice to aid in writing code.
GitHub Copilot is a large-scale generative AI development tool based on the OpenAI Codex model, which can automatically recommend/generate code as a reference when programmers write code.
The main features of GitHub Copilot are code completion, code generation, and smart suggestions.
1.1 Code Completion
When writing code, GitHub Copilot can automatically complete the rest of the code based on what the user has already entered, saving users time and effort.
-
Auto-completion of common functions and methods: When the user enters a method or function name, through the analysis and learning of a large number of code bases, the name of the function or method can be automatically completed, and the parameter list and Return value type.
-
Type inference auto-completion: According to the variable type or function parameter input by the user, the corresponding type information can be automatically completed and used in the subsequent code writing process.
-
Automatic completion of variables and properties: When the user enters an object name or property name, the name and parameter information of the object's properties and methods can be automatically completed based on the existing context and variable information.
-
Code block auto-completion: It can automatically identify the code paragraph that the user is writing, and automatically complete missing statements and code blocks according to the existing context and language grammar.
The code auto-completion function helps users to write code more quickly and conveniently, reduces the tedious steps when writing code, and promotes the improvement of development efficiency. This is very useful for junior programmers, the more rookie the more helpful, for example, I think the experience is very good.
1.2 Code generation
GitHub Copilot can help users write code faster by generating new code snippets based on user code input and context.
-
Function and method generation: When the user enters a method or function name, a new function or method can be automatically created, and corresponding parameter and return value types can be generated according to the existing context.
-
Class and object generation: New classes and objects can be automatically created according to the name and attribute information entered by the user, and corresponding method and attribute definitions can be generated according to the existing context.
-
Conditional statement and loop structure generation: When the user enters a conditional statement or loop structure, the corresponding statement and code block can be automatically generated according to the condition and the code segment in the loop body.
-
Code template generation: It can automatically generate code templates that meet the specifications by learning existing code libraries and code specifications, and generate corresponding code segments based on user input and context information.
By using GitHub Copilot, users can focus more on the business logic and algorithm design of the code without having to pay too much attention to the specific syntax and code implementation.
However, due to inaccurate user descriptions and inconsistent AI understanding, the generated code may have errors, requiring further inspection and modification by the user. In the initial experience, the effect of generating typical code segments is very good, and at least a rough framework can be built for custom requirements.
The overall evaluation is the same as above, it is very easy to use for junior programmers, the more rookie the more helpful.
1.3 Smart Suggestions
Copilot will provide users with more intelligent and accurate code suggestions based on the context and existing code, making the code more accurate and efficient.
- Grammatical error correction: Provide real-time grammatical verification and error prompts, as well as suggestions and repair solutions for possible code errors.
- Operation tips: When the user performs some operations on the code segment, corresponding operation tips can be provided, so that the user can perform operations more accurately and quickly deal with problems in the code.
- Optimization suggestions: According to the existing context and grammatical rules, it can provide users with optimization suggestions and code refactoring suggestions, so as to improve the quality and execution efficiency of the code.
- Tips: According to the user's input, request, fault, etc., it can provide tips and hints, so that users can use the tool better and quickly familiarize themselves with or master related programming skills.
The smart suggestion function can improve the accuracy and efficiency of user code writing and remove redundant operations, thereby improving the quality and efficiency of development.
1.4 Supported languages and IDE integration tools
GitHub Copilot supports a variety of programming languages, including Python, JavaScript, TypeScript, Ruby, Go, and Rust, among others.
GitHub Copilot can be integrated with common development tools (such as Visual Studio Code) and online code editors (such as CodePen) to provide a more flexible programming experience.
2. User registration and application
(1) Register a GitHub account. This needs no introduction.
(2) Subscribe to GitHub Copilot. To apply for using GitHub Copilot X, you must first register GitHub Copilot, so this article will also introduce it.
(3) Apply for the use of GitHub Copilot X, which will be introduced in detail in this article.
2.1 Personal subscription to GitHub Copilot
GitHub Copilot supports VS Code, Visual Studio, Neovim, and JetBrains, and can provide code support for more than a dozen coding languages such as Python, JavaScript, TypeScript, Go, and Ruby.
After signing up for a GitHub account, subscribe to GitHub Copilot for your personal account:
(1) In the upper right corner of any GitHub page, click your profile photo, then click to Settingsenter your personal account settings page.
(2) In the "Code, Planning and Automation" section of the sidebar, click Copilot, and the GitHub Copilot window appears as follows.
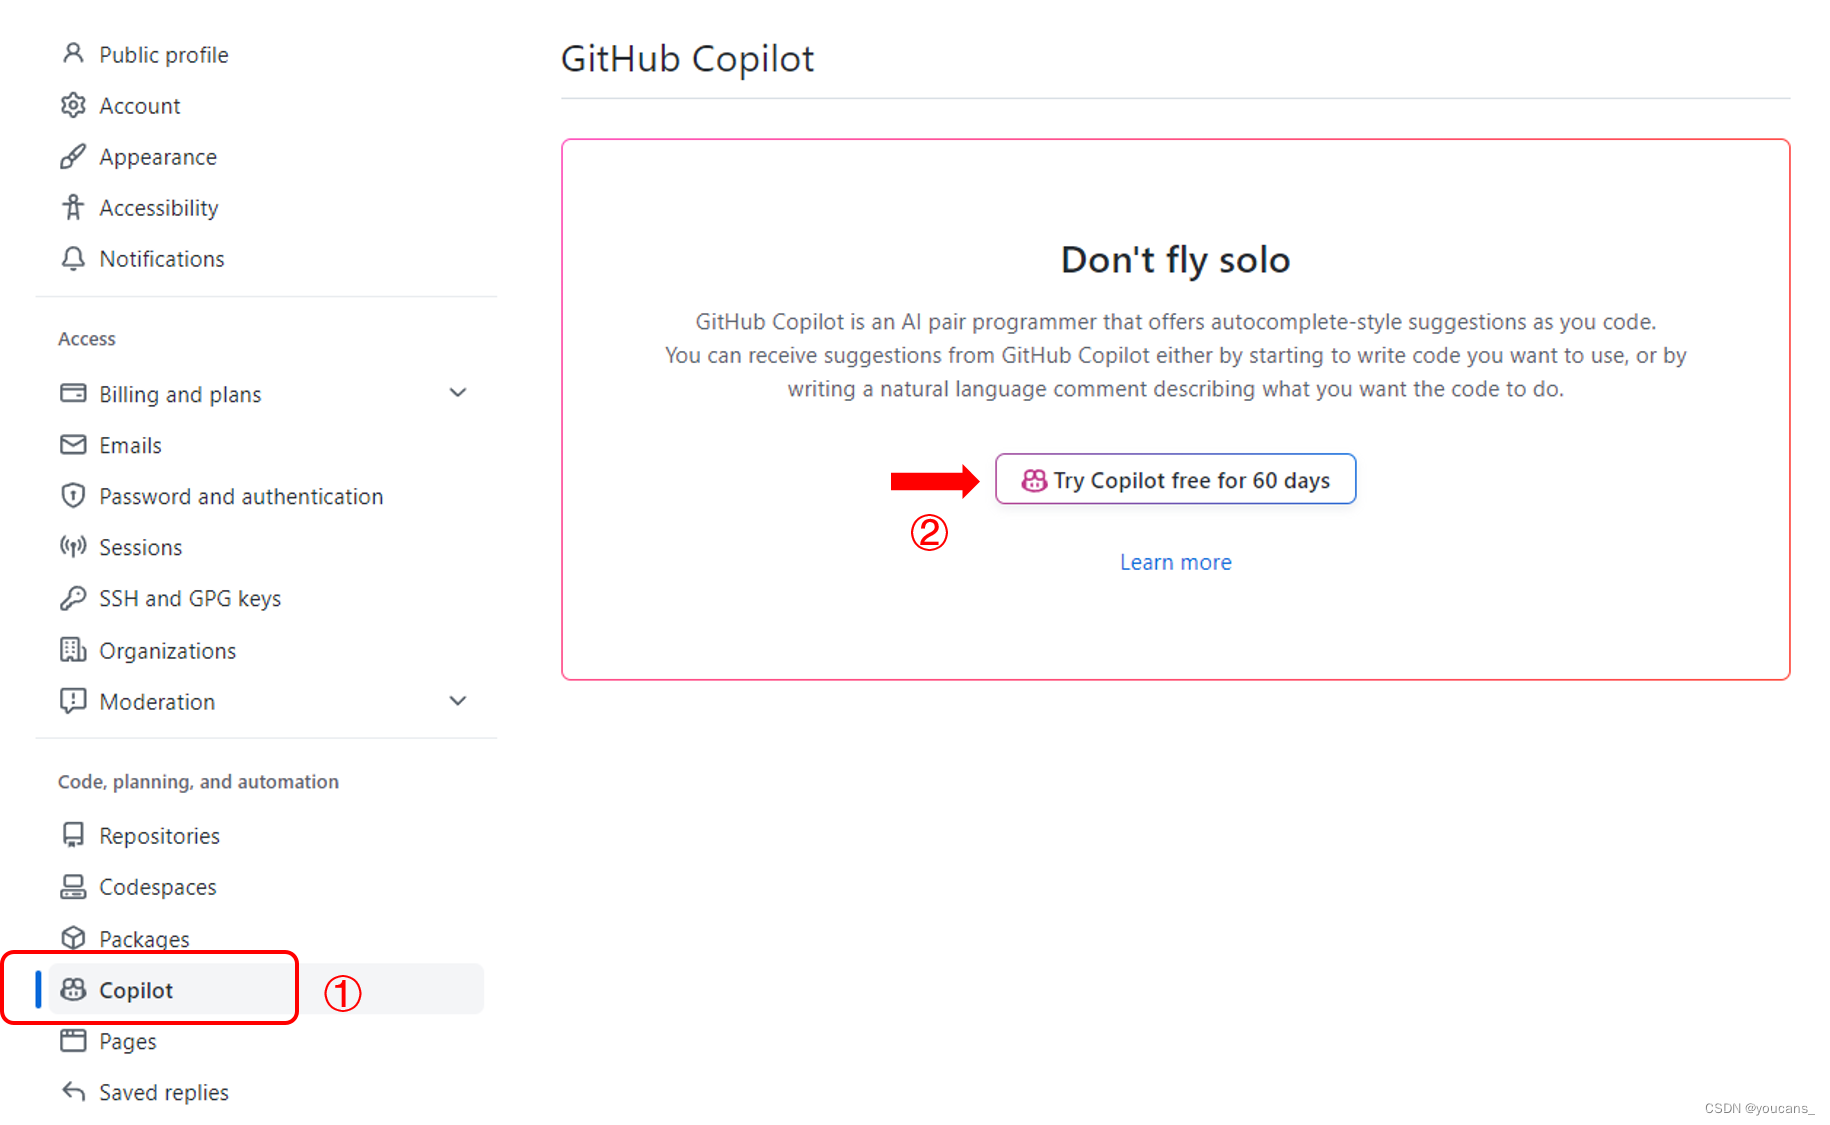
(3) On the GitHub Copilot settings page, select Enable GitHub Copilot, which is Try Copilot free for 60 daysthe button .
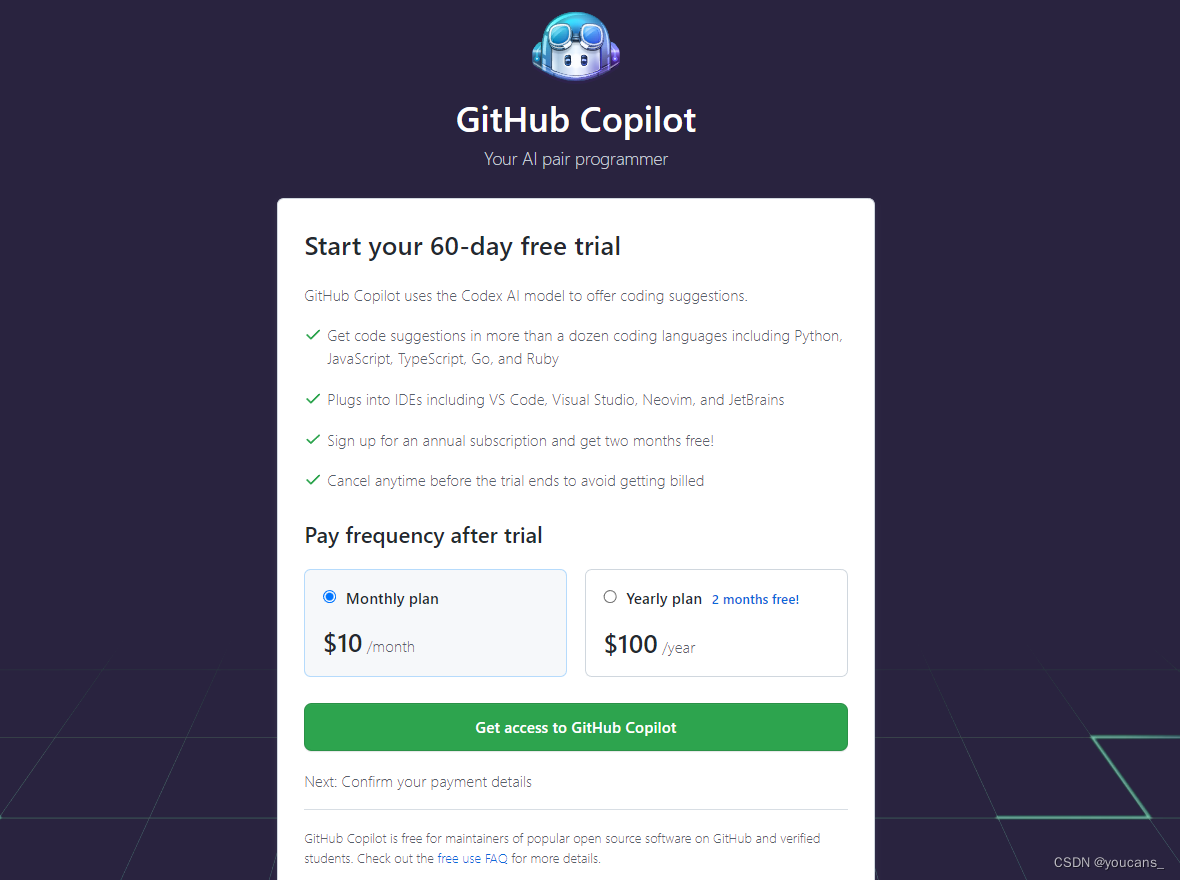
(4) Next, the payment plan will pop up, and you need to choose "Payment by Month" or "Payment by Year", and continue to operate after selection, which is as shown in the figure below Get accesss to GitHub Copilot.
That said, while it's free for 60 days, you're currently subscribing to a paid plan. Of course, this paid plan can be canceled before the trial period ends.
If your GitHub account meets the criteria for a free subscription to GitHub Copilot, (4) (5) will be skipped and step (6) will be automatically entered.
(5) Fill in the payment information for the payment subscription plan, you need to fill in the credit card information, and then click Submit.
That is, you have subscribed to a paid plan and will be automatically charged by credit card after the 60 days of free usage expire. While this paid plan can be canceled before the trial period ends, you will be charged automatically if you forget to cancel. This is exactly the same as the principle of preferential tariff packages for mobile phones.
(6) Click "Save" to complete the personal account registration GitHub Copilot.
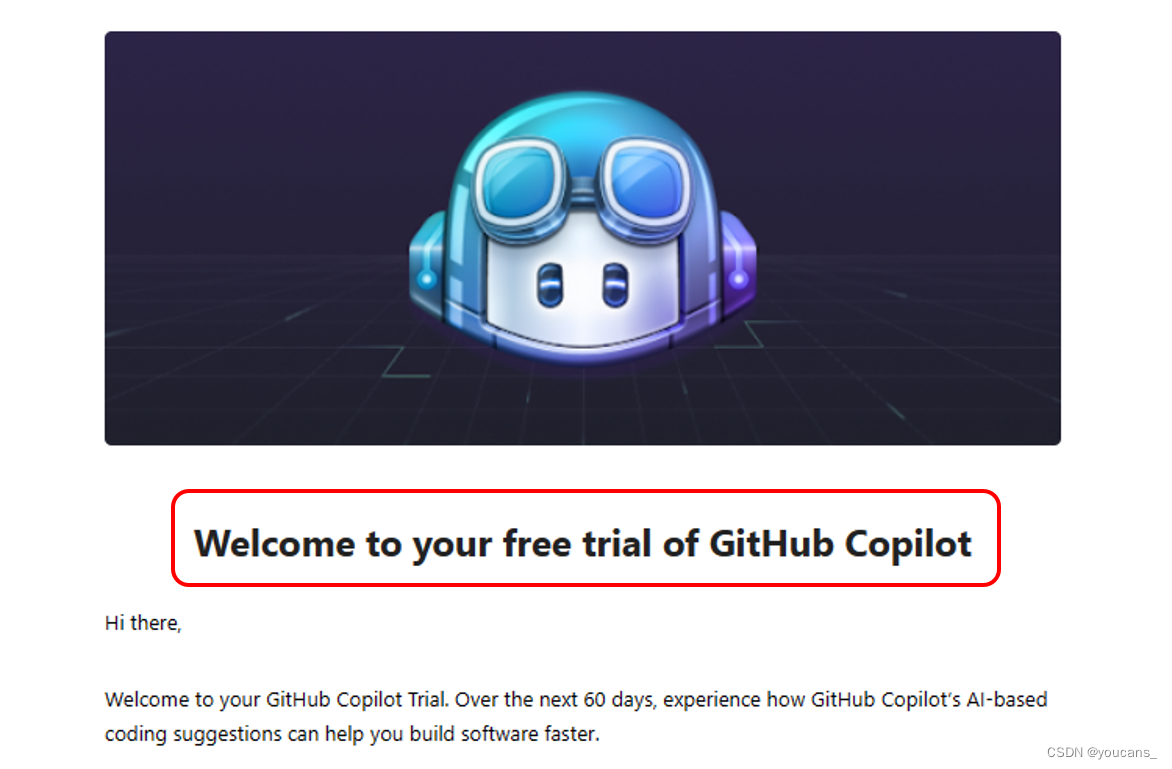
Although GitHub Copilot offers 60 days of free use, credit card information is still required during the registration process. And, what happens when the 60 days expire?
What we care about is: Is there a free way? See Section 3.3 of this article for details: Free, Free!
2.2 Unsubscribe from GitHub Copilot
Since credit card information is used when subscribing to GitHub Copilot, although it can be used for free for 60 days, if the subscription is not canceled in time, it will be automatically charged.
To unsubscribe from GitHub Copilot, follow these steps:
(1) Log in to GitHub, click on the account avatar, and select setting.
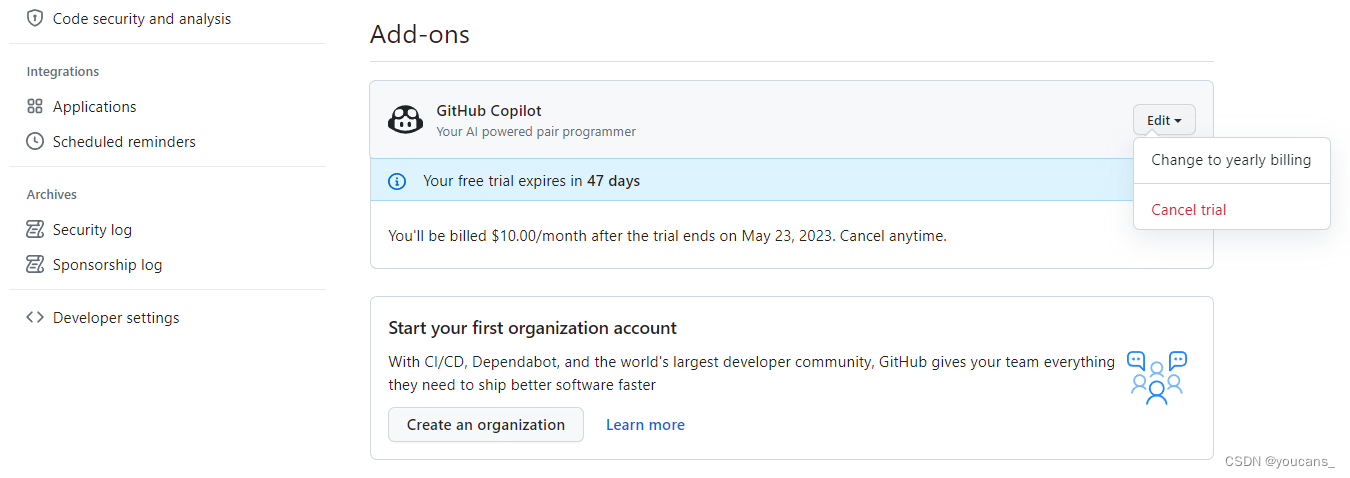
(2) Select a paid plan on the left menu bar: "Billing and plans" – "Plans and usage".
(3) Scroll down to find "Add-ones". For the "GitHub Copilot" project, click Editthe button , and select from the drop-down box Cancel trialto unsubscribe.
2.3 Free, free!
To apply for Copilot X, GitHub Copilot qualification is required. While GitHub Copilot is available as a free 60-day trial, credit card information is required to qualify for a Copilot subscription. What a familiar routine, even GitHub has learned it.
Of course we want it for free!
GitHub Copilot is free for verified students, teachers, and maintainers of popular open source projects. If you don't qualify, you can try GitHub Copilot for free in a one-time 60-day trial. After the free trial, a paid subscription is required to continue using it.
GitHub Copilot is free for verified students, teachers, and maintainers of popular open source projects.
2.3.1 GitHub Student Certification
Authentication entry: 【GitHub education】https://education.github.com/benefits
Steps:
(1) After logging in to the GitHub account, enter the [GitHub education] page as shown in the figure, and select Get Students Benefitsthe button .

(2) Fill in the email address, school and purpose in the form in English.
Note that you must use the school email address of the university you fill in and verify the school email address.

(3) Enter the student status verification page. You need to take a photo with a camera, or you can upload a photo. Notice:
- The school status certificate should include the name of the school and the valid year. If there is no valid year on the student card, you can apply for student status certification on Zaixuexin.com.
- Multiple supporting documents can be included in the uploaded photo, and if the original document is not in English, a photo of the original document can be taken next to the English translation.
- It is recommended to take pictures with a camera, or you can take a photo with your mobile phone and upload it.
- The current Internet location is best in the school, at least in the city where the school is located.
GitHub student authentication is relatively strict. If the authentication fails, a Rejected email will be sent, and a reminder will also be given in the GitHub message.
As long as you are indeed a student, have a school mailbox, submit and modify materials as required, you will definitely be approved.
2.3.2 GitHub Copilot Teacher Certification
Authentication entry: 【GitHub education】https://education.github.com/benefits
Steps:
(1) After logging in to the GitHub account, enter the [GitHub education] page and select Get Teachers Benefitsthe button .
(2) Fill in the email address, school and purpose in the form in English.
(3) Enter the teacher identity verification page,
Teacher qualification certificates, work permits, etc. can be used, and the name of the university is required on the certificates. Multiple pieces of evidence can be included in uploaded photos. If the original document is not in English, you can take a photo of the original document next to the English translation.
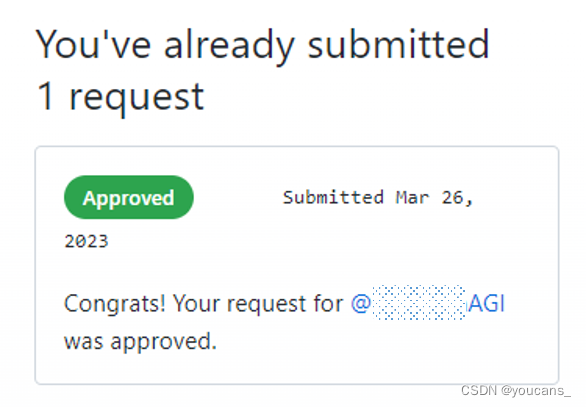
After passing the GitHub student/teacher certification, you will receive the following notification, and you will also receive emails in the reserved email.
2.3.3 Free subscription to GitHub Copilot
After passing the GitHub student/teacher certification, follow the steps of subscribing to GitHub Copilot in section 2.1 of this article, the system will automatically recognize that your GitHub account meets the standards for free subscription to Copilot, skip the payment information step, and complete the personal account subscription to Copilot.
As shown below.

3. Install and use GitHub Copilot in VS Code
Use VSCode to view and incorporate suggestions from GitHub Copilot directly in the editor.

3.1 Install GitHub Copilot in VS Code
3.1.1 Install Visual Studio Code
To use GitHub Copilot with VS Code, VS Code must be installed.
VSCode (Visual Studio Code) is a free and open source modern lightweight code editor that supports almost all mainstream development languages, built-in command-line tools and Git version control system, supports plug-in extensions, and has been developed for web development and cloud application development. Optimization is an excellent remote development tool.
VSCode cross-platform supports Win, Mac and Linux, it has built-in support for JavaScript, TypeScript and Node.js, and has rich other languages (such as C++, C#, Java, Python, PHP, Go) and runtime (such as .NET and Unity) extended ecosystem.
installation steps:
- Download VSCodeUserSetup-x64-1.62.2 and install it.
- It is recommended to modify the installation path to the D: drive, such as installing to the D:\VSCode directory.
- Install the Chinese plug-in package:
Start VSCode, press Ctrl + Shift + P to open the command debugging board, enter "Configure Display Language", and change the language configuration option to "zh-cn".
Click the "Extension" button to enter the VSCode application store, search for and install the Chinese plug-in package, enter "Language Packs" in the search box, and select Chinese (Simplified) to install.
Restart VSCode, it is recommended to restart after shutdown.
3.1.2 Install the GitHub Copilot extension
Install the GitHub Copilot extension in VSCode.
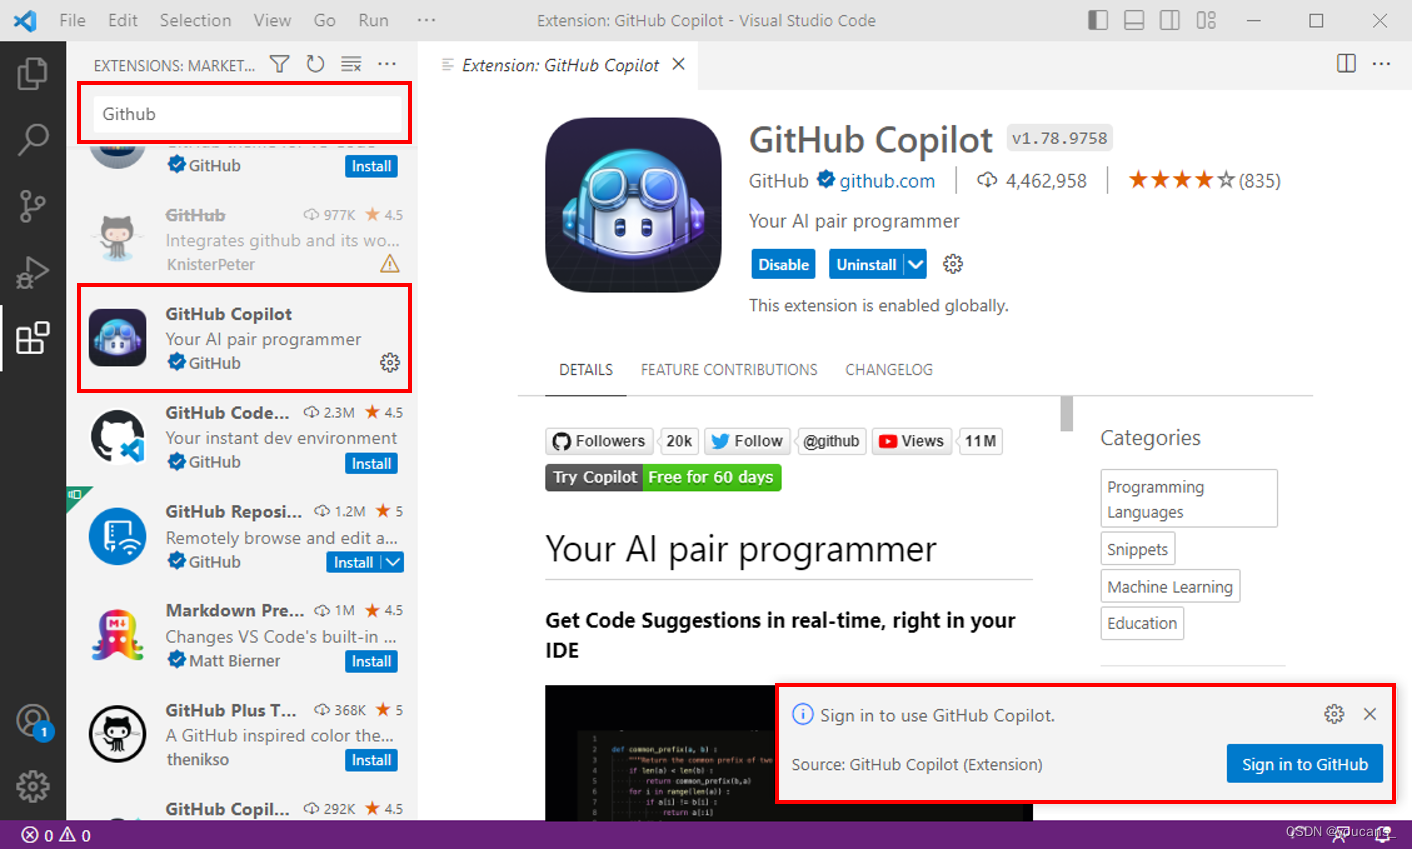
(1) In the VS Code market, search GitHub to find the GitHub Copilot extension, click Installto install the extension.
(2) If VS Code has been authorized in the account on GitHub before, the system will automatically authorize GitHub Copilot.
(3) If VS Code has not been authorized in the GitHub account before, the system will prompt you to log in to GitHub and authorize.
-
As shown in the figure above, there is a prompt window in the lower right corner of VS Code. Usually, a GitHub login and authorization window as shown on the left side of the figure below will pop up automatically; if it does not pop up automatically, you can click
Sign to GitHubthe button . -
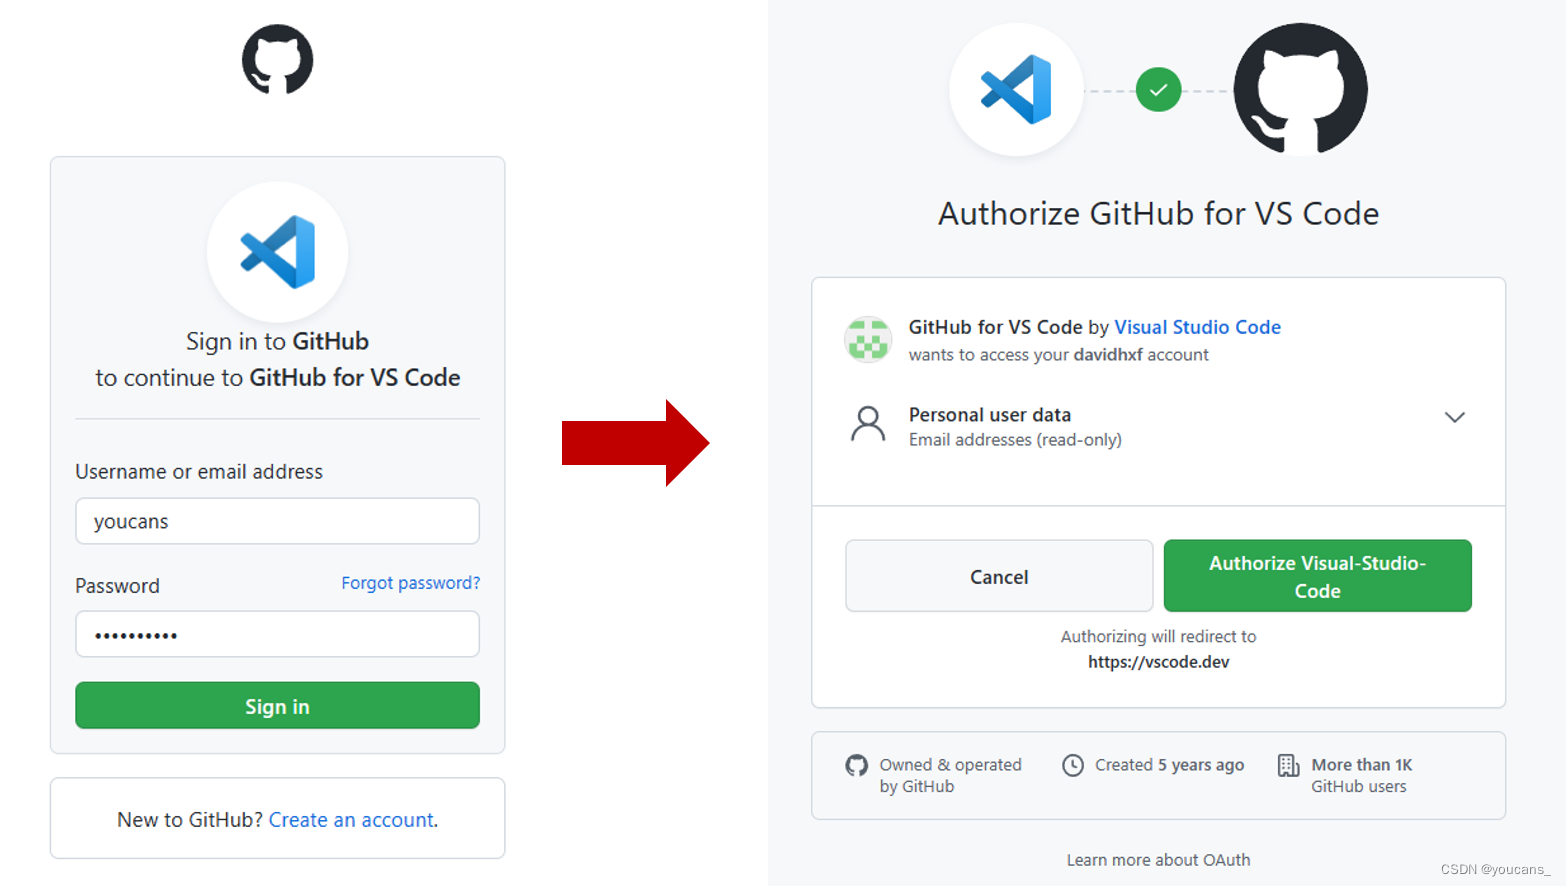
In the GitHub login window, log in to your personal account (requires you have successfully subscribed to GitHub Copilot), as shown on the right side of the figure below.
-
GitHub will request permission for GitHub Copilot to send an email with a verification code to the account's primary email address.
-
Fill in the verification code and click
Authorize Visual Studio Codethe button to authorize. -
In the status bar at the bottom right of VS Code, a GitHub Copilot pig mouth will appear, indicating that the authorization is successful!
3.2 Using GitHub Copilot in VS Code
3.2.1 Basic steps
The basic methods and rules for writing code in GitHub Copilot are as follows:
- Choose the appropriate programming language based on the project needs.
- Open the dev tools and start GitHub Copilot.
- Get input based on your code's business requirements.
- Enter the code according to the code logic, and GitHub Copilot will automatically complete the code for the user.
- After the code is automatically completed, edit and modify the code according to the suggestions and prompts of the automatic completion.
- Verify the syntactic structure and semantic correctness of the code.
- Save the code to a file for later use and maintenance.
3.2.2 How to use
GitHub Copilot provides recommendations for many languages and various frameworks, but is particularly useful for Python, JavaScript, TypeScript, Ruby, Go, C#, and C++.
The following examples are written in Python, other languages work similarly.
(1) In the VSCode code, create a new python (*.py) file.
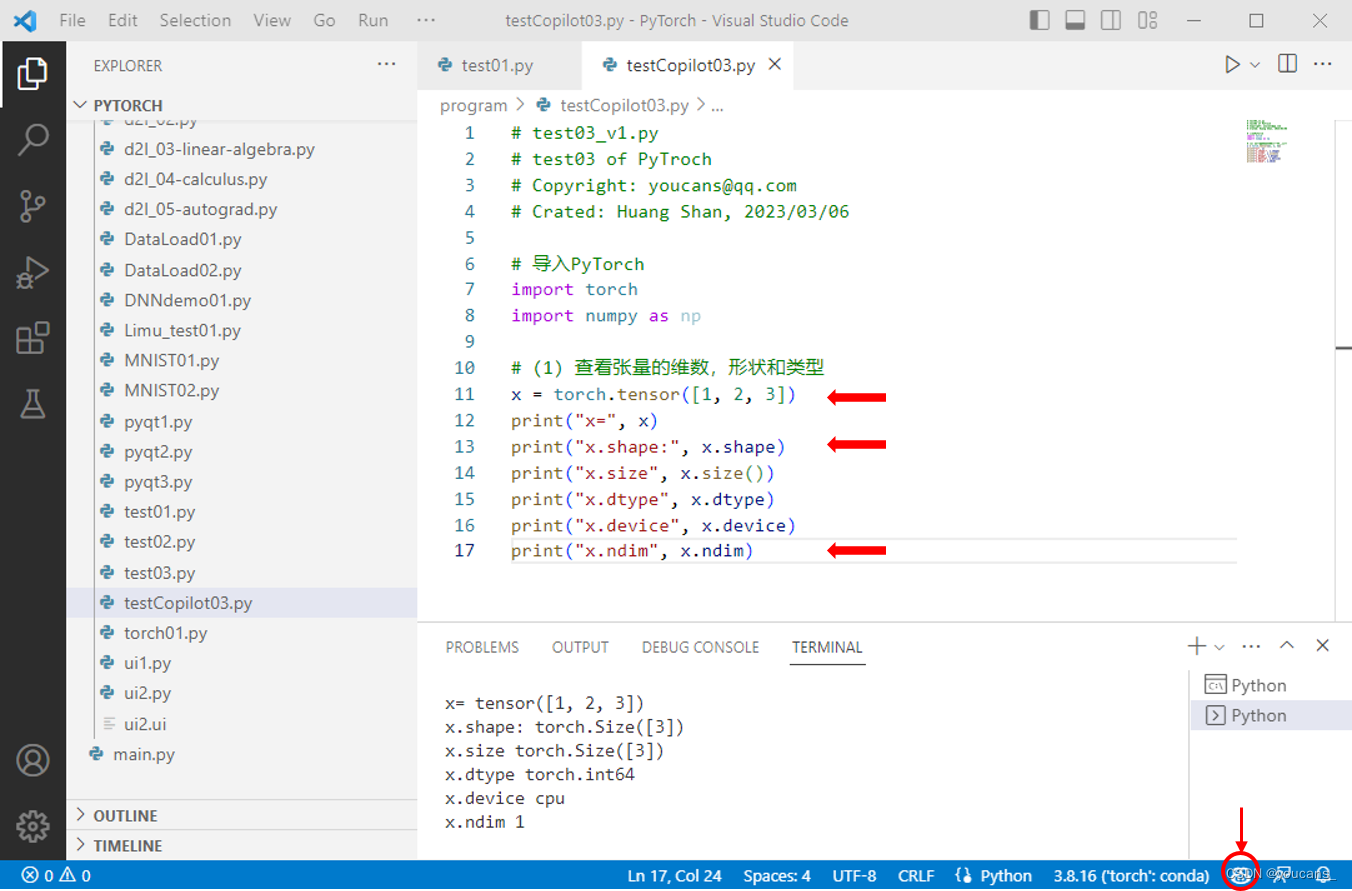
(2) In a Python file, after typing a comment or code, GitHub Copilot will automatically suggest the entire function body in gray text, as shown below.
(3) To accept Copilot's suggestion, press Tabthe key .
(4) If you do not accept the suggestion, please press Escthe key , or you do not need to do anything, just keep typing, and GitHub Copilot will continue to complete the code according to the context.
(5) You can choose to view other suggestions of Copilot (if any), Windows system uses Alt+ ]to view the next suggestion, Alt+ [to view the previous suggestion.
illustrate:
- In the picture above, in the status bar at the bottom right of VSCode, the red arrow and the circle position are marked with the GitHub Copilot's little pig's mouth, indicating that the GitHub Copilot plug-in is enabled.
- Whether it is a comment in the code, a sentence of execution code, a code block, or a function, GitHub Copilot will continue to provide code completion suggestions as you enter the process.
- Each line of code in the above figure is actually code-completion by GitHub Copilot. Of course, GitHub Copilot may also guess wrongly about the code you intend to write, but as long as you keep typing, it will give new suggestions.
- For any given input, GitHub Copilot may offer multiple suggestions. You can choose which suggestions to use, or reject all suggestions.
- Users can enable or disable GitHub Copilot, click the status icon (little pig's mouth) in the status bar at the bottom right of VSCode to choose to enable or disable GitHub Copilot's suggestion.
For more usage methods, please refer to:
-
[GitHub Copilot Getting Started Tutorial] : Getting started with GitHub Copilot in Visual Studio Code
-
[GitHub Copilot Configuration Guide] : Configuring GitHub Copilot in Visual Studio Code
3.3 Use cases
3.3.1 Javascript: Automatically write functions and call them
- Open Visual Studio Code, install and enable the Copilot plugin.
- In the newly created project, open the file used to write the code, eg
index.js. - Enter the following code in the file:
// 按下 Ctrl+Shift+P 启动命令面板
// 输入并运行 "Copilot: Generate Function"
// 输入函数名和参数列表
// Copilot 将自动生成一个函数并在光标处插入函数调用语句
- Press Ctrl+Shift+P to launch the command palette, enter "Copilot: Generate Function" in the command palette and execute the command.
- In the pop-up dialog box, enter the function name and parameter list, eg
function demoFunc(a, b). - Click OK, Copilot will automatically generate a function
demoFuncnamed and insert it into the file, and insert the function call statement at the cursor. - Verify that the auto-generated functions meet your requirements, and edit and tweak them if you need to modify them.
- To call the automatically generated function, you can modify the function parameters, add other codes, debug, etc. according to your own needs.
3.3.2 Python: Automatically write code snippets that process data
- Open Visual Studio Code, install and enable the Copilot plugin. Make sure that in the newly created project, Copilot is started and set up.
- In the newly created Python file, define variables and program logic according to specific data processing requirements.
- In the process of writing data processing code, if you encounter uncertain parts, you can use functions such as automatic completion, code generation and intelligent suggestion provided by Copilot.
- Debug and correct the auto-generated code to make sure it meets the requirements.
- At the end of the program, the automatically generated code segment is called to process the data to ensure that the input and output are as expected.
The following shows a specific example, using the Python language to implement a case of automatically generating a code segment that converts a list into a string:
# 创建一个列表
lst = [1, 2, 3, 4, 5]

# 按下 Ctrl+Shift+P 启动命令面板
# 输入并运行 "Copilot: Generate Code"
# 输入将列表转换为字符串的代码
# Copilot 将自动生成代码并插入到文件中
- First create a Python file and create a list in the file
lst. - Press Ctrl+Shift+P to start the command palette, and enter "Copilot: Generate Code" in the command palette.
- Click OK to enter the data processing code that needs to be automatically written. For example, convert a list to a comma-separated string and print it to the console. Enter the following code and confirm:
# Convert list to comma-separated string
string = ', '.join(map(str, lst))
print(string)
- Copilot will automatically generate code snippets and insert them into the file. The generated code snippet looks like this:
# Convert list to comma-separated string
string = ', '.join(map(str, lst))
print(string)
- Confirm that the generated code meets the requirements, modify and adjust it if necessary. For example, change the output statement to reflect a specific output format.
- Once complete, save the file and execute the program to test that the generated code works correctly. Check the code processing results in the output log.
This example demonstrates how to use Copilot to automatically generate code blocks to process data in a Python file.
Note: When writing code blocks, you need to carefully review the code automatically generated by Copilot, and make necessary modifications and adjustments to ensure that the generated code fragments meet the programming specifications and semantic requirements of the programming language.
3.3.3 matplotlib: Automatically write code for plotting and visualization
- Open Visual Studio Code, install and enable the Copilot plugin. Make sure that in the newly created project, Copilot is started and set up.
- In the newly created Python file, import the required libraries such as matplotlib and numpy. Define variables and program logic.
- In the process of writing drawing and visualization code, if you encounter uncertain parts, you can use functions such as auto-completion, code generation and smart suggestions provided by Copilot.
- Modify the code automatically generated by Copilot as needed, debug and correct.
- At the end of the program, call the code segment automatically generated by Copilot to realize drawing and visualization operations.
The following shows a specific example of automatically writing a simple matplotlib drawing code segment using the Python language:
# 导入库并生成数据
import matplotlib.pyplot as plt
import numpy as np

x = np.linspace(0, 6*np.pi, 100)
y = np.sin(x) + np.random.normal(0, 0.2, x.size)

# 按下 Ctrl+Shift+P 启动命令面板
# 输入并运行 "Copilot: Generate Plot"
# 选择绘图类型和确定参数
# Copilot 将自动生成代码并插入到文件中
-
First, use the numpy library to generate an array as the data input for this plotting operation.
-
Press Ctrl+Shift+P to launch the command palette, enter "Copilot: Generate Plot" in the command palette, and run the command.
-
Select the type of graph to draw and determine the required parameters, such as selecting "Line Graph" and setting the line type, color, and labels. For example, set the line type to solid and draw it in red, set the label to "sin(x)+noise", and confirm the relevant parameters.
-
Copilot will automatically generate the code snippet and insert it into the file. The generated code snippet looks like this:
# Plot the data as a line chart
plt.plot(x, y, 'r-', label='sin(x)+noise')
plt.legend()
plt.show()
- Confirm that the generated code meets the requirements, modify and adjust it if necessary. For example, change the plot style to another type, such as column or scatter, or change plot parameters.
- Finally, save the file and run the program to test that the generated code works correctly. If all is well, review the plot results in the output log to ensure that the generated code snippet can successfully display the data.
3.3.4 Python: Automatically write code for exception handling and error detection
Ok, the following is a GitHub Copilot case that uses the Python language to automatically write exception handling and error detection code in VS Code:
- Open Visual Studio Code, install and enable the Copilot plugin. Make sure that in the newly created project, Copilot is started and set up.
- In the newly created Python file, include the function or program logic that needs to write exception handling and error detection code.
- In the process of writing exception handling and error detection code, if you encounter uncertain parts, you can use the functions provided by Copilot, such as automatic completion, code generation and intelligent suggestions, such as input
try/exceptcode - Modify the code automatically generated by Copilot as needed, debug and correct.
- Called at the end of the program to ensure that the exception handling and error detection code blocks of the function can run normally and effectively capture exceptions and error messages.
The following shows a specific example of automatically writing a simple error handling and exception detection code segment using the Python language:
# 定义函数
def divide(divisor, dividend):
    try:
        result = divisor / dividend
    except ZeroDivisionError:
        print("Error: division by zero")
        result = None
    return result

# 进行函数调用
a = 2
b = 0
c = divide(a, b)
-
First, define a function
dividecalled . This function accepts two parameters, which aredividendanddivisor. -
Use Copilot input
try/exceptcode blocks, or other related error handling or exception detection statements, to ensure that the functiondividecan handle appropriate exceptions and error conditions. Modify the automatically generated code segment according to actual needs. -
Call the function on the last line and verify that the function handles exceptions and error conditions gracefully. For example,
dividewhen , useaas the divisor and usebas the dividend for division. Since the divisor is zero, the function may throw a ZeroDivisionError exception, causing the program to terminate. -
Confirm that the generated code meets the requirements, and modify and adjust it. For example, put error detection and exception handling code blocks into try/except code blocks, modify error message, or define other custom error types.
-
Finally, save the file and run the program to test that the generated code works correctly. Test its exception handling and error detection capabilities by calling
dividethe function . Check the generated exception information in the output log or console, and ensure that the code can successfully catch and handle the exception to avoid program crashes or unknown errors.
4. Precautions
When writing code using the GitHub Copilot plugin, there are a few things to keep in mind:
-
Copilot's running status: When using GitHub Copilot, because it is an artificial intelligence-based technology, it takes a certain amount of time to learn and optimize the user's habits and programming language rules. Therefore, during the initial stages of Copilot, its functionality may be affected, and some bugs, deviations, or inaccurate code snippets may appear. But over time, Copilot will continue to learn and grow, providing more accurate and efficient suggestions and code snippets.
-
Limitations of code completion: While Copilot can provide users with autocompletion suggestions based on existing context, these suggestions are not always correct or optimal. Therefore, in the process of using Copilot, you need to pay attention to the review and verification of auto-completion suggestions, and make necessary modifications and adjustments.
-
Code modification and customization: Although Copilot can automatically generate code snippets that conform to the programming language, it may be necessary to modify and customize the code according to specific needs during actual use. In order to keep the code correct and readable, we need to be careful when modifying the code and pay attention to the maintainability and scalability of the code.
-
Optimization of engineering tasks: Although Copilot can improve the efficiency and quality of code writing, for some complex engineering tasks, we need to carefully think about the implementation of tasks and optimize the logic and structure of the code to achieve more efficiency and maintainability.
5. Summary
1. Whoever uses it will know! Once used, you can never throw it away.
2. The more vegetables the better! A must-have artifact for rookies.
Copyright statement:
Welcome to [youcans' AIGC study notes] , please indicate the original text link when reposting: [AIGC] GitHub Copilot free registration and installation and use in VS Code
Copyright 2023 youcans, XUPT
Crated: 2023-04-06