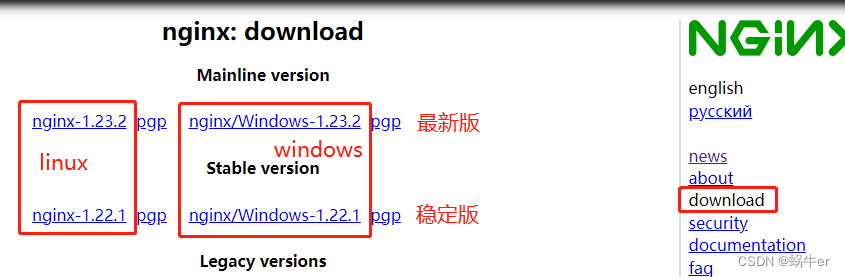
1 download
- Official website portal
- download portal
- Click to download the latest Windows-1.23 version download portal
- Click to download the latest version of Linux-1.23 Download Portal
2 Windows installation
2.1 Environment Introduction
-
Unzip it after the download is complete

-
The directory is as follows

-
Configuration file address:
.\nginx-1.23.2\conf\nginx.conf, the default configured nginx listening port is 80
2.2 Confirm whether the port is occupied
-
Before starting the service, check whether port 80 is occupied. If so, close the corresponding process or modify the default port of nginx
# cmd黑窗口输入如下命令查看端口占用情况(有显示则代表被占用了,无返回内容则未被占用)
netstat -ano | findstr 0.0.0.0:80
-
kill process
taskkill /pid 20112 -F
2.3 Start nginx service
.\nginx.exe
2.4 Close nginx service
-
Quick stop (not recommended: when using nginx -s stop, the nginx.pid file in logs will be deleted)
.\nginx.exe -s stop -
Orderly stop (recommended: when using nginx -s quit, the nginx.pid file in logs will also be deleted))
.\nginx.exe -s quit -
Use taskkill to close: (use on demand: the nginx.pid file in logs will not be deleted)
taskkill /f /t /im nginx.exe
3 Linux installation
3.1 Environment check (whether history is installed)
-
Detection process
# 检索出带有nginx的进程 ps -ef |grep nginx # 或者直接列出nginx相关的pid ps -C nginx -o pid -
stop autostart
# 停掉自启 chkconfig nginx off -
Turn off the nginx service
# 等待工作进程处理完成后关闭 nginx -s quit -
Confirm whether there are nginx processes and kill them
# 查和nginx相关的进程 ps -ef|grep nginx # 杀掉对应的进程 kill -9 pid -
Completely uninstall (confirm whether there are relevant dependencies left)
yum remove -y nginx -
Confirm whether there are nginx related files remaining
# 方法1 whereis
whereis nginx
# 或者方法2 find
find / -name nginx*
# 删除目录及文件
rm -rf */nginx
3.2 Dependencies required for installing nginx
# gcc是linux下的编译器,它可以编译 C,C++,Ada,Object C和Java等语言
# pcre是一个perl库,包括perl兼容的正则表达式库,nginx的http模块使用pcre来解析正则表达式
# zlib库提供了很多种压缩和解压缩方式nginx使用zlib对http包的内容进行gzip
# openssl是web安全通信的基石
yum -y install gcc gcc-c++ pcre pcre-devel zlib zlib-devel openssl openssl-devel
3.3 Installation
3.3.1 Installation method - YUM installation
yum -y install nginx
-
After installation, the path is as follows:
# 可执行程序文件 /usr/sbin/nginx # 配置文件路径 /etc/nginx/nginx.conf # 日志路径 /var/log/nginx # 缓存路径 /var/cache/nginx # PID目录 /var/run/nginx.pid # 默认站点目录 /usr/share/nginx/html -
Start nginx and set it to start automatically
# 查看nginx安装版本
nginx -v
# 启动nginx
systemctl start nginx.service
# 设置开机自启
systemctl enable nginx.service
# 关闭开机自动启动
systemctl disable nginx
3.3.2 Installation method two source code compilation and installation
-
Download
tar.gzthe installation package, click to download- You can also use
weget:wgte https://nginx.org/download/nginx-1.23.2.tar.gz
- You can also use
-
Upload to the specified address/directory of the target server
-
unzip
tar xvf nginx-1.21.6.tar.gz -
Enter the decompressed nginx directory
cd ./nginx -
Change setting
./configure --prefix=/usr/local/nginx --with-http_stub_status_module --with-http_ssl_module -
Compile the source code
# 编译 make # 安装 make install -
start nginx
./nginx
4 Docker installation
# 下载最新镜像
docker pull nginx:latest
# 确认镜像
docker images
# 运行nginx容器
docker run --name nginx-test -p 8080:80 -d nginx
5 common commands
- Common commands
# 重启Nginx
systemctl restart nginx

# 停止Nginx
systemctl stop nginx

# 重新加载Nginx
systemctl reload nginx

# 查看 Nginx 运行状态
systemctl status nginx


# Nginx 应用程序命令:
# 向主进程发送信号,重新加载配置文件,热重启
nginx -s reload
# 重启 Nginx
nginx -s reopen
# 快速关闭
nginx -s stop
# 等待工作进程处理完成后关闭
nginx -s quit
# 查看当前 Nginx 最终的配置
nginx -T
# 检查配置是否有问题
nginx -t
6 Configuration file details
# main段配置信息
user  nginx; # 运行用户,默认即是nginx,可以不进行设置
worker_processes  auto; # Nginx 进程数,一般设置为和 CPU 核数一样
error_log  /var/log/nginx/error.log warn; # Nginx 的错误日志存放目录
pid        /var/run/nginx.pid; # Nginx 服务启动时的 pid 存放位置

# events段配置信息
events {
    use epoll; # 使用epoll的I/O模型(如果你不知道Nginx该使用哪种轮询方法,会自动选择一个最适合你操作系统的)
    worker_connections 1024; # 每个进程允许最大并发数
}

# http段配置信息
# 配置使用最频繁的部分,代理、缓存、日志定义等绝大多数功能和第三方模块的配置都在这里设置
http {
    # 设置日志模式
    log_format  main '$remote_addr - $remote_user [$time_local] "$request" '
                      '$status $body_bytes_sent "$http_referer" '
                      '"$http_user_agent" "$http_x_forwarded_for"';

    access_log  /var/log/nginx/access.log main; # Nginx访问日志存放位置

    sendfile            on; # 开启高效传输模式
    tcp_nopush          on; # 减少网络报文段的数量
    tcp_nodelay         on;
    keepalive_timeout   65; # 保持连接的时间,也叫超时时间,单位秒
    types_hash_max_size 2048;

    include             /etc/nginx/mime.types; # 文件扩展名与类型映射表
    default_type        application/octet-stream; # 默认文件类型

    include /etc/nginx/conf.d/*.conf; # 加载子配置项

    # server段配置信息
    server {
     listen       80; # 配置监听的端口
     server_name  localhost; # 配置的域名

     # location段配置信息
     location / {
      root   /usr/share/nginx/html; # 网站根目录
      index  index.html index.htm; # 默认首页文件
      deny 172.168.22.11; # 禁止访问的ip地址,可以为all
      allow 172.168.33.44;# 允许访问的ip地址,可以为all
     }

     error_page 500 502 503 504 /50x.html; # 默认50x对应的访问页面
     error_page 400 404 error.html; # 同上
    }
}