This article is reproduced from: http://blog.csdn.net/a785975139/article/details/53023590
Recently, I played Centos in a VMware virtual machine, but after installing it, I found that I could not access the Internet. After some hard toss, finally found a solution to the problem. The final effect is that whether it is pinging the internal network IP or pinging the external network IP, it can be pinged normally. The four-step method:
The first step is to enter the /etc/sysconfig/network-scripts directory to see if there is a file like ifcfg-XXX in the directory:
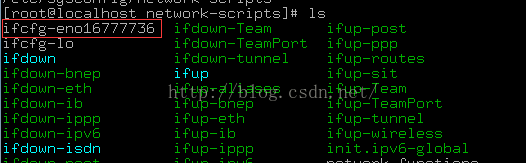
If you can't see the files starting with ifcfg- (except ifcfg-lo), it means that the network card device is not correctly recognized. Maybe the centos image version you downloaded is inconsistent with the centos version you selected when installing centos. For example, the centos image is 64-bit, but installed according to 32-bit. this. . Reinstall it, at least I didn't find a good way
The second step is as follows:
In VMware, click "Edit" - "Virtual Network Editor" in turn, as shown below, I chose NAT mode:
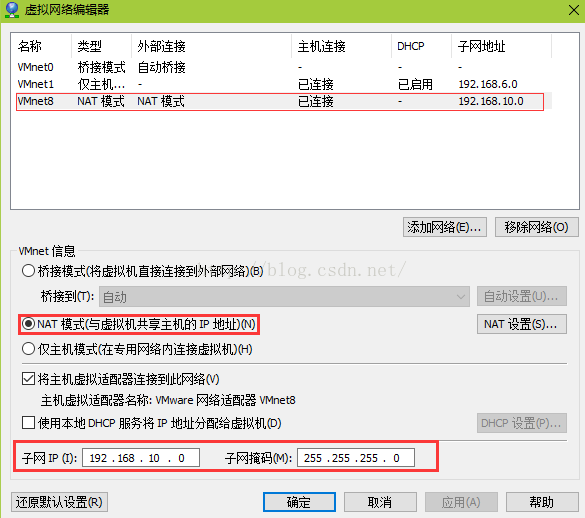
In order to be able to use static IP, do not check the "Use local DHCP service to assign IP to virtual machine" option here. Then configure the subnet IP. The subnet IP and the host's IP must not be in the same address range. Otherwise, even if the virtual machine can access the Internet, the network will be slow and unstable. The ip segment of my host is 192.168.115.xxx, so I matched 192.168.10.xxx to avoid the ip segment of the host. Anyway, the third number of ip is between 0 and 254 and not 115. Nat mode is equivalent to configuring a sub-router. Friends who have set up multi-level routing should understand this. You can reasonably configure a subnet IP based on the IP of your own machine.
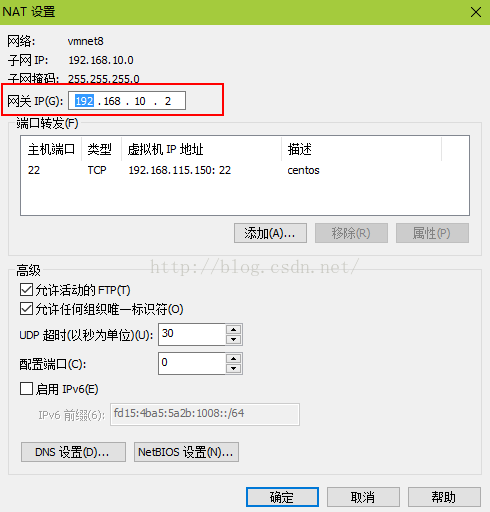
On this interface, click "NAT Settings" to view the gateway of the virtual machine. This gateway will be used in the third step. My gateway here is 192.168.10.2.
third step:
Edit the file /etc/sysconfig/network-scripts/ifcfg-eno16777736 with root privileges, the effect is as follows:
TYPE=Ethernet
BOOTPROTO=static #Set static IP
DEFROUTE = yes
IPV4_FAILURE_FATAL=no
IPV6INIT=yes
IPV6_AUTOCONF=yes
IPV6_DEFROUTE = yes
IPV6_FAILURE_FATAL=no
NAME=eno16777736
UUID=4f40dedc-031b-4b72-ad4d-ef4721947439
DEVICE=eno16777736
ONBOOT=yes #If it is no, it will be changed to yes, indicating that the network card device starts automatically
PEERDNS=yes
PEERROUTES=yes
IPV6_PEERDNS=yes
IPV6_PEERROUTES=yes
IPV6_PRIVACY=no
GATEWAY=192.168.10.2 #The gateway address here is the gateway address obtained in the second step
IPADDR=192.168.10.150 #Configure ip. In the second step, the ip has been set to be in the range of 192.168.10.xxx. I can set it to 150, as long as it is not the same as the gateway.
NETMASK=255.255.255.0#subnet mask
DNS1=202.96.128.86#dns server 1, fill in the dns server address available on your network
DNS2=223.5.5.5#dnsserver2
I have marked the key parameters with colored shading, and the others should be kept as default. After confirmation, save and exit.
Step 4: Restart the network card service, execute service network restart, and then finally be able to access the Internet:
Ping Baidu's domain name

Open the browser and take a look, and find that the webpage opens in seconds

Finally, the renderings of the virtual machine and the intranet ip communication will not be posted, which is naturally a matter of course. Personal expression is not good, please make do with it, I hope it can help you.