An introduction to NFS
NFS is used more, but the update is not as fast as imagined. Nginx iterates many versions a year, and the latest version of NFS, 4.1, was updated in 2010 and has not been updated so far, but this does not affect the use of NFS. Extensive
The RPC protocol is Remote Procedure Call, which is a remote procedure call. RPC needs to provide some support for NFS. For example, when two machines communicate with the client side, they cannot communicate directly with each other, and they need to rely on the RPC protocol to complete.
The NFS architecture is as follows:

There is a scenario: the three servers of ABC are load balanced, and the data is stored on A. Once the data on A changes, the updated file will be shared immediately, and it can be seen on B and C immediately. , or if the file is updated on B, A and C can also see it immediately. We can achieve this requirement through the NFS service.
The NFS schematic is as follows:

NFS principle: The server side needs to start an NFS service. If the server side wants to provide services to the client, it must rely on the RPC protocol, and the RPC protocol is implemented through the rpcbind service. Protmap is called in the version before centos5. The method, called rpcbind in centos6 and centos7, is actually a thing. In the end, this service is started to realize RPC communication; by default, NFS will not listen to any port, and the service that finally listens to the port to realize the TCP/IP communication process is the rpcbind service. The generated RPC protocol is implemented. The port that rpcbind listens on is 111. When RPC communicates, the NFS service will register a port in the RPC protocol. NFS tells RPC what port it communicates with, and then the server RPC tells the client the port number. The client rpcbind, and then the client machine communicates with the server port, and finally realizes data transmission ( question: Is the website data stored on one machine? RPC communication only transmits the port number? Data only passes through Will the two machines RPC client machine keep the website's data files? )
NFS (Network File System) is a network file system, which allows computers in a network to share resources through a TCP/IP network. In the NFS application, the local NFS client application can transparently read and write files located on the remote NFS server, just like accessing local files, that is to say, the client PC can mount the directory provided by the NFS server and mount the After loading, this directory looks like a local disk partition, and you can use disk-related commands such as cp, cd, mv, rm, and df.
Two NFS server installation configuration
Before doing this experiment, we have prepared two virtual machines with IPs 192.168.31.157 and 192.168.31.149 respectively. Among them, 31.157 is the client and 31.149 is the server. Let's install and configure
1. Install the server software
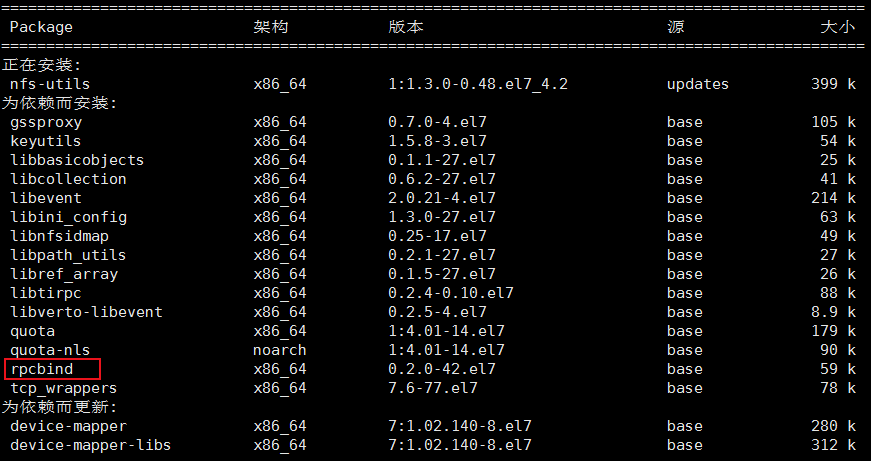
# yum install -y nfs-utils rpcbind //Install nfs-utils and rpcbind packages
2. Install the client software
# yum install -y nfs-utils //Install nfs-utils
As can be seen from the installation process in the figure below, rpcbind will also be installed automatically during the process of installing nfs-utils, so the rpcbind in the command in the previous step can actually be omitted.
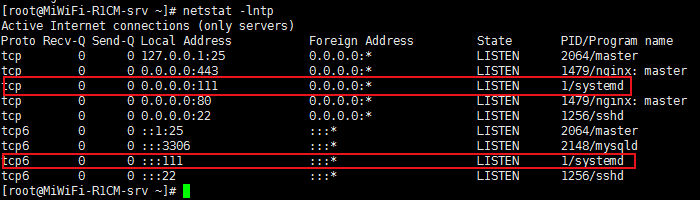
After the installation is complete, let's check the ports monitored by the two machines. At this time, port 111 has been monitored.
3. Edit the configuration file on the server side
# vim /etc/exports
Add the following to the configuration file:
/home/nfstestdir/ //This line is the directory shared by the server. This directory does not exist yet and needs to be created manually
192.168.31.0/24(rw,sync,all_squash,anonuid=1000,anongid=1000) //Define IP or IP segment

4. Create a shared directory on the server
# mkdir /home/nfstestdir/
5. Change the permissions of the analysis directory
# chmod 777 /home/nfstestdir/
6. Start rpcbind
# systemctl start rpcbind //If rpcbind is not started, you can execute this command to start rpcbind

7. Start the nfs service
# systemctl start nfs

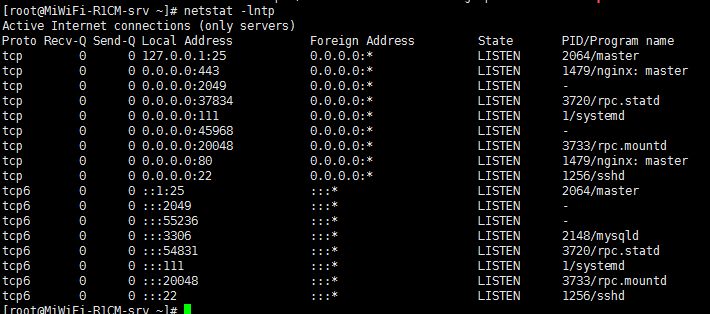
# ps aux |grep rpc //After the nfs service is successfully started, we will check the rpc again. You can see that some services of the rpc will be automatically started when the nfs is started.

8. Start up
If we want nfs to boot, we need to execute the following command
# systemctl enable nfs
Three NFS mount options
• rw read write
• ro read only
• sync synchronization mode, the memory data is written to the disk in real time, and the data can be written to the disk quickly, but this will correspondingly reduce the efficiency of the disk
• async asynchronous mode. Compared with sync, async will write the data in memory to the disk at regular intervals. The advantage of this is to ensure the efficiency of the disk. The disadvantage is that in case of power failure, the data part may be lost
• no_root_squash After the client mounts the NFS shared directory, the root user is not restricted and has great permissions. The root user of the client is not restricted, and can access the shared files on the server as if it were a local file.
• root_squash In contrast to the above options, the root user on the client is constrained and limited to a common user
• All users on the all_squash client are limited to a common user when using NFS shared directories
• anonuid/anongid is used with the above options to define the uid and gid of the restricted user
client mount
1. Install nfs-utils
# yum install -y nfs-utils //We have already followed it before. During the process of installing nfs-utils, rpcbind will also be installed automatically.
2. Check whether the client has access to the server
# showmount -e 192.168.31.149 //This IP is the NFS server IP I configured
![]()
The above access results indicate that the network is blocked. One of the reasons may be that the server rpcbind service is not enabled and is not listening on port 111. We can use the following command to check
# ps aux |grep rpc //As you can see in the figure below, port 111 has been opened
Another reason may be caused by the firewall. To make nfs realize normal communication, we also need to turn off the firewall, because nfs is a special service, although rpc can already communicate, even if port 111 has been released, but nfs does not They must be able to communicate normally, because they use an unfixed port. At this time, we need to close the firewalls of the server and client first.
# systemctl stop firewalld //Close the firewall of the server and client
# setenforce 0 //Only turn off SELinux on the server
Then we query the access rights again, and we can see that we already have access rights.
# showmount -e 192.168.31.149
![]()
The above figure shows that the program is not registered. After querying the data, we restarted rpcbind and nfs, and then executed the previous command. The following prompt appears
![]()
After investigation, it is found that there are several spaces at the beginning of the /etc/exports configuration file line, modify this file
![]()
After modification, let's execute # exportfs -ar
![]()
There is no prompt error, and then restart rpcbind and nfs. After the restart is successful, we go to the client and execute the following command again to view the access permissions
# showmount -e 192.168.31.149

If the above prompt appears, it means that we have the permission to read and write the shared file on the server
3. Mount
We need to mount the shared directory provided by the server as a local disk on the client side
# mount -t nfs 192.168.31.149:/home/nfstestdir/ /mnt/ //mount
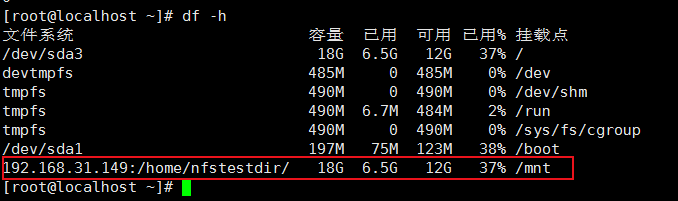
# df -h //Check whether the mount is successful, you can see that we have successfully mounted
4. Test verification
Next, let's verify whether the data on both sides can be synchronized. The first is the operation of the client.
# cd /mnt //First switch to the shared directory
# touch lj.html //Then we create a file in the client shared directory
# ls -l // View details of the newly created file
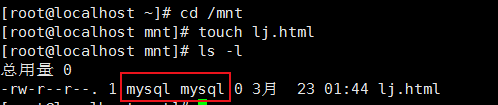
We can see that the owner and group of the file created by the client are mysql, and then we will look at the server
# ls -l /home/nfstestdir //Check whether the file lj.html we just created is updated in the server shared directory

In the above comparison, we can see that the owner and group of the file are both mysql. This is because we configure anonuid=1000 and anongid=1000 in the /etc/exports file to make all the files created in the shared directory The owner and group of the file are the users corresponding to the id number 1000 set here. Let's see if the owner and group corresponding to the id 1000 are mysql?
![]() From this picture, you can see that the id number of the mysql user is 1000
From this picture, you can see that the id number of the mysql user is 1000
In fact, whether the file created by the client or the server in this directory, its owner and group are mysql