Uninstallation process:
Stop the service : systemctl stop mariadb
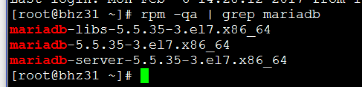
Query the installation package: rpm -qa | grep mariadb
Uninstall:
rpm -e mariadb-server
rpm -e mariadb
rpm -e --nodeps mariadb-libs
1. Prepare the environment
1.1 Check the disk mount status: df –h <If not, mount the system disk: mount /dev/cdrom /media >
PS: Do the following steps in the virtual machine settings :

( If it is automatically mounted on the desktop [ Linux system with desktop ] at startup, it needs to be uninstalled and then remounted )
Uninstall: umonut /dev/cdrom
Mount : mount /dev/cdrom /media
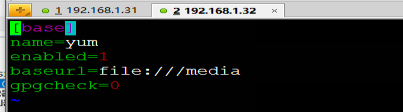
1.1 Use local yum source:
Configure local yum : cd /etc/yum.repos.d/
Create a file ( end with repo ) , such as : yum.repo , the file content is as follows : configure:
1. Start the installation
1.1 Execute the command : yum -y install mariadb mariadb-server
1.2 Copy files : cp /usr/share/mysql/my-huge.cnf /etc/my.cnf
1.3 After logging in with the root account, add lower_case_table_names=1 after [mysqld] in /etc/my.cnf , and restart the MYSQL service. At this time, the setting is successful: the table name is not case-sensitive .
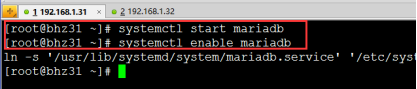
1.4 Start the mariadb service and start it automatically. The command is as follows:
systemctl start mariadb
systemctl enable mariadb
1.1 View firewall status: systemctl status firewalld
Stop the firewall: systemctl stop firewalld
Set boot to disable firewall : systemctl disable firewalld
1.2 Start setting up the Mariadb database and execute the script: /usr/bin/mysql_secure_installation
Just follow the tips below :
NOTE: RUNNING ALL PARTS OF THIS SCRIPT IS RECOMMENDED FOR ALL MariaDB
SERVERS IN PRODUCTION USE! PLEASE READ EACH STEP CAREFULLY!
In order to log into MariaDB to secure it, we'll need the current
password for the root user. If you've just installed MariaDB, and
you haven't set the root password yet, the password will be blank,
so you should just press enter here.
Enter current password for root (enter for none): There is no root password by default after installation , just press Enter
OK, successfully used password, moving on...
Setting the root password ensures that nobody can log into the MariaDB
root user without the proper authorisation.
Set root password? [Y/n] Y
New password: Enter a new password for root
Re-enter new password: new password confirmation
Password updated successfully!
Reloading privilege tables..
... Success!
By default, a MariaDB installation has an anonymous user, allowing anyone
to log into MariaDB without having to have a user account created for
them. This is intended only for testing, and to make the installation
go a bit smoother. You should remove them before moving into a
production environment.
Remove anonymous users? [Y/n] Remove anonymous user Y
... Success!
Normally, root should only be allowed to connect from 'localhost'. This
ensures that someone cannot guess at the root password from the network.
Disallow root login remotely? [Y/n] Disable root remote login Y
... Success!
By default, MariaDB comes with a database named 'test' that anyone can
access. This is also intended only for testing, and should be removed
before moving into a production environment.
Remove test database and access to it? [Y/n] Delete test database Y
- Dropping test database...
... Success!
- Removing privileges on test database...
... Success!
Reloading the privilege tables will ensure that all changes made so far
will take effect immediately.
Reload privilege tables now? [Y/n] Confirm all the above operations Y
... Success!
Cleaning up...
All done! If you've completed all of the above steps, your MariaDB
installation should now be secure.
Thanks for using MariaDB!
1. Configure MariaDB master-slave
1.1 Modify the vim /etc/my.cnf configuration file:
The master node does not need to be modified
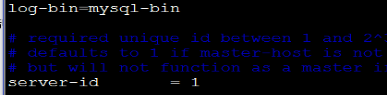
Modify from node server-id=2
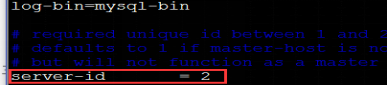
PS: Restart the slave node ( slave ): systemctl restart mariadb
1.1 Create an account on the master node and authorize the slave
Log in to MariaDB database : mysql -uroot -proot
Create a master-slave replication user and authorize:
Syntax :
GRANT REPLICATION SLAVE ON *.* { all permissions } TO 'slave'@'%' { user name is slave , % is any address } identified by 'slave';
Order:
GRANT REPLICATION SLAVE ON *.* TO 'slave'@'%' identified by 'slave';
1.2 Query SQL ( Master status) command : SHOW MASTER STATUS;

1.1 Configure the slave node SLAVE : (note that it is executed on the slave node)
Log in to the slave server : mysql -u root –proot to configure :
grammar:
CHANGE MASTER TO
MASTER_HOST=' IP address of the master node ', MASTER_USER=' user authorized by the master node ', MASTER_PASSWORD=' password of the user authorized by the master node ',MASTER_LOG_FILE='mysql-bin.000007',MASTER_LOG_POS=2197;
命令:
CHANGE MASTER TO MASTER_HOST='192.168.1.31',MASTER_USER='slave',MASTER_PASSWORD='slave',MASTER_LOG_FILE='mysql-bin.000007',MASTER_LOG_POS=2197;
PS: Be careful not to use spaces before and after the syntax comma .
1.2 View master-slave status verification:
Command : show slave status\G;

1.1 Authorize remote user root login : (both master and slave need to execute)
1.1.1 GRANT ALL PRIVILEGES ON *.* TO 'root'@'%' IDENTIFIED BY 'root' WITH GRANT OPTION;
1.1.2 FLUSH PRIVILEGES;
Enter the slave server and run:
MySQL> show slave status\G
.......
Relay_Log_File: localhost-relay-bin.000535
Relay_Log_Pos: 21795072
Relay_Master_Log_File: localhost-bin.000094
Slave_IO_Running: Yes
Slave_SQL_Running: No
Replicate_Do_DB:
Replicate_Ignore_DB:
......
Solution one,
Slave_SQL_Running: No
1. The program may have performed a write operation on the slave
2. It may also be caused by transaction rollback after the slave machine is restarted.
Generally, it is caused by transaction rollback:
Solution:
mysql> stop slave ;
mysql> set GLOBAL SQL_SLAVE_SKIP_COUNTER=1;
mysql> start slave ;
Solution two,
First stop the slave service: slave stop
to the master server to check the host status:
record the values corresponding to File and Position
enter master
mysql> show master status;
+----------------------+----------+--------------+------------------+
| File | Position | Binlog_Do_DB | Binlog_Ignore_DB |
+----------------------+----------+--------------+------------------+
| localhost-bin.000094 | 33622483 | | |
+----------------------+----------+--------------+------------------+
1 row in set (0.00 sec)
Then perform manual synchronization on the slave server:
mysql> change master to
> master_host='master_ip',
> master_user='user',
> master_password='pwd',
> master_port=3306,
> master_log_file=localhost-bin.000094',
> master_log_pos=33622483 ;
1 row in set (0.00 sec)
mysql> start slave ;
1 row in set (0.00 sec)
mysql> show slave status\G
*************************** 1. row ***************************
........
Master_Log_File: localhost-bin.000094
Read_Master_Log_Pos: 33768775
Relay_Log_File: localhost-relay-bin.000537
Relay_Log_Pos: 1094034
Relay_Master_Log_File: localhost-bin.000094
Slave_IO_Running: Yes
Slave_SQL_Running: Yes
Replicate_Do_DB:
Manual synchronization requires stopping the master's write operations!