Overview : FreeRTOS for STM32F103C8
The STM32F103C is an ARM Cortex M3 processor. We can use FreeRTOS for STM32F103C8 in Arduino IDE. We could also use Keil, but the process is relatively lengthy: we need to download and paste the downloaded file into the Keil path, the way we use the Arduino IDE here.
For FreeRTOS documentation and method definitions, you can check out the FreeRTOS STM32F103C8.
What is FreeRTOS ?
FreeRTOS may be a free and open source real-time operating system (RTOS) that runs on many popular microcontrollers, including the STM32.
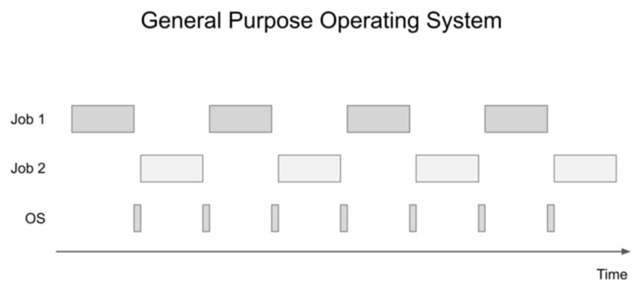
An operating system may be software that manages other software and hardware resources during a computing system. General purpose operating systems are usually designed with user experience in mind.
For example, let's say we are developing an application for a mobile phone operating system. A user might want to stream a movie, so we can split the streaming experience into two jobs: job 1 downloads the video from the web; job 2 displays each chunk of video to the user. These jobs may be part of a program of equivalent jobs, that is, performed simultaneously. In this case, they can be implemented as concurrently running threads.
If our processor had only 1 core, our streaming application might need to jump quickly between job 1 and job 2 to provide the user with both download and viewing.

It is important to understand how the STM32F103C8 in the Arduino IDE bundles FreeRTOS. While FreeRTOS is a low-level software framework that allows switching tasks, scheduling, etc., we will not call FreeRTOS directly. ARM has created the CMSIS-RTOS library, which allows us to form calls to the underlying RTOS, improving code portability between various ARM processors.
How to download and install FreeRTOS that can be used by STM32F103C8 in Arduino IDE ?
Step 1 :
In the Arduino IDE, first go to File -> Preferences. Copy the link below and paste it into the add-on board manager as per the image below.

Step 2 :
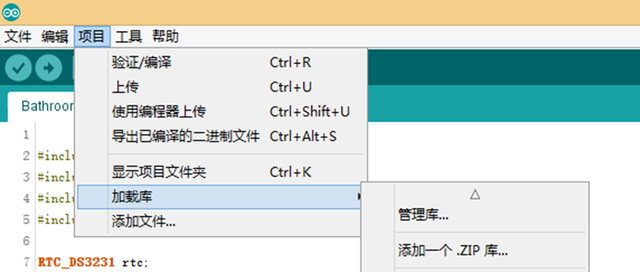
Now we need to download the FreeRTOS library files. To download, go to Project -> Load Libraries and click Manage Libraries.

Step 3 :
Now, type FreeRTOS in the search bar, it will show you some library files, scroll down and find Richard Barry's STM32duino FreeRTOS. Then select the library and click Install. Installation will take some time. Displayed as INSTALLED after installation.

Step 4 :
Now we can use the freeRTOS library of STM32F103C8 in Arduino. Let's write a simple blink program for the onboard LED and another separate LED.
Prepare accessories
This tutorial requires the following hardware.
1. STM32F103C board
2. FTDI
3. LED
4. Jumper
5. Breadboard
Here I have connected an LED to the PB11.

How to run two different tasks on STM32F103C8 using FreeRTOS ?
Use two LEDs, and create two tasks for those two LEDs. One LED blinks 1 time per second and the other LED blinks every 200ms. Now, let's start coding these two LED blinks using FreeRTOS.
Here is part of the code:
static void task1(void * pvParameters) {

  for (; ; ) {

    vTaskDelay(1000);

    digitalWrite(BOARD_LED_PIN, HIGH);

    vTaskDelay(1000);

    digitalWrite(BOARD_LED_PIN, LOW);

  }

}

static void task2(void * pvParameters) {

   for (; ; ) {

    vTaskDelay(200);

    digitalWrite(LED_PIN, HIGH);

    vTaskDelay(200);

    digitalWrite(LED_PIN, LOW);

  }

}
After uploading the code, you can see the results.