1 requests
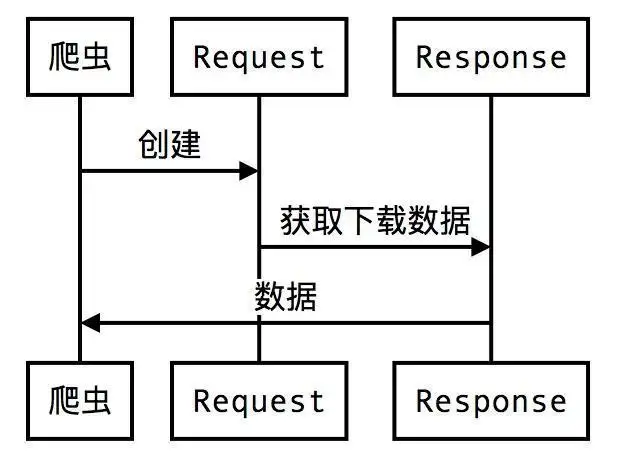
Requests is a way to implement HTTP requests in Python. Requests is a third-party module. This module is much simpler than the urlib and urllib3 modules to implement HTTP requests, and the operation is more user-friendly.
2 Basic request methods
Since the requests module is a third-party module, you need to install the module by executing the "pipinstallrequests" code when using the requests module.
If Anaconda is used, there is no need to install the requests module separately.
2.1 When requests send a GET request + get a website page, set the encoding to prevent garbled characters
import requests    # 导入网络请求模块requests

# 发送网络请求
response = requests.get('https://www.baidu.com')
print('响应状态码:',response.status_code) # 响应状态码: 200
print('请求网络地址',response.url) # 请求网络地址 https://www.baidu.com/
print('头部信息',response.headers) # 头部信息 {'Cache-Control': 'private, no-cache, no-store, proxy-revalidate, no-transform', 'Connection': 'keep-alive', 'Content-Encoding': 'gzip', 'Content-Type': 'text/html', 'Date': 'Mon, 28 Mar 2022 13:01:40 GMT', 'Last-Modified': 'Mon, 23 Jan 2017 13:23:55 GMT', 'Pragma': 'no-cache', 'Server': 'bfe/1.0.8.18', 'Set-Cookie': 'BDORZ=27315; max-age=86400; domain=.baidu.com; path=/', 'Transfer-Encoding': 'chunked'}
print('cookie信息',response.cookies) # cookie信息 <RequestsCookieJar[<Cookie BDORZ=27315 for .baidu.com/>]>

response.encoding = 'utf-8' # 设置编码 防止乱码
print(response.text) # 文本的形式打印
2.2 The requests module obtains image information and saves it
import requests    # 导入网络请求模块requests

# 发送网络请求,下载百度logo
response = requests.get('https://www.baidu.com/img/bd_logo1.png')
print(response.content)              # 打印二进制数据
with open('百度logo.png','wb')as f:   # 通过open函数将二进制数据写入本地文件
    f.write(response.content)        # 写入
2.3 POST request of the requests module
import requests    # 导入网络请求模块requests
import json        # 导入json模块

# 字典类型的表单参数
data = {'1':'好运常伴',
        '2':'平安喜乐'}
# 发送网络请求
response = requests.post('http://httpbin.org/post',data=data)
response_dict = json.loads(response.text)      # 将响应数据转换为字典类型
print(response_dict)                             # 打印转换后的响应数据
3 Advanced request methods
The requests module simplifies the complex request headers, cookies and network timeout request methods. As long as the corresponding parameters are set when sending the request, complex network requests can be implemented.
3.1 Set the request header
When requesting a web page content, it is found that 403 errors will occur through GET or POST and other request methods. The reason is that the server denies the user's access, because malicious collection is prevented by detecting the header information. Solution: simulate the header information of the browser to access.
3.1.1 Code implementation: the requests module sets the request header
import requests    # 导入网络请求模块requests

url = 'https://www.baidu.com/'     # 创建需要爬取网页的地址
# 创建头部信息
headers = {'User-Agent':'Mozilla/5.0 (Windows NT 10.0; Win64; x64; rv:72.0) Gecko/20100101 Firefox/72.0'}
response = requests.get(url, headers=headers)    # 发送网络请求
print(response.status_code)                       # 打印响应状态码 200
3.2 Get cookies
When crawling some data, it is necessary to log in to the web page before the data crawling work can be carried out. Cookie login is like the automatic login function in many web pages, which allows users to log in directly without verifying the account number and password when logging in for the second time.
When using the requests module to implement cookie login, first find the cookie information that can realize login in the developer tool page of the browser, then process and add the cookie information to the RequestsCookieJar object, and finally use the RequestsCookieJar object as the cookie parameter of the network request , you can send a network request.
3.2.1 Code implementation: requests module gets cookies
import requests  # 导入网络请求模块
from lxml import etree  # 导入lxml模块

cookies = '此处填写登录后网页中的cookie信息'
headers = {'Host': 'www.XXXXX.com',
           'Referer': 'https://www.baidu.com/',
           'User-Agent': 'Mozilla/5.0 (Windows NT 10.0; Win64; x64) '
                         'AppleWebKit/537.36 (KHTML, like Gecko) '
                         'Chrome/72.0.3626.121 Safari/537.36'}
# 创建RequestsCookieJar对象,用于设置cookies信息
cookies_jar = requests.cookies.RequestsCookieJar()
for cookie in cookies.split(';'):
    key, value = cookie.split('=', 1)
    cookies_jar.set(key, value)  # 将cookies保存RequestsCookieJar当中
# 发送网络请求
response = requests.get('https://www.douban.com/',headers=headers, cookies=cookies_jar)
if response.status_code == 200:  # 请求成功时
    html = etree.HTML(response.text)  # 解析html代码
    # 获取用户名
    name = html.xpath('//*[@id="db-global-nav"]/div/div[1]/ul/li[2]/a/span[1]/text()')
    print(name[0])  # 打印用户名
3.3 Session Request
The method of setting a cookie first realizes a simulated login, and then obtains the information content of the recorded page, which is rather cumbersome.
3.3.1 Session Request Function
The Session object in the requests module implements sending multiple network requests within the same session. That is, create a logged-in object, and perform the login operation in the properties of the object. After the login is completed, the object is a simulated user who has successfully logged in, and can send requests at will to collect data.
3.3.1 Code implementation: requests module session request
import requests        # 导入requests模块
# 原理:使用同一个对象获取,分别从这个对象读取不同的页面信息
s = requests.Session()  # 创建会话对象
data={'username': 'LiBiGor', 'password': '123456'}  # 创建用户名、密码的表单数据
# 发送登录请求
response_1 = s.post('http://site.XXXX.com:8001/index/checklogin.html',data=data)
response_2 = s.get('http://site.XXXX.com:8001')   # 发送登录后页面请求
print('登录信息:',response_1.text)                # 打印登录信息
print('登录后页面信息如下:\n',response_2.text)    # 打印登录后的页面信息
3.4 Verify the request page
3.4.1 Brief Description of Authentication Request
When viewing an article, a pop-up requesting the login account password will suddenly pop up to prevent malicious crawling.
The requests module comes with an authentication function. You only need to fill in the auth parameter in the request method. The value of this parameter is an HTTPBasicAuth object with authentication parameters (username and password).
3.4.2 Code implementation: the requests module solves the verification request
import requests          # 导入requests模块
from requests.auth import HTTPBasicAuth  # 导入HTTPBasicAuth类

url = 'http://sck.XXX.com:8001/spider/auth/'  # 定义请求地址
ah = HTTPBasicAuth( 'LiBiGor', '123456')     #创建HTTPBasicAuth对象,参数为用户名与密码
response = requests.get(url=url,auth=ah) # 发送网络请求
if response.status_code==200:            # 如果请求成功
    print(response.text)                 # 打印验证后的HTML代码
3.5 Network timeout and exception
When visiting a web page, if the web page does not respond for a long time, the system will determine that the web page times out, so the web page cannot be opened.
3.5.1 Code implementation: requests module simulates timeout exception
import requests     # 导入网络请求模块
# 循环发送请求50次
for a in range(0, 50):
    try:    # 捕获异常
        # 设置超时为0.5秒
        response = requests.get('https://www.baidu999.com/', timeout=0.1)
        print(response.status_code)            # 打印状态码
    except Exception as e:                     # 捕获异常
        print('异常'+str(e))                   # 打印异常信息
3.5.2 Code implementation: requests module determines network abnormality
import requests  # 导入网络请求模块
# 导入requests.exceptions模块中的三种异常类
from requests.exceptions import ReadTimeout,HTTPError,RequestException
# 循环发送请求50次
for a in range(0, 50):
    try:    # 捕获异常
        # 设置超时为0.1秒
        response = requests.get('https://www.baidu999.com/', timeout=0.1)
        print(response.status_code) # 打印状态码
    except ReadTimeout:       # 超时异常
        print('timeout')
    except HTTPError:         # HTTP异常
        print('httperror')
    except RequestException:  # 请求异常
        print('reqerror')
3.6 Uploading files
3.6.1 Upload image file
Using the requests module to upload files to the server is also very simple. You only need to specify the files parameter in the post() function to specify a BufferedReader object, which can be returned using the built-in open() function.
3.6.2 Code implementation: requests module uploads image files
import requests                   # 导入网络请求模块
bd = open('百度logo.png','rb')     # 读取指定文件
file = {'file':bd}                 # 定义需要上传的图片文件
# 发送上传文件的网络请求
response = requests.post('http://httpbin.org/post',files = file)
print(response.text)               # 打印响应结果
3.7 Set IP proxy
In the process of crawling web pages, the IP is blocked by the server that crawls the website, which often leads to failure. At this time, the proxy service can solve this trouble. When setting the proxy, you first need to find the proxy address.
For example, the port number corresponding to 1788.176.38 is 3000, and the complete format is 117.88.176.38:3000
3.7.1 Code implementation: requests module sets IP proxy
import requests      # 导入网络请求模块
# 头部信息
headers = {'User-Agent': 'Mozilla/5.0 (Windows NT 10.0; Win64; x64) '
                         'AppleWebKit/537.36 (KHTML, like Gecko) '
                         'Chrome/72.0.3626.121 Safari/537.36'}
proxy = {'http': 'http://117.88.176.38:3000',
         'https': 'https://117.88.176.38:3000'}  # 设置代理ip与对应的端口号
try:
    # 对需要爬取的网页发送请求
    response = requests.get('http://baidu.com', headers= headers,proxies=proxy,verify=False,timeout=3)
    print(response.status_code)  # 打印响应状态码
except Exception as e:
    print('错误异常信息为:',e)    # 打印异常信息