The fourth round of initial access to the Internet (connected to Shell IOT)
The original plan was to introduce all the hardware first, and then introduce how to intervene in Shell IoT. But that would be boring, so try to connect Shell IoT first to increase the playability of the ESP8266 module.
Need to understand [Shell IoT Platform Communication Protocol] ( Shell IoT Platform Communication Protocol-Shell IoT Cloud Platform (bigiot.net), which allows you to communicate with smart devices more conveniently ). If you don’t want to know, you can skip the communication This section of the agreement does not affect later learning. When you have any questions later, you can look for it in this section.
Forgot to say, you can first go to the official website of Shell IOT to get familiar with it. It is best to register your own account and use your own equipment in subsequent tests;
letter of agreement
The TCP (websocket) long connection protocol is used here, and the communication address, communication data format and command list are introduced first.
mailing address
Communication method : TCP or websocket
Address : www.bigiot.net
TCP port : 8181, there are other 8282, 8585
Websocket port: 8383, 8484
If port 8181 is selected, the server does not actively send heartbeat packets, and the client actively sends heartbeat packets to stay online. The heartbeat interval is preferably 40~50s;
In human terms, the device needs to send an instruction to the server at an interval of 40~50s to notify the server that it is still alive. Because the time interval is very regular, it is supposed to be called a heartbeat packet.
Other situations, please understand by yourself;
Communication data format
JsonString + newline character, such as:
{

    "M":"beat"}\n
This form is also called Json New Line.
Command list
There are 10 commonly used commands, namely:
- Device login (encrypted);
- Send real-time data;
- User and device online notification data;
- User or device offline notification data;
- User and equipment, equipment and equipment, user and user communication instruction data;
- Check whether the device or user is online;
- Query the current device status;
- Send alarm information;
- Query server time;
- Force the target device to go offline;
Commands are all in one-sentence Json New Linedata format (somewhat similar to Python's dictionary) and are sent to the server in the form of a package.
Detailed introduction of device login and sending real-time data , familiar with these two can complete the basic operation of sending instructions to the server.
Device login (encrypted)
Format :
{

    "M":"checkin","ID":"xx1","K":"xx2"}\n
Explanation :
M —— fixed (Method)
checkin —— fixed, login instruction
ID —— fixed
xx1 —— variable, device ID, check
K —— fixed (apiKey)
xx2 —— variable, device apikey, in View in Member Center
After logging in, if there is no data transmission within 1 minute, the connection will be automatically closed.
If you keep the device online for a long time, you can send information to the server every 50 seconds, any information is fine.
Return result (return when the login information is correct, no error is returned, if the device is already logged in, there will be no return information, and the login will not succeed):
{

    "M":"checkinok","ID":"xx1","NAME":"xx2","T":"xx3"}\n
Explanation:
M —— fixed (Method)
checkinok —— fixed, the device login successful instruction
ID —— fixed
xx1 —— variable, after the device is successfully logged in, the unique ID used for communication, which is composed of the characters "D" + device ID , Such as D24
NAME —— fixed
xx2 —— variable, the name of the device
T —— fixed (time)
xx3 —— variable, the timestamp when the server sends the message, since the Unix epoch (00, January 1, 1970, Greenwich Mean Time) :00:00) The number of seconds to the current time. Send real-time data
Send real-time data
Format :
{

    "M":"update","ID":"xx1","V":{

    "id1":"value1",...}}\n
Note : This command has no return information, and the interval between two sendings should not be less than 5s. Before sending data, make sure that the device is online.
M —— fixed (Method)
update —— fixed, real-time update data command (you can use u instead of update to reduce the command length)
ID —— fixed
xx1 —— variable, device ID, check in the member center
V —— fixed (Value )
id1 —— variable, data interface ID , view in the member center,
value1 —— variable (numerical type), local data (for example: sensor measurement data)
… —— You can update the data of multiple data interfaces under the device
Example
Example of uploading a single interface data at a time:
{

    "M":"update","ID":"2","V":{

    "2":"120"}}\n
Example of uploading multiple interface data at the same time:
{

    "M":"update","ID":"112","V":{

    "6":"1","36":"116"}}\n
Examples of real-time upload of positioning interface data:
{

    "M":"update","ID":"112","V":{

    "36":"116,40"}}\n
Among them, 116 is the longitude value, and 40 is the latitude value. For details, see: Positioning data upload instructions .
The official instruction manual of Shell IOT also provides a simulation test on the PC side . You can use the software to first make convenient network access to the devices you create.
PC simulation test TCP long connection tutorial see: " Shell Internet of Things Communication Protocol TCP Connection Test Tutorial "
For Windows test tools, see: https://www.bigiot.net/talk/1140.html
Device networking
The next step is real practice, so start from the internal file directory of ESP8266.
Internal file directory
Connect the ESP8266 module to the PC via MicroUSB and make sure that the COM port has been recognized. Open the MicroPython File Uploader.exetool on the PC , and then come to the user interface of the tool to wake up the memory of the first time:
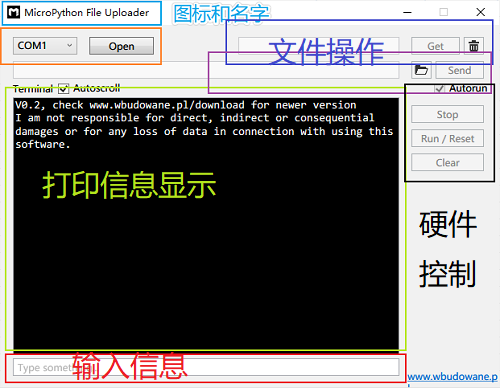
Select COM口, Open.
Type in the command line: import os, os.listdir():
>>> import os
>>> os.listdir()
['boot.py', 'main.py']
It can be seen that in the ESP8266 module, there are two special startup files:
- boot.py
- main.py
The file operation method is: when the device is started, once the file system is mounted, boot.py will be executed first, and then main.py.
You can create user code in main.py, or create your own user script, and establish an association in main.py. For example, write the following code in main.py:
import my_app

my_app.main()
And create my_app.py to write user code, which contains the main() function, and you can also create other user modules.
First create main.py and my_app.py on the PC side, and edit main.py as above, and edit as follows in my_app.py:
from machine import Pin
import time

# 定义引脚2为输出
ledPin = Pin(2, Pin.OUT)

def main():
	while True:
		# 延时1000ms使ledPin进行数值反转
		ledPin.value(not ledPin.value())
		time.sleep_ms(1000)
Use the file transfer tool to transfer to the ESP8266 module. In the MicroPython File Uploadertool, select the main.py and my_app.py files (you need to upload them one by one), and then click send, the REPL prompt is as follows:
>>> os.listdir()
['boot.py']
Sending main.py...
SUCCESS: 52 bytes written
>>>
MPY: soft reboot
MicroPython v1.13 on 2020-09-11; ESP module with ESP8266
Type "help()" for more information.
Sending my_app.py...
SUCCESS: 223 bytes written
MicroPython v1.13 on 2020-09-11; ESP module with ESP8266
Type "help()" for more information.
>>> import os
>>> os.listdir()
['boot.py', 'main.py', 'my_app.py']
In the above operation, first check that there is only boot.py file inside, and then send it to main.py and my_app.py, check the existence of the file again, and upload it successfully;
At this time, the ESP8266 module will flash once every 1s according to the design of my_app.py;
This shows that the module executed boot.py, main.py and my_app.py in sequence as expected.
Connect to WIFI
Before accessing Shell IOT, the ESP8266 module that needs to be connected to the network through WIFI's STA mode can be edited in my_app.py (must be changed to your own hotspot account and password):
import network

SSID = "MEIZU 17"	# 这里为WIFI名称
PASSWORD = "123456.789" # 这里为WIFI密码

def connect_wifi():
	wlan = network.WLAN(network.STA_IF)
	wlan.active(True)
	if not wlan.isconnected():
		print('Connecting to network...')
		wlan.connect(SSID, PASSWORD)
		while not wlan.isconnected():
			pass
	print('Network config:', wlan.ifconfig())

def main():
	connect_wifi()
Upload the file to the ESP8266 module, RSTand then you can access WIFI. Here is the mobile hotspot opened by the mobile phone. The REPL will printprint out the configuration information of the wifi interface:
>>>
MPY: soft reboot
network config: ('192.168.43.70', '255.255.255.0', '192.168.43.127', '192.168.43.127')
In the hotspot list on the mobile phone, you can also see that ESP_XXXXthe device named is connected.
Connect to Shell IoT
In Shell IOT 个人中心, add a smart device, enter the device name as LED light (there are some details that can be added as required), if the device is not disclosed, it can be set to encryption, etc.
Returning to the smart device list, you can get important information about the device, such as ID , APIKEY , (the two are very important, you must remember your device ID and APIKEY, and you also support resetting APIKEY) online status and control mode, etc.
[External link image transfer failed. The origin site may have an anti-leech link mechanism. It is recommended to save the image and upload it directly (img-2oFc1sIt-1608449167465)(https://i.loli.net/2020/12/20/oJ2R9HsEgiOm1Kc.png )]
The more important information is IDand APIKEY(again, you have to use your own), which will be defined as constants in the my_app.py script.
DEVICEID = "10471"
APIKEY = "2530067a3"
host = "www.bigiot.net"
port = 8181
Then, use the socket connection:
import socket

def connect_bigiot():
	s = socket.socket()
	# s = socket.socket(socket.AF_INET, socket.SOCK_STREAM)
	addr = socket.getaddrinfo(host, port)[0][-1]

	try:
		s.connect(addr)
	except:
		print('Waiting for connect bigiot.net')

	print('Connect bigiot success!')
	# 获取会话返回信息
	ans = s.recv(50)
	print(ans)

	# 连接至贝壳物联后,需要通过发送命令,使得设备上线
    checkinBytes=bytes('{\"M\":\"checkin\",\"ID\":\"'+DEVICEID+'\",\"K\":\"'+APIKEY+'\"}\n', 'utf8')
	s.sendall(checkinBytes)
	print('Check in OK!')
	ans = s.recv(50)
	print(ans)


def main():
	# 先连接WIFI
	connect_wifi()

	# 再连接贝壳物联
	connect_bigiot()
After uploading my_app.py to the ESP8266 module, the corresponding REPL is displayed as:
>>>
MPY: soft reboot
Network config: ('192.168.43.70', '255.255.255.0', '192.168.43.127', '192.168.43.127')
Connect bigiot success!
b'{"M":"WELCOME TO BIGIOT"}\n'
Check in OK!
b'{"M":"checkinok","ID":"D10471","NAME":"LED\\u706f",'
From the content in the previous section, we can understand that the returned Json New Lineinformation is the data returned by the server. Through the above IDsum NAME, we can see that the ESP8266 device has been successfully logged in, and the device can also be observed online in the Shell IOT smart device list:
A picture of the device online.jpg
In this way, the ESP8266 module named LED light is completed.
- Connect to the network first;
- Then connect to Shell IoT to log in to the device
In two steps, the device is networked and connected to the server.
Control device via web/mobile phone
According to the network access requirements of the device, port 8181 requires the device to send sequential heartbeat packets to the server every 40~50s. Here, set it to send once every 40 seconds (interruption can also be used) check status:
def keepOnline(s, t):
	if utime.time()-t > 40:
		sayBytes = bytes('{\"M\":\"status\"}\n', 'utf8')
		s.sendall(sayBytes)
		ans = s.recv(100)
		print('Check status : {}\n'.format(json.loads(str(ans, 'utf-8'))["M"]))
		return utime.time()
	else:
		return t
There are two LED states, the simplest way to set the switch:
def toggle(pin):
	pin.value(not pin.value())
The next step is to hand it over to the main()function to use the polling method to determine whether a message from the web or mobile phone is received to determine whether the local LED status needs to be changed:
def main():

	# 定义引脚2为输出
	ledPin = Pin(2, Pin.OUT)
	# 定义引脚的初始状态为关闭, 此ESP8266模块中on()为LED熄灭;
	ledPin.off()

	# 先连接WIFI
	connect_wifi()

	# 再连接贝壳物联
	s = socket.socket()
	# 设置超时
	s.settimeout(10)
	connect_bigiot(s)

	recvData = b''
	t = utime.time()
	print("The start time is :{}\n".format(t))

	while True:

		try:	# 在超时时间内是否接收到数据
			recvData = s.recv(100)
		except: # 如果接收不到,维持上线状态
			t = keepOnline(s, t)
			print("Keep online operate, The time now is {}\n".format(t))
		if recvData : # 接收到数据
			msg = json.loads(str(recvData, 'utf-8'))
			print("Received Data is : {}\n".format(msg))
			if "C" in msg.keys(): # 接收到offOn的命令,执行操作
				if msg["C"] == "offOn":
					toggle(ledPin)
				else:
					print("The other C in msg : {}\n".format(msg["C"]))
			else:
				print("NO keys C in the msg!\n")
			recvData = b''
In the main function, first define the LED pin as an output, then connect to WIFI, and then connect to Shell IOT; by receiving the information returned by Shell IOT, according to the information offOn, control the LED inversion;
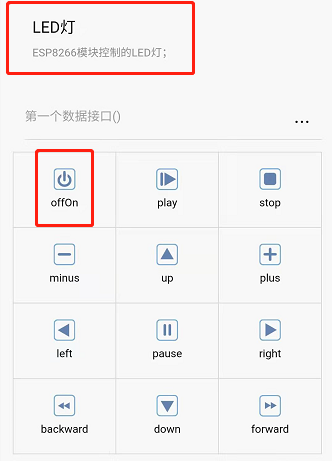
You can control the switch of the device named LED light through the Shell Internet of Things web terminal, or the WeChat applet. The demonstration effect is as follows:

Carefully observe the switch button and the blue LED light on the ESP8266 module, and send offOninstructions to the module to control the on and off of the LED.
Log in to the Shell IOT WeChat applet , you can also see that the device named LED light is online, and it also supports the same control method. The interface effect is the same as the above Web terminal. The following picture shows the applet operation interface:
Presumably, if you are careful, you have found that there are many control buttons on the control panel (in fact, you can also customize the control), then you can perform other controls according to the control, and the content behind emm is more abundant.
At this point, using Micropython with the ESP8266 module, the way to connect to Shell IoT is smooth.
Concluding remarks
On the surface, it is over, but in fact there are many things that need to be done later, such as:
- Use interrupt for interval status query;
- Set the SSID and PASSWORD of wifi through AP;
- Enrich the content of received information processing;
- Enrich the function of ESP8266 module connection hardware;
- OTA remote software upgrade?
- Module systemization, refinement, etc.;
After two weeks of tinkering for the weekend, the four blog posts seemed a bit decent. The content behind this series is intended to continue this series according to the functional requirements and the functions of the small production.
The road is long and hindered, and its repair is far away.
2020-12-20;