MySQL master-slave replication, read-write separation
- 1. The principle of MySQL master-slave replication
- Two. MySQL read and write separation principle
- Three. Master-slave replication
-
- 1. Environment
- 2. Configure the NTP server on the master server
- 3. Install ntp and ntpdate services on slave1
- 4. Install ntp and ntpdate services on slave2
- 5. Install MySQL on master, slave1 and slave2 respectively
- 6. Configure the master master server
- 7. Configure slave1 from the server
- 8. Configure slave2 from the server
- 9. Test master-slave synchronization
- Four. Read and write separation
-
- 1. Configure the amoeba server
- 2. Raise the access rights of amoeba on master, slave1, slave2
- 3. Go back to the amoeba server to modify the configuration file
- 4. Test read and write separation on the client
-
- Test machine creation table
- Check whether there are tables created on the master and slave servers
- Close the synchronous slave on the two slave servers
- Write table data on the test machine
- View on the main server
- View on the slave server
- View on the test machine
- Write content in slave1 and slave2
- View the info table data on the test machine (polling method)
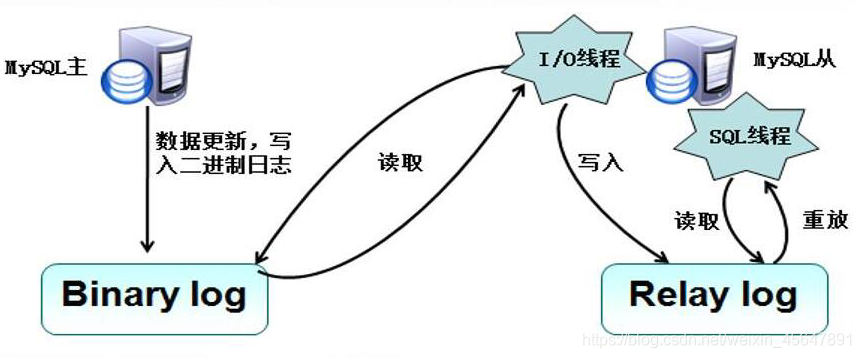
1. The principle of MySQL master-slave replication
1. MySQL replication type
基于语句的复制
基于行的复制
混合类型的复制
2. MySQL master-slave replication work process
Two. MySQL read and write separation principle
1.只在主服务器上写,只在从服务器上读
2.主数据库处理事务性查询,从数据库处理select查询
3.数据库复制用于将事务性查询的变更同步到群集中的从数据库
4.读写分离方案
  (1)基于程序代码内部实现
  (2)基于中间代理层实现
       MySQL-Proxy
       Amoeba
Three. Master-slave replication
1. Environment
amoeba服务器(192.168.45.130)
master服务器(192.168.45.131)
slave1服务器 (192.168.45.132)
slave2服务器 (192.168.45.133)
client客户端
2. Configure the NTP server on the master server
yum install -y ntp
vi /etc /ntp.conf
17行:restrict 192.168.80.0 mask 255.255.255.0 nomodify notrap
server 127.127.13.0
fudge 127.127.13.0 stratum 8  //设置时间服务器的层次为8级,顶级是0

server ntpd strat
service firewalld stop
setenforce 0
3. Install ntp and ntpdate services on slave1
[root@slave1 ~]# yum install ntp ntpdate -y
[root@slave1 ~]# systemctl start ntpd
[root@slave1 ~]# systemctl stop firewalld
[root@slave1 ~]# setenforce 0
[root@slave1 ~]# /usr/sbin/ntpdate 192.168.13.151    ##同步主服务器时间
29 Nov 16:58:43 ntpdate[4932]: the NTP socket is in use, exiting
4. Install ntp and ntpdate services on slave2
[root@slave2 ~]# yum install ntp ntpdate -y
[root@slave2 ~]# systemctl start ntpd
[root@slave2 ~]# systemctl stop firewalld
[root@slave2 ~]# setenforce 0
[root@slave2 ~]# /usr/sbin/ntpdate 192.168.13.151
29 Nov 17:02:08 ntpdate[4850]: the NTP socket is in use, exiting
5. Install MySQL on master, slave1 and slave2 respectively
[root@master1 ~]# mkdir /abc   ##创建挂载点
[root@master1 ~]# mount.cifs //192.168.100.3/LNMP-C7 /abc/   ##远程挂载
Password for root@//192.168.100.3/LNMP-C7:
[root@master1 ~]# cd /abc/
[root@master1 abc]# ls
mysql-5.5.24
[root@master1 abc]# tar zxvf mysql-5.5.24.tar.gz -C /opt/   ##解压
[root@master1 opt]# yum install -y \
> gcc gcc-c++ \
> ncurses \
> ncurese-devel \    ##控制终端屏幕显示的库
> bison \                 ##语法分析
> make
> cmake                 ##cmake工具
> libaio-devel         ##系统调用来实现异步IO


[root@slave1 opt]# useradd -s /sbin/nologin mysql   ##添加不可登录的mysql用户
[root@slave1 opt]# cd /opt/mysql-5.5.24/
[root@slave1 mysql-5.5.24]# mkdir /usr/local/mysql   ##创建安装目录
[root@slave1 mysql-5.5.24]# cmake \      ##配置
> -DCMAKE_INSTALL_PREFIX=/usr/local/mysql \    ##安装路径
> -DMYSQL_UNIX_ADDR=/home/mysql/mysql.sock \   ##sock文件路径
> -DDEFAULT_CHARSET=utf8 \      ##字符集
> -DDEFAULT_COLLATION=utf8_general_ci \
> -DWITH_EXTRA_CHARSETS=all \
> -DWITH_MYISAM_STORAGE_ENGINE=1 \     ##存储引擎
> -DWITH_INNOBASE_STORAGE_ENGINE=1 \
> -DWITH_MEMORY_STORAGE_ENGINE=1 \
> -DWITH_READLINE=1 \
> -DENABLED_LOCAL_INFILE=1 \
> -DMYSQL_DATADIR=/home/mysql \     ##数据文件路径
> -DMYSQL_USER=mysql \      ##用户
> -DMYSQL_TCP_PORT=3306    ##端口

[root@slave1 mysql-5.5.24]# make && make install   ##编译及安装
[root@master1 mysql-5.5.24]# chown -R mysql.mysql /usr/local/mysql   ##设置mysql属主属组
[root@master1 mysql-5.5.24]# vim /etc/profile   ##配置环境变量便于系统识别
export PATH=$PATH:/usr/local/mysql/bin/
[root@master1 mysql-5.5.24]# source /etc/profile   ##刷新配置文件
[root@master1 mysql-5.5.24]# cp support-files/my-medium.cnf /etc/my.cnf   ##主配置文件
cp:是否覆盖"/etc/my.cnf"? yes
[root@master1 mysql-5.5.24]# cp support-files/mysql.server /etc/init.d/mysqld   ##启动文件
[root@master1 mysql-5.5.24]# chmod 755 /etc/init.d/mysqld    ##设置权限
[root@master1 mysql-5.5.24]# chkconfig --add /etc/init.d/mysqld    ##添加到service管理中
[root@master1 mysql-5.5.24]# chkconfig mysqld --level 35 on   ##开机自启动
[root@master1 mysql-5.5.24]# /usr/local/mysql/scripts/mysql_install_db \   ##初始化数据库
> --user=mysql \
> --ldata=/var/lib/mysql \
> --basedir=/usr/local/mysql \
> --datadir=/home/mysql

[root@master1 mysql-5.5.24]# vim /etc/init.d/mysqld    ##编辑启动脚本文件
basedir=/usr/local/mysql   ##找到此处添加路径
datadir=/home/mysql
[root@master1 mysql-5.5.24]# service mysqld start    ##启动MySQL
Starting MySQL.. SUCCESS!
[root@master1 mysql-5.5.24]# mysqladmin -u root password 'abc123'  ##设置密码
6. Configure the master master server
[root@master1 mysql-5.5.24]# vim /etc/my.cnf
server-id       = 11     ##服务ID号
log-bin=master-bin                         ##主服务器日志文件
log-slave-updates=true                   ##从服务器更新二进制日志
[root@master1 mysql-5.5.24]# service mysqld restart   ##重启MySQL服务
Shutting down MySQL. SUCCESS!
Starting MySQL.. SUCCESS!
[root@master1 ~]# mysql -uroot -pabc123   ##进入数据库

mysql> GRANT REPLICATION SLAVE ON *.* TO 'myslave'@'192.168.13.%' IDENTIFIED BY '123456';
##给从服务器提权复制权限,名为myslave密码123456对于13段网段
Query OK, 0 rows affected (0.01 sec)

mysql> FLUSH PRIVILEGES;    ##刷新提权
Query OK, 0 rows affected (0.00 sec)

mysql> show master status;   ##查看主服务器状态
+-------------------+----------+--------------+------------------+
| File              | Position | Binlog_Do_DB | Binlog_Ignore_DB |
+-------------------+----------+--------------+------------------+
| master-bin.000002 |      338 |              |                  |
+-------------------+----------+--------------+------------------+
1 row in set (0.00 sec)
7. Configure slave1 from the server
[root@slave1 mysql-5.5.24]# vim /etc/my.cnf
server-id       = 22              ##另外一台为23

relay-log=relay-log-bin                         ##从主服务器上同步日志文件记录到本地
relay-log-index=slave-relay-bin.index           ##定义relay-log的位置和名称
[root@slave1 mysql-5.5.24]# service mysqld restart    ##重新服务
Shutting down MySQL. SUCCESS!
Starting MySQL.. SUCCESS!
[root@slave1 mysql-5.5.24]# mysql -uroot -pabc123

mysql> change master to master_host='192.168.13.151',master_user='myslave',master_password='123456',master_log_file='master-bin.000002',master_log_pos=338;
##同步主服务器二进制文件和位置使用授权的账号密码
Query OK, 0 rows affected (0.00 sec)

mysql> start slave;     ##开启同步
Query OK, 0 rows affected (0.01 sec)

mysql> show slave status\G;   ##查看状态
							Master_Log_File: master-bin.000002
					Read_Master_Log_Pos: 338
							 Relay_Log_File: relay-log-bin.000001
								Relay_Log_Pos: 4
				Relay_Master_Log_File: master-bin.000002
						 Slave_IO_Running: Yes
						Slave_SQL_Running: Yes
8. Configure slave2 from the server
[root@slave2 mysql-5.5.24]# vim /etc/my.cnf
server-id       = 23

relay-log=relay-log-bin                         ##从主服务器上同步日志文件记录到本地
relay-log-index=slave-relay-bin.index           ##定义relay-log的位置和名称
[root@slave2 mysql-5.5.24]# service mysqld restart    ##重新服务
Shutting down MySQL. SUCCESS!
Starting MySQL.. SUCCESS!
[root@slave2 mysql-5.5.24]# mysql -uroot -pabc123

mysql> change master to master_host='192.168.13.151',master_user='myslave',master_password='123456',master_log_file='master-bin.000002',master_log_pos=338;
##同步主服务器二进制文件和位置使用授权的账号密码
Query OK, 0 rows affected (0.00 sec)

mysql> start slave;    ##开启同步
Query OK, 0 rows affected (0.01 sec)

mysql> show slave status\G;    ##查看状态
							Master_Log_File: master-bin.000002
					Read_Master_Log_Pos: 338
							 Relay_Log_File: relay-log-bin.000001
								Relay_Log_Pos: 4
				Relay_Master_Log_File: master-bin.000002
						 Slave_IO_Running: Yes
						Slave_SQL_Running: Yes
9. Test master-slave synchronization
Main server
mysql> create database school;    ##创建school数据库
Query OK, 1 row affected (0.00 sec)
Slave server 1
mysql> show databases;   ##查看数据库
+--------------------+
| Database           |
+--------------------+
| information_schema |
| #mysql50#.mozilla  |
| mysql              |
| performance_schema |
| school             |
| test               |
+--------------------+
6 rows in set (0.01 sec)
Slave server 2
mysql> show databases;   ##查看数据库
+--------------------+
| Database           |
+--------------------+
| information_schema |
| #mysql50#.mozilla  |
| mysql              |
| performance_schema |
| school             |
| test               |
+--------------------+
6 rows in set (0.01 sec)
Four. Read and write separation
1. Configure the amoeba server
[root@amoeba ~]# systemctl stop firewalld.service   ##关闭防火墙
[root@amoeba ~]# setenforce 0
[root@amoeba ~]# mount.cifs //192.168.100.3/LNMP-C7 /mnt/  ##挂载
Password for root@//192.168.100.3/LNMP-C7:
[root@amoeba ~]# cd /mnt/
[root@amoeba mnt]# ls
[root@amoeba mnt]# cp jdk-6u14-linux-x64.bin /usr/local/   ##复制jdk二进制文件到/usr/local下
[root@amoeba mnt]# cd /usr/local/
[root@amoeba local]# ./jdk-6u14-linux-x64.bin  ##直接执行安装
Do you agree to the above license terms? [yes or no]
yes   ##选择yes进行安装
Press Enter to continue.....
##回车继续
[root@amoeba local]# mv jdk1.6.0_14/ /usr/local/jdk1.6   ##简化文件名
[root@amoeba local]# vim /etc/profile   ##设置环境变量
##末行插入
export JAVA_HOME=/usr/local/jdk1.6  ##家目录
export CLASSPATH=$CLASSPATH:$JAVA_HOME/lib:$JAVA_HOME/jre/lib ##class环境变量
export PATH=$JAVA_HOME/lib:$JAVA_HOME/jre/bin/:$PATH:$HOME/bin   ##环境变量
export AMOEBA_HOME=/usr/local/amoeba   ##amoeba家目录
export PATH=$PATH:$AMOEBA_HOME/bin   ##环境变量
[root@amoeba local]# source /etc/profile   ##刷新配置文件
[root@amoeba local]# mkdir /usr/local/amoeba   ##创建amoeba目录
[root@amoeba local]# cd /mnt/
[root@amoeba mnt]# tar zxvf amoeba-mysql-binary-2.2.0.tar.gz -C /usr/local/amoeba   ##解压amoeba
[root@amoeba mnt]# chmod -R 755 /usr/local/amoeba/   ##设置权限
[root@amoeba mnt]# /usr/local/amoeba/bin/amoeba     ##检查是否安装成功
amoeba start|stop
2. Raise the access rights of amoeba on master, slave1, slave2
grant all on *.* to test@'192.168.13.%' identified by '123.com';
##给amoeba访问权限用户test密码123.com
3. Go back to the amoeba server to modify the configuration file
[root@amoeba conf]# vim amoeba.xml  ##修改主配置文件
---30行--

 <property name="user">amoeba</property>    ##从服务器同步主服务器的用户密码
----32行---------
 <property name="password">123456</property>

---117-去掉注释-
 <property name="defaultPool">master</property>
 <property name="writePool">master</property>
 <property name="readPool">slaves</property>


[root@amoeba conf]# vim conf/dbServers.xml   ##配置数据库配置文件

--26-29--去掉注释--
 <property name="user">test</property>

 <property name="password">123.com</property>

-----42-主服务器地址---
<dbServer name="master"  parent="abstractServer">
 <property name="ipAddress">192.168.45.131</property>
--52-从服务器主机名-
<dbServer name="slave1"  parent="abstractServer">
 <property name="ipAddress">192.168.45.132</property>
 ##复制6行添加slave2
 <dbServer name="slave2"  parent="abstractServer">
 <property name="ipAddress">192.168.45.133</property>
--65行左右--
 <dbServer name="slaves" virtual="true">
 <poolConfig class="com.meidusa.amoeba.server.MultipleServerPool">


--末尾--
<property name="poolNames">slave1,slave2</property>
 </poolConfig>
[root@amoeba conf]# /usr/local/amoeba/bin/amoeba start&   ##开启amoeba服务
[root@amoeba ~]# netstat -anpt | grep java   ##开启另一个终端查看开启情况
tcp6       0      0 127.0.0.1:26268         :::*                    LISTEN      40925/java
tcp6       0      0 :::8066                 :::*                    LISTEN      40925/java
tcp6       0      0 192.168.45.130:34090    192.168.45.131:3306     ESTABLISHED 40925/java
tcp6       0      0 192.168.45.130:33866    192.168.45.132:3306     ESTABLISHED 40925/java
tcp6       0      0 192.168.45.130:55984    192.168.45.133:3306     ESTABLISHED 40925/java
4. Test read and write separation on the client
Test machine creation table
[root@client ~]# mysql -u amoeba -p123456 -h 192.168.13.160 -P8066
##使用amoeba账户密码登录amoeba
MySQL [(none)]> show databases;   ##查看数据库
+--------------------+
| Database           |
+--------------------+
| information_schema |
| #mysql50#.mozilla  |
| mysql              |
| performance_schema |
| school             |
| test               |
+--------------------+
6 rows in set (0.00 sec)

MySQL [(none)]> use school;   ##使用数据库
Database changed
MySQL [school]> create table info (    ##创建表
		-> id int(4) not null primary key,
		-> name varchar(10) not null,
		-> score decimal(4,1) not null);
Query OK, 0 rows affected (0.02 sec)
Check whether there are tables created on the master and slave servers
mysql> use school;    ##使用数据库
Database changed
mysql> show tables;  ##查看表
+------------------+
| Tables_in_school |
+------------------+
| info             |
+------------------+
1 row in set (0.00 sec)
Close the synchronous slave on the two slave servers
mysql> stop slave;
Query OK, 0 rows affected (0.01 sec)
Write table data on the test machine
MySQL [school]> insert into info (id,name,score) values (1,'zhangsan',88);  ##插入数据内容
Query OK, 1 row affected (0.03 sec)
View on the main server
mysql> select * from info;
+----+----------+-------+
| id | name     | score |
+----+----------+-------+
|  1 | zhangsan |  88.0 |
+----+----------+-------+
1 row in set (0.00 sec)
View on the slave server
mysql> select * from info;  ##从服务器上没有写入
Empty set (0.00 sec)
View on the test machine
MySQL [school]> select * from info;   ##没有查看到写入的内容
Empty set (0.01 sec)
Write content in slave1 and slave2
mysql> insert into info (id,name,score) values (2,'lisi',70);
Query OK, 1 row affected (0.00 sec)

mysql> insert into info (id,name,score) values (3,'wuwang',60);
Query OK, 1 row affected (0.00 sec)
View the info table data on the test machine (polling method)
MySQL [school]> select * from info;
+----+--------+-------+
| id | name   | score |
+----+--------+-------+
|  3 | wuwang |  60.0 |
+----+--------+-------+
1 row in set (0.00 sec)

MySQL [school]> select * from info;
+----+------+-------+
| id | name | score |
+----+------+-------+
|  2 | lisi |  70.0 |
+----+------+-------+
1 row in set (0.00 sec)
Realize the separation of reading and writing: writing is writing on the master server, and reading is reading on the slave server, using a polling method
MySQL [school]> select * from info;
+----+------+-------+
| id | name | score |
+----+------+-------+
|  2 | lisi |  70.0 |
+----+------+-------+
1 row in set (0.00 sec)