[OpenCV introductory tutorial 6] Create Trackbar & adjust image contrast and brightness value
This series of articles is produced by @浅墨_毛星云, please indicate the source for reprinting.
Article link: http://blog.csdn.net/poem_qianmo/article/details/21176257
The OpenCV version used when writing the current blog post: 4.20
In this article, we learned how to create and use track bars with the createTrackbar function in OpenCV, as well as the dynamic adjustment of image contrast and brightness values.
The article first explained in detail the function createTrackbar in the new version of OpenCV2.0, and gave an example of a detailed comment.
Then explain the details of image contrast and brightness adjustment, and finally released a program source code that uses the createTrackbar function to create a track bar to assist in image contrast and brightness adjustment.
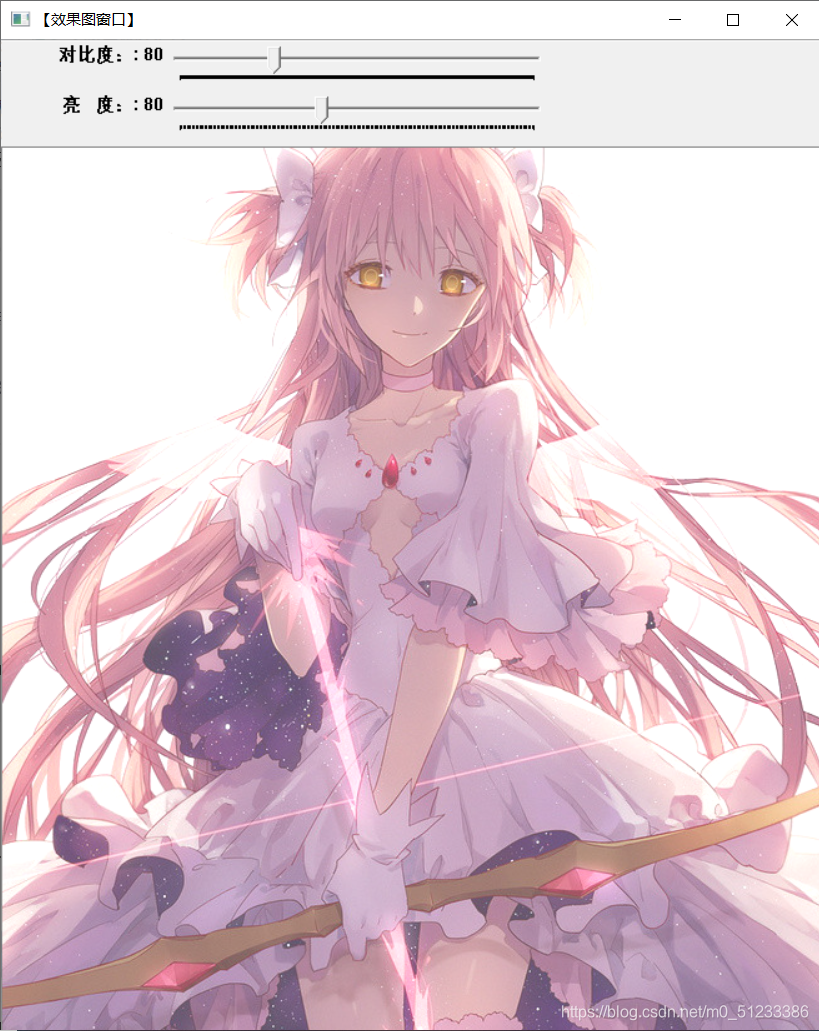
Still put a screenshot of the operation first:
OK, let's officially start our explanation.
1. The creation and use of Trackbar in OpenCV
<1>Create a track bar-a detailed explanation of the createTrackbar function
The function createTrackbar will be used frequently in the future. It creates a track bar that can adjust the value and attaches the track bar to the specified window, which is very convenient to use. First of all, everyone must remember that it is often used in conjunction with a callback function. First look at his function prototype:
C++: int createTrackbar(conststring& trackbarname, conststring& winname,
 int* value, int count, TrackbarCallback onChange=0,void* userdata=0);
The first parameter , trackbarname of const string& type, represents the name of the track bar, which is used to represent the track bar we created.
The second parameter , winname of const string& type, fills in the name of the window, which indicates which window the track bar will be attached to, which corresponds to a certain window name filled in when namedWindow() creates the window.
The third parameter , value of type int*, a pointer to an integer, indicating the position of the slider. And when it is created, the initial position of the slider is the current value of the variable.
The fourth parameter , count of type int, represents the value of the maximum position that the slider can reach. PS: The value of the smallest position of the slider is always 0.
The fifth parameter , onChange of TrackbarCallback type, first notice that it has a default value of 0. This is a pointer to a callback function. This function will make a callback every time the position of the slider changes. And the prototype of this function must be void XXXX(int,void*); the first parameter is the position of the track bar, and the second parameter is the user data (see the sixth parameter below). If the callback is a NULL pointer, it means that there is no callback function call, and only the third parameter value has changed.
The sixth parameter , userdata of type void*, also has a default value of 0. This parameter is the data passed by the user to the callback function to process track bar events. If the third parameter value argument used is a global variable, you can ignore the userdata parameter.
This createTrackbar function creates a track bar (Trackbar, or slider range control tool) with a specific name and range for us, and specifies a variable that is synchronized with the position of the track bar. And you need to specify the callback function onChange (the fifth parameter), which is called when the position of the track bar changes. And we know that the created track bar is displayed on the window represented by the specified winname (the second parameter).
After reading the function explanation, let's first give you a small example of function usage:
 //创建轨迹条
       createTrackbar("对比度:", "【效果图窗口】",&g_nContrastValue,
300,ContrastAndBright );// g_nContrastValue为全局的整型变量,ContrastAndBright为回调函数的函数名(即指向函数地址的指针)
Let's give you a complete example of use. This is the official sample program of OpenCV, a program that demonstrates the use of track bars to control contour detection and contour filling. Qianmo puts out its modification, code simplification and detailed comments for everyone to digest and study. There will be a more detailed explanation of contour detection in the updated blog post later.
//-----------------------------------【头文件包含部分】---------------------------------------
// 描述:包含程序所依赖的头文件
//----------------------------------------------------------------------------------------------
#include "opencv2/imgproc/imgproc.hpp"
#include "opencv2/highgui/highgui.hpp"
#include <iostream>
//-----------------------------------【命名空间声明部分】---------------------------------------
// 描述:包含程序所使用的命名空间
//-----------------------------------------------------------------------------------------------
using namespace cv;
using namespace std;
//-----------------------------------【全局函数声明部分】--------------------------------------
// 描述:全局函数声明
//-----------------------------------------------------------------------------------------------
Mat img;
int threshval = 160; //轨迹条滑块对应的值,给初值160
//-----------------------------【on_trackbar( )函数】------------------------------------
// 描述:轨迹条的回调函数
//-----------------------------------------------------------------------------------------------
static void on_trackbar(int, void*)
{
Mat bw = threshval < 128 ? (img < threshval) : (img > threshval);
//定义点和向量
vector<vector<Point> > contours;
vector<Vec4i> hierarchy;
//查找轮廓
findContours(bw, contours, hierarchy, RETR_CCOMP, CHAIN_APPROX_SIMPLE);
//初始化dst
Mat dst = Mat::zeros(img.size(), CV_8UC3);
//开始处理
if (!contours.empty() && !hierarchy.empty())
{
//遍历所有顶层轮廓,随机生成颜色值绘制给各连接组成部分
int idx = 0;
for (; idx >= 0; idx = hierarchy[idx][0])
{
Scalar color((rand() & 255), (rand() & 255), (rand() & 255));
//绘制填充轮廓
drawContours(dst, contours, idx, color, FILLED, 8, hierarchy);
}
}
//显示窗口
imshow("Connected Components", dst);
}
//-----------------------------------【main( )函数】--------------------------------------------
// 描述:控制台应用程序的入口函数,我们的程序从这里开始
//-----------------------------------------------------------------------------------------------
int main()
{
system("color 5F");
//载入图片
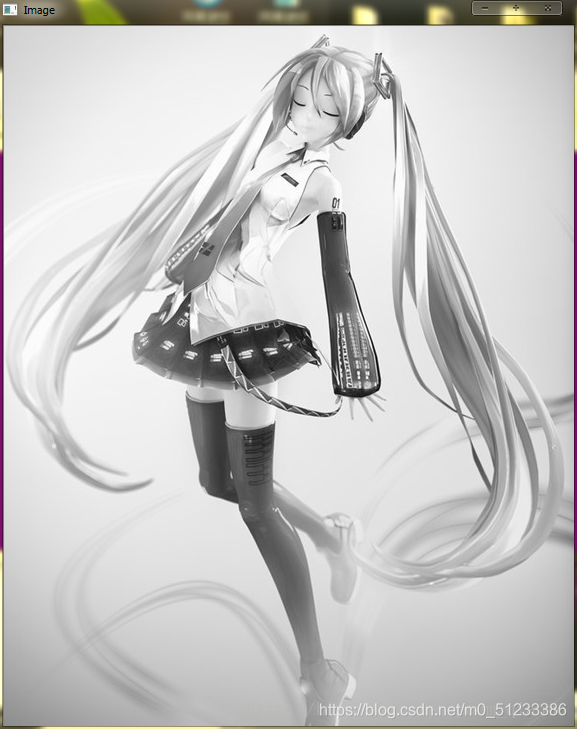
img = imread("1.jpg", 0);
if (!img.data) { printf("Oh,no,读取img图片文件错误~! \n"); return -1; }
//显示原图
namedWindow("Image", 1);
imshow("Image", img);
//创建处理窗口
namedWindow("Connected Components", 1);
//创建轨迹条
createTrackbar("Threshold", "Connected Components", &threshval, 255, on_trackbar);
on_trackbar(threshval, 0);//轨迹条回调函数
waitKey(0);
return 0;
}
Original picture:
Running effect picture:
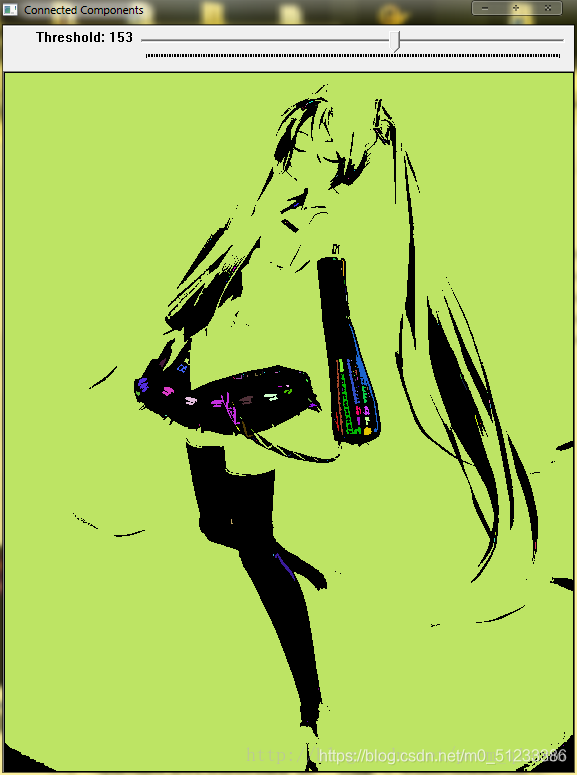
Drag the scroll bar to change the value of threshval (threshold) to get pictures with different effects:
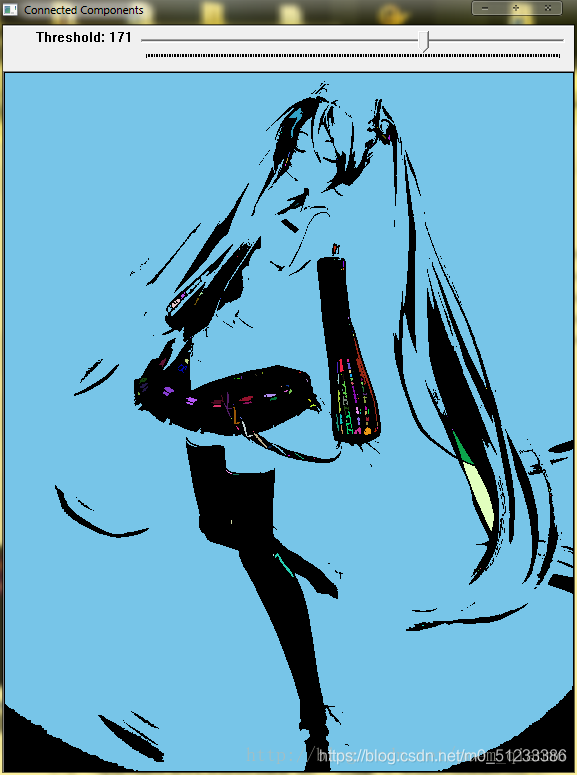
In addition, you can find the original official code under the OpenCV path opencv_source_code/samples/cpp/connected_components.cpp.
Then by the way, let's talk about a function used with createTrackbar, the getTrackbarPos function used to get the position of the current track bar.
<2>Get the position of the current track bar-getTrackbarPos function
<2>Get the position of the current track bar-getTrackbarPos function
This function is used to get the position of the current track bar and return it.
The first parameter , trackbarname of type const string&, represents the name of the trackbar.
The second parameter , winname of type const string&, represents the name of the parent window of the track bar.
That's probably it for this part. Let's go to the next part non-stop:)
2. Theoretical basis for brightness and contrast adjustment
First, we give the concept of operators. The general image processing operator is a function, which accepts one or more input images and produces an output image. The following formula gives the general form of the operator:

The adjustment operation of image brightness and contrast that we are explaining today is actually a relatively simple type of image processing transformation-pointoperators. The point operation has a characteristic, only based on the input pixel value (sometimes can add some global information or parameters), to calculate the corresponding output pixel value. Such operators include brightness and contrast adjustments, as well as color corrections and transformations.
The two most commonly used point operations (or point operators), obviously, are multiplying by a constant (corresponding to the adjustment of the contrast) and adding a constant (corresponding to the adjustment of the brightness value). The formula is like this:

Seeing this formula, our strategy for image brightness and contrast adjustment is ready to come out.
among them:
**Parameter f(x)** represents the source image pixel.
The parameter g(x) represents output image pixels.
The parameter a (need to satisfy a>0) is called gain and is often used to control the contrast of the image.
The parameter b is usually called bias and is often used to control the brightness of the image.
And one step closer, we rewrite this formula like this:

where i and j indicate that the pixel is located in the i-th row and j-th column.
Then, this formula can be used as a theoretical formula for controlling the brightness and contrast of the image in OpenCV.
3. About accessing pixels in pictures
There are many ways to access the pixels in the picture, and the light ink will use a topic to explain in the future. At present, we can first understand the following one.
In order to perform this operation, we need to access every pixel of the image. Because the operation is performed on GBR images, each pixel has three values (G, B, R), so we must access them separately (the image storage mode in PS:OpenCV is GBR). The following is a code snippet for accessing the pixel. Three for loops solve the problem:
//三个for循环,执行运算 new_image(i,j) =a*image(i,j) + b
       for(int y = 0; y < image.rows; y++ )
       {
              for(int x = 0; x < image.cols; x++ )
              {
                     for(int c = 0; c < 3; c++ )
                     {
                            new_image.at<Vec3b>(y,x)[c]= saturate_cast<uchar>( (g_nContrastValue*0.01)*(image.at<Vec3b>(y,x)[c] ) + g_nBrightValue );
                     }
              }
       }
Let us explain in three aspects:
In order to access each pixel of the image, we use this syntax: image.at(y,x)[c]
Among them, y is the row where the pixel is located, x is the column where the pixel is located, and c is one of R, G, and B (corresponding to 0, 1, 2).
Because our calculation result may exceed the pixel value range (overflow), or may be a non-integer (if it is a floating point number), we need to use saturate_cast to convert the result to ensure that it is a valid value.
Here a is the contrast. Generally, the value is a floating point value from 0.0 to 3.0 for the effect of observation, but our track bar generally takes an integer value, so here we can set the nContrastValue parameter which represents the contrast value. It is an integer between 0 and 300. Multiply a 0.01 in the final formula, so that you can complete the change of 300 different values in the track bar. So in the formula, we will see g_nContrastValue*0.01 in saturate_cast( (g_nContrastValue 0.01) (image.at(y,x)[c]) + g_nBrightValue ).
Four, image contrast, brightness value adjustment sample program
It is still a detailed annotated blog post supporting sample program that every article will be assigned to you. The knowledge points introduced in this article are used as a carrier to show you the code.
This sample program uses two track bars to control the contrast and brightness values respectively, which has a certain degree of playability. Not much nonsense, let's go to the code:
// 操作系统: Windows 10 64bit
// 开发语言: C++
// IDE 版 本:Visual Studio 2019
// OpenCV版本:4.20
//-----------------------------------【头文件包含部分】---------------------------------------
//	描述:包含程序所依赖的头文件
//----------------------------------------------------------------------------------------------
#include <opencv2/core/core.hpp>
#include <opencv2/highgui/highgui.hpp>
#include "opencv2/imgproc/imgproc.hpp"
#include <iostream>

//-----------------------------------【命名空间声明部分】---------------------------------------
//	描述:包含程序所使用的命名空间
//-----------------------------------------------------------------------------------------------
using namespace std;
using namespace cv;


//-----------------------------------【全局函数声明部分】--------------------------------------
//	描述:全局函数声明
//-----------------------------------------------------------------------------------------------
static void ContrastAndBright(int, void*);
void   ShowHelpText();

//-----------------------------------【全局变量声明部分】--------------------------------------
//	描述:全局变量声明
//-----------------------------------------------------------------------------------------------
int g_nContrastValue; //对比度值
int g_nBrightValue;  //亮度值
Mat g_srcImage, g_dstImage;
//-----------------------------------【main( )函数】--------------------------------------------
//	描述:控制台应用程序的入口函数,我们的程序从这里开始
//-----------------------------------------------------------------------------------------------
int main()
{
	//改变控制台前景色和背景色
	system("color 2F");

	// 读入用户提供的图像
	g_srcImage = imread("1.jpg");
	if (!g_srcImage.data) { printf("读取g_srcImage图片错误~! \n"); return false; }
	g_dstImage = Mat::zeros(g_srcImage.size(), g_srcImage.type());

	//设定对比度和亮度的初值
	g_nContrastValue = 80;
	g_nBrightValue = 80;

	//创建窗口
	namedWindow("【效果图窗口】", 1);

	//创建轨迹条
	createTrackbar("对比度:", "【效果图窗口】", &g_nContrastValue, 300, ContrastAndBright);
	createTrackbar("亮   度:", "【效果图窗口】", &g_nBrightValue, 200, ContrastAndBright);

	//调用回调函数
	ContrastAndBright(g_nContrastValue, 0);
	ContrastAndBright(g_nBrightValue, 0);

	//输出一些帮助信息
	cout << endl << "\t运行成功,请调整滚动条观察图像效果\n\n"
		<< "\t按下“q”键时,程序退出\n";

	//按下“q”键时,程序退出
	while (char(waitKey(1)) != 'q') {}
	return 0;
}


//-----------------------------【ContrastAndBright( )函数】------------------------------------
//	描述:改变图像对比度和亮度值的回调函数
//-----------------------------------------------------------------------------------------------
static void ContrastAndBright(int, void*)
{

	// 创建窗口
	namedWindow("【原始图窗口】", 1);

	// 三个for循环,执行运算 g_dstImage(i,j) = a*g_srcImage(i,j) + b
	for (int y = 0; y < g_srcImage.rows; y++)
	{
		for (int x = 0; x < g_srcImage.cols; x++)
		{
			for (int c = 0; c < 3; c++)
			{
				g_dstImage.at<Vec3b>(y, x)[c] = saturate_cast<uchar>((g_nContrastValue * 0.01) * (g_srcImage.at<Vec3b>(y, x)[c]) + g_nBrightValue);
			}
		}
	}

	// 显示图像
	imshow("【原始图窗口】", g_srcImage);
	imshow("【效果图窗口】", g_dstImage);
}
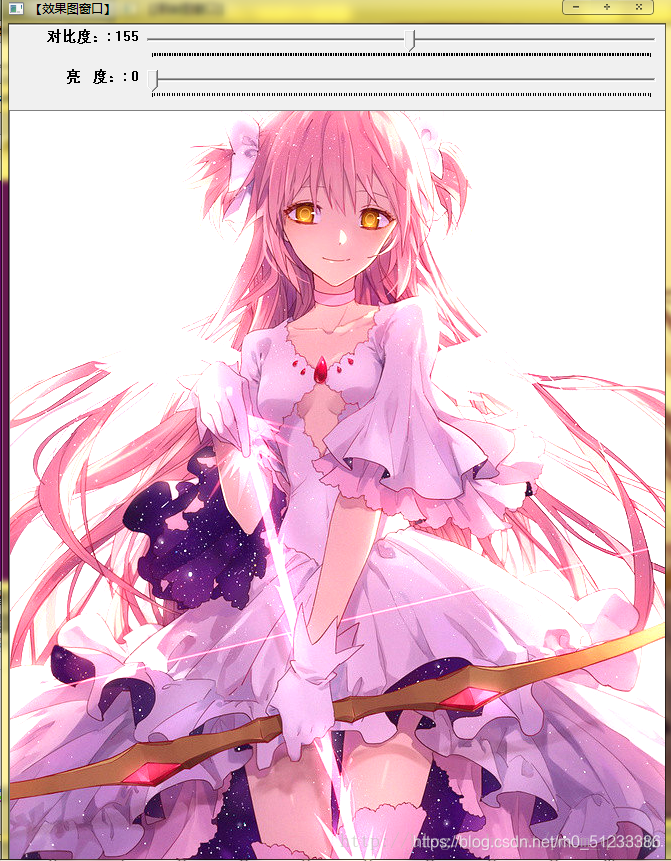
Finally, take a look at the screenshot of the operation, and you will get two picture display windows when you run this program. The first is the original image window, and the second is the effect image window. Two track bars can be adjusted in the effect picture window to change the contrast and brightness of the current picture.
Original image: