1 Overview
When the system is ready to go live, we will evaluate and plan the capacity of the hardware platform, and leave as much margin as possible. However, the reality is often unpredictable. With the expansion of business, the data capacity and computing power of the system will become overwhelmed. We have to face a question: how to increase the data capacity and computing power of the existing system?
Since DolphinDB's nodes integrate computing and storage, increasing computing power and data capacity is one thing for DolphinDB clusters: adding nodes. Of course, DolphinDB also supports separate storage for the original nodes.
2. Expansion mechanism
The DolphinDB cluster is composed of three roles: Controller, Agent, and Data Node:
- Controller is responsible for managing cluster metadata and providing Web cluster management tools;
- Agent is deployed on each physical machine and is responsible for the start and stop of local nodes;
- Data Node is a computing and data node.
DolphinDB expansion nodes need to modify the node configuration file, and load the new node configuration through the cluster Controller restart. If the new node is deployed on a new physical machine, a new Agent service needs to be deployed to be responsible for the node start and stop on the new physical machine. When the new node is started, the computing power of the node will be incorporated into the computing resources of the cluster for overall planning; the new node will default to [Home Dir]/[Data Node Alias]/storage as the data storage area,
Note that here [Home Dir] In this example, by adding -home data to the startup command, it means that [Home Dir] points to the /data/ directory in the same level directory of the executable file, so the default directory for data storage for example node3 is / data/node3/storage.
When the new node is started, the directory will be automatically created and initialized to store the distributed data of the cluster.
If you only need to expand the storage space, you only need to modify the node configuration file and add a path for the volume attribute of the specified node.
3. Method
The work that needs to be done to expand the node is to let the Controller know the new machine IP and Data Node that need to be added. This work is mainly realized by the configuration file. DolphinDB provides the following configuration files to configure the cluster information.
- [Controller] controller.cfg: Responsible for defining the relevant configuration of the control node, such as the IP port, the upper limit of the number of connections of the control node, etc.
- [Controller] cluster.cfg: Responsible for the personalized configuration of each node in the cluster, such as the volume properties of node3, etc.
- [Controller] cluster.nodes: Define the list of nodes and agents within the cluster, the control node will obtain the node information of the cluster through this file
- [Agent] agent.cfg: Define the relevant attributes of the agent node, such as the agent node IP and port, the cluster control node to which it belongs, and other information, which are deployed on each physical machine together with the agent node program
Then deploy the Agent on the newly added physical machine to start and stop the Data Node of the machine, and the rest of the detailed configuration work and node start and stop can be conveniently completed on the Web cluster management interface.
As for the expansion of storage space, because the volumes attribute supports specifying multiple storage directories separated by commas, it is sufficient to append the storage directory after the original volumes attribute.
4. Expansion Node
4.1 Environmental description
Because the specific operation is to do an expansion operation on an existing cluster, let's first understand the configuration of the original cluster. 4 original servers, all operating systems are ubuntu 16.04, and DolphinDB 0.7 version is deployed
172.18.0.10 : controller
172.18.0.11 : datanode1
172.18.0.12 : datanode2
172.18.0.13 : datanode3
The specific configuration is as follows:
controller.cfg
localSite=172.18.0.10:8990:ctl8990
cluster.nodes
localSite,mode
172.18.0.11:8701:agent1,agent
172.18.0.12:8701:agent2,agent
172.18.0.13:8701:agent3,agent
172.18.0.11:8801:node1,datanode
172.18.0.12:8802:node2,datanode
172.18.0.13:8803:node3,datanode
启动Controller脚本
nohup ./dolphindb -console 0 -mode controller -script dolphindb.dos -config config/controller.cfg -logFile log/controller.log -nodesFile config/cluster.nodes &
启动Agent脚本
./dolphindb -mode agent -home data -script dolphindb.dos -config config/agent.cfg -logFile log/agent.log
为了在扩展工作完成之后可以验证效果,我们在集群内创建一个分布式数据库,并写入初始数据
data = table(1..1000 as id,rand(`A`B`C,1000) as name)
//分区时预留了1000的余量,预备后续写入测试用
db = database("dfs://scaleout_test_db",RANGE,cutPoints(1..2000,10))
tb = db.createPartitionedTable(data,"scaleoutTB",`id)
tb.append!(data)
执行完后通过集群web界面 dfs explorer观察生成的数据分布情况
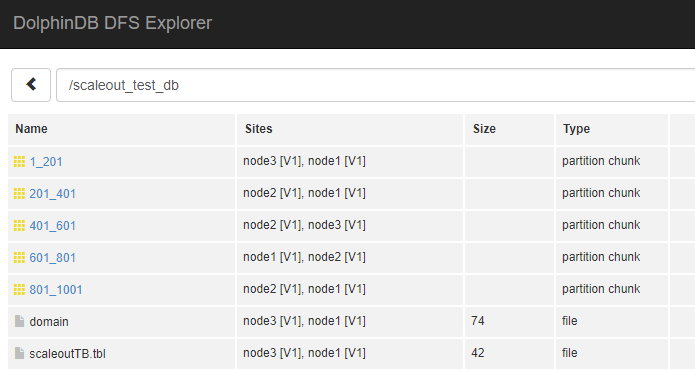
在后续完成节点和存储的扩展之后,我们会用同样的方式追加数据,来验证新节点和存储是否已经启用。
需要了解集群初始化配置可以参考 多物理机上部署集群教程
4.2 扩展目标
本次扩容目标是为了增加计算和存储能力,增加了一台新的服务器,将之加入原有的集群作为一个新的节点。
新增的物理机IP
172.18.0.14
新增的节点信息
172.18.0.14:8804:datanode4
4.3 扩展步骤
4.3.1 在新机器上部署和配置Agent
拷贝原机器上的Agent部署包到新机器,并修改agent.cfg
#指定Agent本身的ip和端口
localSite=172.18.0.14:8701:agent4
#告诉Agent本集群的controller位置
controllerSite=172.18.0.10:8990:ctl8990
mode=agent
4.3.2 配置controller
修改节点清单配置cluster.nodes,配置新增加的Data Node和Agent
localSite,mode
172.18.0.14:8704:agent4,agent
172.18.0.14:8804:node4,datanode
4.3.3 重启集群
- 访问集群web管理界面,关闭所有的节点。
http://172.18.0.10:8990
- 关闭Controller,在172.18.0.10机器上执行
pkill dolphindb
- 等待半分钟之后(等待端口释放,可能根据操作系统这个时间有不同),重新再启动Controller
- 回到web管理界面,可以看到已经新增了一个agent4并且是已启动状态,在web界面上启动所有节点
到此我们已经完成了新节点的增加。
4.4 验证
下面我们通过向集群写入一些数据来验证node4是否已经在集群中启用。
tb = database("dfs://scaleout_test_db").loadTable("scaleoutTB")
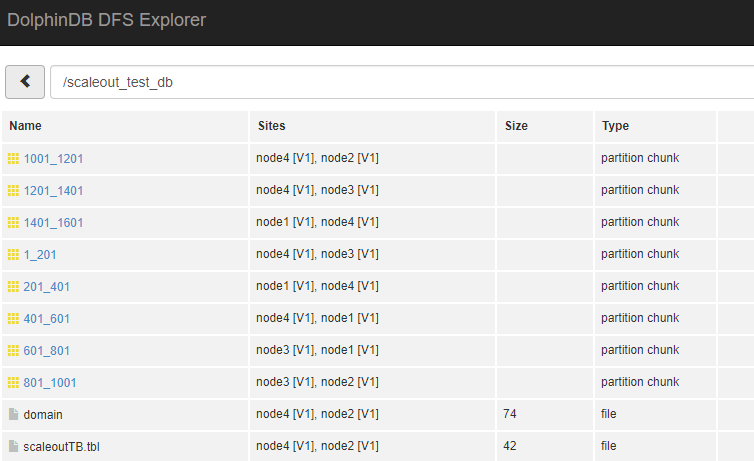
tb.append!(table(1001..1500 as id,rand(`A`B`C,500) as name))
观察dfs explorer,可以看到数据已经分布到新的 node4 节点上。

5. 扩展存储
由于node3所在服务器本身的磁盘空间不足,现扩展了一块磁盘,路径为/dev/disk2,将这块磁盘纳入node3的存储。
5.1 步骤
DolphinDB的节点存储可以通过配置文件中的volumes属性来配置,上述案例中没有配置,那么默认的存储路径[HomeDir]/[Data Node Alias]/Storage, 在本例中即 data/node3/storage 目录下
若从默认路径增加磁盘,那么在设置volumes属性时,必须要将原默认路径显式设置,否则会导致默认路径下元数据丢失
默认情况的volumes属性内容如下,如果没有这一行,需要手工加上
cluster.cfg
node3.volumes=data/node3/storage
修改配置文件后,在controller上执行loadClusterNodesConfigs()使得Controller重新载入节点配置,如果上述步骤在集群管理web界面上完成,这个重载过程会自动完成,无需手工执行。 配置完成后无需重启controller,只要在web界面上重启node3节点即可使新配置生效。
如果希望node3暂不重启,但是新的存储马上生效,可以在node3上执行addVolumes("/dev/disk2/node3")函数动态添加volumes,此函数的效果并不会持久化,重启后会被新配置覆盖。
5.2 验证
配置完成后,通过下面的语句向集群写入新数据,查看数据是否被写入新的磁盘
tb = database("dfs://scaleout_test_db").loadTable("scaleoutTB")
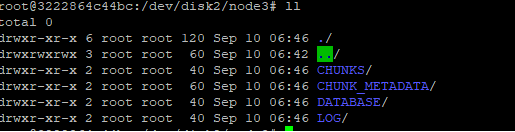
tb.append!(table(1501..2000 as id,rand(`A`B`C,500) as name))
到磁盘下观察数据已被写入
6 常见问题
- 在验证节点的数据写入分布情况时 , 从dfs explorer里经常会发现site信息有时候会发生变化,比如原来保存在node3的数据迁移到其他节点了?
这个问题涉及到DolphinDB的Recovery 机制: DolphinDB的集群支持数据自动Recovery机制,当侦测到集群内部分节点长时间没有心跳时(判定宕机),将会从其他副本中自动恢复数据并且保持整个集群的副本数稳定, 这也是当某个节点长时间未启动,系统后台会发生数据迁移的原因。需要注意的是,这个数据稳定的前提是宕掉的节点数少于系统设置的数据副本数。这个机制涉及到的配置项及默认值如下
controller.cfg
//集群内每个数据副本数,默认2
dfsReplicationFactor=2
//副本安全策略,0 多个副本允许存在一个节点 1 多个副本必须分存到不同节点,默认0
dfsReplicaReliabilityLevel=1
//节点心跳停止多久开启Recovery,默认不启用,单位ms
dfsRecoveryWaitTime=30000
这3个参数对于系统的数据稳定性非常重要
dfsRecoveryWaitTime控制recovery的启动,默认不设置即关闭recovery功能。这个等待时间的设置主要是为了避免一些计划内的停机维护导致不必要的recovery,需要用户根据运维的实际情况来设置。
从稳定性上来讲,副本数越多数据越不容易因意外丢失,但是副本数过多也会导致系统保存数据时性能低下,所以dfsReplicationFactor的值不建议低于2,但是具体设置多高需要用户根据整体集群的节点数、数据稳定性需求、系统写入性能需求来综合考虑。
dfsReplicaReliabilityLevel这个设置在生产环境下建议设置为1,0只建议作为学习或者测试环境下使用。