Article Directory
-
- Implementation process
-
-
- 1. Select the video and download
- 2. Get the barrage content of the video
- Three, extract pictures from the video
- 4. Portrait segmentation (with free Baidu AI)
- Five, word cloud generation
- Six, check the frame rate and picture size in the original video
- Seven, composite dancing video
- 8. Add original video and audio to render
- Nine, reference blog post
-
Implementation process
1. Select the video and download
You can use you-get to download Bilibili's videos to the local area. For
details, please refer to the previous article: Portal
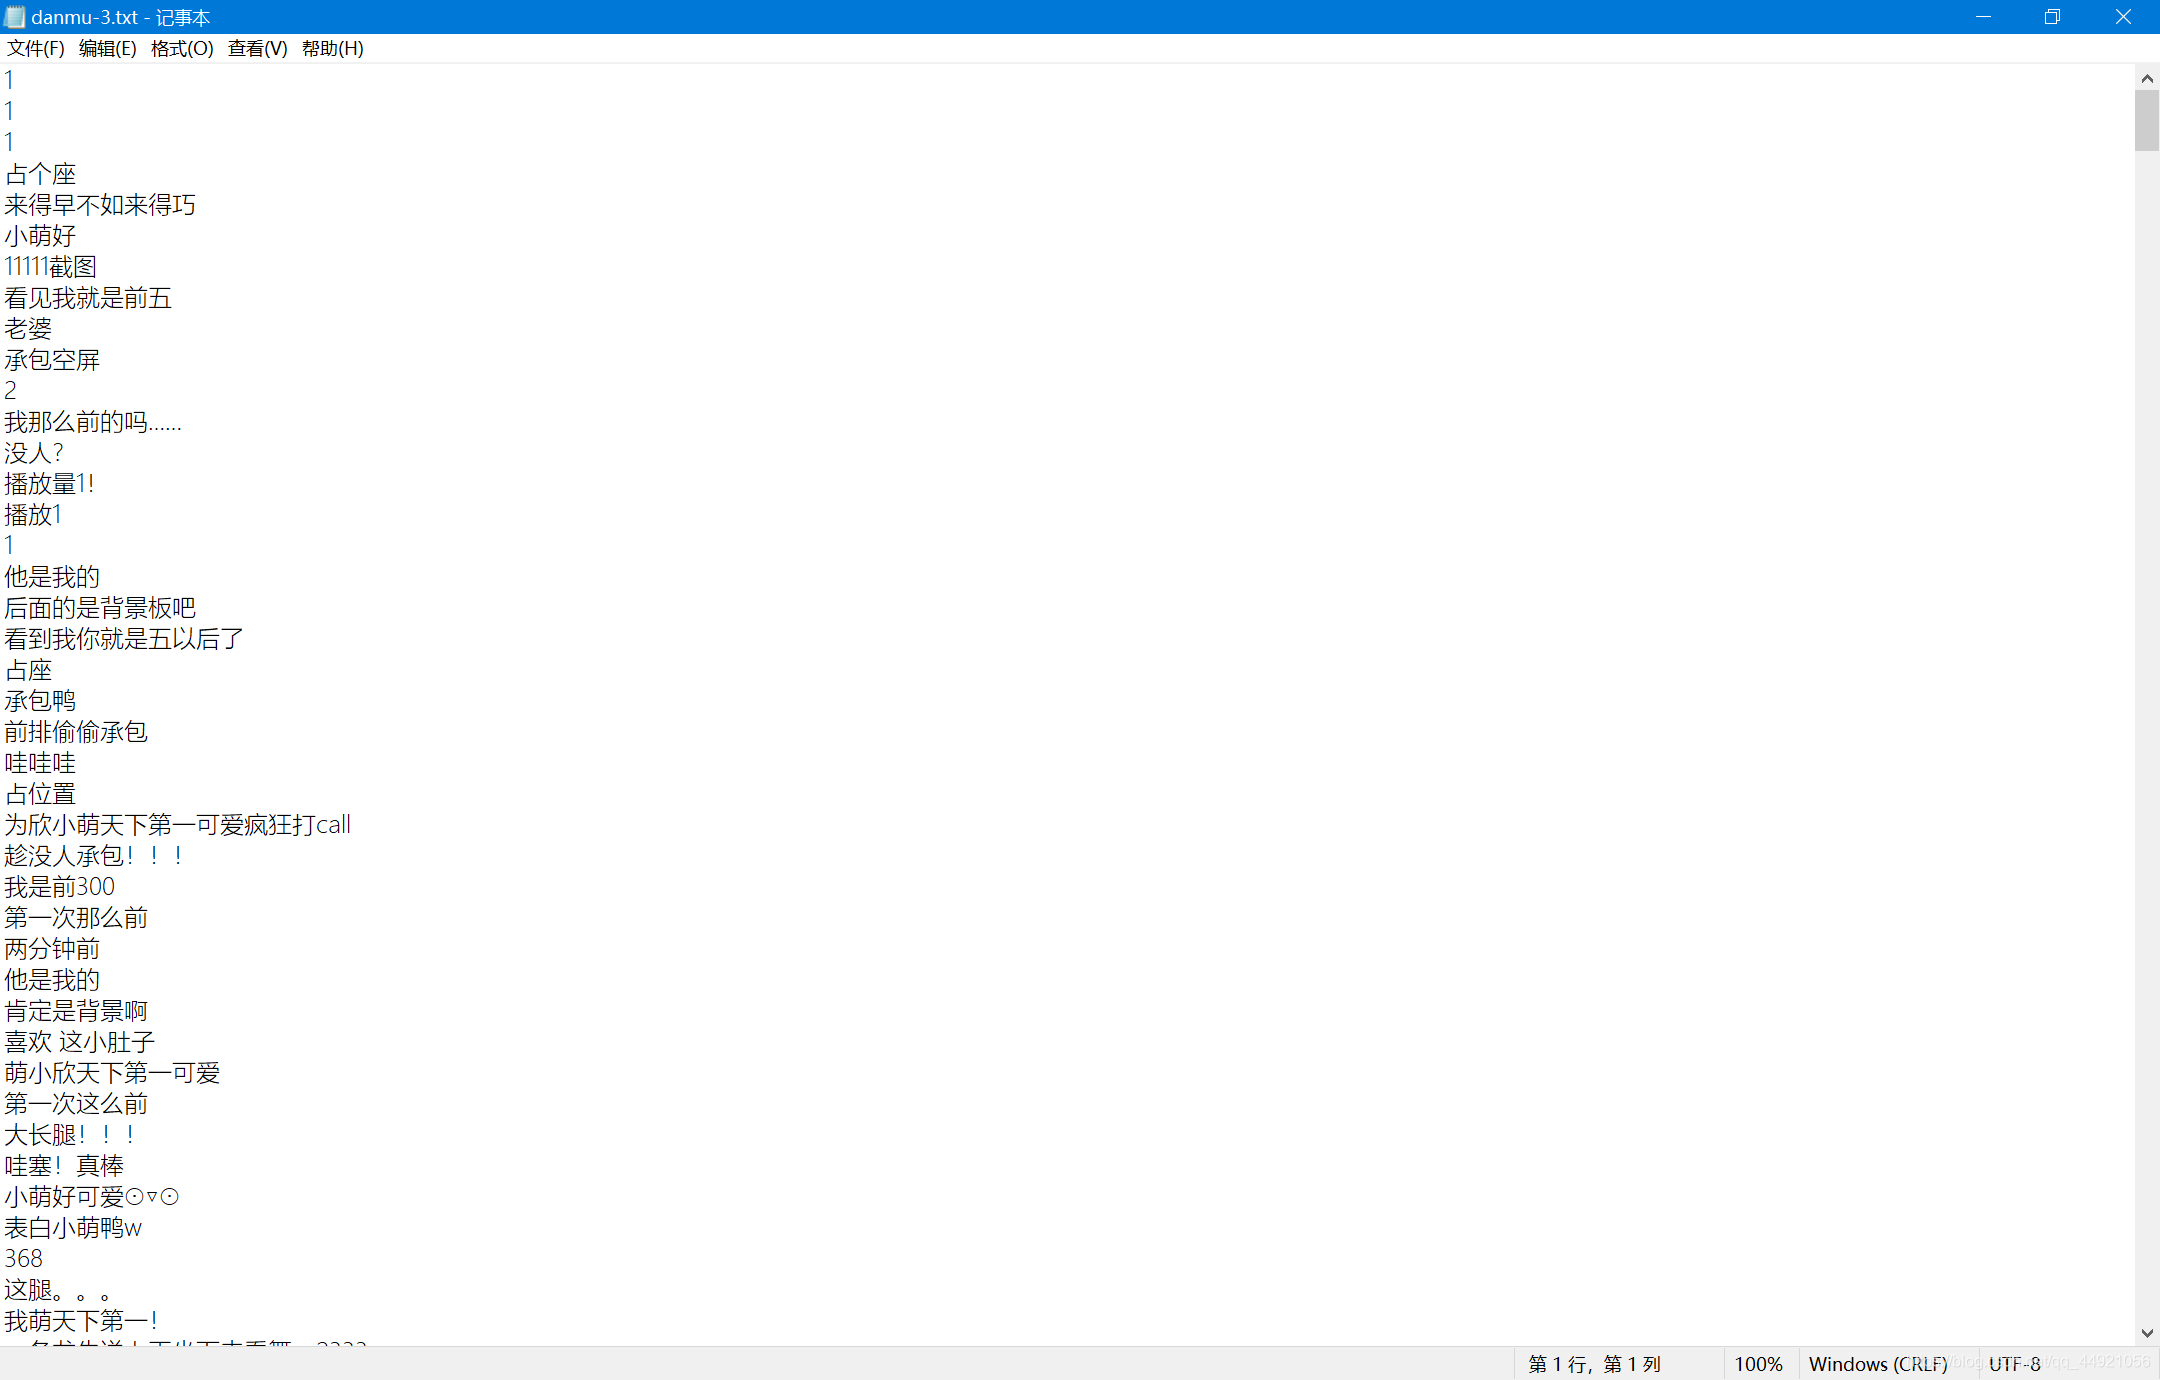
2. Get the barrage content of the video
To crawl the content of the barrage, I recommend a very easy-to-use third-party library, bilibili_api , for details, please refer to the official document: The portal
code is as follows:
from bilibili_api import Verify, video

verify = Verify(sessdata="你的sessdata值的内容", csrf="你的csrf值的内容")
# 参数
BVID = "这里填爬取视频弹幕的BV号"
# 获取视频信息
info = video.get_video_info(bvid=BVID, verify=verify)

# # 假设这里获取 p1 的最新弹幕信息,需要取出 page_id,即每 p 都有自己的编号
page_id = info["pages"][0]["cid"]

# 然后开始获取弹幕
danmakus = video.get_danmaku(bvid=BVID, page_id=page_id)

# 保存弹幕内容
list_all = list()
filename = 'D:/danmu.txt'  # 这里是保存的地址
for dm in danmakus:
    dm = dm.text
    list_all.append(dm)
    # print(list_all)
file = open(filename, 'w', encoding='utf-8')
for i in range(len(list_all)):
    s = str(list_all[i]).replace('[', '').replace(']', '')  # 去除[]
    s = s.replace("'", '').replace(',', '') + '\n'  # 去除单引号,逗号,每行末尾追加换行符
    file.write(s)  # 将列表中数据依次写入文件中
print('弹幕获取完毕!!!')
file.close()
Q: How to find the values of sessdata and csrf?
A:
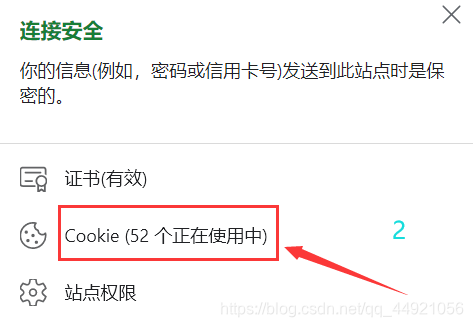
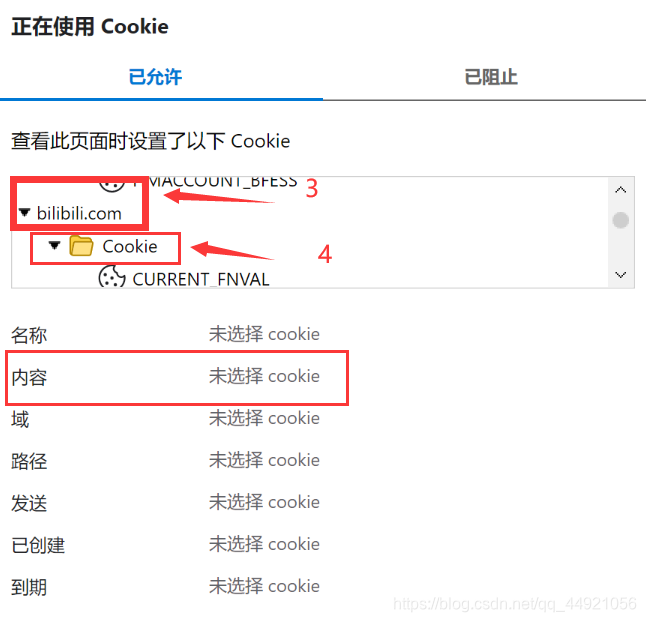
Find the content of sessdata and bili_jct in it (the official document says that the value of bili_jct is the value of csrf)
Note: Do not expose these two values to others, as they may be hacked (tips from official documents)
The results are as follows:
Three, extract pictures from the video
(Extracting frame by frame, the amount of work is still quite large)
We can use the following code to check first, how many sheets can be divided in total.
import cv2
# 查看总共有多少张图片
cap = cv2.VideoCapture(r"这里是下载的视频所在的路径")
num = 1
while True:
    ret, frame = cap.read()
    if ret:
        num += 1
    else:
        break
    print(num)
cap.release()   # 释放资源
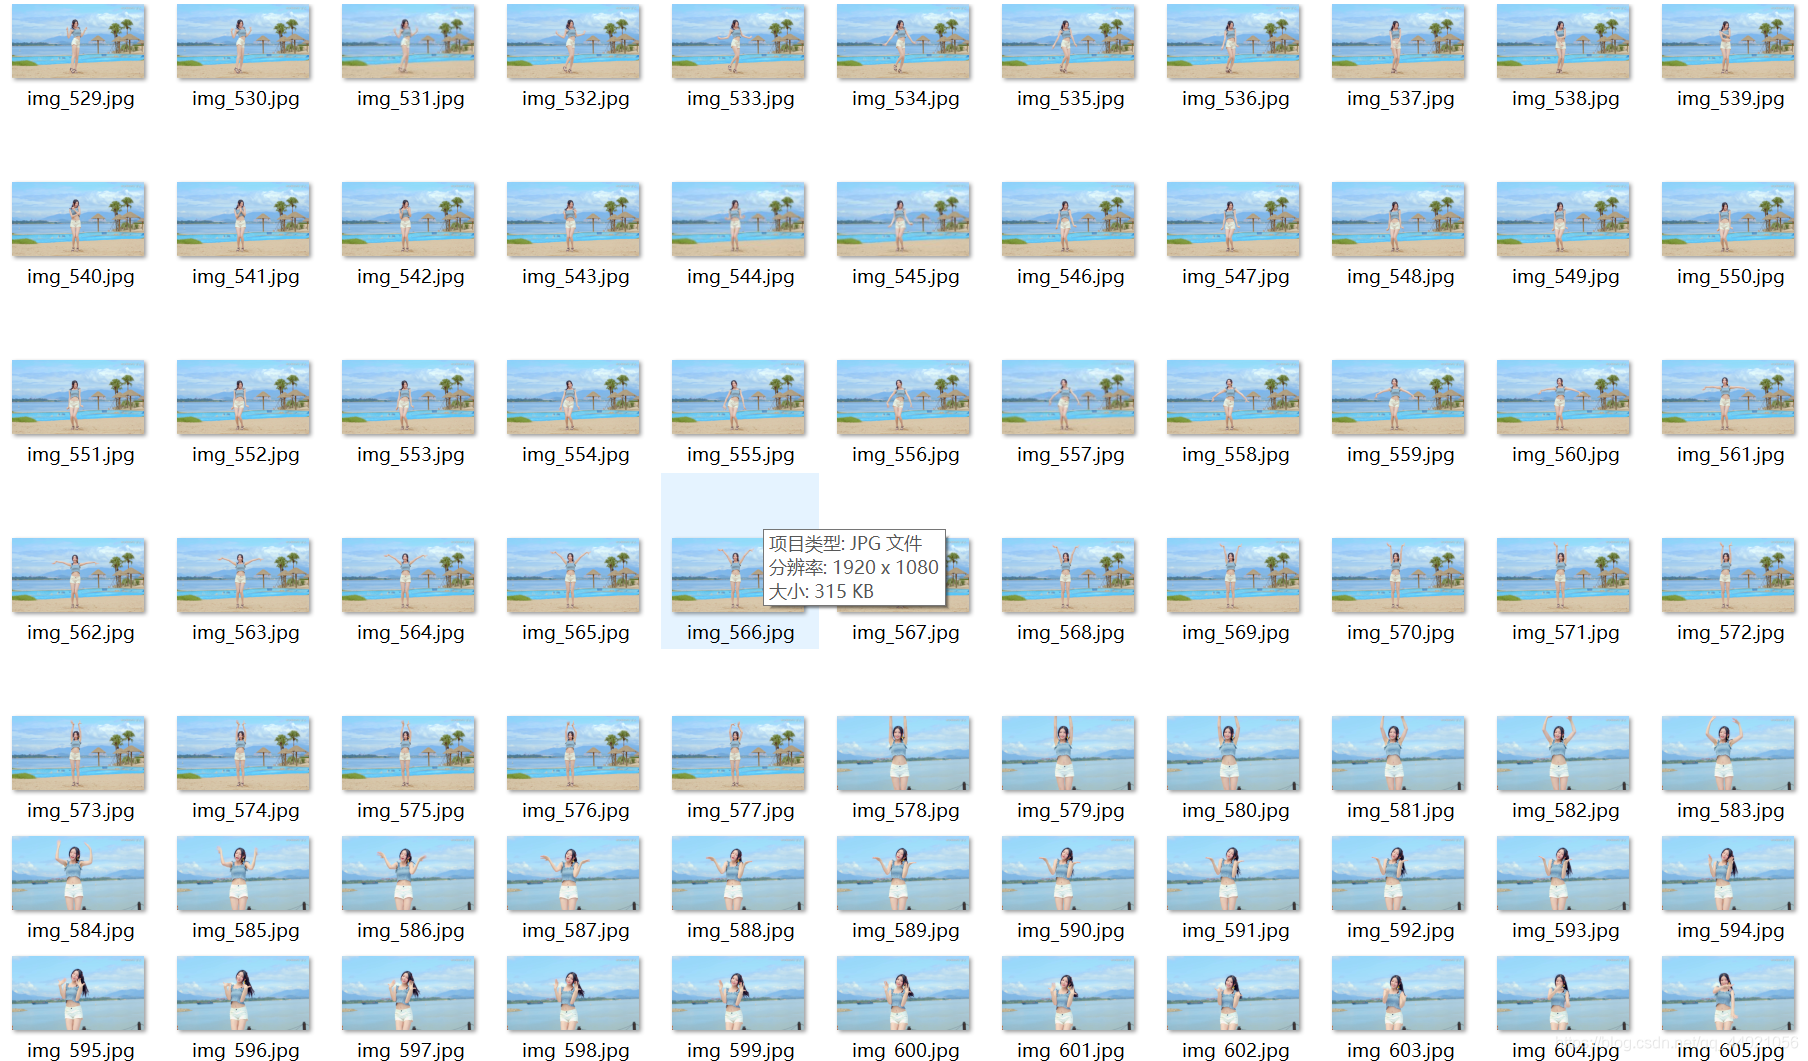
emmm, there are more than two thousand videos I have crawled for more than a minute. We can select a range, from the 521th to the 1314th.
import cv2
cap = cv2.VideoCapture(r"这里是下载的视频所在的路径")
num = 1
while True:
    # 逐帧读取视频  按顺序保存到本地文件夹
    ret, frame = cap.read()
    if ret:
        if 521 <= num < 1314:
            cv2.imwrite(f"这里填预保存图片文件夹的路径/img_{num}.jpg", frame)   # 保存一帧帧的图片
            print(f'========== 已成功保存第{num}张图片 ==========')
        num += 1
    else:
        break
cap.release()   # 释放资源
The results are as follows:
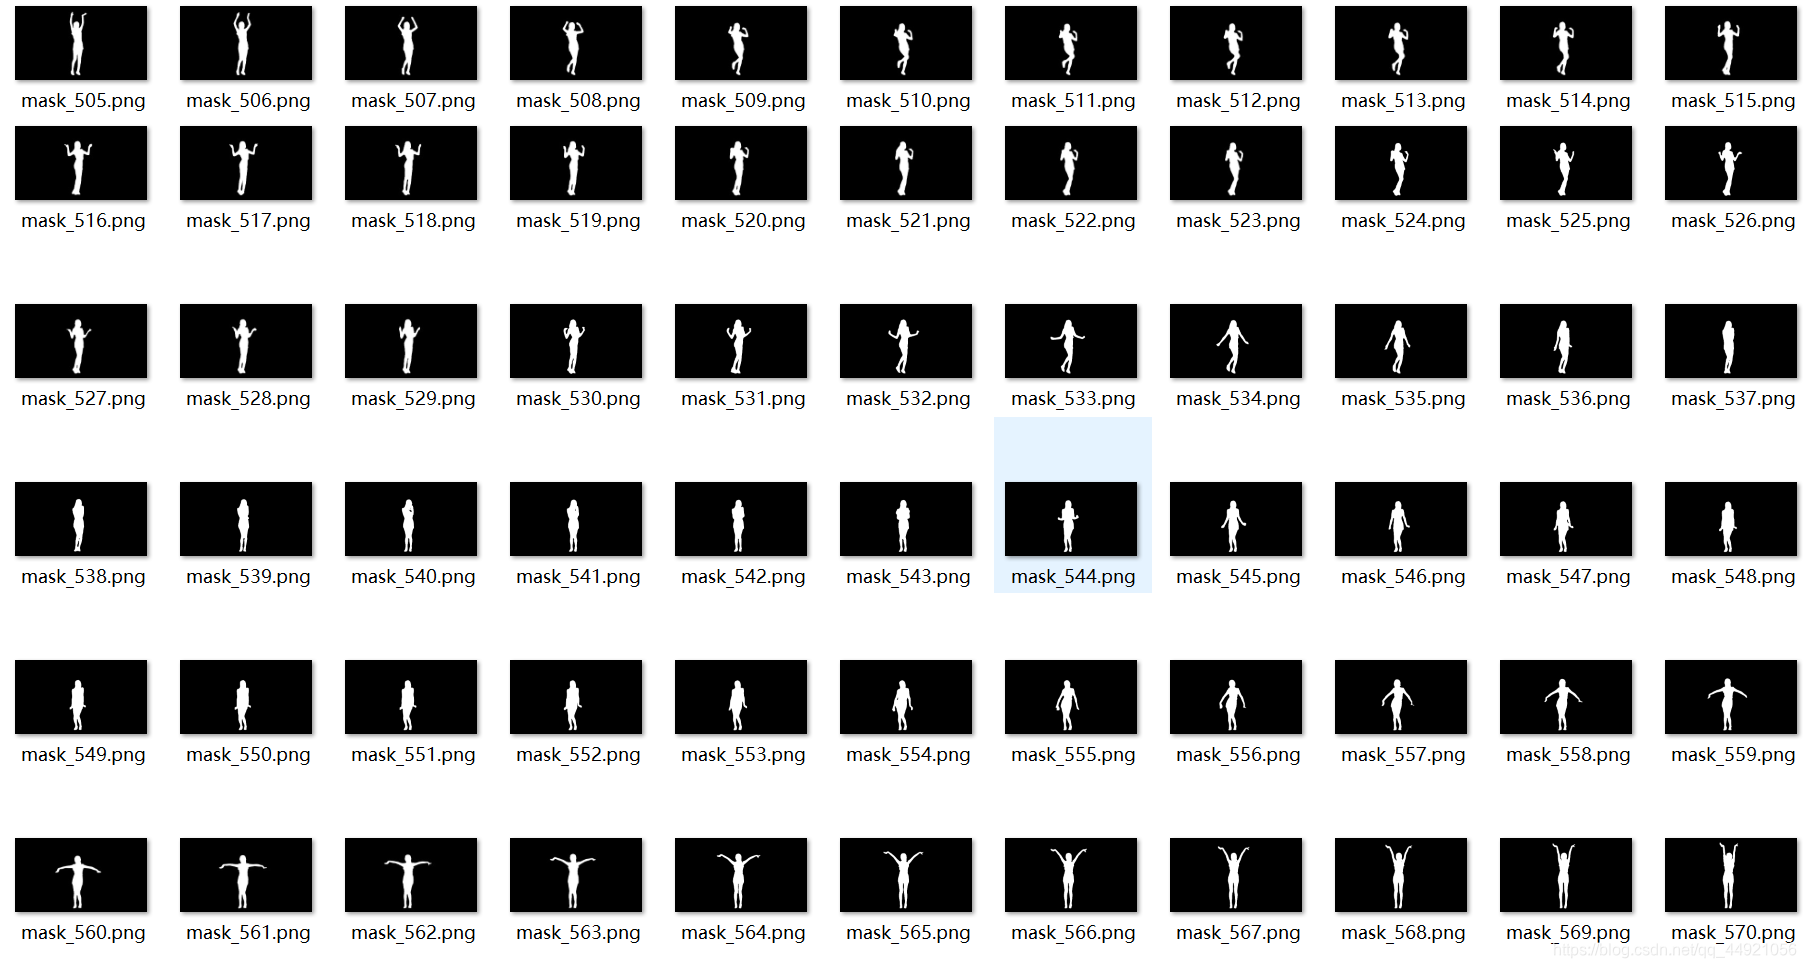
4. Portrait segmentation (with free Baidu AI)
First, open Baidu AI, the portal , click the console in the upper right corner, and log in with your mobile phone to scan the code. After logging in successfully, click on the face analysis in the left column to create the application. After the creation is successful, you will get three values in your application:

these three values will be used soon.
Next, check the Python SDK file for face analysis, the file link portal is
basically familiar with its application.
Finally, directly on the code:
from aip import AipBodyAnalysis
import os
import cv2
import base64
import numpy as np
import time
import random

# 百度云中已创建应用的  APP_ID API_KEY SECRET_KEY
APP_ID = '你的APP_ID的值'
API_KEY = '你的API_KEY的值'
SECRET_KEY = '你的SECRET_KEY的值'

client = AipBodyAnalysis(APP_ID, API_KEY, SECRET_KEY)
# 保存图像分割后的路径
path = '分割后的图像,想要保存的文件夹的路径'
# os.listdir  列出保存到图片名称
img_files = os.listdir('上一步中,保存提取出来的图片的文件夹路径')
# print(img_files)
for num in range(521, 1314):  # 图片范围
    # 按顺序构造出图片路径
    img = f'上一步中,保存提取出来的图片的文件夹路径/img_{num}.jpg'
    img1 = cv2.imread(img)  # imread读取图片
    height, width, _ = img1.shape
    # 二进制方式读取图片
    with open(img, 'rb') as fp:
        img_info = fp.read()
        # 设置只返回前景   也就是分割出来的人像
    seg_res = client.bodySeg(img_info)
    labelmap = base64.b64decode(seg_res['labelmap'])
    nparr = np.frombuffer(labelmap, np.uint8)
    labelimg = cv2.imdecode(nparr, 1)
    labelimg = cv2.resize(labelimg, (width, height), interpolation=cv2.INTER_NEAREST)
    new_img = np.where(labelimg == 1, 255, labelimg)
    mask_name = path + '\mask_{}.png'.format(num)
    # 保存分割出来的人像
    cv2.imwrite(mask_name, new_img)
    print(f'======== 第{num}张图像分割完成 ========')
    time.sleep(random.randint(1, 2))
The results are as follows:
Five, word cloud generation
from wordcloud import WordCloud
import collections
import jieba
import re
from PIL import Image
import matplotlib.pyplot as plt
import numpy as np

# 读取数据
with open('存放弹幕内容的文件路径', "rt", encoding="utf-8") as f:
    data = f.read()
# 文本预处理  去除一些无用的字符   只提取出中文出来
new_data = re.findall('[\u4e00-\u9fa5]+', data, re.S)
new_data = "/".join(new_data)

# 文本分词
seg_list_exact = jieba.cut(new_data, cut_all=True)
result_list = []
with open('stopwords.txt的存放路径', encoding='utf-8') as f:
    con = f.read().split('\n')
    stop_words = set()
    for i in con:
        stop_words.add(i)

for word in seg_list_exact:
    # 设置停用词并去除单个词
    if word not in stop_words and len(word) > 1:
        result_list.append(word)
# 筛选后统计词频
word_counts = collections.Counter(result_list)
path = '保存词云图片的文件夹路径'

for num in range(521, ):
    img = f'保存分割后的图像的文件夹的路径/mask_{num}.png'
    # 获取蒙版图片
    mask_ = 255 - np.array(Image.open(img))
    # 绘制词云
    plt.figure(figsize=(8, 5), dpi=200)
    my_cloud = WordCloud(
        background_color='black',  # 设置背景颜色  默认是black
        mask=mask_,      # 自定义蒙版
        mode='RGBA',
        max_words=500,
        font_path='simhei.ttf',   # 设置字体  显示中文
    ).generate_from_frequencies(word_counts)

    # 显示生成的词云图片
    plt.imshow(my_cloud)
    # 显示设置词云图中无坐标轴
    plt.axis('off')
    word_cloud_name = path + 'wordcloud_{}.png'.format(num)
    my_cloud.to_file(word_cloud_name)    # 保存词云图片
    print(f'======== 第{num}张词云图生成 ========')
Q: What is the stopwords.txt file?
A: It is a fixed file, just download it. Baidu Netdisk Portal
Extraction Code: iits
The results of the operation are as follows:


Six, check the frame rate and picture size in the original video
import cv2
mp4 = cv2.VideoCapture(r"这里是下载的视频所在的路径")  # 读取视频
is_opened = mp4.isOpened()  # 判断是否打开
print(is_opened)
fps = mp4.get(cv2.CAP_PROP_FPS)  # 获取视频的帧率
print(fps)
width = mp4.get(cv2.CAP_PROP_FRAME_WIDTH)  # 获取视频的宽度
height = mp4.get(cv2.CAP_PROP_FRAME_HEIGHT)  # 获取视频的高度
print(str(width) + "x" + str(height))
i = 1
time_f = int(fps)
The results of the operation are as follows:

Seven, composite dancing video
import cv2
import os

# 输出视频的保存路径
video_dir = '保存视频的文件路径'
# 帧率(最好填上一步得到的帧率)
fps = 25
# 图片尺寸(最好填上一步得到的尺寸)
img_size = (1920, 1080)

fourcc = cv2.VideoWriter_fourcc('M', 'P', '4', 'V')  # opencv3.0 mp4会有警告但可以播放
videoWriter = cv2.VideoWriter(video_dir, fourcc, fps, img_size)
img_files = os.listdir('词云图片所在的文件路径')

for i in range(521, 1314):
    img_path = '词云图片所在的文件路径/' + 'wordcloud_{}.png'.format(i)
    frame = cv2.imread(img_path)
    frame = cv2.resize(frame, img_size)   # 生成视频   图片尺寸和设定尺寸相同
    videoWriter.write(frame)      # 写进视频里
    print(f'======== 按照视频顺序第{i}张图片合进视频 ========')

videoWriter.release()   # 释放资源
The results of the operation are as follows:

8. Add original video and audio to render
emmmm, I just deleted the editing software "Da Vinci" a few weeks ago, so I used the Bilibili Cloud clip and uploaded it. Anyone who wants to see it can check it out.
Maybe only those who read this article and see here will see this video.
Nine, reference blog post
Reference blog post: Portal