
Target detection refers to the task of locating and recognizing targets in images or scenes by computers and software systems.
Target detection has been widely used in many fields such as face detection, vehicle detection, human flow statistics, network images, security systems and unmanned driving.
The implementation of early target detection is based on classic algorithms, such as those supported in the popular computer vision library OpenCV. However, these classic algorithms cannot obtain stable performance under different conditions.
In 2012, the breakthrough progress and rapid popularization of deep learning led to the emergence of R-CNN, Fast-RCNN, Faster-RCNN, RetinaNet, and fast and highly accurate SSD, YOLO and other target detection algorithms.
These algorithms based on deep learning and machine learning require a certain degree of mathematics and deep learning framework foundation. There are millions of professional computer programmers and software developers who want to integrate and create new products based on object detection algorithms. At the same time, due to the complexity of understanding and actual use, it has not been realized. How to develop efficient target detection code?
ImageAI came into being.
01, ImageAI makes the code concise
ImageAI is a python library that requires only a few lines of code to allow programmers and software developers to easily integrate the most advanced computer vision technology into their existing or new applications. ImageAI is open source on Github.
Github address:
https://github.com/OlafenwaMoses/ImageAI

ImageAI currently supports the use of 4 different machine learning algorithms trained on the ImageNet-1000 dataset for image prediction and training.
ImageAI also supports the use of RetinaNet, YOLOv3 and TinyYOLOv3 trained on the COCO dataset for object detection, video detection and object tracking. Finally, ImageAI allows training custom models to perform the detection and recognition of new targets.
The ImageAI library depends on other Python libraries, so you need to import other packages before using ImageAI for development.
02, preparations
To use ImageAI to achieve target detection, you only need to perform the following 4 steps:
-
Install Python on your computer
-
Install ImageAI, configure dependent environment
-
Download the target detection module file
-
Run the sample code (only 10 lines)
Let's expand step by step in detail:
(1) Download and install Python3 from Python official website
Link address: https://python.org
(2) Use the pip command to install the following dependent packages:
pip install tensorflowpip install numpypip install scipypip install opencv-pythonpip install pillowpip install matplotlibpip install h5pypip install keraspip3 install imageai --upgrade
Note: The first time you install the ImageAI library, you need to download the corresponding version of the .whl file, and the Python3 environment needs to download the imageai-2.0.2-py3-none-any.whl file, and then transfer to the corresponding folder, and execute the following command You can install:
pip install imageai-2.0.2-py3-none-any.whl
.whl file link address:
https://github.com/OlafenwaMoses/ImageAI/releases/download/2.0.2/imageai-2.0.2-py3-none-any.whl
(3) Download the RetinaNet model file for target detection
link address:
https://github.com/OlafenwaMoses/ImageAI/releases/download/1.0/resnet50_coco_best_v2.0.1.h5
03. Turn on target detection with 10 lines of code
At this point you have installed all the dependencies and can start writing your first target detection code.
Create a Python file and name it (such as FirstDetection.py), and then write the following code into the file. Copy the RetinaNet model file and the image to be detected to the folder containing the Python file.
FirstDetection.py:
from imageai.Detection import ObjectDetection
import os

execution_path = os.getcwd()

detector=ObjectDetection()
detector.setModelTypeAsRetinaNet()
detector.setModelPath( os.path.join(execution_path , "resnet50_coco_best_v2.0.1.h5"))
detector.loadModel()
detections = detector.detectObjectsFromImage(input_image=os.path.join(execution_path , "image.jpg"), output_image_path=os.path.join(execution_path , "imagenew.jpg"))

for eachObject in detections:
    print(eachObject["name"] , " : " , eachObject["percentage_probability"] )
Then run the code and wait for the result to be output. After the result is displayed, you can find the saved new image in the folder where FirstDetection.py is located.
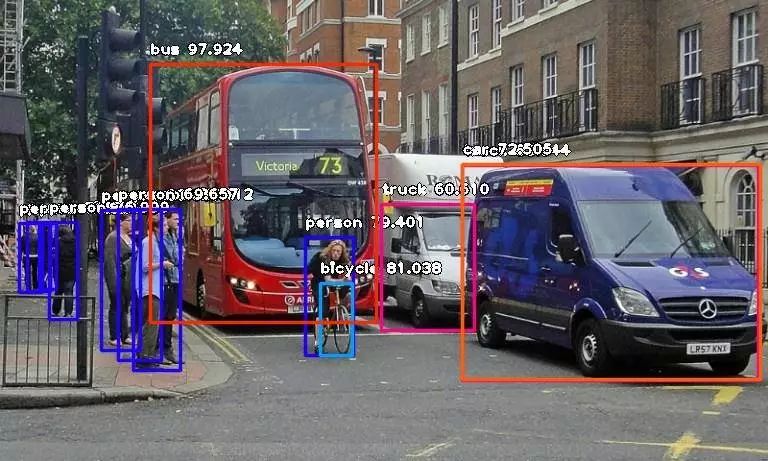
Below are two examples of new images.
Before target detection:


After target detection:
The results of running in the Spyder compiler are as follows:

Output target detection accuracy results:
person : 57.20391869544983
person : 52.57977843284607
person : 70.81094980239868
person : 76.99859142303467
person : 79.40077781677246
bicycle : 81.0384213924408
person : 83.66722464561462
person : 89.41188454627991
truck : 60.61040759086609
person : 69.65749859809875
bus : 97.92424440383911
truck : 83.94358158111572
car : 72.50492572784424
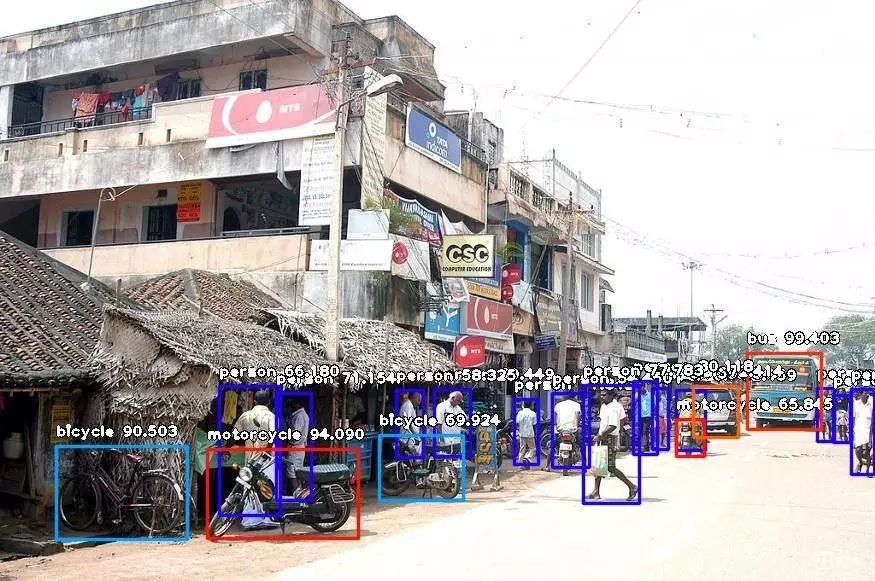
The results of running in the Spyder compiler are as follows:
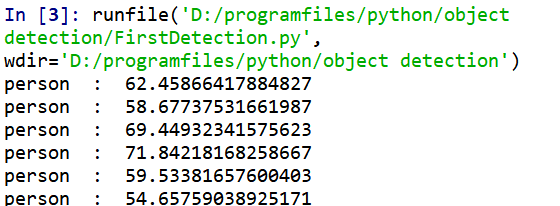
Output target detection accuracy results:
person : 62.45866417884827
person : 58.67737531661987
person : 69.44932341575623
person : 71.84218168258667
person : 59.53381657600403
person : 54.65759038925171
motorcycle : 65.84504842758179
bus : 99.40318465232849
car : 72.41445779800415
person : 58.32530856132507
person : 54.449981451034546
person : 80.11815547943115
person : 74.30745959281921
person : 77.78302431106567
person : 71.15439772605896
bicycle : 69.92427110671997
person : 66.17957353591919
bicycle : 90.50283432006836
motorcycle : 94.09030675888062
04, code interpretation
Let's explain the working principle of these 10 lines of code:
from imageai.Detection

import ObjectDetectionimport

osexecution_path = os.getcwd()
In the above 3 lines of code, the ImageAI target detection class is imported in the first line; the Python os class is imported in the second line; a variable is defined in the third line to save the Python file, the RetinaNet model file and the image location The path of the folder.
detector=ObjectDetection()
detector.setModelTypeAsRetinaNet()
detector.setModelPath( os.path.join(execution_path , "resnet50_coco_best_v2.0.1.h5"))
detector.loadModel()
detections = detector.detectObjectsFromImage(input_image=os.path.join(execution_path , "image.jpg"), output_image_path=os.path.join(execution_path , "imagenew.jpg"))
In the above 5 lines of code, we define an instance of the target detection class in the first line; set the model type of the instance to RetinaNet in the second line; set the model path to the RetinaNet model in the third line Path; Load the model into the instance of the target detection class in the fourth line; call the detection function in the fifth line, and pass in the file input and output path as a parameter.
for eachObject in detections:
    print(eachObject["name"] , " : " , eachObject["percentage_probability"] )
In the above two lines of code, the first line is used to iterate over all the results returned by the detector.detectObjectsFromImage function, and the second line is used to output the name and probability of each target detected in the image.
05, custom target detection
In addition, ImageAI also supports powerful custom target detection. One of them is the ability to extract every object detected in the image. Just need to parameter
extract_detected_objects=True
Incoming
detectObjectsFromImage
In the function, as shown below, the object detection class will create a folder for the image object, extract each image, save each sub-image to the new folder created, and return an array containing the path of each image.
detections, extracted_images = detector.detectObjectsFromImage(input_image=os.path.join(execution_path , "image.jpg"), output_image_path=os.path.join(execution_path , "imagenew.jpg"), extract_detected_objects=True)
Apply it to the first picture and get the following result:

All pedestrians are well extracted, and only part of it is shown here in order to save space.
06. Other functions of ImageAI
ImageAI provides many functions that can be used for customization and deployment of target detection tasks. The supported functions include:
-
Adjust the minimum probability : By default, objects with a probability less than 50% will not be displayed. For situations that require high accuracy, this value can be increased; for situations that need to detect all possible objects, this value can be reduced.
-
Custom target detection : Through the provided CustomObject class, the detection class can detect one or several specific targets.
-
Detection speed : By setting the detection speed to "fast", "faster" or "fastest", the time required to detect images can be reduced.
-
Input type : The file path of the image can be specified and parsed, and the Numpy array or image file stream can be used as input
-
Output type : you can specify the detectObjectsFromImage function to return the image in the form of a file or a Numpy array
The above is the introduction and demonstration of ImageAI, the target detection library.