table of Contents
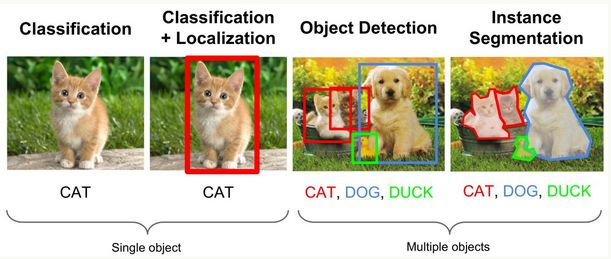
What is the target detection
Specific target detection target object in the target image, while addressing the need to resolve the positioning (localization) + identification (Recognition). Compared classification, detection is given the understanding of the foreground and background of the picture, we need to be separated from the background objects of interest, and to determine the description of this goal (category and location), so the output is a list of detection model , using a list of each item is given an array of categories and target detection position (coordinate representation common rectangular detection frame).
In layman's terms, Object Detection of a frame is out of the object in the target in FIG target, and recognizes that the frame is valid, and it is best able to image all objects are out of the box.
Target detection algorithm
Currently depth learning object detection field is divided into two categories: two-stage (Two Stages) target detection algorithm; a stage (One Stage) target detection algorithm.
Two Stages
Generating a first list of candidate frame as a sample by an algorithm (algorithm), then the sample (the Sample) via convolutional neural network classification. Also known algorithm based on the candidate region (Region Proposal) a. Common algorithm R-CNN, Fast R-CNN, Faster R-CNN and so on.
One Stage
Need not be generated candidate block, directly to the target block is transformed into positioning regression (Regression) Problem, also known as on-end (End-to-End) algorithm. Common algorithms YOLO, SSD and so on.
python achieve
This paper describes how to achieve target detection, as to the rationale behind, but many go, you can see the relevant papers.
ImageAI is an easy to use computer vision Python library so that developers can easily integrate the latest most advanced artificial intelligence functionality into their applications.
ImageAI in line with the principles of simplicity, support the most advanced machine learning algorithms for image prediction, forecast a custom image, object detection, video detection, video object tracking and image prediction training.
rely
- Python 3.5.1 (and later)
- pip3
- Tensorflow 1.4.0 (and later)
- Numpy 1.13.1 (and later)
- SciPy 0.19.1 (and later)
- OpenCV
- pillow
- Matplotlib
- h5py
- hard 2.x
installation
- Command line installation
pip3 install https://github.com/OlafenwaMoses/ImageAI/releases/download/2.0.1/imageai-2.0.1-py3-none-any.whl- Download imageai-2.1.0-py3-none- any.whl installation files and install files specified in the command line path
pip3 install .\imageai-2.1.0-py3-none-any.whluse
Image support deep learning algorithms are RetinaNet , YOLOv3 , TinyYoLOv3 . ImageAI has COCO dataset pre-trained on a model corresponding to a good three, different models may be selected according to need. Can be downloaded using the following link:
- Download RetinaNet Model - resnet50_coco_best_v2.0.1.h5
- Download YOLOv3 Model - yolo.h5
- Download TinyYOLOv3 Model - yolo-tiny.h5
Above to detect and identify the model 80 different objectives:
person,   bicycle,   car,   motorcycle,   airplane,
bus,   train,   truck,   boat,   traffic light,   fire hydrant, stop_sign,
parking meter,   bench,   bird,   cat,   dog,   horse,   sheep, cow,
elephant,   bear,   zebra,   giraffe,   backpack,   umbrella,
handbag,   tie,   suitcase, frisbee,   skis,   snowboard,
sports ball,   kite,   baseball bat,   baseball glove,   skateboard,
surfboard,   tennis racket,   bottle,   wine glass,   cup,   fork,   knife,
spoon,   bowl, banana,   apple,   sandwich,   orange,   broccoli,   carrot,
hot dog,   pizza,   donot,   cake,   chair,   couch,   potted plant,   bed,
dining table,   toilet,   tv,   laptop,   mouse,   remote,   keyboard,
cell phone,   microwave,   oven,   toaster,   sink,   refrigerator,
book,   clock,   vase,   scissors,   teddy bear,   hair dryer,
toothbrush
Let's look at the complete code, YOLOv3 algorithm 13 photo for target identification.
from imageai.Detection import ObjectDetection
import os

detector = ObjectDetection()
detector.setModelTypeAsYOLOv3()
detector.setModelPath("./model/yolo.h5")
detector.loadModel()

path = os.getcwd()
input_image_list = os.listdir(path+"\pic\input")
input_image_list = sorted(input_image_list, key = lambda i:len(i),reverse = False)
size = len(input_image_list)
for i in range(size):
    input_image_path = os.path.join(path+"\pic\input", input_image_list[i])
    output_image_path = os.path.join(path+"\pic\output", input_image_list[i])
    detections, extract_detected_objects = detector.detectObjectsFromImage(input_image=input_image_path,
                                                 output_image_path=output_image_path,
                                                 extract_detected_objects=True)
    print('------------------- %d -------------------' % int(i + 1))
    for eachObject in detections:
        print(eachObject["name"], " : ", eachObject["percentage_probability"], " : ", eachObject["box_points"])
    print('------------------- %d -------------------' % int(i + 1))
The very first line introduction ImageAI Object Detectiontype, introduced in the second line oslibrary.
ObjectDetection then creates a new instance of the class, then you can select the algorithm to use. There are the following three functions:
.setModelTypeAsRetinaNet()
.setModelTypeAsYOLOv3()
.setModelTypeAsTinyYOLOv3()
You must set the model file path After selecting algorithm, the path must be given here, and the same algorithm selection.
.setModelPath()
- 参数path(必须):模型文件的路径
Load the model.
.loadModel()
- 参数detection_speed(可选):最多可以减少80%的时间,单身会导致精确度的下降。可选的值有: “normal”, “fast”, “faster”, “fastest” 和 “flash”。默认值是 “normal”。
File input and output paths, etc. obtained by the os library, it is not the focus of this article, skip table.
Start the image target detection.
.detectObjectsFromImage()
- 参数input_image(必须):待检测图像的路径
- 参数output_image(必须):输出图像的路径
- 参数parameter minimum_percentage_probability(可选):能接受的最低预测概率。默认值是50%。
- 参数display_percentage_probability(可选):是否展示预测的概率。默认值是True。
- 参数display_object_name(可选):是否展示识别物品的名称。默认值是True。
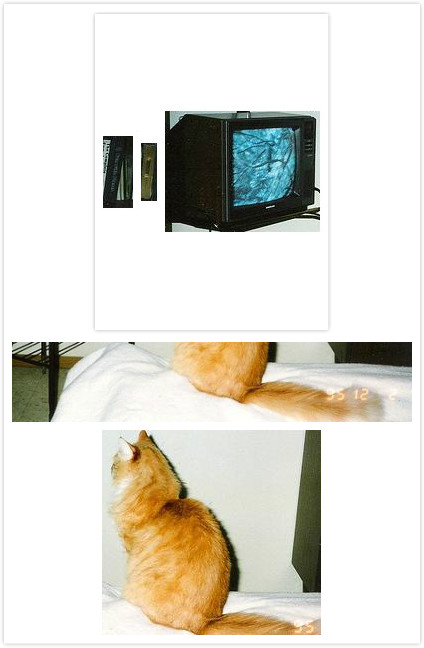
- 参数extract_detected_objects(可选):是否将识别出的物品图片保存。默认是False。The return value of different parameters have different, but will return to a an array of dictionaries. Dictionary includes the following attributes:
* name (string)
* percentage_probability (float)
* box_points (tuple of x1,y1,x2 and y2 coordinates)
As mentioned above we can identify 80 kinds of targets, where you can also choose to recognize only target they want.
custom = detector.CustomObjects(person=True, dog=True)

detections = detector.detectCustomObjectsFromImage( custom_objects=custom, input_image=os.path.join(execution_path , "image3.jpg"), output_image_path=os.path.join(execution_path , "image3new-custom.jpg"), minimum_percentage_probability=30)
First, define the goals you want with the rest of the target will be set to False. Then with .detectCustomObjectsFromImage()target detection.
Main code substantially as described above, then see the results. Take a look at the picture effect is only a target.

------------------- 10 -------------------
dog : 98.83476495742798 : (117, 91, 311, 360)
dog : 99.24255609512329 : (503, 133, 638, 364)
dog : 99.274742603302 : (338, 38, 487, 379)
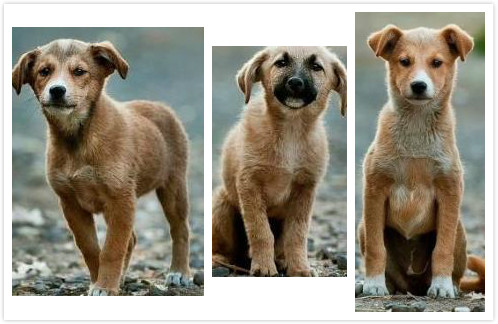
------------------- 10 -------------------The effect is good. Look at how to identify if there are multiple target picture results.
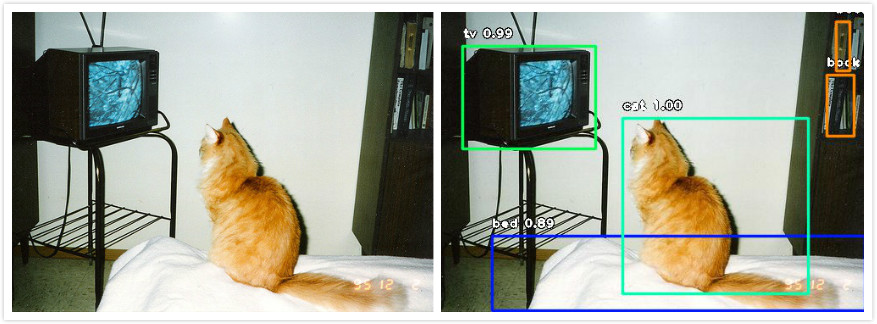
------------------- 4 -------------------
book  :  55.76887130737305  :  (455, 74, 487, 146)
book  :  82.22097754478455  :  (466, 11, 482, 69)
tv  :  99.34800863265991  :  (25, 40, 182, 161)
bed  :  88.7190580368042  :  (60, 264, 500, 352)
cat  :  99.54025745391846  :  (214, 125, 433, 332)
------------------- 4 -------------------
The degree of recognition is still high, the human eye can not see behind the books can be identified.
appendix
GitHub:https://github.com/Professorchen/Computer-Vision/tree/master/object-detection