Tools used:
CentOS7, VMare12 virtual machine, hadoop-2.6.4, SecureCRT (remote connection to the virtual machine), WinSCP (to realize file transfer between local and virtual machine installations of CentOS7) After
installing a CentOS, use the cloned one The method is producing the second and third systems.
From here, Centos7 has been installed.
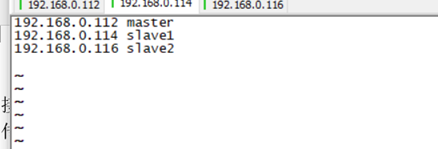
1. Modify the system name and the mapping of the ip and name of the three systems.
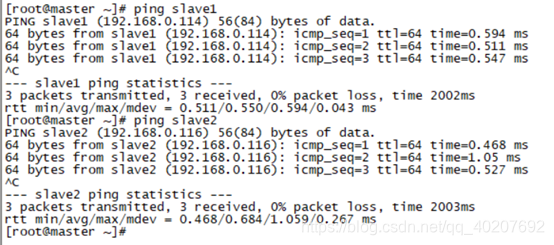
2. Ping to see if the above changes take effect?
3. SSH realizes password-free login of three machines
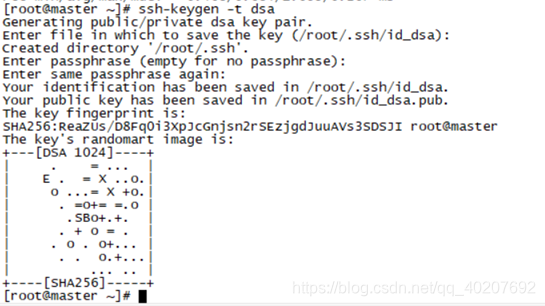
ssh-keygen -t dsa
Hit enter twice during the execution of the command, and then generate id_dsa id_dsa.pub under the /root/.ssh file, create an authorized_keys file under this file, and copy the content of the id_dsa.pub file to the
other two in the authorized_keys file The virtual machine also executes the #ssh-keygen -t dsa operation and copies the content of id_dsa.pub to the authorized_keys file of the first virtual machine. Copy the authorized_keys file of the first machine to /root/.ssh/ of the other two virtual machines. 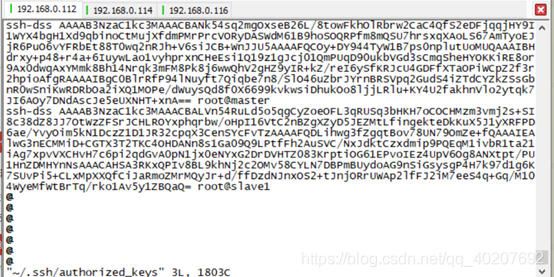
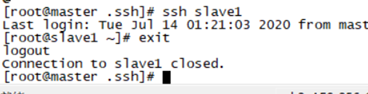
Use the command # ssh slave1 to see if you can log in without secrets. Exit through the command exit.
4. Install the java environment on 3 machines
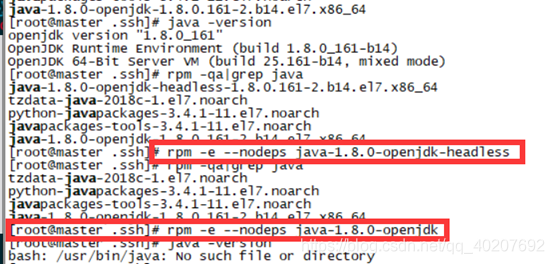
① View and uninstall the built-in jdk
rpm -qa|grep java

② Uninstall the built-in jdk
③ Install jdk1.8 and
upload jdk-8u191-linux-x64.tar.gz to the /app directory.

Unzip
tar -xvf jdk-8u191-linux-x64.tar.gz
Move the decompressed folder to /usr/local/
mv jdk1.8.0_191 /usr/local/
Configure environment variables
vim /etc/profile
Add

environment variables to take effect:
source /etc/profile
View java
java -version

5. Installing hadoop is the same as above. First upload hadoop to master using WinSCP, and finally upload the installed files to other machines after installing hadoop on master.
(1) Create a new directory named hadoop under the opt directory, and unzip the downloaded hadoop-2.4.6.tar.gz to this directory.
(2) Create several new directories Create several new directories
under the /root directory, copy and paste and execute the following commands:
mkdir  /root/hadoop
mkdir  /root/hadoop/tmp
mkdir  /root/hadoop/var
mkdir  /root/hadoop/dfs
mkdir  /root/hadoop/dfs/name
mkdir  /root/hadoop/dfs/data
(3) Modify a series of configuration files in etc/hadoop
/opt/hadoop/hadoop-3.2.0/etc/hadoop/
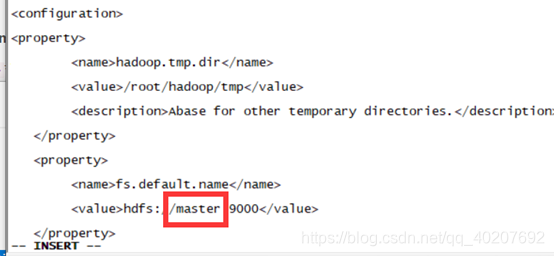
① Modify core-site.xml
to add configuration in the node:
<property>
        <name>hadoop.tmp.dir</name>
        <value>/root/hadoop/tmp</value>
        <description>Abase for other temporary directories.</description>
   </property>
   <property>
        <name>fs.default.name</name>
        <value>hdfs://master:9000</value>
   </property>
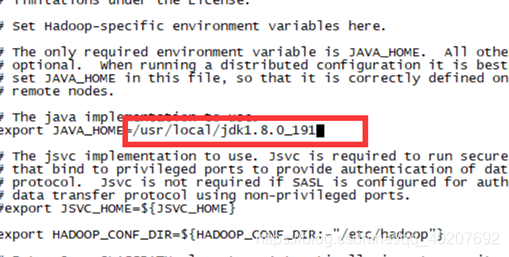
② Modify hadoop-env.sh and modify
export JAVA_HOME=${JAVA_HOME}
to:
export JAVA_HOME=/usr/local/jdk1.8.0_191 (actual situation)
③ Modify hdfs-site.xml
to add configuration in the node:
<property>
<name>dfs.name.dir</name>
<value>/root/hadoop/dfs/name</value>
<description>Path on the local filesystem where theNameNode stores the namespace and transactions logs persistently.</description>
</property>
<property>
<name>dfs.data.dir</name>
<value>/root/hadoop/dfs/data</value>
<description>Comma separated list of paths on the localfilesystem of a DataNode where it should store its blocks.</description>
</property>
<property>
<name>dfs.replication</name>
<value>2</value>
</property>
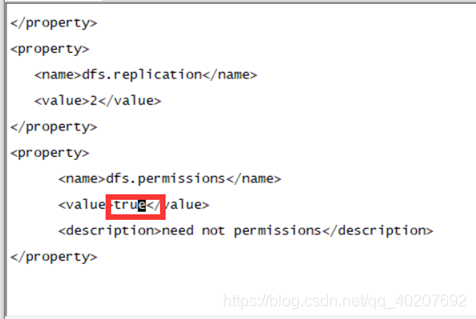
<property>
<name>dfs.permissions</name>
<value>ture</value>
<description>need not permissions</description>
</property>
④ Modify mapred-site.xml. template
to add configuration in the node:
<property>
   <name>mapred.job.tracker</name>
   <value>maaster:49001</value>
</property>
<property>
      <name>mapred.local.dir</name>
       <value>/root/hadoop/var</value>
</property>
<property>
       <name>mapreduce.framework.name</name>
       <value>yarn</value>
</property>
⑤ Modify the yarn-site.xml file
and add configuration in the node
<property>
        <name>yarn.resourcemanager.hostname</name>
        <value>master</value>
   </property>
   <property>
        <description>The address of the applications manager interface in the RM.</description>
        <name>yarn.resourcemanager.address</name>
        <value>${

    yarn.resourcemanager.hostname}:8032</value>
   </property>
   <property>
        <description>The address of the scheduler interface.</description>
        <name>yarn.resourcemanager.scheduler.address</name>
        <value>${

    yarn.resourcemanager.hostname}:8030</value>
   </property>
   <property>
        <description>The http address of the RM web application.</description>
        <name>yarn.resourcemanager.webapp.address</name>
        <value>${

    yarn.resourcemanager.hostname}:8088</value>
   </property>
   <property>
        <description>The https adddress of the RM web application.</description>
        <name>yarn.resourcemanager.webapp.https.address</name>
        <value>${

    yarn.resourcemanager.hostname}:8090</value>
   </property>
   <property>
        <name>yarn.resourcemanager.resource-tracker.address</name>

        <value>${

    yarn.resourcemanager.hostname}:8031</value>
   </property>
   <property>
        <description>The address of the RM admin interface.</description>
        <name>yarn.resourcemanager.admin.address</name>
        <value>${

    yarn.resourcemanager.hostname}:8033</value>
   </property>
   <property>
        <name>yarn.nodemanager.aux-services</name>
        <value>mapreduce_shuffle</value>
   </property>
   <property>
        <name>yarn.scheduler.maximum-allocation-mb</name>
        <value>2048</value>
        <discription>每个节点可用内存,单位MB,默认8182MB</discription>
   </property>
   <property>
        <name>yarn.nodemanager.vmem-pmem-ratio</name>
        <value>2.1</value>
   </property>
   <property>
        <name>yarn.nodemanager.resource.memory-mb</name>
        <value>2048</value>
</property>
   <property>
       <name>yarn.nodemanager.vmem-check-enabled</name>
        <value>false</value>
</property>
⑥ Repeat the above steps for the other two, or copy them directly
scp -r /opt/Hadoop slave1:/opt
scp -r /opt/Hadoop slave2:/opt
⑦ Start Hadoop
because the master is the namenode, and slave1 and slave2 are both datanodes, so only the master is initialized, that is, the hdfs is formatted.
1) Enter the /opt/hadoop/hadoop-2.6.4/bin directory of the master machine, that is, execute the command:
cd /opt/hadoop/hadoop-2.6.4/bin
2) Execute the initialization script, that is, execute Command:
./hadoop namenode -format
3) If no error is reported for a few seconds, the execution is successful. After the format is successful, you can see that there is an additional current directory in the /root/hadoop/dfs/name/ directory, and there is one in the directory. Series files.

4) Execute the startup command on the namenode
Because the master is the namenode, and slave1 and slave2 are both datanodes, you only need to execute the startup command on the master.
Enter the /opt/hadoop/hadoop-2.6.4/sbin directory of the master machine to
execute the initialization script, which is to execute the command:
./start-all.sh The
first time the above startup command is executed, we will need to interact Operation, enter yes on the question and answer interface and press Enter.
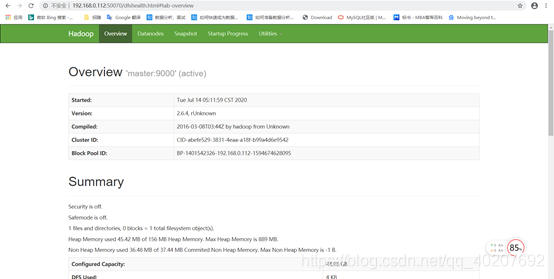
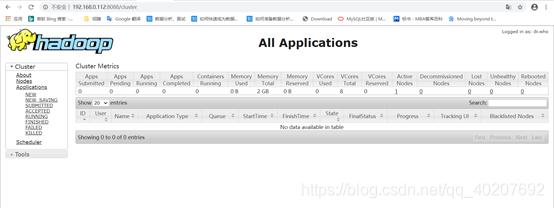
5) Visit the following address on the local computer:
http://192.168.0.112:50070/
http://192.168.0.112:8088/
After the end, be sure to./stop-all.sh