Foreword
Probably just in front of introduction about Hadoop, now began to build a cluster. Our next try to build a simple cluster. Why after such share will slowly build, first look at the effect of it!
1.1, stand-alone mode (separate mode) (the Local or Standalone Mode)
- By default, the Hadoop i.e. in this mode, and for developing modal.
- No configuration file is modified.
- Use the local file system, rather than a distributed file system.
-Hadoop not start NameNode, DataNode, JobTracker, TaskTracker such as daemons, Map () and Reduce () task as different parts of the same process to be executed.
- for logic debug MapReduce programs to ensure that correct procedures.
1.2, pseudo-distributed mode (Pseudo-Distrubuted Mode)
-Hadoop daemon running in native machine to simulate a small cluster
- Analog multi-host in a host.
-Hadoop start NameNode, DataNode, JobTracker, TaskTracker these daemons run on the same machine, are independent Java process.
- In this mode, Hadoop distributed file system is used, each job is also served by JobTraker, independent process to manage. Increase over the stand-alone mode code debugging function, allows to check memory usage, the HDFS input and output,
As well as other daemons interaction. Similar to the fully distributed mode, therefore, this model used to develop test Hadoop program execution is correct.
- modify three configuration files: core-site.xml (Hadoop cluster characteristics, and applies to all process and client), hdfs-site.xml (HDFS cluster configuration work attributes), mapred-site.xml (MapReduce cluster configuration property)
- formatted file system
1.3, fully distributed cluster mode (Full-Distributed Mode)
-Hadoop daemon running on a cluster
-Hadoop daemon running on multiple hosts to build a cluster, is a real production environment.
- Installation and JDK Hadoop on all hosts, a network of interconnected.
- Set free SSH login password, add each node generated from the list of trusted public key to the master node between hosts.
- Modify Profile 3: core-site.xml, hdfs-site.xml , mapred-site.xml,, such as a copy of the specified location and JobTraker NameNode and port parameter settings file
- file system is formatted
Second, build a pseudo-distributed cluster prerequisite
Environment: In ubuntu17.04
jdk1.8.0_131
hadoop 2.8.1
2.1, the normal operation of the Ubuntu operating system
In Ubuntu, install the software under / opt, the user is currently being used for opt directory need to have read and write permissions:
1) the authority to opt for the 777 (file vulnerability), is not recommended for use in a production environment. But it can be used in learning and debugging environment.
2)sudo
When start of each Hadoop daemon, you need to use sudo.
When managing Hadoop actually start the daemon different clusters by different users.
Unified using the current user to manage all clusters.
3) the owner of the directory is set to the current user
2.2, install JDK, and configuration environment variable
1) The jdk installation package placed in the home directory
2) extract to opt directory
sudo tar zxvf jdk-8u131-linux-x64.tar.gz -C /opt
At this point in the / opt directory: there will be a jdk1.8.0_131
3) Create a soft link
sudo ln -snf /opt/jdk1.8.0_131 /opt/jdk

Note: Create a soft link of the purpose, we are doing the project, might use different jdk versions, it is incumbent software, then only need to modify the soft link on it. Without modifying the configuration file.
4) configuration environment variable
Local environment variables: ~ / .bashrc
global environment variables: / etc / Profile
Export the JAVA_HOME = / opt / JDK
Export the JRE_HOME the JAVA_HOME = $ / JRE
Export the CLASSPATH =:. $ The JAVA_HOME / lib
Export the PATH the PATH = $: $ the JAVA_HOME / bin
source documents (updated configuration file)
5) Check whether the installation is successful
java、javac、java -version
Third, build a pseudo-distributed cluster
3.1, install hadoop
1) extracting hadoop installation package to the next directory opt
sudo tar zxvf hadoop-2.8.1.tar.gz -C /opt
2) Create a soft link
ln -snf /opt/hadoop-2.8.1 /opt/hadoop

3) configuration environment variable
Add the following line in / etc / profile file:
Export HADOOP_HOME = / opt / hadoop
Export the PATH = $ the PATH: $ HADOOP_HOME / bin: $ HADOOP_HOME / sbin
Source / etc / profile
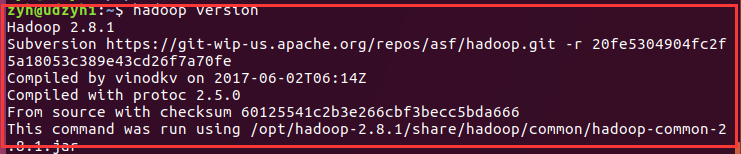
4) Use hadoop version command to test whether the configuration
3.2, configure hadoop
Configuration files are stored in / opt / hadoop / etc / hadoop have more than n files, we only need to modify the time being only five
1)hadoop-env.sh
In about 25 lines
export JAVA_HOME=${JAVA_HOME}改成export JAVA_HOME=/opt/jdk

Note: there are tips how we set in the configuration file, we generally do not delete, select two back annotation of its tips.
2)core-site.xml
      <configuration>
                <property>
                    <name>fs.defaultFS</name>
                    <value>hdfs://1.0.0.5:9000</value>
                </property>
            </configuration>

Analysis: 1.0.0.5 ip is the host of your primary node is located, and 9000 for the port
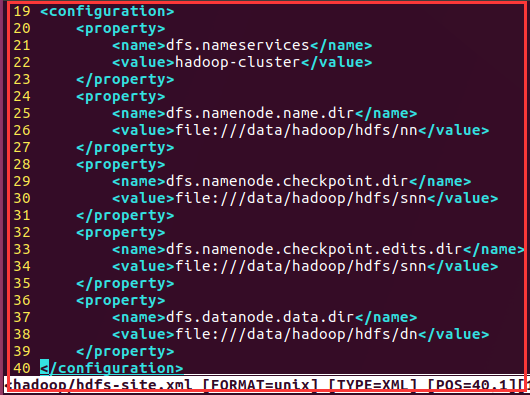
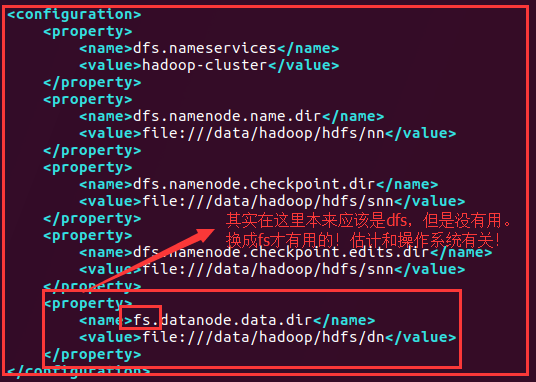
3)hdfs-site.xml

            <configuration>
                <property>
                    <name>dfs.nameservices</name>
                    <value>hadoop-cluster</value>
                </property>
                <property>
                    <name>dfs.namenode.name.dir</name>
                    <value>file:///data/hadoop/hdfs/nn</value>
                </property>
                <property>
                    <name>dfs.namenode.ch
                    eckpoint.dir</name>
                    <value>file:///data/hadoop/hdfs/snn</value>
                </property>
                <property>
                    <name>dfs.namenode.checkpoint.edits.dir</name>
                    <value>file:///data/hadoop/hdfs/snn</value>
                </property>
                <property>
                    <name>dfs.datanode.data.dir</name>
                    <value>file:///data/hadoop/hdfs/dn</value>
                </property>
            </configuration>
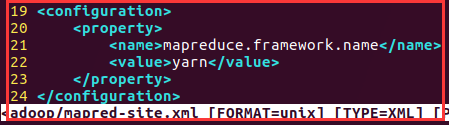
4)mapred-site.xml
Without this file in the relevant directory hadoop in, but there is a mapred-site.xml.template file, copy the file to mapred-site.xml
cp mapred-site.xml.template mapred-site.xml
            <configuration>
                <property>
                    <name>mapreduce.framework.name</name>
                    <value>yarn</value>
                </property>
            </configuration>
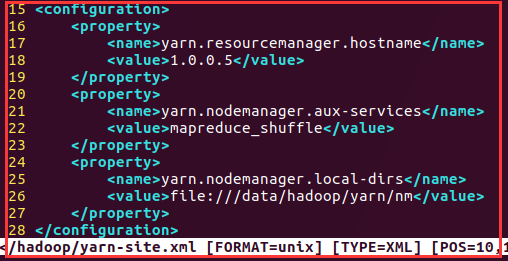
5)yarn-site.xml
            <configuration>
                <!-- 指定ResourceManager的地址-->
                <property>
                    <name>yarn.resourcemanager.hostname</name>
                    <value>1.0.0.5</value>
                </property>
                <!-- 指定reducer获取数据的方式-->
                <property>
                    <name>yarn.nodemanager.aux-services</name>
                    <value>mapreduce_shuffle</value>
                </property>
                <property>
                    <name>yarn.nodemanager.local-dirs</name>
                    <value>file:///data/hadoop/yarn/nm</value>
                </property>
            </configuration>
7)创建相关目录
        sudo mkdir -p /data/hadoop/hdfs/nn
        sudo mkdir -p /data/hadoop/hdfs/dn
        sudo mkdir -p /data/hadoop/hdfs/snn
        sudo mkdir -p /data/hadoop/yarn/nm
注意:
如果使用sudo启动hadoop的相关进程,这几目录的权限可以不用管。
如果是使用当前的用户启动相关进程,对于opt目录,当前用户得有读写权限,对于/data目录也需要读写权限。
遇到问题:
笔者就是在这个目录权限的问题吃el很大得亏。首先为了不使用sudo我将/data目录的权限修改为777,然后进行
HDFS集群格式化的时候,出现:
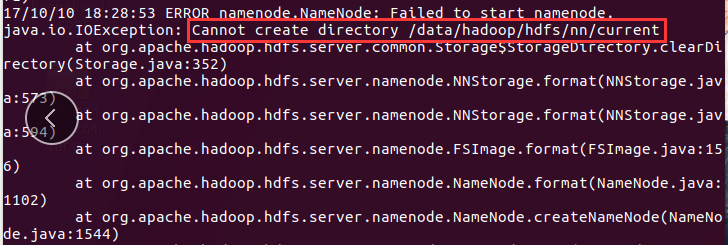
这时我在想为什么呢?原来我只是给data目录设置了读写权限,但是没有给它的子目录设置读写权限。所以:
chmod -R 777 /data 递归设置权限
8)对HDFS集群进行格式化,HDFS集群是用来存储数据的。
hdfs namenode -format
3.3、启动集群
1)启动HDFS集群
hadoop-daemon.sh start namenode 启动主节点
hadoop-daemon.sh start datanode 启动从节点

2)启动YARN集群
yarn-daemon.sh start resourcemanager
yarn-daemon.sh start nodemanager

3)启动作业历史服务器
mr-jobhistory-daemon.sh start historyserver

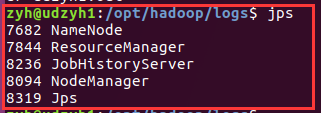
4)jps命令查看是否启动成功
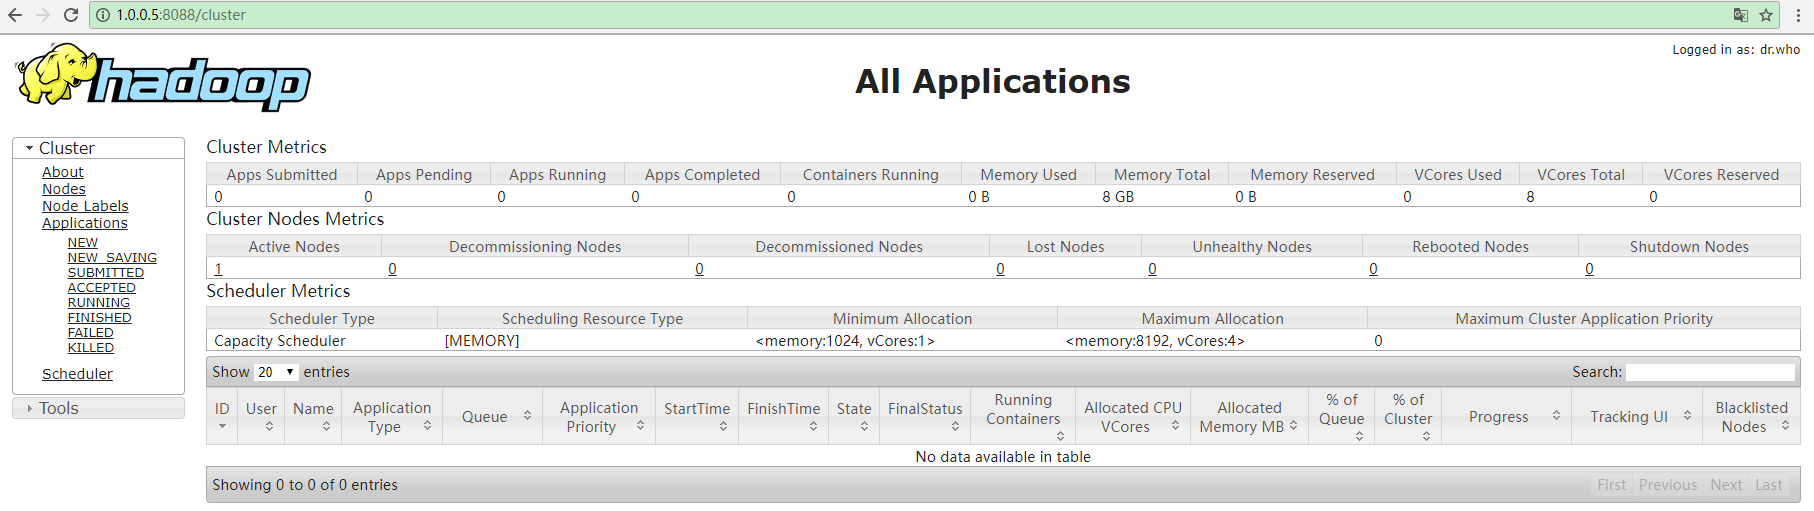
5)HDFS和YARN集群都有相对应的WEB监控页面
HDFS:http://ip:50070

YARN:http://ip:8088
6)HDFS集群的简单操作命令
hdfs dfs -ls /

hdfs dfs -mkdir -p /user/zyh

7) YARN集群的操作----提交任务/作业
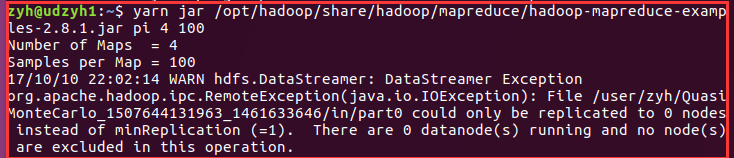
计算PI值的作业:
yarn jar /opt/hadoop/share/hadoop/mapreduce/hadoop-mapreduce-examples-2.8.1.jar pi 4 100
四、一个问题
我之前没有注意发现我的yarn的从节点没有启动起来,在执行计算PI值的时候没有成功才看到:

查看日志发现是配置文件:
在hdfs-site-web.xml中:
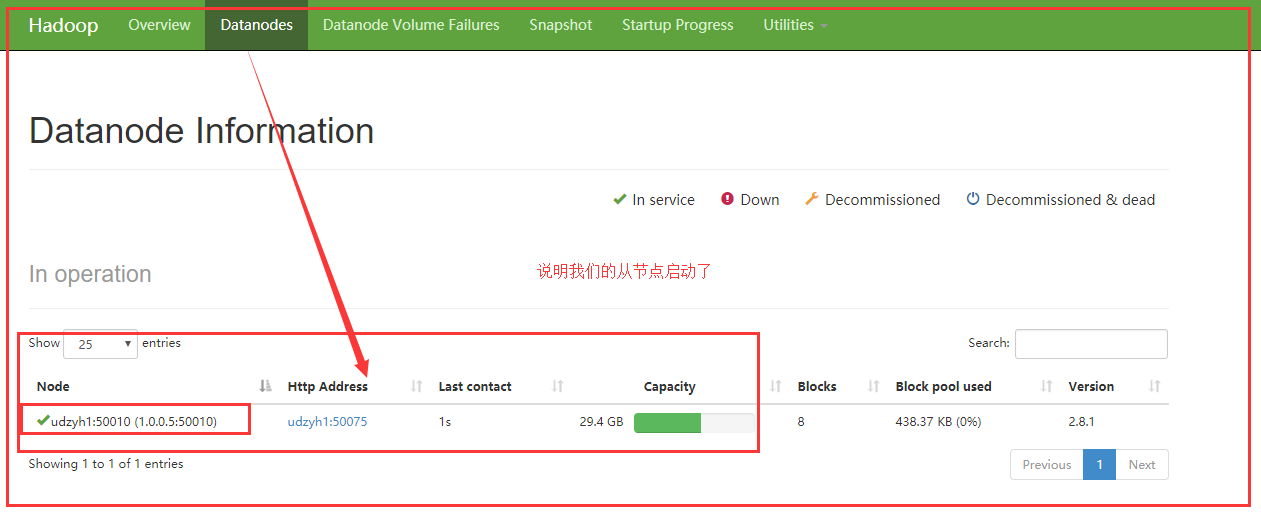
查看http://1.0.0.5:50070可以查看从节点是否启动:
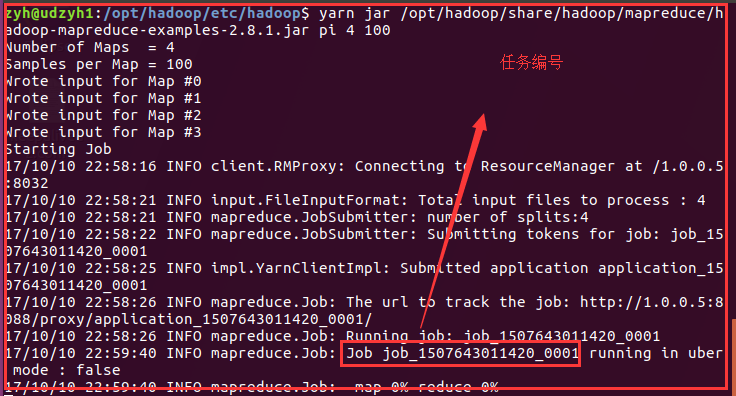
在执行上面使用yarn集群来计算pi值得命令:
查看http://1.0.0.5:8088可以看出计算pi值得任务正在执行:

最后成功:
这里就截图了,电脑卡住了,上图中在web页面可以查看到任务执行成功,终端中会显示执行结果!
前言
前面只是大概介绍了一下Hadoop,现在就开始搭建集群了。我们下尝试一下搭建一个最简单的集群。之后为什么要这样搭建会慢慢的分享,先要看一下效果吧!
1.1、单机模式(独立模式)(Local或Standalone Mode)
-默认情况下,Hadoop即处于该模式,用于开发和调式。
-不对配置文件进行修改。
-使用本地文件系统,而不是分布式文件系统。
-Hadoop不会启动NameNode、DataNode、JobTracker、TaskTracker等守护进程,Map()和Reduce()任务作为同一个进程的不同部分来执行的。
-用于对MapReduce程序的逻辑进行调试,确保程序的正确。
1.2、伪分布式模式(Pseudo-Distrubuted Mode)
-Hadoop的守护进程运行在本机机器,模拟一个小规模的集群
-在一台主机模拟多主机。
-Hadoop启动NameNode、DataNode、JobTracker、TaskTracker这些守护进程都在同一台机器上运行,是相互独立的Java进程。
-在这种模式下,Hadoop使用的是分布式文件系统,各个作业也是由JobTraker服务,来管理的独立进程。在单机模式之上增加了代码调试功能,允许检查内存使用情况,HDFS输入输出,
以及其他的守护进程交互。类似于完全分布式模式,因此,这种模式常用来开发测试Hadoop程序的执行是否正确。
-修改3个配置文件:core-site.xml(Hadoop集群的特性,作用于全部进程及客户端)、hdfs-site.xml(配置HDFS集群的工作属性)、mapred-site.xml(配置MapReduce集群的属性)
-格式化文件系统
1.3、全分布式集群模式(Full-Distributed Mode)
-Hadoop的守护进程运行在一个集群上
-Hadoop的守护进程运行在由多台主机搭建的集群上,是真正的生产环境。
-在所有的主机上安装JDK和Hadoop,组成相互连通的网络。
-在主机间设置SSH免密码登录,把各从节点生成的公钥添加到主节点的信任列表。
-修改3个配置文件:core-site.xml、hdfs-site.xml、mapred-site.xml,指定NameNode和JobTraker的位置和端口,设置文件的副本等参数
-格式化文件系统
二、搭建伪分布式集群的前提条件
环境:在ubuntu17.04
jdk1.8.0_131
hadoop 2.8.1
2.1、能够正常运行的Ubuntu操作系统
在Ubuntu下,软件安装到/opt下,当前正在使用的用户,对于opt目录需要有读写权限:
1)将opt的权限给为777(漏洞文件),不推荐在生产环境中使用。但是可以在学习和调试环境中使用。
2)sudo
在启动Hadoop的各个守护进程的时候,需要使用sudo。
在管理Hadoop的时候,实际上由不同的用户启动不同集群的守护进程。
统一使用当前的用户管理所有集群。
3)该目录的所有者设置为当前用户
2.2、安装JDK,并配置环境变量
1)将jdk安装包放在家目录下
2)解压到opt目录下
sudo tar zxvf jdk-8u131-linux-x64.tar.gz -C /opt
此时在/opt目录下:会有一个jdk1.8.0_131
3)创建软链接
sudo ln -snf /opt/jdk1.8.0_131 /opt/jdk
注意:创建软连接的目的是为了,我们在做项目的时候,可能会用到不同的jdk版本,这是要换软件的话,只需要修改软链接就可以了。而不用修改配置文件。
4)配置环境变量
局部环境变量:~/.bashrc
全局环境变量:/etc/profile
export JAVA_HOME=/opt/jdk
export JRE_HOME=$JAVA_HOME/jre
export CLASSPATH=.:$JAVA_HOME/lib
export PATH=$PATH:$JAVA_HOME/bin
source 相关文件(更新配置文件)
5)查看是否安装成功
java、javac、java -version
三、搭建伪分布式集群
3.1、安装hadoop
1)解压hadoop安装包到opt目录下
sudo tar zxvf hadoop-2.8.1.tar.gz -C /opt
2)创建软链接
ln -snf /opt/hadoop-2.8.1 /opt/hadoop
3)配置环境变量
在/etc/profile文件中加入以下内容:
export HADOOP_HOME=/opt/hadoop
export PATH=$PATH:$HADOOP_HOME/bin:$HADOOP_HOME/sbin
source /etc/profile
4)使用hadoop version命令测试是否配置成功
3.2、配置hadoop
配置文件存放在/opt/hadoop/etc/hadoop中有n多个文件,暂时我们只需要修改的只有5个
1)hadoop-env.sh
大约在25行左右
export JAVA_HOME=${JAVA_HOME}改成export JAVA_HOME=/opt/jdk
注意:在配置文件中有提示我们怎么设置,我们一般不删除,二回选择注释它的提示。
2)core-site.xml
      <configuration>
                <property>
                    <name>fs.defaultFS</name>
                    <value>hdfs://1.0.0.5:9000</value>
                </property>
            </configuration>
分析:1.0.0.5是你主节点所在主机的ip,而9000为端口
3)hdfs-site.xml
            <configuration>
                <property>
                    <name>dfs.nameservices</name>
                    <value>hadoop-cluster</value>
                </property>
                <property>
                    <name>dfs.namenode.name.dir</name>
                    <value>file:///data/hadoop/hdfs/nn</value>
                </property>
                <property>
                    <name>dfs.namenode.ch
                    eckpoint.dir</name>
                    <value>file:///data/hadoop/hdfs/snn</value>
                </property>
                <property>
                    <name>dfs.namenode.checkpoint.edits.dir</name>
                    <value>file:///data/hadoop/hdfs/snn</value>
                </property>
                <property>
                    <name>dfs.datanode.data.dir</name>
                    <value>file:///data/hadoop/hdfs/dn</value>
                </property>
            </configuration>
4)mapred-site.xml
在hadoop的相关目录中没有此文件,但是有一个mapred-site.xml.template文件,将该文件复制一份为mapred-site.xml
cp mapred-site.xml.template mapred-site.xml
            <configuration>
                <property>
                    <name>mapreduce.framework.name</name>
                    <value>yarn</value>
                </property>
            </configuration>
5)yarn-site.xml
            <configuration>
                <!-- 指定ResourceManager的地址-->
                <property>
                    <name>yarn.resourcemanager.hostname</name>
                    <value>1.0.0.5</value>
                </property>
                <!-- 指定reducer获取数据的方式-->
                <property>
                    <name>yarn.nodemanager.aux-services</name>
                    <value>mapreduce_shuffle</value>
                </property>
                <property>
                    <name>yarn.nodemanager.local-dirs</name>
                    <value>file:///data/hadoop/yarn/nm</value>
                </property>
            </configuration>
7)创建相关目录
        sudo mkdir -p /data/hadoop/hdfs/nn
        sudo mkdir -p /data/hadoop/hdfs/dn
        sudo mkdir -p /data/hadoop/hdfs/snn
        sudo mkdir -p /data/hadoop/yarn/nm
注意:
如果使用sudo启动hadoop的相关进程,这几目录的权限可以不用管。
如果是使用当前的用户启动相关进程,对于opt目录,当前用户得有读写权限,对于/data目录也需要读写权限。
遇到问题:
笔者就是在这个目录权限的问题吃el很大得亏。首先为了不使用sudo我将/data目录的权限修改为777,然后进行
HDFS集群格式化的时候,出现:
这时我在想为什么呢?原来我只是给data目录设置了读写权限,但是没有给它的子目录设置读写权限。所以:
chmod -R 777 /data 递归设置权限
8)对HDFS集群进行格式化,HDFS集群是用来存储数据的。
hdfs namenode -format
3.3、启动集群
1)启动HDFS集群
hadoop-daemon.sh start namenode 启动主节点
hadoop-daemon.sh start datanode 启动从节点
2)启动YARN集群
yarn-daemon.sh start resourcemanager
yarn-daemon.sh start nodemanager
3) Start the server job history
mr-jobhistory-daemon.sh start historyserver
4) jps command to see if a successful start
5) HDFS and YARN cluster has a corresponding monitoring WEB page
HDFS:http://ip:50070
YARN:http://ip:8088
Simple commands 6) HDFS clusters
HDFS dfs -Ls /
hdfs dfs -mkdir -p /user/zyh
Operation 7) YARN cluster ---- submit task / job
Calculated PI value of the job:
Yarn JAR /opt/hadoop/share/hadoop/mapreduce/hadoop-mapreduce-examples-2.8.1.jar PI. 4 100
Fourth, a problem
I did not notice until I found the yarn from the node does not start up, when performing calculations PI values did not succeed only to see:
View log configuration file is found:
In hdfs-site-web.xml in:
View http://1.0.0.5:50070 can see if from the start node:
Use yarn cluster in the implementation of the above command to calculate pi worth:
View http://1.0.0.5:8088 can be seen calculate pi worth executing tasks:
Last Success:
Screenshot here, the computer got stuck, the above figure can be viewed in a web page to perform the task successfully, the terminal will display the results!