Article Directory
- 1. Click [winddowns install loopback network card article](https://blog.csdn.net/weixin_42768634/article/details/113836530) to complete the network configuration
- 2. Configure DNS service (click [DDNS Configuration and Application in CentOS7] (https://blog.csdn.net/weixin_42768634/article/details/114106450) to complete the configuration
- 3. Configure APACHE service
1. Click Windows Install Loopback Network Card article to complete the network configuration
2. Configure DNS service (click DDNS configuration and application in CentOS7 to complete the configuration
3. Configure APACHE service
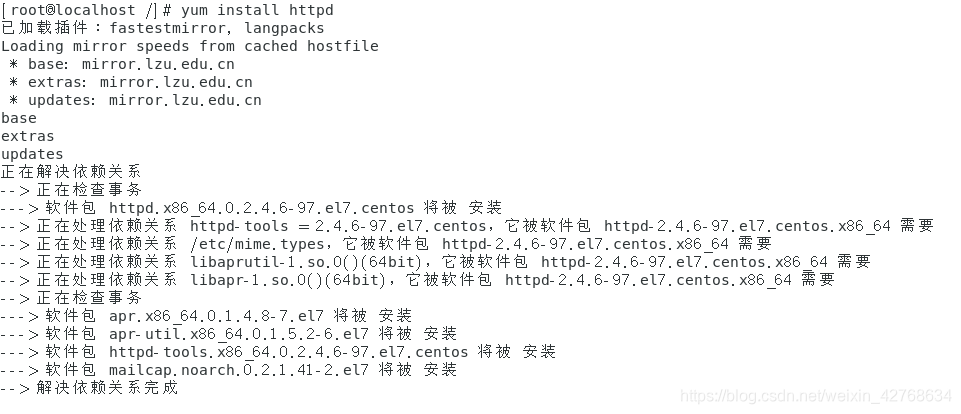
3.1 Check whether APACHE is installed in the system
# rpm -q httpd
If not installed, please use yum to install
# yum install httpd
3.2 Open the main configuration file (#vi/etc/httpd/conf/httpd.conf), and then modify it according to the following requirements
3.2.1 Basic configuration
Because the file is too long, use vim keywords to find and modify the corresponding code, hit the diagonal bar (/) in the command mode, and then enter the keyword and press Enter.
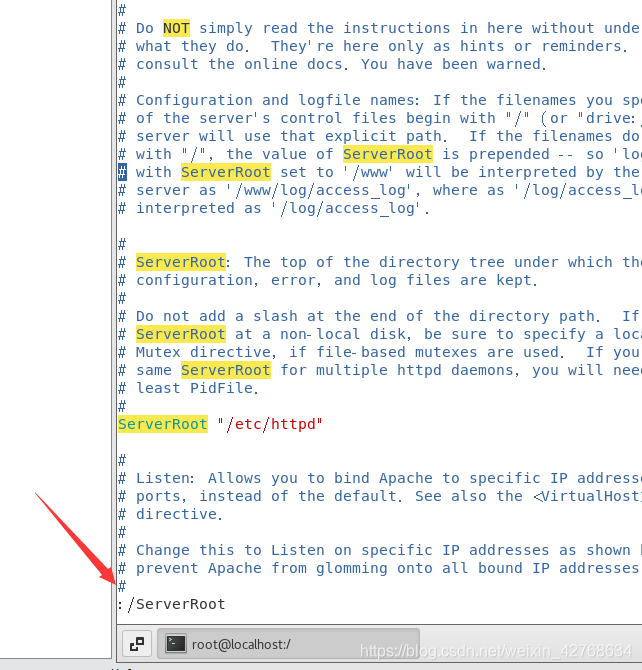
After finding the corresponding keyword, modify it into the following code
ServerRoot "/etc/httpd"
Listen 80
ServerName dns.example.com:80
DocumentRoot "/var/www/html"
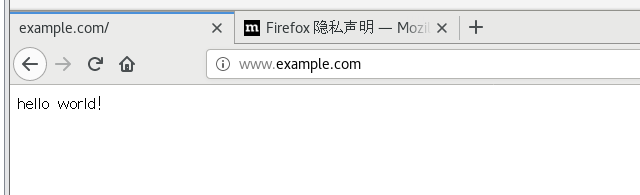
Set homepage
# echo 'hello world!'> /var/www/html/index.html
Restart service
# systemctl restart httpd
Test method: input in linux or windows browser: http://www.example.com
3.2.2 Support local users to establish personal homepages
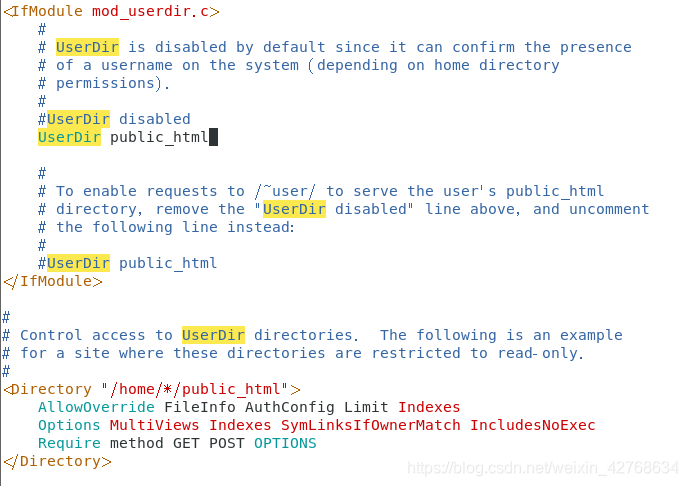
Modify userdir.conf (/etc/httpd/conf.d/userdir.conf)
# vim /etc/httpd/conf.d/userdir.conf
After finding the keyword, modify the following code
UserDir public_html
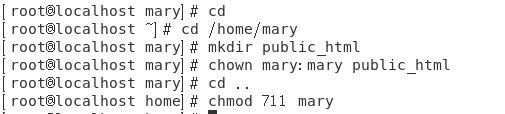
Example: Open user mary's personal site configuration (assuming mary already exists). Do the following on the command line.
# cd /home/mary
# mkdir public_html
# chown mary:mary public_html
# cd ..
# chmod 711 mary
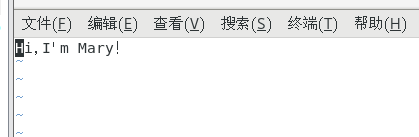
Create a simple homepage file on the directory /home/mary/public_html for testing. Specific settings can be modeled as follows:
# vim /home/mary/public_html/index.html
Enter the following
Hi,I’m Mary!
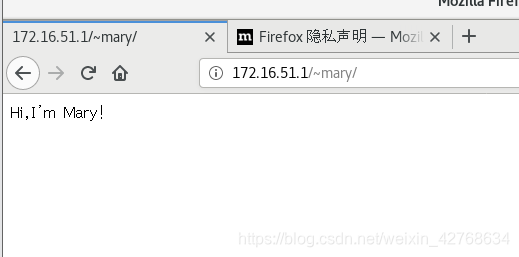
Restart the service:
# systemctl restart httpd
Test method: input in the browser: http://172.16.51.1/~mary
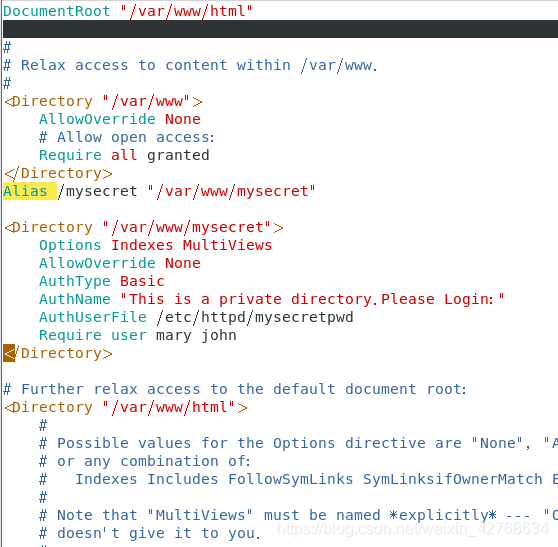
3.2.3 Set path alias and user authentication settings
# vim /etc/httpd/conf/httpd.conf
Add the following information
Alias /mysecret "/var/www/mysecret"
<Directory "/var/www/mysecret">
Options Indexes MultiViews
AllowOverride None
AuthType Basic
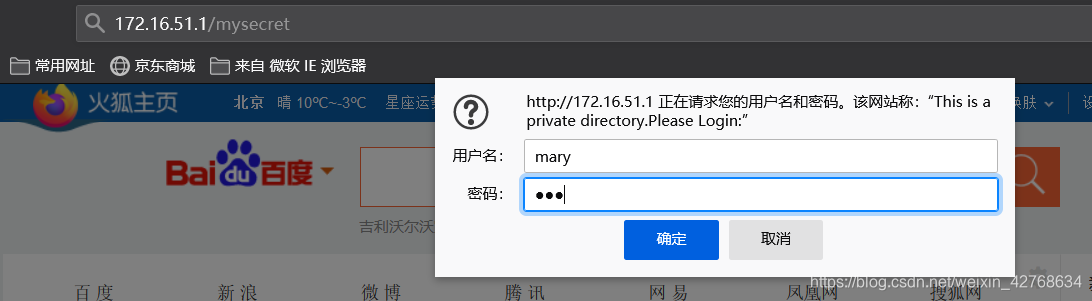
AuthName "This is a private directory.Please Login:"
AuthUserFile /etc/httpd/mysecretpwd
Require user mary john
</Directory>
Enter the following command on the command line:
# mkdir -p /var/www/mysecret
Create a password file and add user mary
# htpasswd -c /etc/httpd/mysecretpwd mary

If there are users in the password file, do not use the "-c" parameter to
restart the service:
# systemctl restart httpd
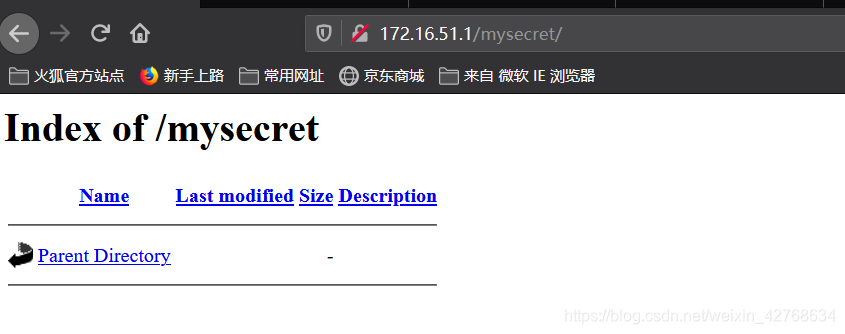
Test method: input in the browser: http://172.16.51.1/mysecret
3.2.4 Browse custom catalog information
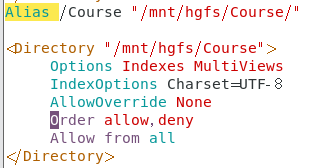
Set up a shared directory on the virtual machine, the name of the directory is course

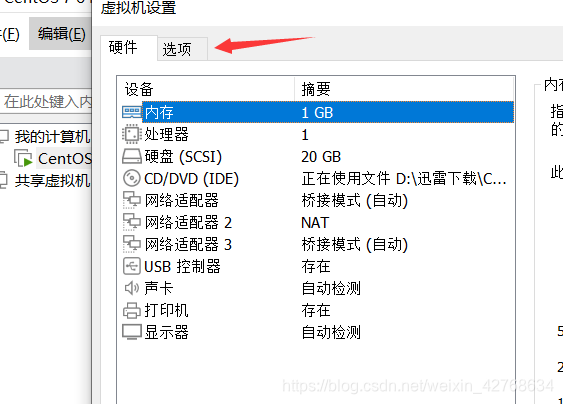
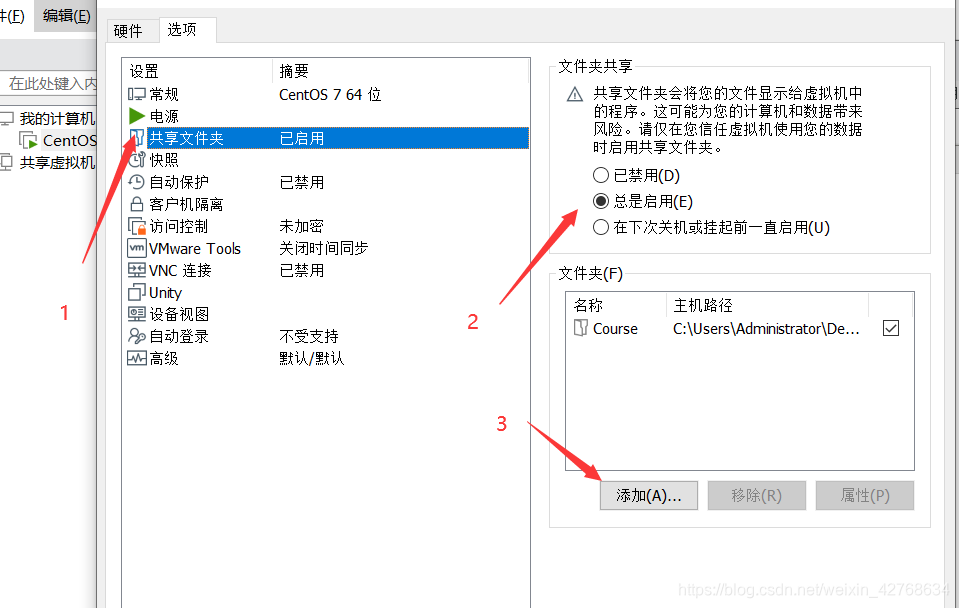
This directory can be accessed in the /mnt/hgfs directory of the virtual machine. (If the /mnt/hgfs directory does not appear in the virtual machine, please install or reinstall Vmwaretools)
# ll /mnt/hgfs/

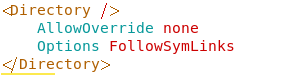
In the /etc/httpd/conf/httpd.conf configuration file, modify the access permissions and access methods of the root directory:
<Directory />
    AllowOverride none
    Options FollowSymLinks
</Directory>
At the same time, insert the following statement:
Alias /Course "/mnt/hgfs/Course/"

<Directory "/mnt/hgfs/Course">
     Options Indexes MultiViews
     IndexOptions Charset=UTF-8
     AllowOverride None
     Order allow,deny
     Allow from all
</Directory>
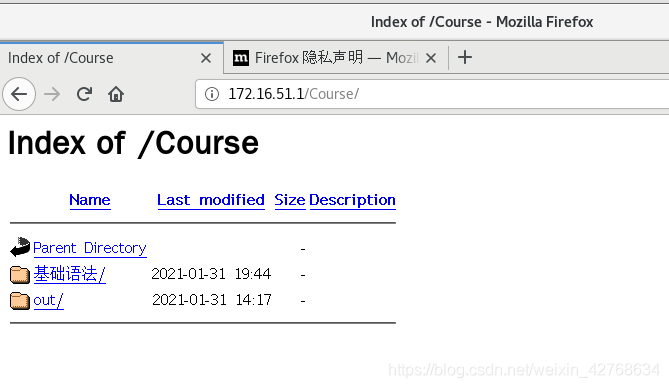
Restart the service and test as follows:
# systemctl restart httpd
3.2.5 IP-based virtual host configuration
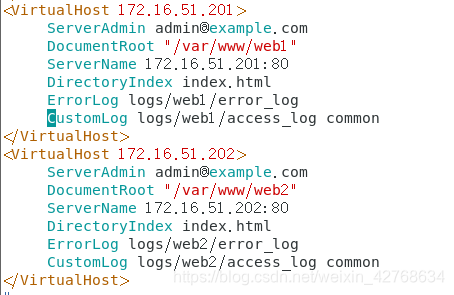
# vim /etc/httpd/conf/httpd.conf
<VirtualHost 172.16.51.201>
     ServerAdmin [email protected]
     DocumentRoot "/var/www/web1"
     ServerName 172.16.51.201:80
     DirectoryIndex index.html
     ErrorLog logs/web1/error_log
     CustomLog logs/web1/access_log common
</VirtualHost>
<VirtualHost 172.16.51.202>
     ServerAdmin [email protected]
     DocumentRoot "/var/www/web2"
     ServerName 172.16.51.202:80
     DirectoryIndex index.html
     ErrorLog logs/web2/error_log
     CustomLog logs/web2/access_log common
</VirtualHost>
Enter the following command on the command line:
# ifconfig ens33:1 172.16.51.201 netmask 255.255.255.0
# ifconfig ens33:2 172.16.51.202 netmask 255.255.255.0
Establish test homepage index.html on /var/www/web1 and /var/www/web2 respectively
# mkdir -p /var/www/web1
# mkdir -p /var/www/web2
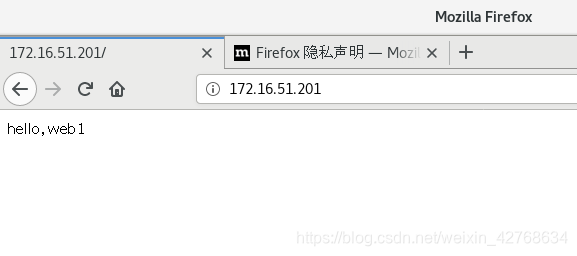
# echo "hello,web1" >/var/www/web1/index.html
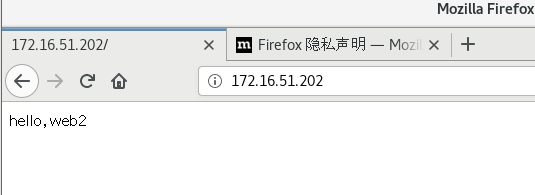
# echo "hello,web2" >/var/www/web2/index.html

Create web1 and web2 directories in /etc/httpd/logs/, and create error_log and access_log files in each directory (note: these two files are not directory files)
# mkdir -p /etc/httpd/logs/web1/
# mkdir -p /etc/httpd/logs/web2/
# touch /etc/httpd/logs/web1/error_log
# touch /etc/httpd/logs/web1/access_log
# touch /etc/httpd/logs/web2/error_log
# touch /etc/httpd/logs/web2/access_log

Restart the service:
# systemctl restart httpd
Test method: input in the browser: http://172.16.51.201
Enter in the browser: http://172.16.51.202
3.2.6 Virtual host configuration based on domain name
# vim /etc/httpd/conf/httpd.conf
NameVirtualHost 172.16.51.203
<VirtualHost abc.example.com>
ServerAdmin [email protected]
DocumentRoot "/var/www/web3"
ServerName abc.example.com
DirectoryIndex index.html
ErrorLog logs/web3/error_log
CustomLog logs/web3/access_log common
</VirtualHost>
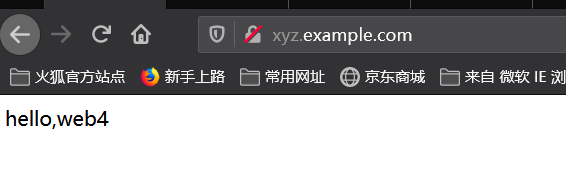
<VirtualHost xyz.example.com>
ServerAdmin [email protected]
DocumentRoot "/var/www/web4"
ServerName xyz.example.com
DirectoryIndex index.html
ErrorLog logs/web4/error_log
CustomLog logs/web4/access_log combined
</VirtualHost>

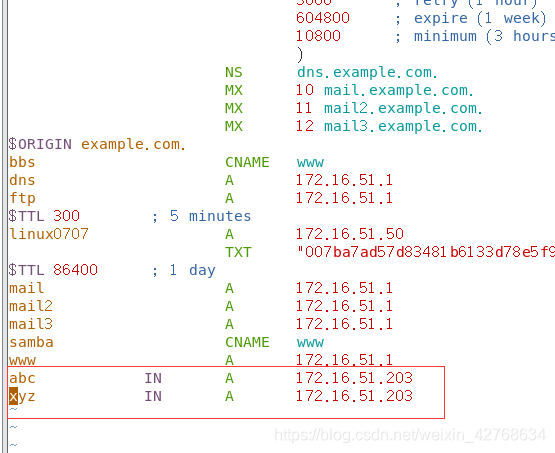
Add 2 A marks to the forward data zone of DNS
# vim /var/named/data/example.com.zone
abc            IN       A       172.16.51.203
xyz            IN       A       172.16.51.203
Add 2 PTR marks to the reverse data zone of DNS
# vim /var/named/data/172.16.51.arpa
203                        PTR  abc.example.com.
                              PTR  xyz.example.com.

Enter the following command on the command line:
# ifconfig ens33:3 172.16.51.203 netmask 255.255.255.0
Restart the service:
# systemctl restart named
Establish test homepage index.html on /var/www/web3 and /var/www/web4 respectively
# mkdir -p /var/www/web3
# mkdir -p /var/www/web4
# echo "hello,web3" > /var/www/web3/index.html
# echo "hello,web4" > /var/www/web4/index.html

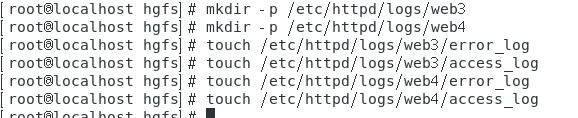
Same as above, /etc/httpd/logs creates web3 and web4 directories, and creates corresponding error_log and access_log files
# mkdir -p /etc/httpd/logs/web3
# mkdir -p /etc/httpd/logs/web4
# touch /etc/httpd/logs/web3/error_log
# touch /etc/httpd/logs/web3/access_log
# touch /etc/httpd/logs/web4/error_log
# touch /etc/httpd/logs/web4/access_log
Restart the service:
# systemctl restart httpd
Before the test, confirm that the DNS address of the test machine points to the Linux server.
# cat /etc/resolv.conf
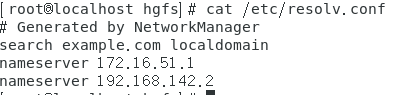
If it's not pointing to the linux server, just disable the network card that connects to the Internet in NAT mode, my name is ens37
# ifdown ens37
Test method: Test on Windows and Linux browsers respectively
linux test

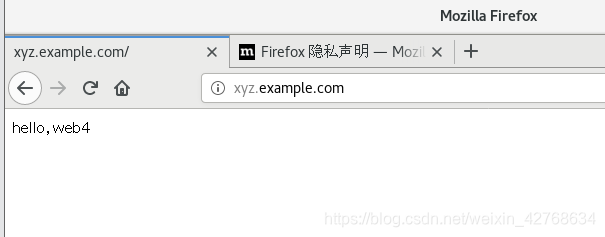
windows test

Use wget to download the homepage on the Linux host and enter the command:
#wget http://xyz.example.com

View the log file /etc/httpd/logs/web4/access_log
# # cat /etc/httpd/logs/web4/access_log

View the log file /etc/httpd/logs/web3/access_log
# wget http://abc.example.com
# cat /etc/httpd/logs/web3/access_log

Since the common log format common is enabled, only access records can be seen, but there is no specific client detailed information.