Article Directory
- 1. Click [winddowns install loopback network card article](https://blog.csdn.net/weixin_42768634/article/details/113836530) to complete the network configuration
- 2. Install the samba file
- 3. Specify samba to start at boot
- 4. Configure the /etc/samba/smb.conf configuration file
- 5. Set up file sharing
-
- 5.1 Set the anonymous user directory (add it at the last place in the configuration file)
- 5.2 Set the shared directory of the user group share (just add it at the last place in the configuration file)
- 5.3 Save the text file and restart the smaba service. If you use the vim text editor, you can enter ":wq" in the command mode and press Enter.
- 5.4 New users mary, john and guest
- 5.6 Create a new group share, and add users mary and john to the share group.
- 5.7 Add mary, john, guest to the smbpasswd file
- 5.8 Create a new directory share under the /home directory and change its group attribute to share group
- 5.9 Restart the service
- 6. Windows and Linux interconnection test
- 7. Use the smbmount command to mount the remote share
1. Click Windows Install Loopback Network Card article to complete the network configuration
2. Install the samba file
2.1 Check whether the samba file has been installed inside the system
#rpm -qa | grep samba

2.2 If the version information similar to the following is displayed, it proves that the samba service has been installed in the system
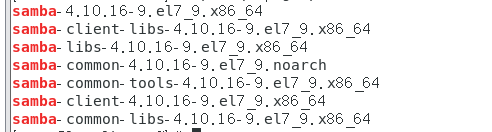
2.3 If the above information is not prompted, install the corresponding package.
#yum -y install samba-client samba-common cifs-utils samba

3. Specify samba to start at boot
#systemctl enable smb.service

4. Configure the /etc/samba/smb.conf configuration file
4.1 Use the vim text editor to open the configuration file /etc/samba/smb.conf
#vim /etc/samba/smb.conf

4.2 Configure the global global variable area (you only need to find the corresponding variable to modify, and manually add it without the variable)
[global]
        workgroup = SAMBA //文档中存在多个security变量,只需其中一个有效即可。
        security = user //配置文件中所有等号前后加一个空格
        netbios name = linux
        passdb backend = tdbsam
        log file = /var/log/samba/smbd.log //指定日志文件路径
        log level = 2 //一共有10个级别,2是LOG_NOTICE,3是LOG_INFO
        max log size = 50 //日志文件最大大小,单位KB

        printing = cups
        printcap name = cups
        load printers = yes
        cups options = raw

5. Set up file sharing
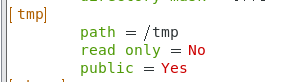
5.1 Set the anonymous user directory (add it at the last place in the configuration file)
[tmp]
       path = /tmp
       read only = No
       public = Yes
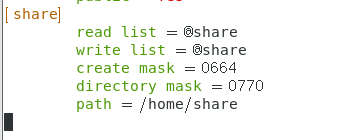
5.2 Set the shared directory of the user group share (just add it at the last place in the configuration file)
        read list = @share
        write list = @share
        create mask = 0664
        directory mask = 0770
        path = /home/share
5.3 Save the text file and restart the smaba service. If you use the vim text editor, you can enter ":wq" in the command mode and press Enter.
#systemctl restart smb.service

5.4 New users mary, john and guest
#useradd mary
#passwd mary
#useradd john
#passwd john
#useradd guest
#passwd guest

5.6 Create a new group share, and add users mary and john to the share group.
#groupadd share
#usermod -G share mary
#usermod -G share john

5.7 Add mary, john, guest to the smbpasswd file
#smbpasswd -a mary
#smbpasswd -a john
#smbpasswd -a guest

5.8 Create a new directory share under the /home directory and change its group attribute to share group
#mkdir -p /home/share
#chown :share /home/share
#chmod 770 /home/share

5.9 Restart the service
systemctl restart smb.service(或者systemctl restart smb)

6. Windows and Linux interconnection test
6.1 Disable SELinux
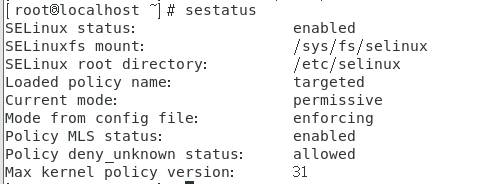
First test the SElinux settings, if it is in the Enforcing state, modify it to permissive or disabled. details as follows:
#getenforce
If the output "Enforcing", enter the following command
#setenforce 0
-
The above command can only be effective in the current operation. If you want to change it permanently, you can modify the configuration file: /etc/selinux/config. After finding the SELINUX variable, modify it to the corresponding value (permissive or disabled) according to the context prompt.
-
If you want to view the current status of selinux, you can command sestatus
6.2 Disable firewall firewalld
Check the running status of the firewall first
#systemctl is-active firewalld.service
Output active (active), inactive (inactive) if it is in the active state, it is disabled.

#systemctl stop firewalld.service

The above two commands 6.1 and 6.2 are invalid after restart and need to be reset.
6.3 To access the shared files of the Linux server through the Linux client, first enter the following command on the Linux console to view the shared information of the host 172.16.99.1.
# smbclient -L //172.16.51.1 -U mary

To access the share directory, enter the following command:
#smbclient -c ls //172.16.51.1/share -U mary
(The following figure creates a file 1234 under /home/share, and then accesses the share directory through user mary)

6.4 Access to Linux via Windows
Right-click "My Computer", left-click Map Network Drive, and fill in \172.16.51.1\share (172.16.51.1 is the address of the Linux server) in the folder box in the following format.


If you need to map another user's next time File, you can disconnect the original mapping first, and then modify the "other user name" to change.
 You can also directly enter the path in the address bar of my computer: \172.16.51.1\share (you can try, but not recommended).
 View the log file /var/log/samba/smbd.log, which indicates the successful access record.
]# vim /var/log/samba/smbd.log

7. Use the smbmount command to mount the remote share
7.1 Create a mount point
#mkdir -p /mnt/smb/win

7.2 Mount the remote shared share to the local /mnt/smb/win directory
# mount.cifs -o user=mary //172.16.51.1/share /mnt/smb/win/

7.3 Enter the mount point
#cd /mnt/smb/win/
#ls

7.4 Use the mount command to view the contents of the mount table
#mount | grep cifs

7.5 Unmount the mount point
#cd /
#umount /mnt/smb/win //如果处于/mnt/smb/win目录下,是不能卸载的
