1. Introduction to samba service
Role: shared files
smb=Server Message Block Sum
cifs=Common Internet System Linux
2.samba basic information
Service startup script:
smb.service
main configuration directory:
/etc/smb
main configuration file:
/etc/smb.conf
security context:
samba_share_t
port:
139 445
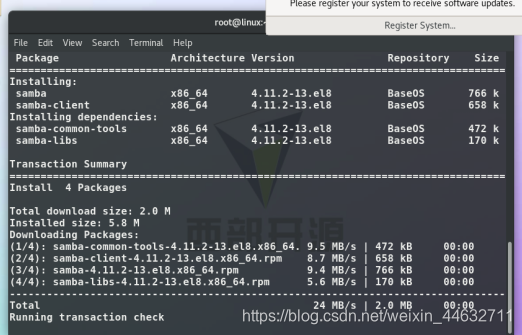
installation package:
samba
samba-common
test:
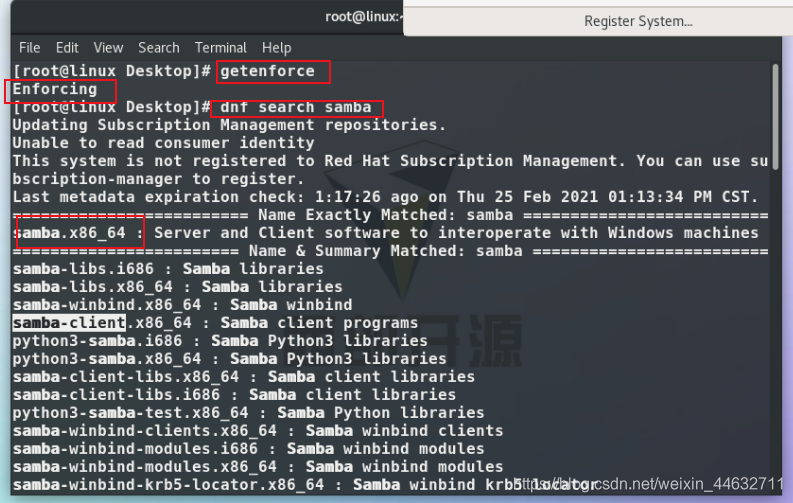
dnf search samba
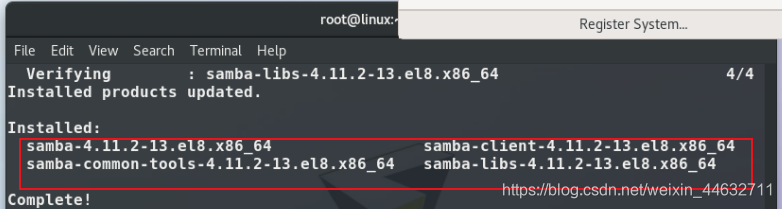
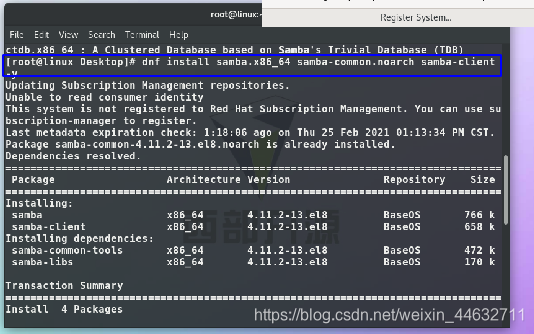
dnf install samba.x86_64 samba-common.noarch samba-client -y ##安装
3. Installation and activation of samba
- samba installation dnf install samba.x86_64 samba-common.noarch samba-client -y
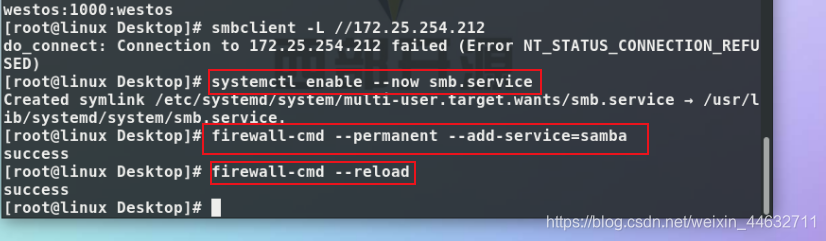
- samba service start systemctl enable --now smb samba service enable
- firewall-cmd --permanent --add-service=samba
firewall-cmd --reload
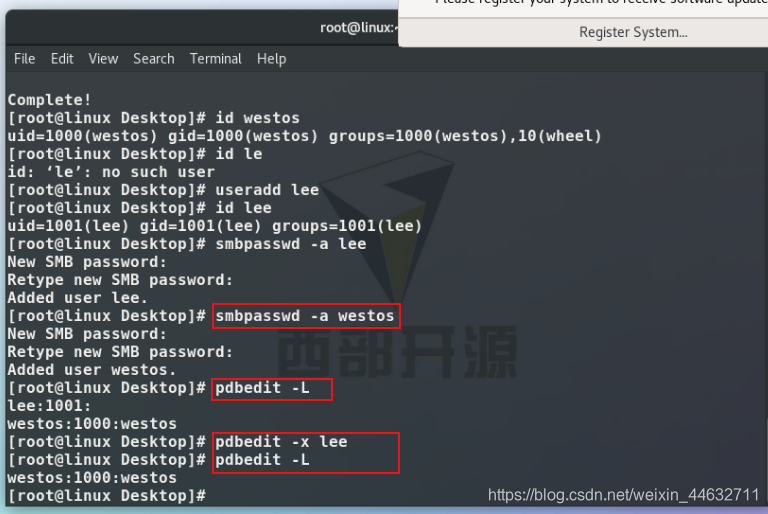
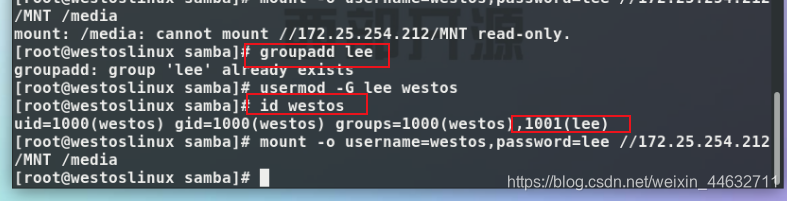
add samba user
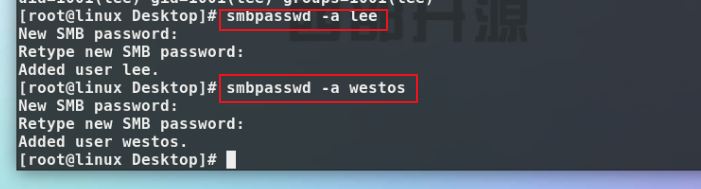
- smbpasswd -a lee
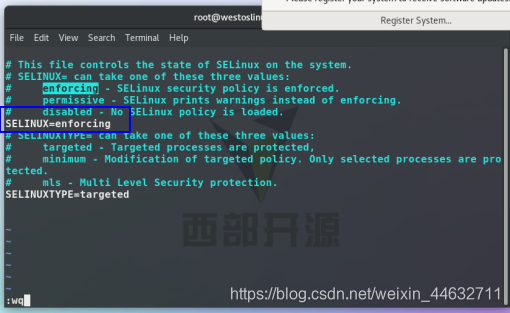
- Must run with selinux turned on
Must be a local user to appear as a sanba user
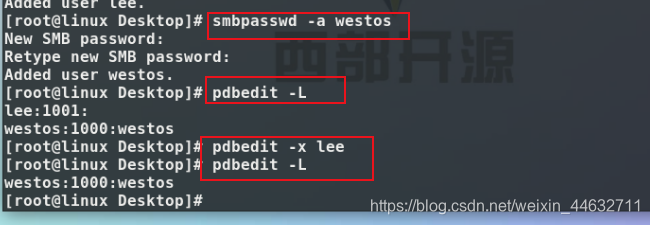
- Add user smbpasswd -a westos
- View user pdbedit -L
- Delete user pdbedit -x westos
- test:
getenforce
vim /etc/selinux/config
reboot
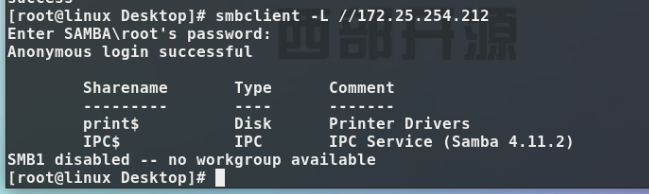
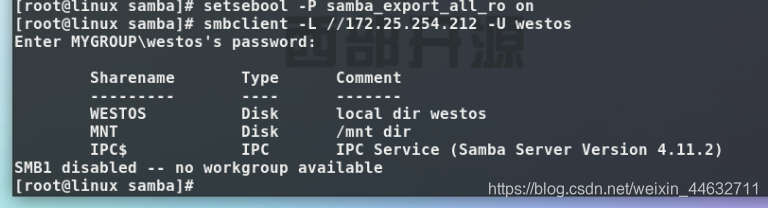
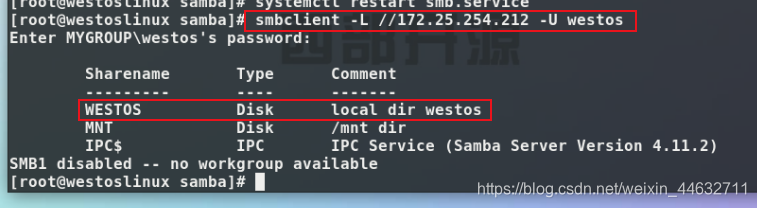
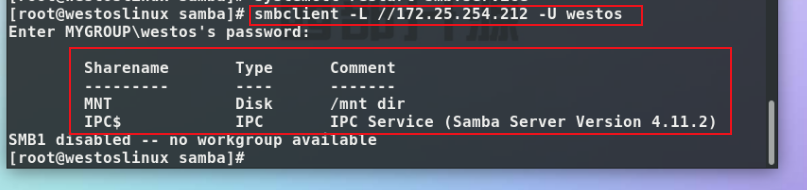
smbclient -L //172.25.254.212 -U westos
smbpasswd -a westos ##Add westos user
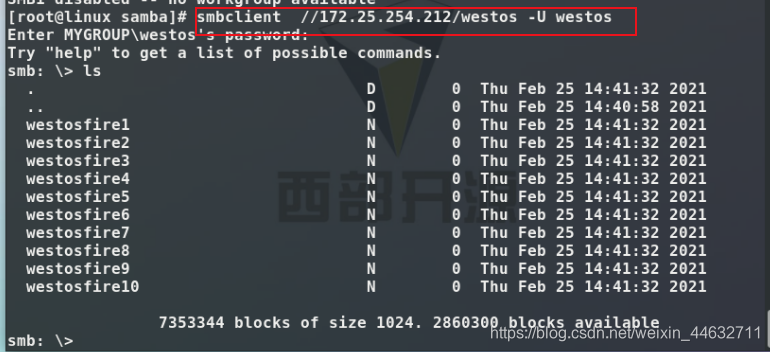
smbclient //172.25.254.212/WESTOS -U westos
pdbedit -x lee
pdbedit -L


4. The samba user accesses the home directory
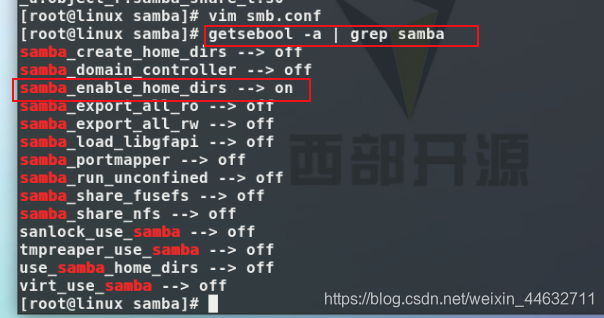
- When seliunx is turned on:
setsebool -P samba_enable_home_dirs on
under windows

Smbclient //172.25.254.212/westos -U westos ##Access home directory under linux- test:
setsebool -P samba_enable_home_dirs on
getsebool -a | grep samba ##View samba related ports
smbclient //172.25.254.212/westos -U westos
smbclient -L //172.25.254.212 -U westos
smbclient //172.25.254.212/westos- U westos ##Access home directory
5. samba service shared directory
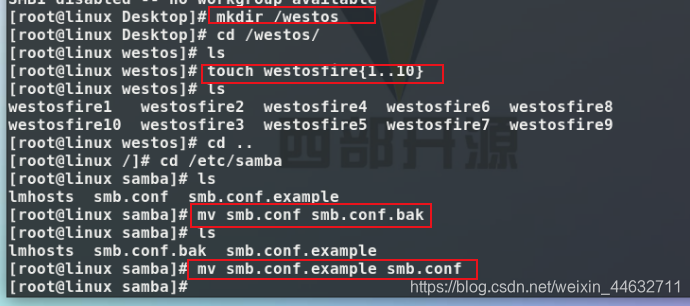
mkdir /westos
cd /westos/
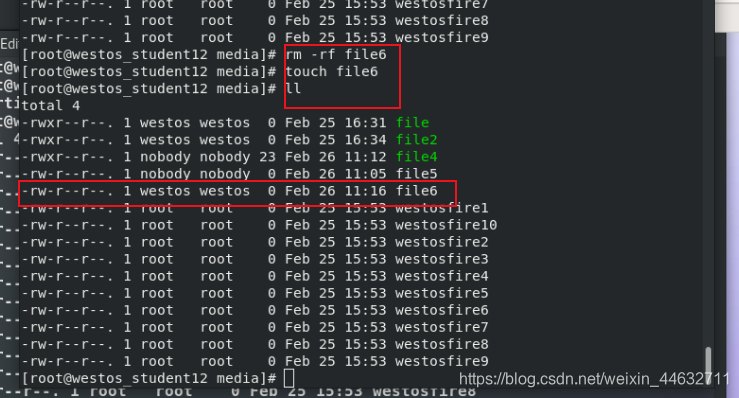
touch westosfire{1..10}
semanage fcontext -a -t samba_share_t '/westos(/.*)?' ##安全上下文修改
restorecon -RvvF /westos
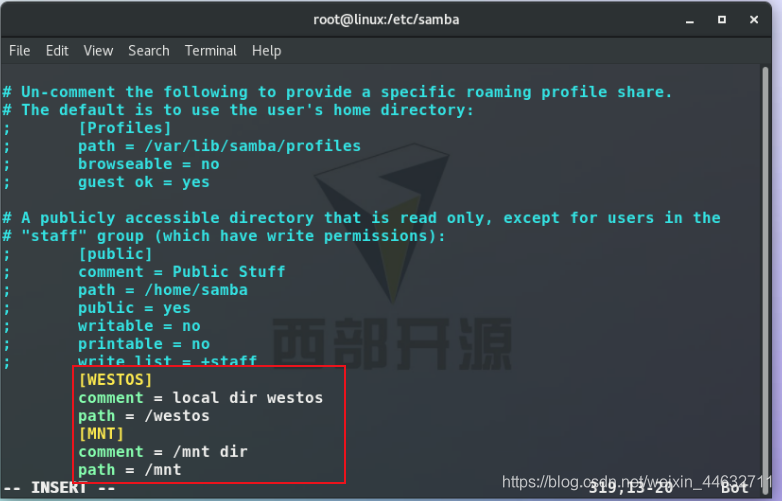
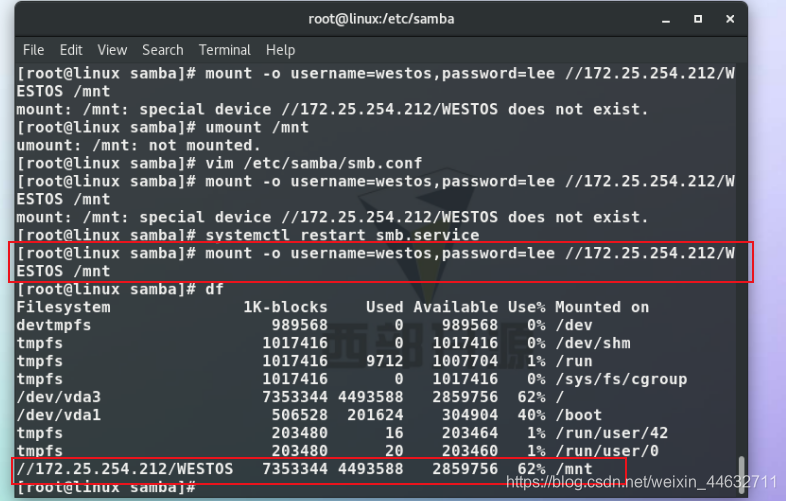
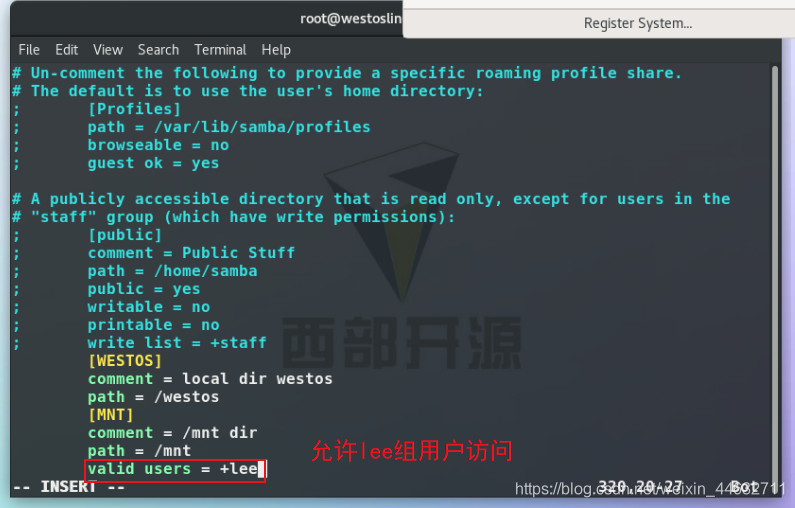
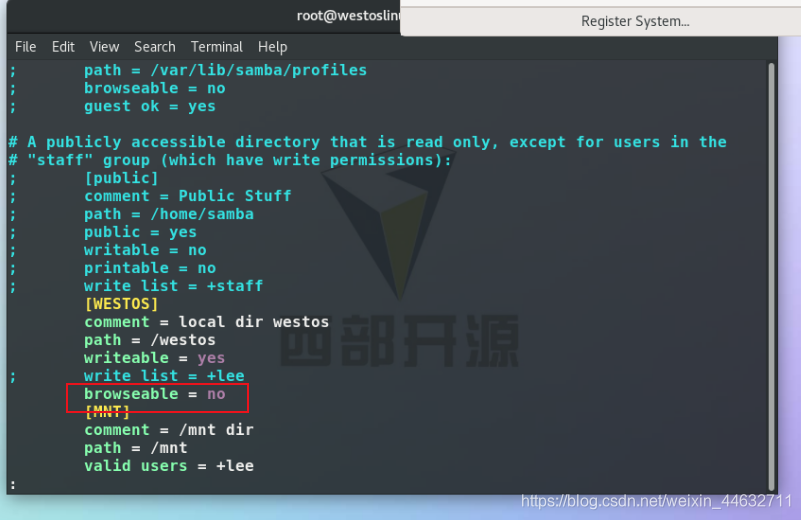
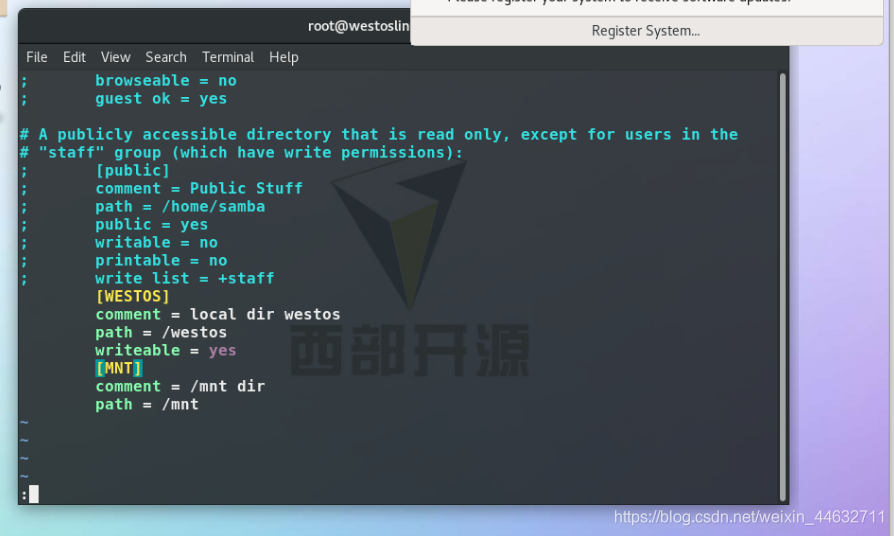
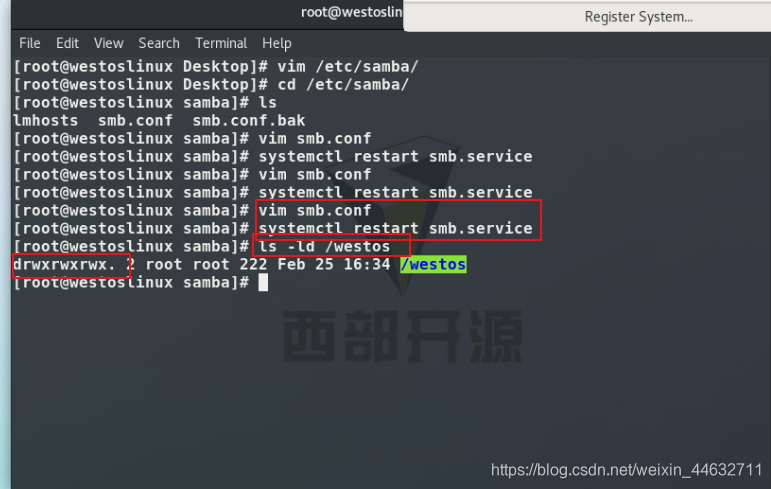
vim /etc/samba/smb.conf
[WESTOS] ##共享名称
comment = local dir westos ##共享说明
path = /westos ##共享路径
- test:
mkdir /westos
cd /westos/
touch westosfire{1…10}
cd /etc/samba
mv smb.conf smb.conf.bak
mv smb.conf.example smb.conf
vim smb.conf
[WESTOS]
comment = local dir westos
path = /westos
[MNT]
comment = /mnt dir
path = /mnt
smbclient -L //172.25.254.212 -U westos
semanage fcontext -a -t samba_share_t ‘/westos(/.*)?’
restorecon -RvvF /westos

smbclient -L //172.25.254.212 -U westos
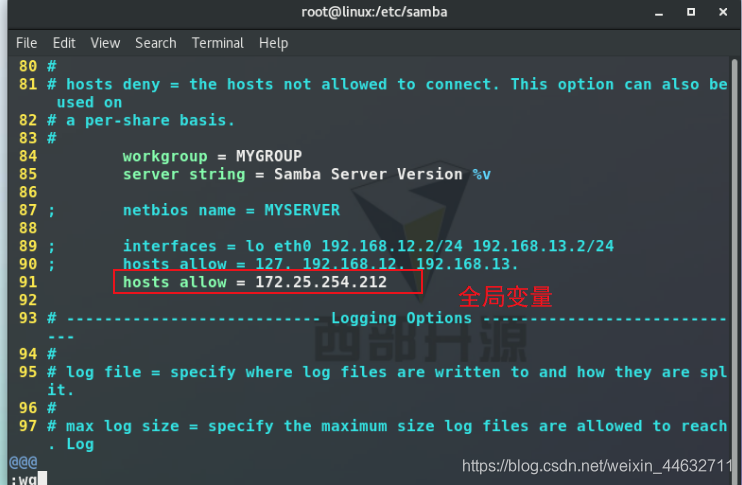
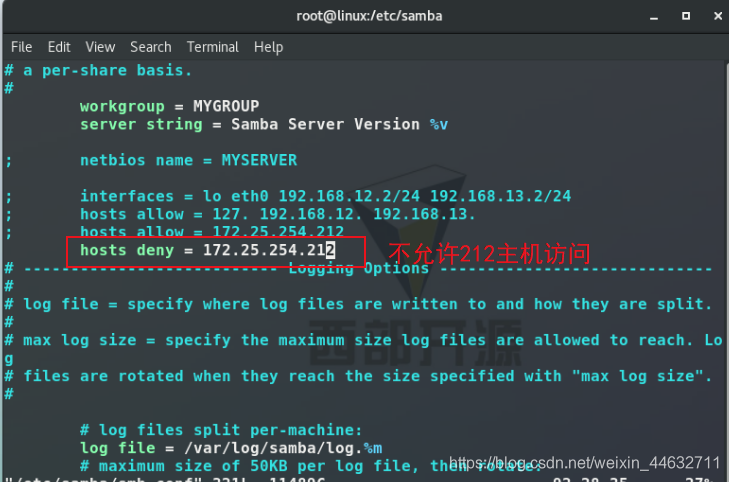
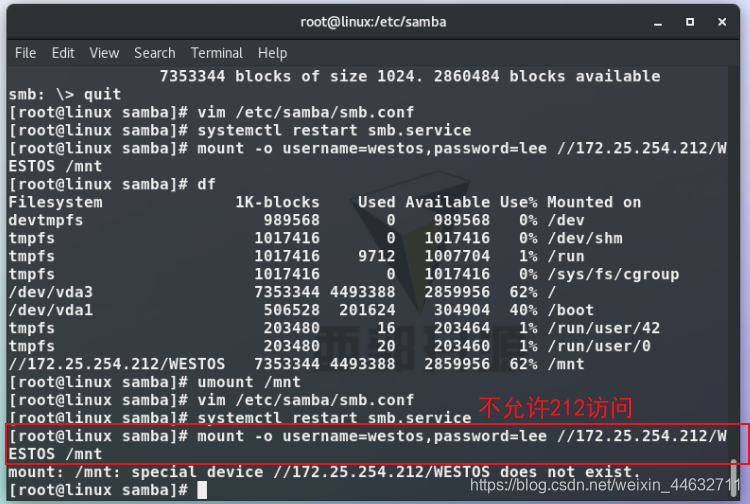
6. samba access control
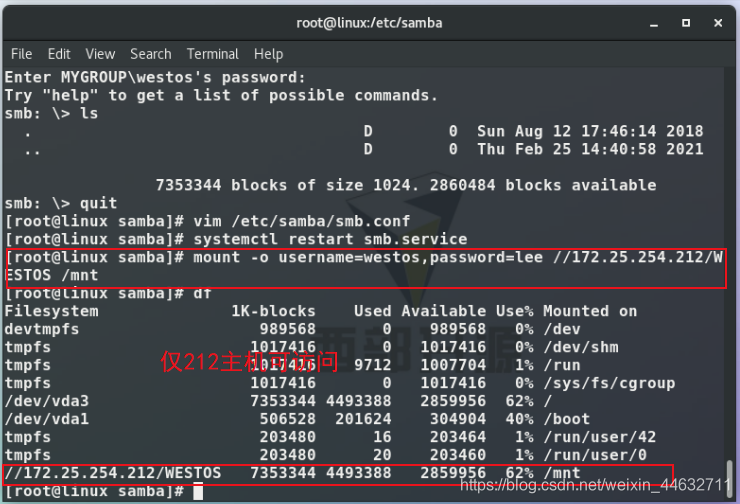
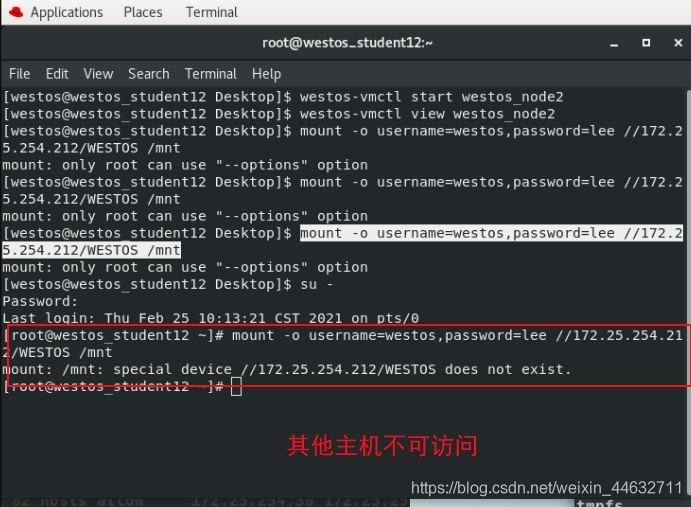
- hosts allow 172.25.254.212 172.25.254. ##When writing to a separate share, it only takes effect for this share
hosts deny ###When writing to CLOABL, it takes effect for samba as a whole - test:
vim smb.conf ##Edit the main configuration file
hosts deny 172.25.254.212 ##Reject 172.25.254.212 access to
hosts allow 172.25.254.212 ##Allow 172.25.254.212
systemctl restart smb.service

7. Writable common parameters of samba
-
writeable = yes ##Allow read and
write write list = lee ##Allow lee user to access
valid users = +lee ##Specify access user group
valid users = lee ##Specify access user
write list = +/@lee ##Allow lee group User access
browseable = yes | no ##Hide the share
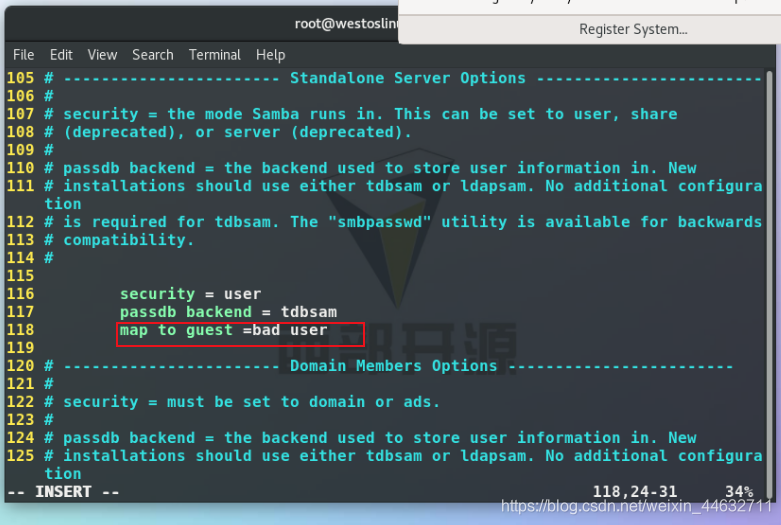
map to guest =bad user ##Write to the global share
guest ok = yes ##Allow anonymous user access -
test:
chmod 777 /westos ##/westos file full permissions, allowing any user to read and write
vim smb.conf ##Edit the main configuration filewriteable = yes ##Allow reading and writing
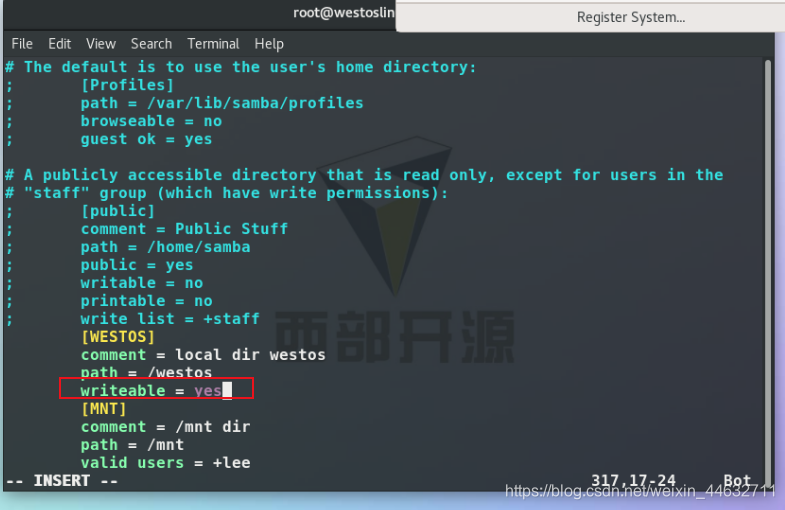

write list = lee ##Allow lee user access
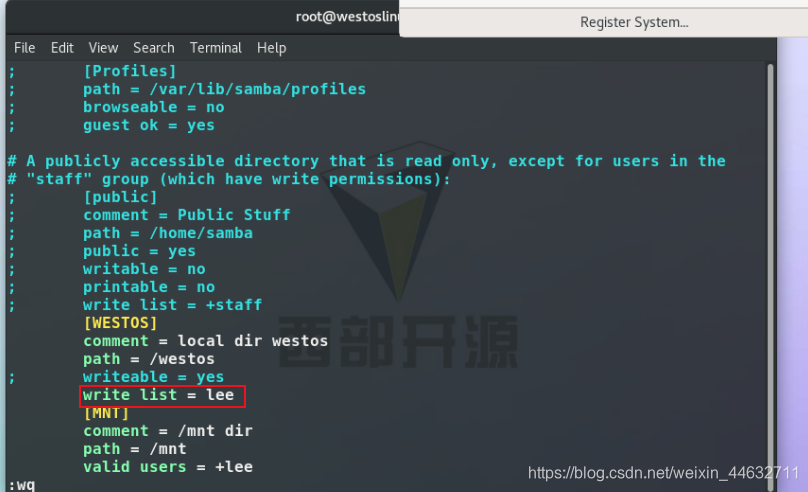
write list = +lee ##Allow lee group users to access
browseable = yes ##Allow the directory to be viewed

map to guest =bad user ##Allow access as guest, guest must be added globally
ok = yes ##The specified file allows access as guest account
systemctl restart smb.service ##Load the service every time the configuration file is modified
8. Multi-user mount of samba
- smbpasswd -a westos ##Modify the password (make sure the password is correct)
smbpasswd -a lee ##Modify the password
Client:
- smbclient -L //172.25.254.212/westos##Log in, check whether the password can log in
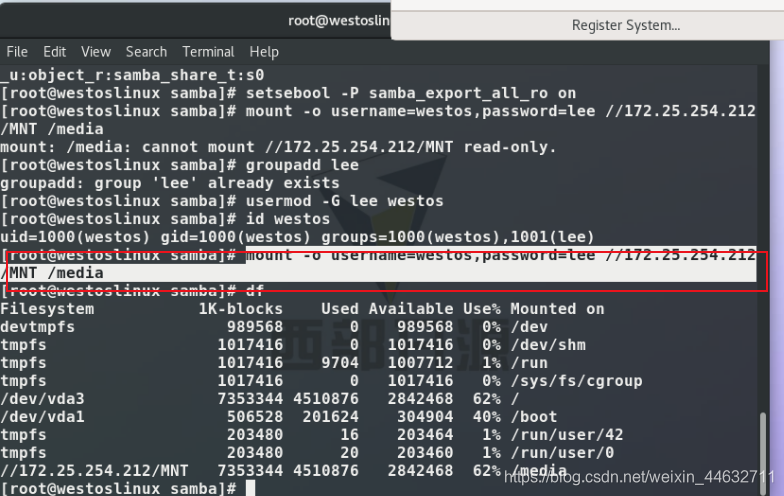
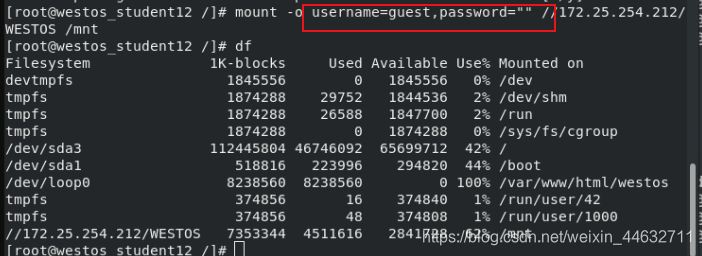
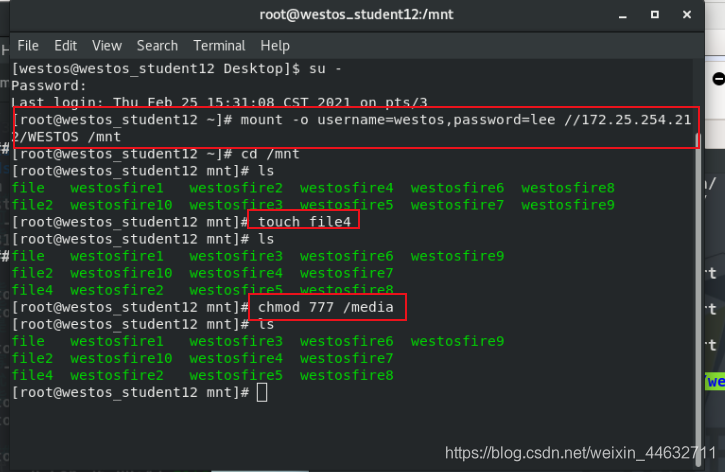
mount -o username=westos,password=lee //172.25.254.212/WESTOS /mnt ##Mount, but not writable
Server:
- Edit the configuration file:
writeable = yes ##Allow writing
ls -ld /westos :##Writable by everyone in the mounted directory
Client:
- mount -o username=westos,password=lee //172.25.254.212/WESTOS /mnt
##测试
chmod 777 /media ##Make the mount point directory writable
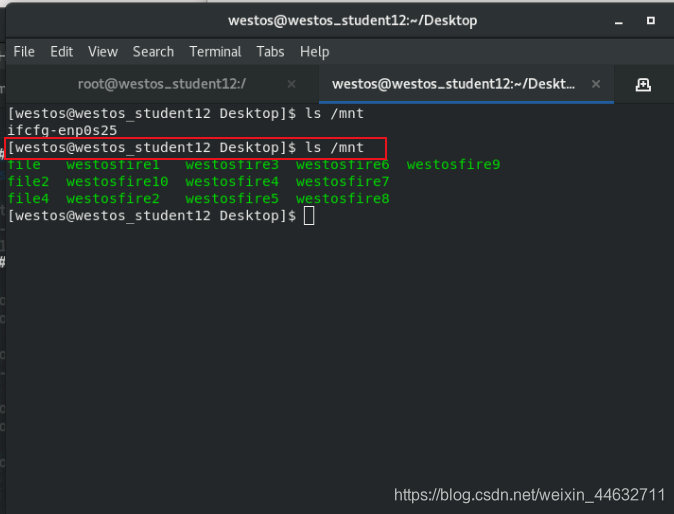
Non-samba authenticated users can see the mount point file (the problem occurs on the client side)
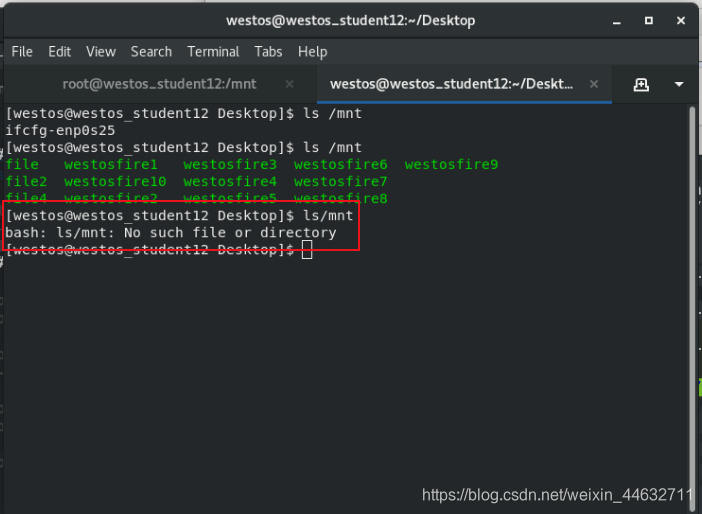
- [westos @ westos_student12 Desktop] $ ls / mnt
The client installs the samba-recognized security plug-in:
-
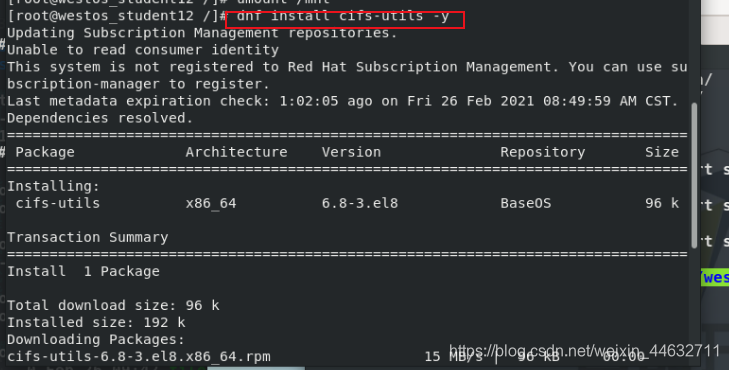
dnf install cifs-utils -y ##Install the software
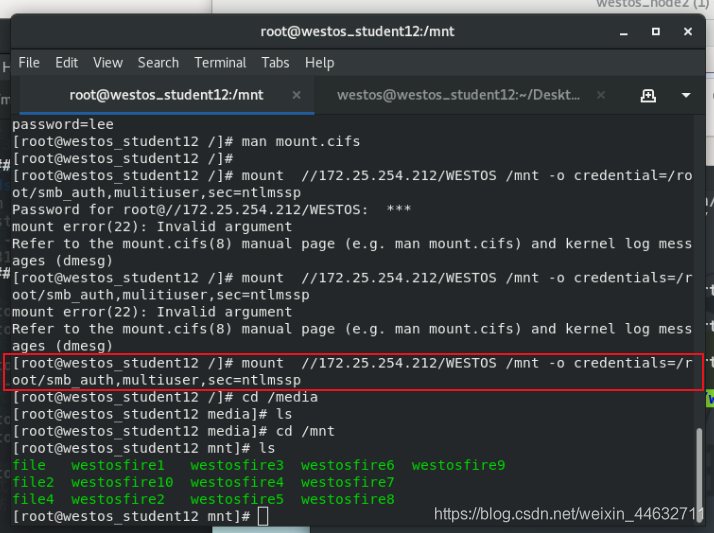
Write authentication file: vim /root/smb_auth
username=westos
password=lee
##File only allows everyone to view

mount //172.25.254.212/WESTOS /mnt -o credential=/root /smb_auth ##Check the authentication file by reading the authentication file when mounting, and specify the authentication file -
mulitiuser ##Make the mount support multi-user mount
test:
mount //172.25.254.212/WESTOS /mnt -o credential=/root/smb_auth,mulitiuser
[westos@westos_student12 Desktop]$ ls/mnt
bash: ls/mnt: No such file or directory
##Other users of the client cannot read
-
ntlmssp ##Set the authentication method
test:
mount //172.25.254.212/WESTOS /mnt -o credential=/root/smb_auth,mulitiuser,sec=ntlmssp
-
Other users view the mount point
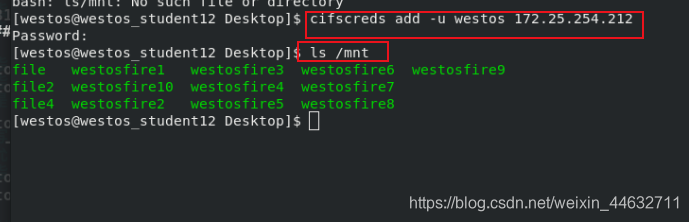
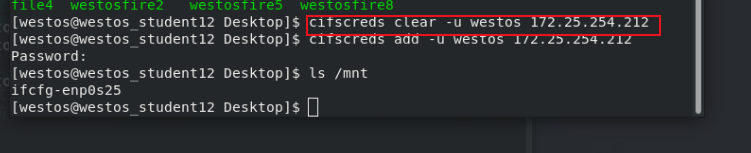
cifscreds add -u westos 172.25.254.212 ##Other users of the client can enter
cifscreds through authentication clear -u westos 172.25.254.212 ##Delete authentication identity
9.NFS
net file system
- Basic nfs information:
nfs-utils ##installation package
nfs-server ##service script
/etc/exports ##shared configuration file
nfs enable
server:
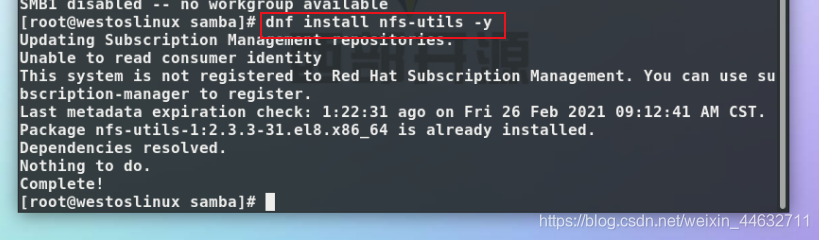
- dnf install nfs-utils -y ##Install the software
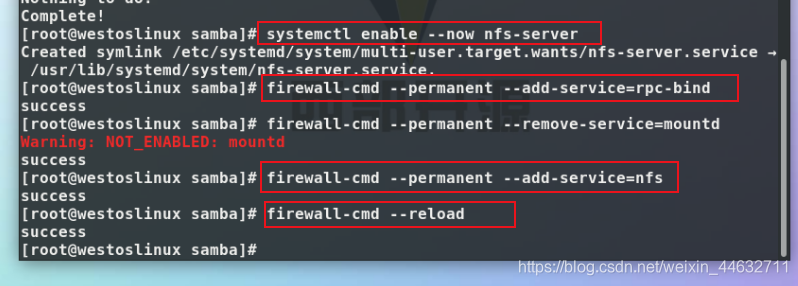
systemctl enable --now nfs-server ##Open the service
showmount -e 172.25.254.212 ##Connect the service
firewall-cmd --permanent --add-service=rpc-bind ## Firewall opens rpc-bind settings
firewall-cmd --permanent --remove-service=mountd ##Delete mountd service firewall settings
firewall-cmd --permanent --add-service=nfs
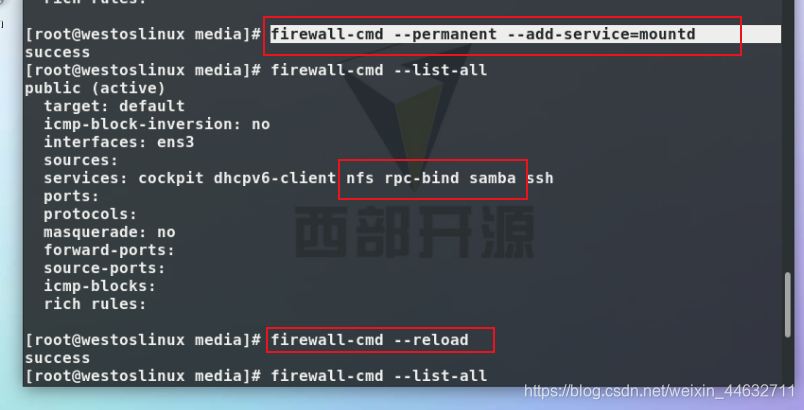
firewall-cmd --reload ##Add nfs service
firewall-cmd --permanent --add-service=mountd
##Add mountd service
nfs configuration
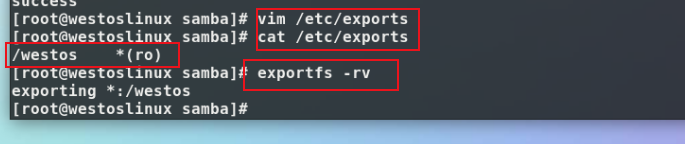
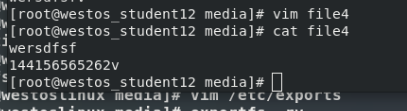
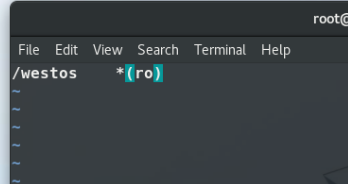
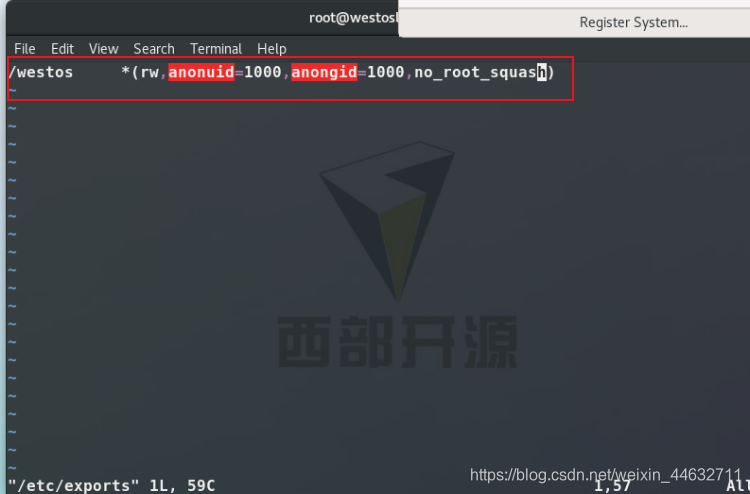
- vim /etc/exports
/westos *(ro) ##Edit the shared configuration file, the file is read-only
exportfs -rv ##load
- test:
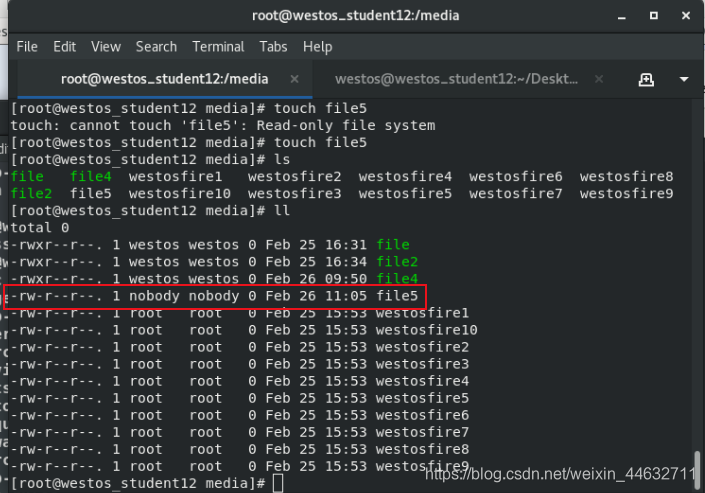
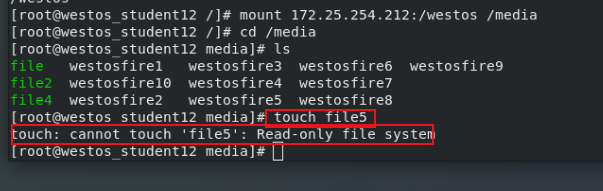
Client:
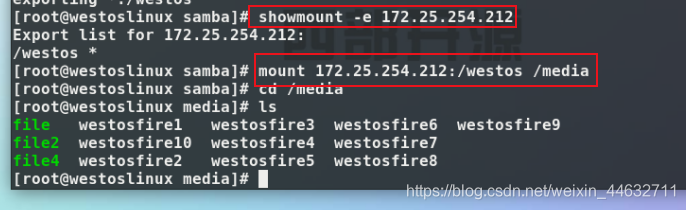
showmount -e 172.25.254.212 ##Connect to service
mount 172.25.254.212:/westos /media ##Mount
nfs configuration parameters
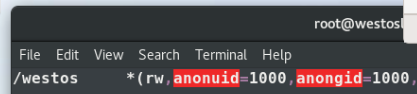
-
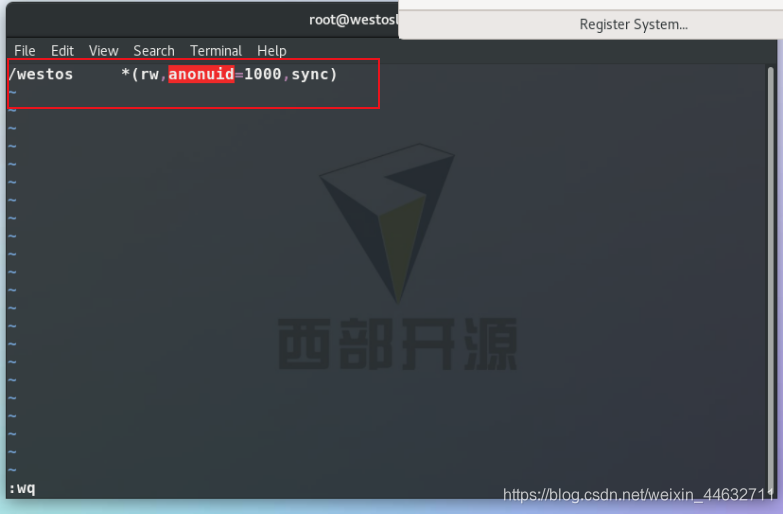
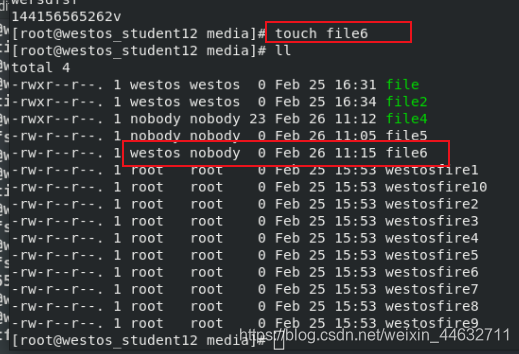
anonuid=1000,anongid ##Specify user identity
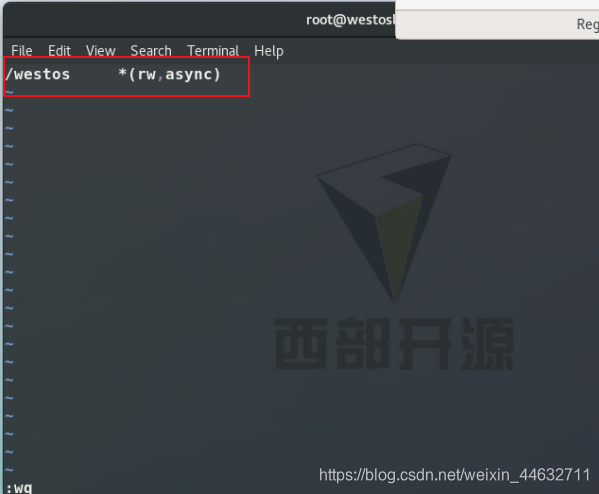
sync ##Synchronize data to the server after the change is generated


async ##Sync data to the server

rw in real time ##read-write


ro ##read-only
no_root_squash ##root user mount does not change identity, create File owner is root
-
test:
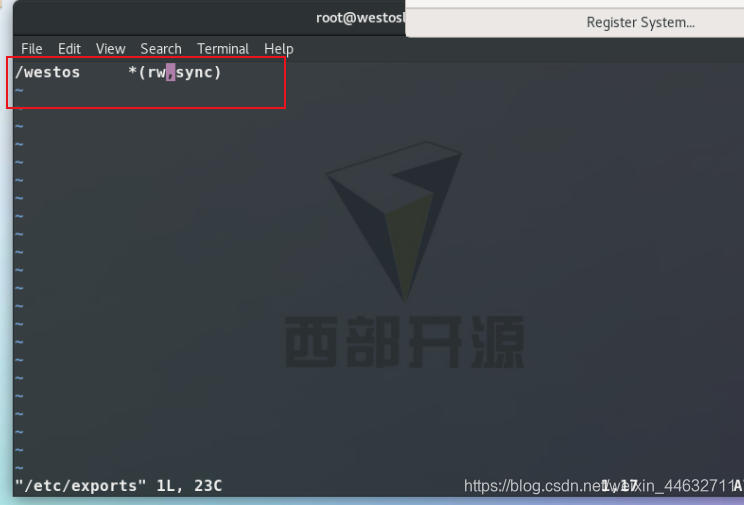
vim /etc/exports
adds permissions to the file
/westos *(rw, sync)
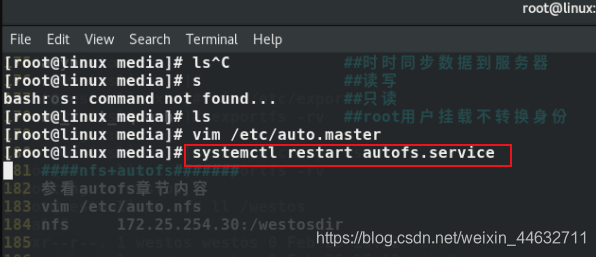
10.nfs+autofs
Automatic mounting and unmounting
Client:
- dnf install autofs -y ##Install the software autofs
systemctl enable --now autofs.service ##Start service
/net ##File already exists
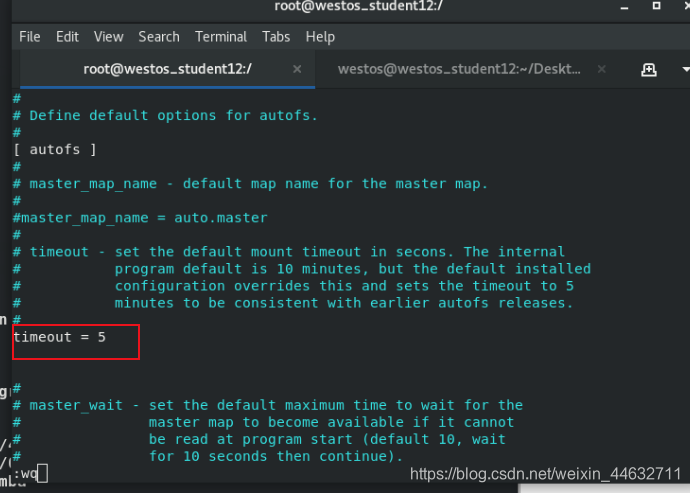
vim /etc/autofs.conf ##Main configuration file
timeout 5 ##Default waiting time
systemctl restart autofs.service
autofs+samba
autofs: software
samba that realizes automatic mounting and unloading on the client side , nfs mounting strategy
-
Configuration method:
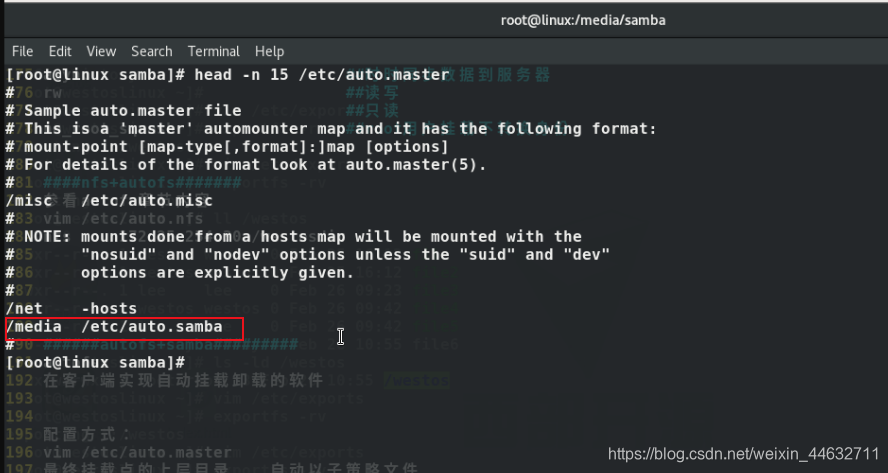
vim /etc/auto.master ##Master policy file One file cannot write two identical mount points
/media /etc/auto.samba ##Final mount point policy file and mount upper directory
-
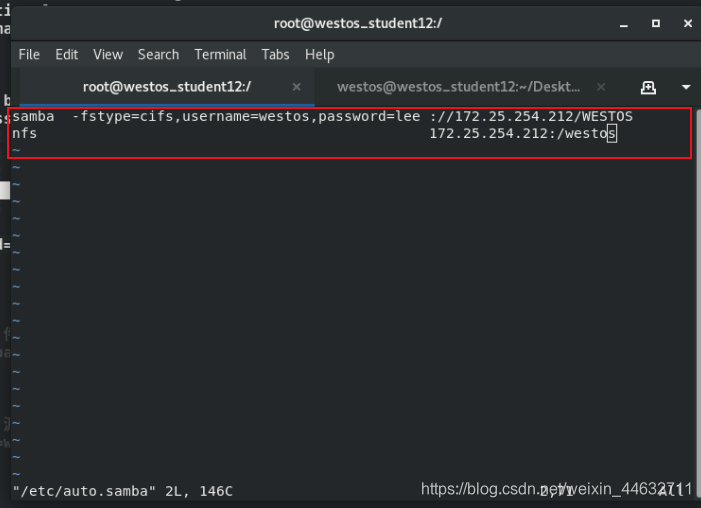
vim /etc/auto.samba ##Mount policy file, multiple mounts can be written in multiple lines
samba -fstype=cifs,username=westos,password=lee :\\172.25.254.212/WESTOS ##samba mount policy Write
nfs 172.25.254.212:/westos ##nfs mount policy
systemctl restart autofs.service ##Restart service
-
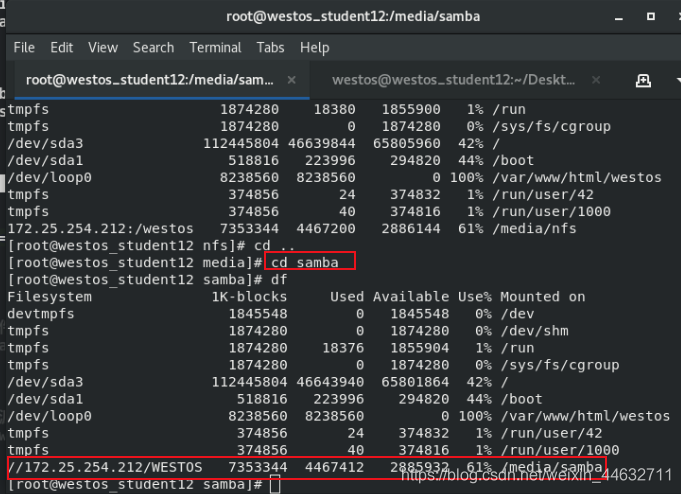
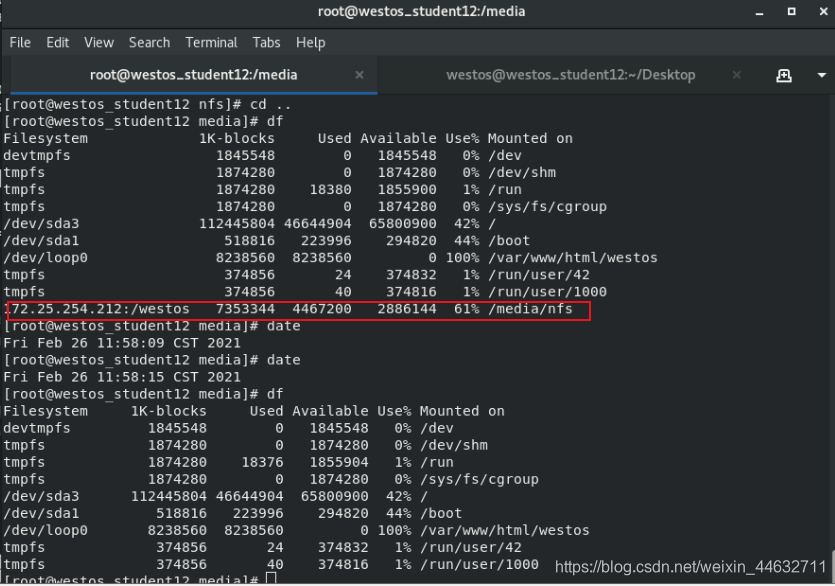
test:
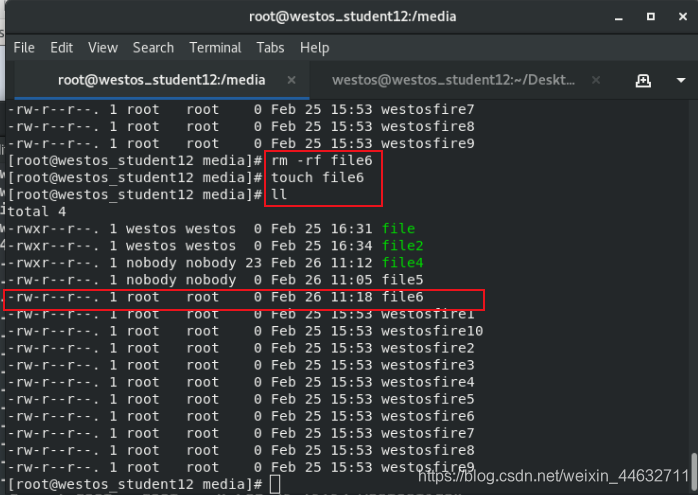
cd /media
cd nfs df ##Check to
see if the
cd is mounted samba
df ### Check to see if the
cd is mounted ...
df ##Check the uninstallation
11.iscsi
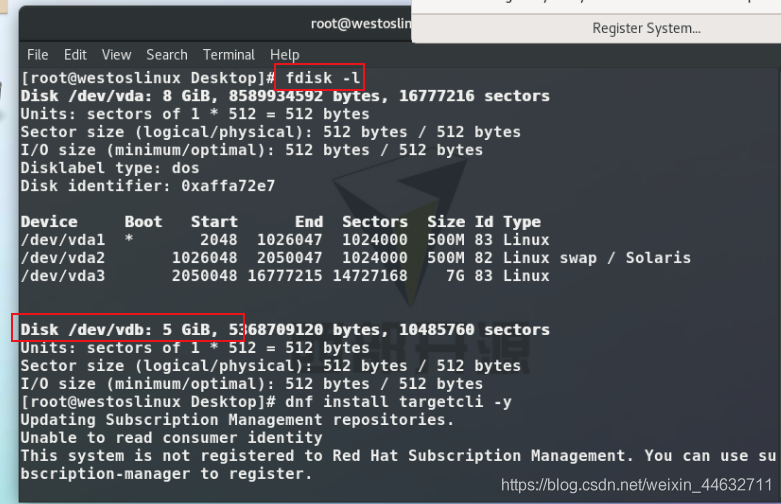
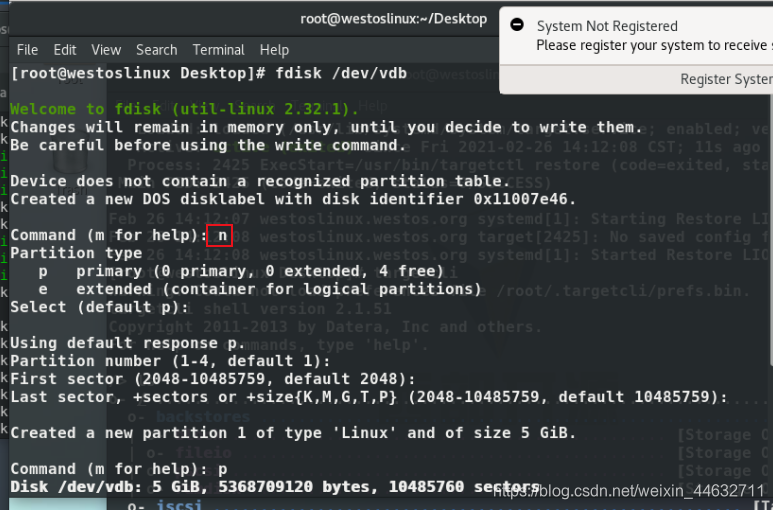
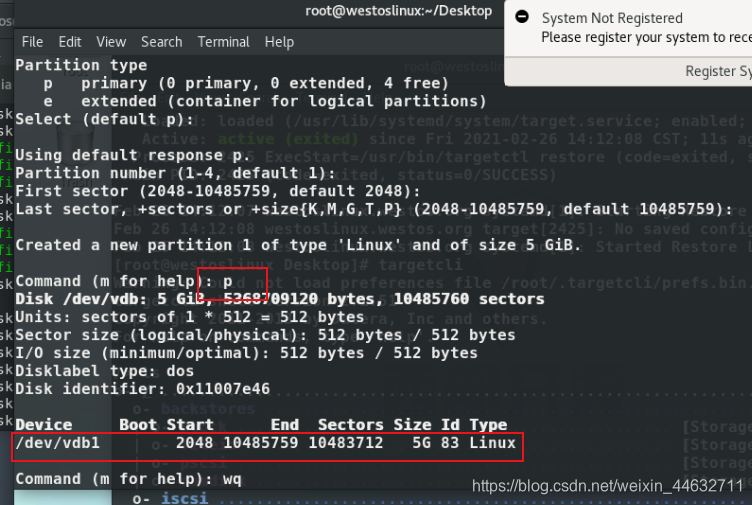
Server:
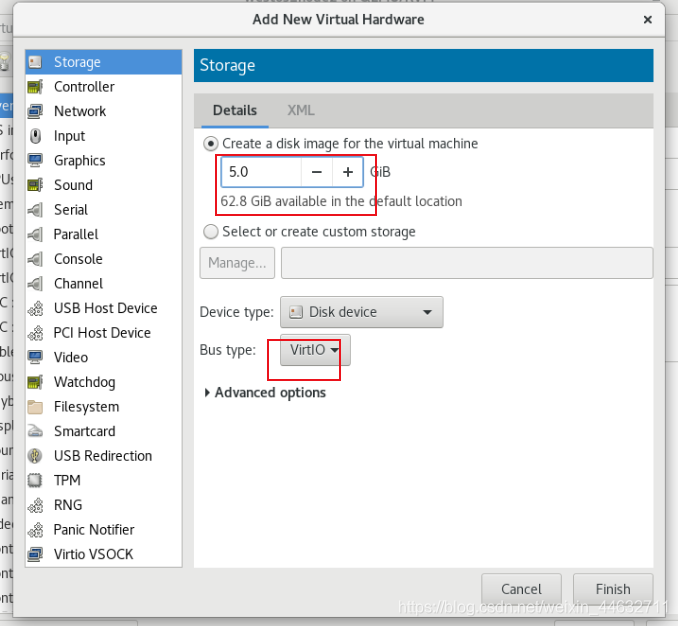
- fdisk /dev/vdb ##Add hard disk:
np ##Division device
udevadm settle ##Synchronize data table
Shared device usage rights
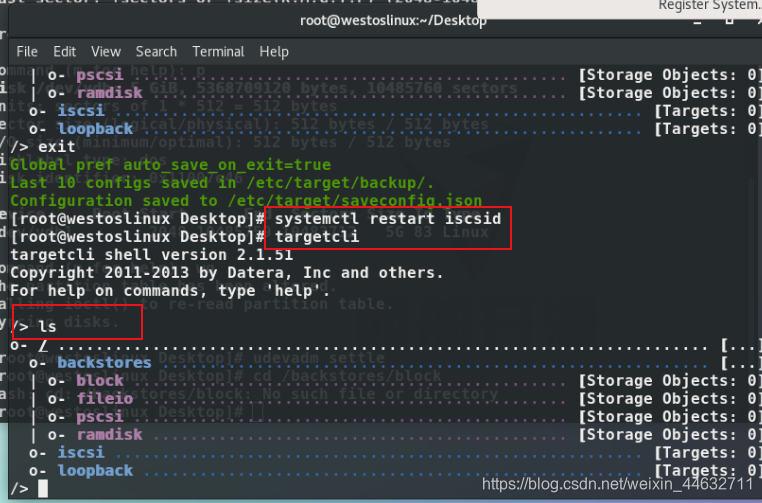
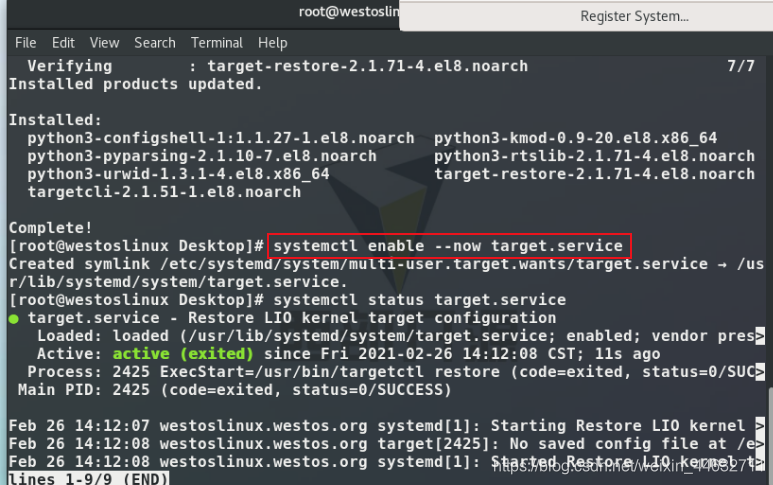
- dnf install targetcli -y ##Install the shared plug-in
systemctl enable --now target.service ##Start the service

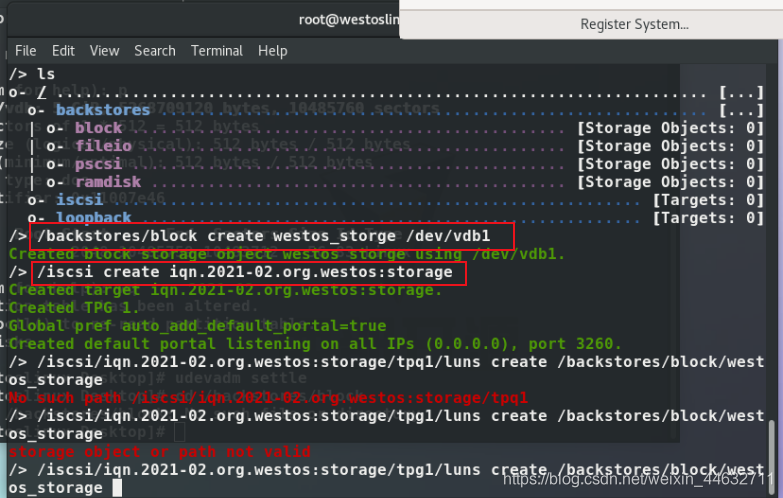
- targetcli ##Enter target settings
/backstores/block create westos_storge /dev/vdb1 ##target sharing
/iscsi create iqn.2021-02.org.westos:storage ##Establishing a sharing link year and month domain name reversed sharing name
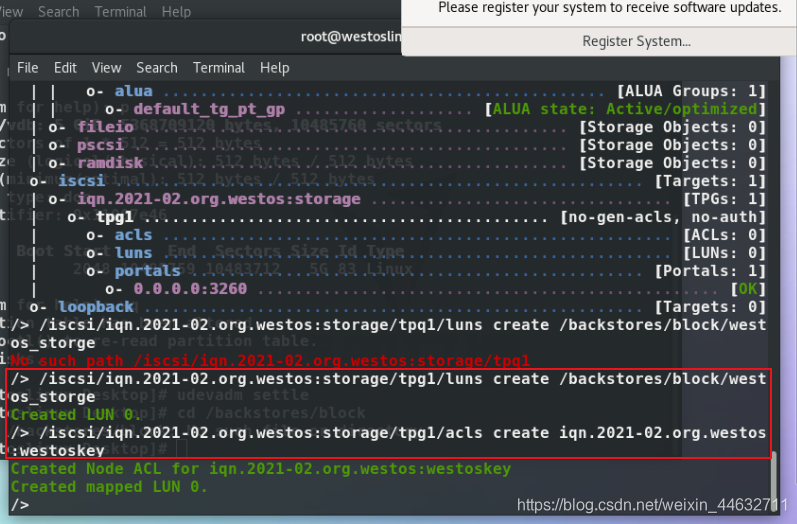
/iscsi/ iqn.2021-02.org.westos:storage/tpg1/luns create /backstores/block/westos_storge ##Associated Sharing and Equipment/iscsi/iqn.2021-02.org.westos:storage/tpg1/
acls create iqn.2021 -02.org.westos:westoskey ##Set password
firewall-cmd --permanent --add-port=3260/tcp
firewall-cmd --reload ##Firewall settings, add port
systemctl restart iscsid ##Restart service

Client: Use sharing
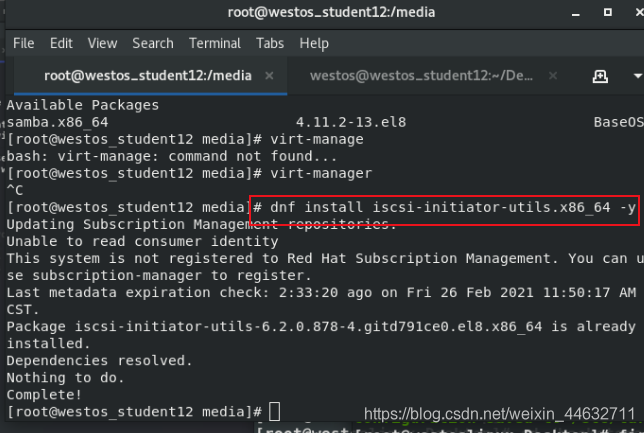
- dnf install iscsi-initiator-utils.x86_64 -y ##Install client software
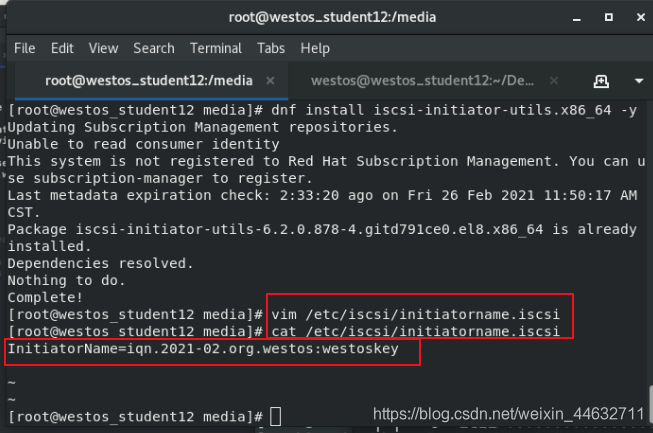
vim /etc/iscsi/initiatorname.iscsi
InitiatorName=iqn.2021-02.org.westos:westoskey ##Edit the password file and change it to your own password
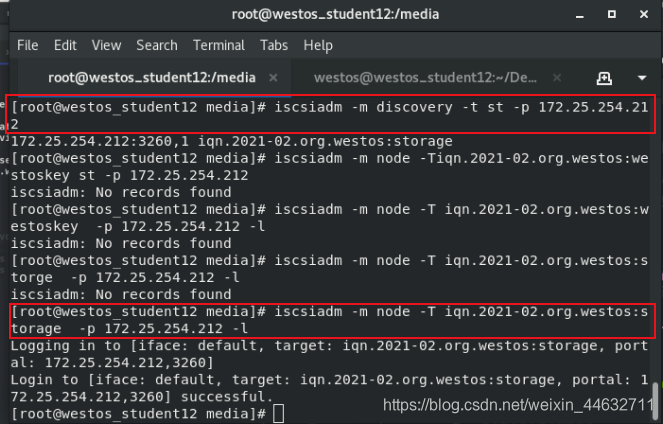
iscsiadm -m discovery -t st -p 172.25.254.212 ##View shared devices (cannot be viewed, maybe the server firewall is not set to allow it to pass)
iscsiadm -m node -T iqn.2021-02.org.westos:storage -p 172.25 .254.212 -l ##Recognize the shared device -T target device name -t device type -p device ip -l login device
systemctl restart iscsid ##restart service
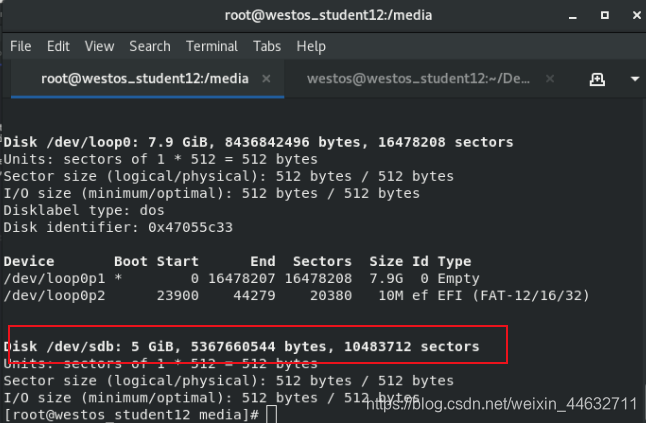
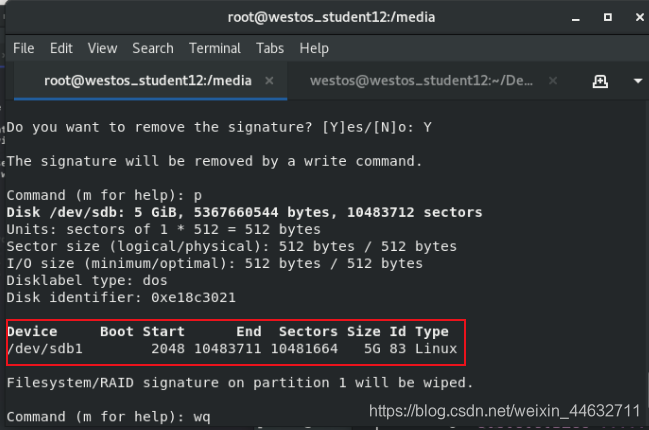
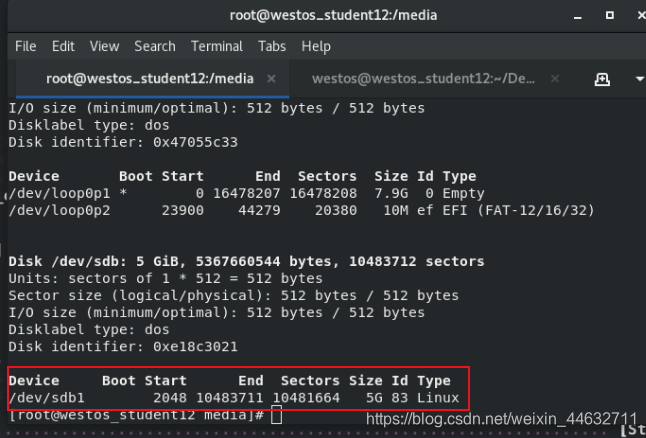
fdisk -l ##view
np ##create
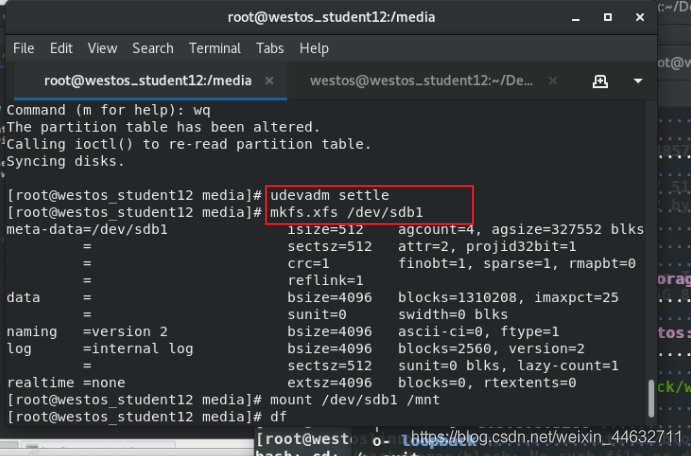
udevadm settle ##Save Create a table
mkfs.xfs /dev/sdb1 ##Format the device, format and use it locally
mount /dev/sdb1 /mnt ##Mount
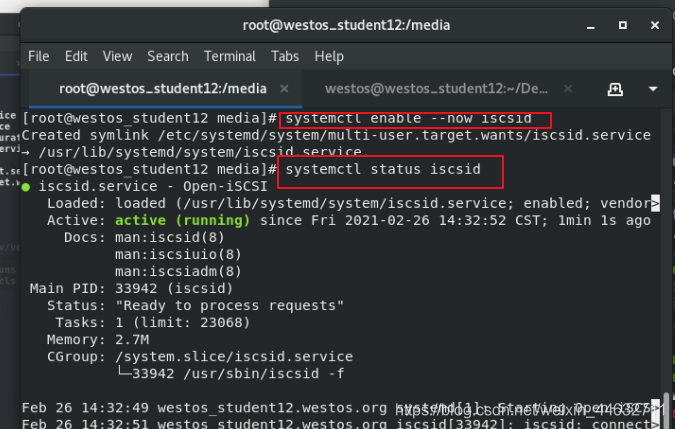
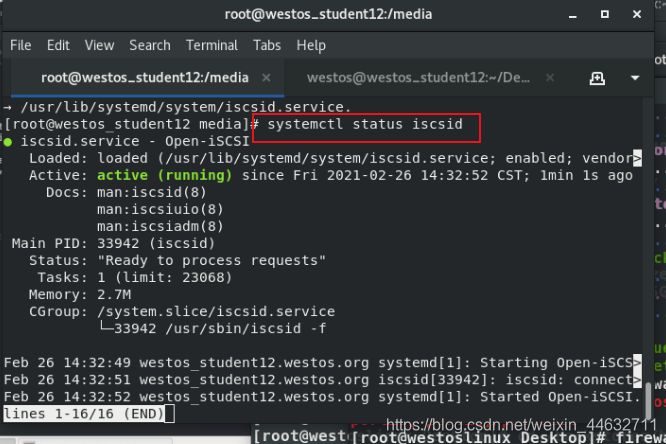
systemctl enable --now iscsid ##The service starts automatically

Delete:
Client:
- umount /mnt ##Uninstall

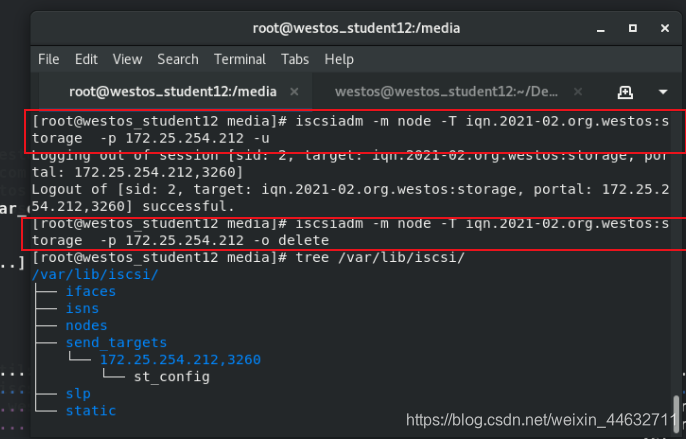
iscsiadm -m node -T iqn.2021-02.org.westos:storage -p 172.25.254.212 -u ##Delete connection (restart will connect again)
systemctl restart iscsi ##Restart
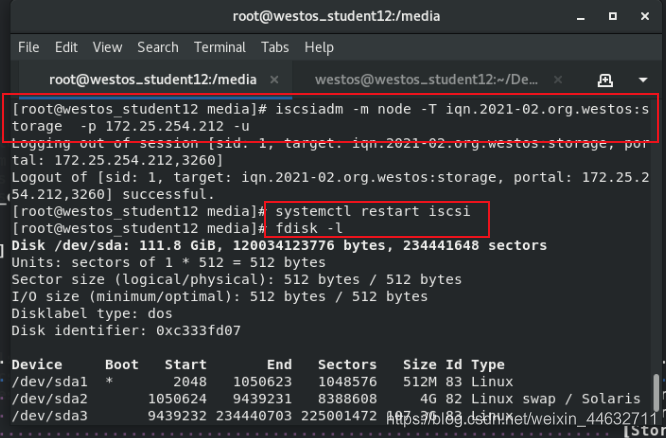
iscsiadm -m node -T iqn.2021-02.org.westos:storage -p 172.25.254.212 -u
u ##Delete connection
iscsiadm -m node -T iqn.2021-02.org.westos:storage -p 172.25.254.212 -o delete ##Delete device
tree /var/lib/iscsi/ ##Check whether to delete
Server:
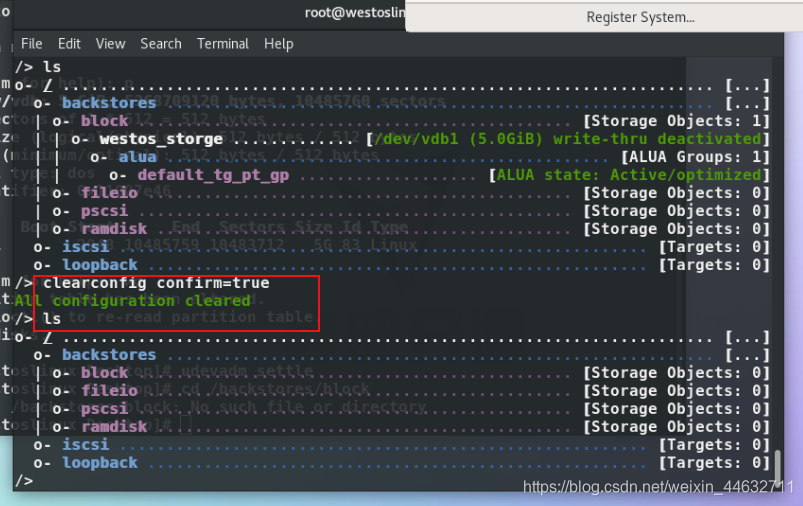
- targetcli
/iscsi delete iqn.2021-02.org.westos:storage ##Delete device
clearconfig confirm=true ##Delete all settings, you can view the help

systemctl restart iscsid ##Restart to view the deleted complete
targetcli
ls