Apache configuration and application
Project: Apache Access Control
First make an Apache environment
 1  ping www.baidu/com
    2  ifconfig
    3  vi /etc/resolv.conf
    4  ping www.baidu/com
    5  ping www.baidu.com
    6  vi /etc/resolv.conf
    7  ping www.baidu.com
    8  tar jxvf httpd-2.4.29.tar.bz2
    9  tar zxvf apr-1.6.2.tar.gz
   10  tar zxvf apr-util-1.6.0.tar.gz
   11  mv apr-1.6.2 httpd-2.4.29/srclib/apr
   12  mv apr-util-1.6.0 httpd-2.4.29/srclib/apr-util
   13  yum -y install gcc gcc-c++ make pcre-devel expat-devel perl
   14  cd httpd-2.4.29
   15  ./configure --prefix=/usr/local/httpd --enable-so --enable-rewrite --enable-charset-lite --enable-cgi
   16  make && make install
   17  cd
   18  cp /usr/local/httpd/bin/apachectl /etc/init.d/httpd
   19  vi /etc/init.d/httpd
   20  chkconfig --add httpd
   21  systemctl start httpd
   22  systemctl status httpd
   23  ls -s /usr/local/httpd/conf/httpd.conf /etc/
   24  ln -s /usr/local/httpd/conf/httpd.conf /etc/
   25  vi /etc/httpd.conf
   26  vi /etc/hosts
   27  systemctl restart httpd
   28  http -t
   29  httpd -t
   30  ln -s /usr/local/httpd/bin/* /usr/bin/
   31  httpd -t
   32  netstat -anpt | grep httpd
   33  netstat -anpt | grep 80
   34  apachectl -t
进入本地配置文件中 然后修改配置参数
Method 1: Search the htdocs directory and add under "AllowOverride None"
vi /usr/local/httpd/conf/httpd.conf
<Directory "/usr/local/httpd/htdocs">
Order deny,allow
Deny from 20.0.0.1/32
</Directory>
Method 2: Set control to the htdocs directory, increase the scope and reject ip:
<Directory "/usr/local/httpd/htdocs">
<RequireAll>
Require all granted
Require not ip 20.0.0.1/32
</RequireAll>
</Directory>
创建一个需要认证的tom用户
htpasswd -c /usr/local/httpd/conf/.awspwd tom
输入密码:abc123
查看创建的用户
[root@client1 ~]# cat /usr/local/httpd
tom:$apr1$V2DLN/xV$pv0ygMM7cN.HTY1dKW6H6/`3、添加用户授权配置
搜索htdocs目录,在"AllowOverride None"下面添加:
vi /etc/httpd.conf
Order allow,deny
Allow from all
AuthName "www.aa.com"
AuthType Basic
AuthUserFile /usr/local/httpd/conf/.awspwd
Require valid-user
.....
# Require all granted 记得注释掉
systemctl stop httpd
systemctl start httpd
4、为了让客户机也能访问主机,添加一个映射
vi /etc/hosts
20.0.0.11 www.aa.com (末行添加)
Project log split
The third-party tool cronolog splits the log
1、先解压缩然后编译安装
 tar zxvf cronolog-1.6.2.tar.gz
 cd cronolog-1.6.2/
 ./configure
 make && make install

2、
[root@client1 ~]# which cronolog
/usr/local/sbin/cronolog

ErrorLog "|/usr/local/sbin/cronolog logs/error.log_%Y-%m-%d "
CustomLog "|/usr/local/sbin/cronolog logs/access_log_%Y-%m-%d " common
Then check the log
Self-contained tool to split the log
rotatelogs segmentation tool
First look at the path [root@client1 ~]# which rotatelogs
/usr/bin/rotatelogs·
修改配置文件
vi /etc/httpd.conf
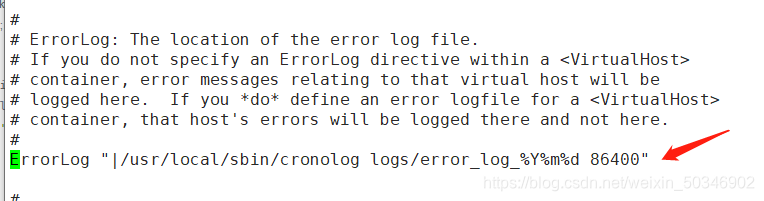
搜索ErrorLog "logs/error_log"
然后修改成为ErrorLog "|/usr/bin/rotatelogs -l logs/error_log_%Y-%m-%d 86400" 
同上

在搜索
CustomLog修改成为CustomLog "|/usr/bin/rotatelogs -l logs/access_log_%Y-%m-%d 86400"
即可得到分割日志
Use cronolog for log separation
Unzip the package first

Compile and install
[root@client1 cronolog-1.6.2]# ./configure
creating cache ./config.cache


[root@client1 cronolog-1.6.2]# make && make install

[root@client1 ~]# which cron
crond       cronolog    cronosplit  crontab
[root@client1 ~]# which cron
crond       cronolog    cronosplit  crontab
[root@client1 ~]# which cronolog
/usr/local/sbin/cronolog
[root@client1 ~]#
[root@client1 ~]# vi /etc/httpd.conf Then modify the configuration parameters
[root@client1 ~]# cd /usr/local/httpd/logs/
[root@client1 logs]# ll
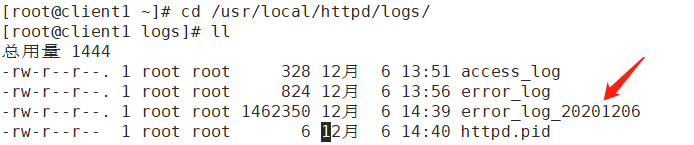
Same as above,
search for Custom and modify the configuration parameters

AWStats log analysis
Restore configuration:
ErrorLog "logs/error_log"
CustomLog "logs/access_log" common
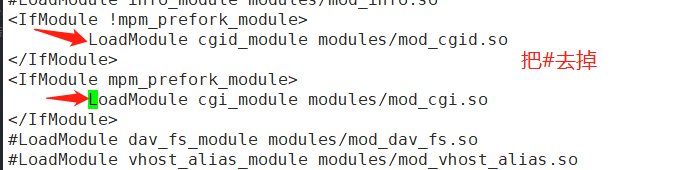
[root@client1 logs]# apachectl -D DUMP_MODULES | grep cgi
[root@client1 logs]# ls /usr/local/httpd/moudles | grep cgi
ls: 无法访问/usr/local/httpd/moudles: 没有那个文件或目录vi /etc/httpd.conf modify the configuration file to
 set the group
[root@client1 local]# chown -R root.root awstats/
[root@client1 ~]# cd /usr/local/awstats/tools/
[root@client1 tools]# ./awstats_configure.pl
    /usr/local/httpd/conf/httpd.conf
    N
    y
    www.aa.com
    回车
    回车
    把finish前的url的路径复制出来:
http://localhost/awstats/awstats.pl?config=www.aa.com
Delete the original log file
[root@client1 tools]# cd /usr/local/httpd/logs/
[root@client1 logs]# rm -rf error.log*
[root@client1 logs]# rm -rf access_log_*
[root@client1 logs]# ls -lh
Set up awstats configuration file
[root@client1 tools]# vi /etc/awstats/awstats.www.aa.com.conf
    LogFile="/usr/local/httpd/logs/access_log"
    DirData="/var/lib/awstats"
[root@server1 ~]# mkdir /var/lib/awstats
设置访问权限
[root@server1 tools]# vi /etc/httpd.conf
<Directory "/usr/local/awstats/wwwroot">
    Options None
    AllowOverride None
#Order allow,deny   #'注释掉'
#Allow from all     #'注释掉'
Require all granted      #'添加'

[root@server1 ~]# systemctl restart httpd #重新生成日志文件
[root@server1 logs]# systemctl restart httpd
[root@server1 logs]# ls
access_log  cgisock.17216  error_log  httpd.pid  www.abc.com.error_2020-12-6.log
[root@server1 ~]# cd /usr/local/awstats/tools/
[root@server1 tools]# chmod +x awstats_updateall.pl #设置运行权限