
Author: JackTian
micro-channel public number: IT's Jiege trip (ID: Jake_Internet)
1. What is Rsync?
Rsync is an open source fast backup tool. It is one of the components installed by default in Linux and UNIX operating systems. It can mirror and synchronize entire directories between different hosts, supports incremental backup file transfer, maintains links and permissions, and uses optimized synchronization algorithms. , Execute compression before transmission, suitable for remote backup, mirror server and other applications.
Rsync official website address: https://rsync.samba.org/
2. Configure the rsync source server
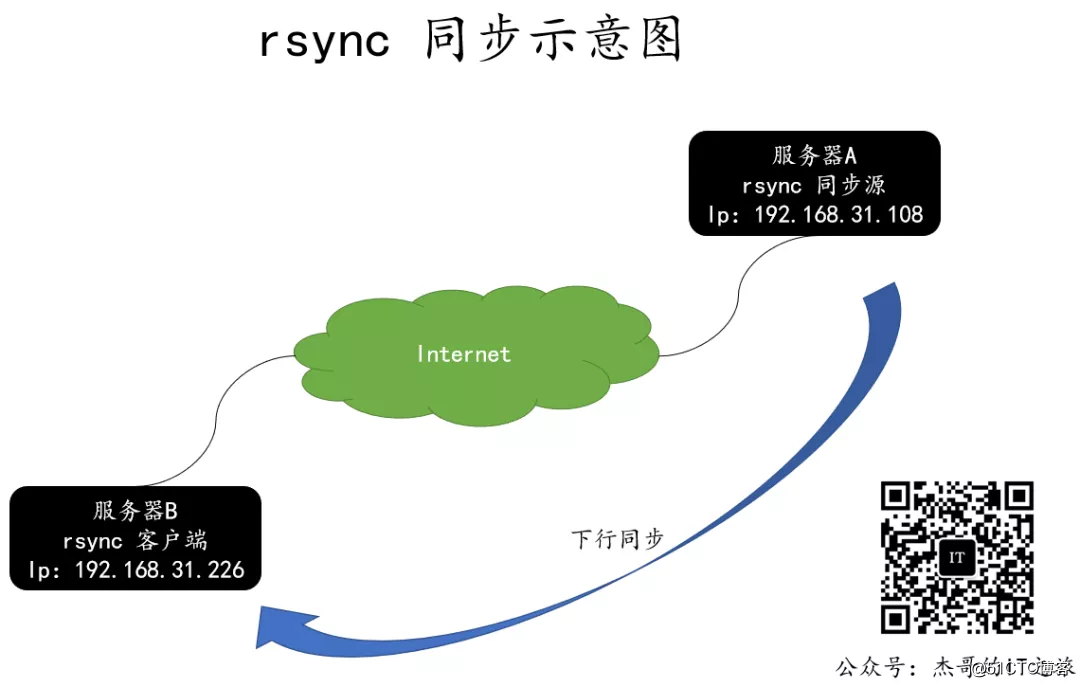
In the remote synchronization task, the client responsible for initiating the rsync synchronization operation is called the initiator, and the server responsible for responding to the rsync synchronization operation from the client is called the synchronization source.
During the synchronization process, the synchronization source is responsible for providing the original location of the document, and the initiator should have read permission to this location.
Turn off the iptables firewall and selinux.
# service iptables stop
# setenforce 0
Analyze the /etc/hosts configuration files of the rsync source server and rsync client to be the same, and configure as follows.
# tail -2 /etc/hosts
192.168.31.108  linuxserver.com
192.168.31.226  linuxclient.com
Configure the /etc/rsyncd.conf file
# vi /etc/rsyncd.conf

### This is rsyncd.conf
### By 微信公众号:杰哥的IT之旅(ID:Jake_Internet)
uid = rsync                                      // 使用的用户
gid = rsync                                      // 使用的用户
use chroot = no                                  // 是否使用根目录锁   如果"use chroot"指定为true,那么 rsync 在传输文件以前首先 chroot 到 path 参数所指定的目录下。这样做的原因是实现额外的安全防护,但是缺点是需要以 roots 权限,并且不能备份指向外部的符号连接所指向的目录文件。默认情况下 chroot 值为 true。
max connections = 2000                           // 指定该模块的最大并发连接数量以保护服务器,超过限制的连接请求将被告知随后再试,默认值是 0,也就是没有限制。
timeout = 600                                    // 通过该选项可以覆盖客户指定的IP超时时间。通过该选项可以确保rsync服务器不会永远等待一个崩溃的客户端。超时单位为秒钟,0表示没有超时定义,这也是默认值。对于匿名rsync服务器来说,一个理想的数字是600。
pid file = /var/run/rsyncd.pid                   // 存放进程 ID 的文件位置
lock file = /var/run/rsync.lock
log file = /var/log/rsyncd.log                   // 日志文件位置
ignore errors
read only = false                                // 是否为只读
list = false
hosts allow = 192.168.31.0/24                    // 允许访问的客户端 IP 地址范围
hosts deny = 0.0.0.0/32                          // 拒绝访问的客户端 IP 地址范围
auth users = rsync_backup                        // 授权账户
secrets file = /etc/rsync.password               // 存放账户信息的数据文件
#################################
[backup]
path = /backup
Start rsync service
At this time, when starting the rsync service, an error like the above will appear.
# rsync --daemon
failed to create pid file /var/run/rsyncd.pid: File exists
Solution: Delete the /var/run/rsyncd.pid file and restart the rsync service
# rm -rf /var/run/rsyncd.pid                     // 删除 rsyncd.pid 文件
# rsync --daemon                                 // 再重新启动 Rsync 服务
Create /etc/rsync.password file
# echo “rsync_backup:123456” >/etc/rsync.password
Check the /etc/rsync.password file, whether it is successful, and adjust the file permissions.
cat /etc/rsync.password
rsync_backup:123.com
chmod 600 /etc/rsync.password
Listening service port.
# pgrep rsync
5081
5125
# netstat -lntup|grep rsync
tcp        0      0 192.168.31.108:873          0.0.0.0:*                   LISTEN      5081/rsync
tcp        0      0 :::873                      :::*                        LISTEN      5125/rsync
Create the right real users for rsync
# useradd -s /sbin/nologin -M rsync
# id rsync
uid=500(rsync) gid=500(rsync) 组=500(rsync)
Create directories needed for rsync push
# mkdir /backup
# chown -R rsync.rsync /backup/
3. Basic usage of rsync command using Rsync backup tool
Most backup programs require specifying the original location and target location. The rsync command is actually similar to the cp command.
For example: synchronously back up the file /etc/fstab and the directory /boot/grub to the /opt directory.
-r: option means to recurse the entire directory, -l: option means to back up linked files.
# rsync /etc/fstab /opt
# rsync -rl /etc/fstab /boot/grub /opt
rsync command format
Basic format: rsync [options] original location target location
Common backup options of rsync command
-r: Recursive mode, including all files in the directory and subdirectories.
-l: Copy the symbolic link file as a symbolic link file.
-v: Display detailed information about the synchronization process.
-a: Archive mode, retain file permissions, attributes and other information, the combination option is equal to -rlptgoD.
-z: Compress when transferring files.
-p: Keep the permission mark of the file.
-t: Keep the time stamp of the file.
-g: Keep the group mark of the file. (For super users only)
-o: Keep the owner mark of the file. (For super users only)
-H: Keep hard-linked files.
-A: Keep ACL attribute information.
-D: Keep device files and other special files.
- delete: Delete files in the target location but not in the original location.
--checksum: Decide whether to skip the file based on the checksum (not the file size, modification time).
Representation of configuration source
When performing remote synchronization tasks, the rsync command needs to specify the resource location in the synchronization source server.
Two representation methods
-
Username@Host Address::Shared module name (separated by two colons)
- rsync://username@host address/shared module name (URL address format)
Use real users to test the rsync service
If the ssh port is modified, the port must be added.
Command format: rsync -parameter file -e'ssh -p port number' username @ip: directory path
# rsync -avz abc '-e ssh -p 22' [email protected]:/tmp     // 实操命令格式
[email protected]'s password:                              //输入 linuxserver 设备的 root 密码
sending incremental file list
abc

sent 64 bytes  received 31 bytes  27.14 bytes/sec
total size is 0  speedup is 0.00
# ll /tmp                                                    // 查看同步结果
总用量 52
-rw-r--r--. 1 root root    0 12月 30 07:25 abc
Backup work in the actual production environment is usually repetitive, so we can set up a scheduled task to complete the backup operation. For example: synchronize the tmp shared module of the server at 04:00 every morning, and download it to the local /mnt/jacktian directory, and complete it through the crond service.
In this synchronization process, we do not want to enter a password, so we need to create a password file to save the password of the rsync_backup user.
# cat /etc/rsync.password
rsync_backup:123.com
# chmod 600 /etc/rsync.password
# ll /etc/rsync.password
-rw-------. 1 root root 21 12月 30 08:04 /etc/rsync.password
Use the option --password-file=/etc/rsync.password to specify when performing rsync synchronization.
# crontab -e
00 04 * * * /usr/bin/rsync -az --delete --password-file=/etc/rsync.password@[email protected]::tmp /mnt/jacktian
# service crond restart
# chkconfig crond on
4. Configure rsync+inotify real-time synchronization
Linux has provided the inotify notification interface since the kernel version 2.6.13 to monitor various changes of the file system, such as file access, deletion, movement, modification, etc. Using this mechanism, file change warnings, incremental backups, and timely responses to changes in directories or files can be realized.
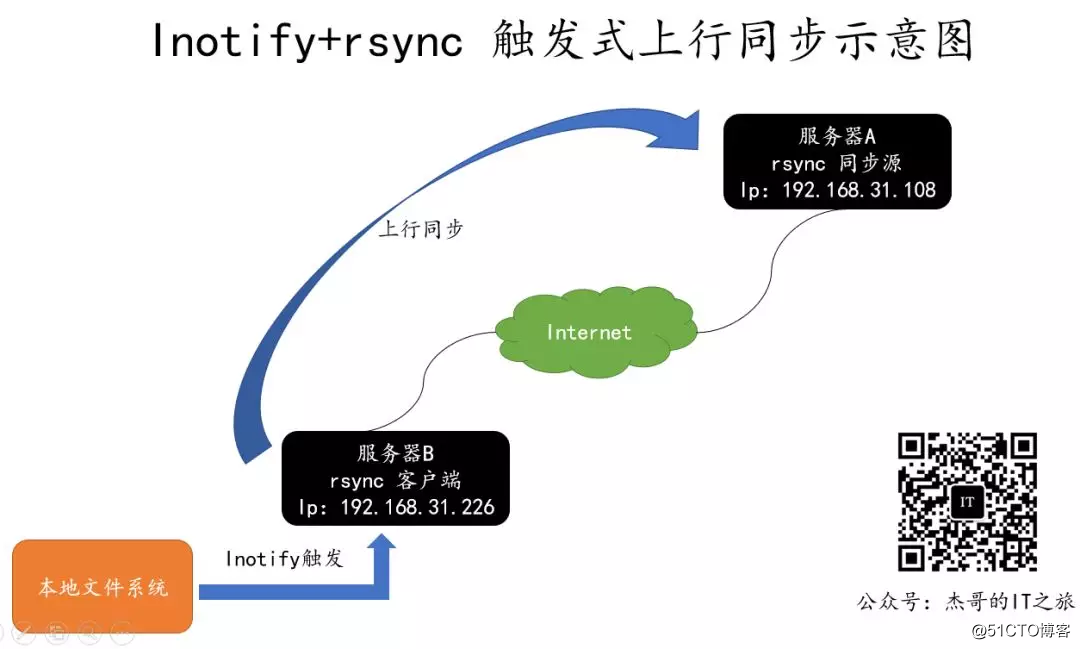
rsync+inotify can achieve triggered backup. As long as the original location of the document changes, the incremental backup will be started immediately, otherwise it will be in a silent waiting state, which avoids the delay and over-density of the cycle when backing up in a fixed cycle.
Inotify is mainly used for local monitoring, which is more suitable for uplink synchronization in triggered backup applications.
The inotify mechanism provides three control parameters
max_queued_events: indicates the monitoring event queue
max_user_instances: Maximum number of monitored instances
max_user_watches: Maximum number of monitored files per instance
# cat /proc/sys/fs/inotify/max_queued_events
16384
# cat /proc/sys/fs/inotify/max_user_instances
128
# cat /proc/sys/fs/inotify/max_user_watches
8192
Adjust the inotify kernel parameters
When the directory to be monitored has a large number of files or changes frequently, it is recommended to increase the values of these three parameters.
# vi /etc/sysctl.conf
fs.inotify.max_queued_events = 16384
fs.inotify.max_user_instances = 1024
fs.inotify.max_user_watches = 1048576
# sysctl -p
Install inotify-tools
Installing inotify-tools mainly provides inotifywait, inotifywatch and other tools to monitor and summarize changes.
# tar zxf inotify-tools-3.14.tar.gz
# cd inotify-tools-3.14
# ./configure && make && make install
Take the monitoring website directory /var/www/html as an example, after executing the inotifywait command, change the content in the /var/www/html directory in another terminal.
-e: Specify the event to be monitored
-m: indicates continuous monitoring
-r: Represents the entire directory recursively
-q: simplified output information
# mkdir /var/www/html -p
# inotifywait -mrq -e modify,create,move,delete /var/www/html/
Another terminal: Add files in the /var/www/html/ directory, move files, and track screen output results.
# mkdir /var/www/html/a
# mkdir /var/www/html/b
# mv /var/www/html/b /var/www/html/bb
# rm -rf /var/www/html/a
inotifywait can monitor various events such as modify (modify), create (create), move (move), delete (delete), attrib (attribute change), and output the result immediately when there is a change. It can be used to collect system changes and output summary changes after running.
# inotifywait -mrq -e modify,create,move,delete /var/www/html/
fy,create,move,delete /var/www/html/
/var/www/html/ CREATE,ISDIR a
/var/www/html/ CREATE,ISDIR b
/var/www/html/ MOVED_FROM,ISDIR b
/var/www/html/ MOVED_TO,ISDIR bb
/var/www/html/ DELETE,ISDIR a
Write triggered synchronization scripts
In the monitoring results output by inotifywait, each line of records includes directories, events, and files, which can identify changes. As long as changes are detected, the rsync uplink synchronization operation will be executed.
Note: When updates are frequent, avoid concurrent execution of rsync backups. If the rsync process already exists, ignore this synchronization, or decide whether to synchronize according to the number of rsync processes
The script is used to test the changes of the local /var/www/html directory. Once updated, it will trigger the rsync synchronization operation and upload it to the /var/www/html directory of the server 192.168.31.108.
Triggered uplink synchronization verification process
1. Use the rsync tool to perform an uplink synchronization;
2. Run the bak_transfer.sh script on the machine;
3. Create, delete, modify and other operations in the /var/www/html directory of the machine;
4. View the server Changes in the /var/www/html directory;
# vi bak_transfer.sh
# This is bak_transfer.sh
# 微信公众号:杰哥的IT之旅(ID:Jake_Internet)
#!/bin/bash
INOTIFY_CMD="inotifywait -mrq -e modify,create,move,attrib,delete /var/www/html/"
RSYNC_CMD="rsync -azH --delete /var/www/html/ [email protected]:/var/www/html"
$INOTIFY_CMD | while read DIRECTORY EVENT FILE
do
        if [ $(pgrep rsync | wc -l) -le 0 ]
        then
                $RSYNC_CMD
        fi
done

# chmod +x bak_transfer.sh
# ./bak_transfer.sh
# echo "/bin/bash /root/bak_transfer.sh" >> /etc/rc.local
Rsync startup exception solution summary
error: failed to create pid file /var/run/rsyncd.pid: File exists
solution: rm /var/run/rsyncd.pid
start service: rsync --daemon --config=/etc/rsyncd .conf
Error: rsync: failed to connect to IP address: Connection refused (111)
rsync error: error in socket IO (code 10) at clientserver.c(124) [receiver=3.0.5]
Solution: Start the service: rsync --daemon --config=/etc/rsyncd.conf
Error: rsync: failed to connect to IP address: Connection timed out (110)
rsync error: error in socket IO (code 10) at clientserver.c(124) [receiver=3.0.5]
Solution: It may be caused by the iptables firewall being turned on Unable to communicate, you can set rules to allow port 873 or close the firewall directly.
Error: @ERROR: chroot failed
rsync: connection unexpectedly closed (75 bytes read so far)
rsync error: error in rsync protocol data stream (code 12) at io.c(150)
Solution: The path set in rsync.conf is not Exist, need to create a new directory.