Ready to work
- The local hexo has been configured
- Personal system: deepin15.11
- Server: Ubuntu 18.04
let's start
Install git and nginx
apt update
apt install git nginx
Configure nginx
nginx version: nginx/1.14.0 (Ubuntu)
I explain the nginx version here because I have tried a lot of nginx configurations on the Internet but none of them took effect (forgive me for only using Apache). Later, I searched for the specific version of the configuration to take effect. So in the future, we still have to develop the habit of adding versions when searching.
My blog directory is in /opt/hexo
Of course, you can also set it yourself, just change to your directory in the next steps
mkdir /opt/hexo
Write nginx configuration file
vim /etc/nginx/conf.d/blog.conf
server {


        listen 80 ;
        root /opt/hexo;
        index index.html index.htm index.nginx-debian.html;
        server_name 47.93.34.7; #有域名就填域名,也可填服务器公网ip
}
Restart nginx
service nginx restart
At this time, we have changed the default site to /opt/hexo, you can create a new file access ip in the corresponding directory to see if it works.
Configure Git Hooks
Create Git bare warehouse
blog.git is a remote Git repository, and the blog static files generated locally by Hexo can be synchronized with it through push.
mkdir ~/blog.git && cd ~/blog.git
git init --bare
Configure Hooks script
The post-receive script will be executed when the blog.git repository receives a push.
vim ./hooks/post-receive
The script is very simple, delete the original **/opt/hexo directory, and then clone the new blog static files from the blog.git repository.
#!/bin/bash

rm -rf /opt/hexo
git clone /root/blog.git /opt/hexo
Give the post-receive script execution permission
chmod +x ./hooks/post-receive
Modify local files
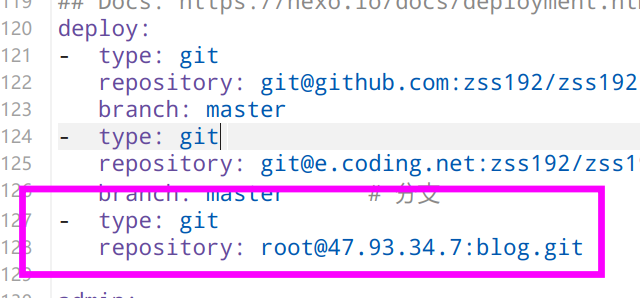
Modify the _config.yml in the root directory of the local blog
deploy:
    type: git
    repo: root@你的公网ip:blog.git
As shown below
Password-free push code
The premise is that there is an ssh key locally (you can use cat ~/.ssh/id_rsa.pub to see if it exists)
If there is no ssh key, you need to generate ssh key, press 3 enter
ssh-keygen -t rsa -C "[email protected]"
Then push the public key to the server
cat ~/.ssh/id_rsa.pub | ssh [username]@[remote_host] "mkdir -p ~/.ssh && cat >> ~/.ssh/authorized_keys"
例如:cat ~/.ssh/id_rsa.pub | ssh [email protected] "mkdir -p ~/.ssh && cat >> ~/.ssh/authorized_keys"
Deployment blog
Execute in the local blog root directory
hexo g -d
You can see the blog by visiting the public network ip. If the domain name is configured, don't forget to resolve the domain name (note whether the port is open).
Write at the end
The above is the whole process of deploying the hexo blog to the server. The reason for writing this blog is that I used a server to deploy the blog before. After the expiration, I bought another server and had to search for related operations.
Record related operations here to facilitate future needs.