Navigate the parent-child page jump back
Code example:
import 'package:flutter/material.dart';

void main() {


  runApp(MaterialApp(
    title: "导航演示",
    home: new FirstScreen(),
  ));
}

class FirstScreen extends StatelessWidget {


  @override
  Widget build(BuildContext context) {


    return Scaffold(
      appBar: AppBar(
        title: Text('导航页面'),
      ),
      body: Center(
        child: RaisedButton(
          child: Text('查看商品详情页'),
          onPressed: () {


            Navigator.push(context,
                MaterialPageRoute(builder: (context) => new SecondScreen()));
          },
        ),
      ),
    );
  }
}

class SecondScreen extends StatelessWidget {


  @override
  Widget build(BuildContext context) {


    return Scaffold(
      appBar: AppBar(
        title: Text('商品详情页'),
      ),
      body: Center(
        child: RaisedButton(
            child: Text('返回'),
            onPressed: () {


              Navigator.pop(context);
            }),
      ),
    );
  }
}
Run interface:

Navigation parameter transfer and acceptance
This part of the hand-knocking code requires a large amount of work, so we can automatically generate a part. First, download a VSCode plug-in: After

having this plug-in, enter:

press enter to generate:

other functions can be specifically viewed in the plug-in Description
Next is the code example:
import 'package:flutter/material.dart';

class Product {


  final String title; //商品标题
  final String description; //商品描述
  Product(this.title, this.description); //构造函数
}

//入口文件
void main() {


  runApp(MaterialApp(
    title: '导航的数据传递和接受',
    home: ProductList(
        products: List.generate(
            20, (index) => Product('商品 $index', '这是一个商品详情,编号为:$index'))),
  ));
}

class ProductList extends StatelessWidget {


  final List<Product> products;
  ProductList({

    Key key, @required this.products}) : super(key: key);
  @override
  Widget build(BuildContext context) {


    return Scaffold(
      appBar: AppBar(
        title: Text('商品列表'),
      ),
      body: ListView.builder(
        itemCount: products.length,
        itemBuilder: (context, index) {


          return ListTile(
            title: Text(products[index].title),
            onTap: () {


              Navigator.push(
                  context,
                  MaterialPageRoute(
                      builder: (context) =>
                          ProductDetail(product: products[index])));
            },
          );
        },
      ),
    );
  }
}

class ProductDetail extends StatelessWidget {


  final Product product;
  ProductDetail({

    Key key, @required this.product}) : super(key: key);
  @override
  Widget build(BuildContext context) {


    return Scaffold(
      appBar: AppBar(
        title: Text('${product.title}'),
      ),
      body: Center(
        child: Text('${product.description}'),
      ),
    );
  }
}
Run interface:

Page jump and return data
Code example:
import 'package:flutter/material.dart';

//入口文件
void main() {


  runApp(MaterialApp(title: '页面跳转返回数据', home: FirstPage()));
}

class FirstPage extends StatelessWidget {


  @override
  Widget build(BuildContext context) {


    return Scaffold(
      appBar: AppBar(
        title: Text('阿巴阿巴阿巴阿巴'),
      ),
      body: Center(
        child: RouteButton(),
      ),
    );
  }
}

class RouteButton extends StatelessWidget {


  @override
  Widget build(BuildContext context) {


    return RaisedButton(
      onPressed: () {


        _navigateToABa(context);
      },
      child: Text('阿巴阿巴阿巴阿巴'),
    );
  }

  _navigateToABa(BuildContext context) async {


    final result = await Navigator.push(
        context, MaterialPageRoute(builder: (context) => ABa()));
    Scaffold.of(context).showSnackBar(SnackBar(
      content: Text('$result'),
    ));
  }
}

class ABa extends StatelessWidget {


  @override
  Widget build(BuildContext context) {


    return Scaffold(
      appBar: AppBar(
        title: Text('欢迎来到妙妙屋!'),
      ),
      body: Center(
        child: Column(
          children: [
            RaisedButton(
              child: Text('玛卡巴卡'),
              onPressed: () {


                Navigator.pop(context, '玛卡巴卡:1511008888');
              },
            ),
            RaisedButton(
              child: Text('迪西唔西'),
              onPressed: () {


                Navigator.pop(context, '迪西唔西:1511009999');
              },
            ),
          ],
        ),
      ),
    );
  }
}
Run interface:

Processing of static resources and project pictures
First, create an [images] folder in the project root directory, and put the pictures you want to use in it:

Then find [pubspec.yaml] to import the pictures:

[main.dart] code example:
import 'package:flutter/material.dart';

void main() => runApp(MyApp());

class MyApp extends StatelessWidget {


  @override
  Widget build(BuildContext context) {


    return Container(
      child: Image.asset('images/taylor.jpg'),
    );
  }
}
Run interface:

Flutter packaging
Take Android as an example:
Change App icon
First of all, there is the problem with the icon of the App. Just change the icon in the following parts (the file name should be the same):

Don’t forget to change the icon reference setting:

Change app name
Then there is the name of the App:

Generate keystore
The next step is to generate the keystore. There are many pits here. The official writing is very simple. As long as you run the following code in the terminal, you can succeed, but the fact is that an error is reported:
keytool -genkey -v -keystore ~/key.jks -keyalg RSA -keysize 2048 -validity 10000 -alias key
I can't find this directory at all. It's really a pitfall. In fact, we just didn't configure environment variables. But it’s not worth configuring environment variables for a package; [but I configured hahaha]
At this time, you can use the following command to find the location of keytool.exe:
flutter doctor -v
What we are looking for here is actually this java address: at

this time you directly copy the command and enter it, but there is also a pitfall here, that is, if the folder is empty, you need to enclose it with quotes, for example:
D:\Program\Android\'Android Studio'\jre\bin\keytool -genkey -v -keystore ~/key.jks -keyalg RSA -keysize 2048 -validity 10000 -alias key
But I didn't. I should be like this:
C:\Users\86135\Downloads1\jre\bin\keytool -genkey -v -keystore ~/key.jks -keyalg RSA -keysize 2048 -validity 10000 -alias key
But because I have configured the environment, I am like this:
keytool -genkey -v -keystore ~/key.jks -keyalg RSA -keysize 2048 -validity 10000 -alias key
Is this all right? Then you are too naive, and you will still report an error:

The main problem of this error is that the directory does not exist and does not have write permissions, so we need to replace a directory with write permissions. We changed the command to the following form:
C:\Users\86135\Downloads1\jre\bin\keytool -genkey -v -keystore D:/key.jks -keyalg RSA -keysize 2048 -validity 10000 -alias key
Configure the environment directly:
keytool -genkey -v -keystore D:/key.jks -keyalg RSA -keysize 2048 -validity 10000 -alias key
At this time, it can be created successfully. There will be a Jks file under your D drive. Remember that this file cannot be shared with anyone.

With this key.jks file, you can go to the project directory androidfolder, create a file named key.properties and open paste the following code:
storePassword=<password from previous step>    //输入上一步创建KEY时输入的 密钥库 密码
keyPassword=<password from previous step>    //输入上一步创建KEY时输入的 密钥 密码
keyAlias=key
storeFile=<E:/key.jks>    //key.jks的存放路径
My file ended up like this:
storePassword=123123
keyPassword=123123
keyAlias=key
storeFile=D:/key.jks
Don't share it in this work, even if the key is generated successfully.
Configure key registration
After the key is generated, it needs to be configured in the build.gradle file. This process is actually very simple, just paste and copy something, you don't need to know the specific use of these files.
the first item:
/Android/app/build.gradle file into the project directory, in android{
front of this line, add the following code:
def keystorePropertiesFile = rootProject.file("key.properties")
def keystoreProperties = new Properties()
keystoreProperties.load(new FileInputStream(keystorePropertiesFile))

Replace the following code:
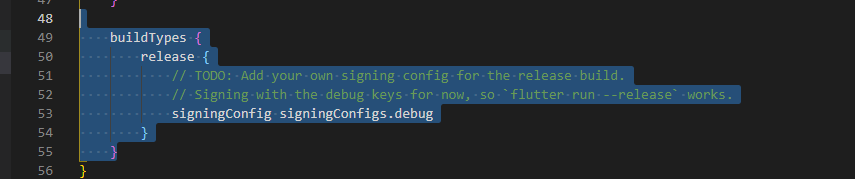
Replaced code:
signingConfigs {


    release {


        keyAlias keystoreProperties['keyAlias']
        keyPassword keystoreProperties['keyPassword']
        storeFile file(keystoreProperties['storeFile'])
        storePassword keystoreProperties['storePassword']
    }
}
buildTypes {


    release {


        signingConfig signingConfigs.release
    }
}
Generate apk
Directly in the terminal input flutter build apkon the package is successful, we can be entered directly in the terminal flutter installto make apk installed on a virtual machine;

this is a success:

After the success can be generated in the build -> app -> outputs - > apk folder to obtain the final The packaged apk file installation trial:
