Start from scratch, build a simple shopping platform (2): https://blog.csdn.net/time_____/article/details/105408640
Project source code (continuous update): https://gitee.com/DieHunter/myCode/ tree/master/shopping
This article adds a front-end interface based on the last server login
Before we start, we can simply use postman to test the function of token and login. You can generate a token on the backend and request it from the frontend.
Validation token (success and failure)


Then verify the user login (provided that the user information is added to the database in advance, the adding process and encryption will not be described in detail)
After the test is successful, we start to configure and write the front-end part (only realize the function, the interface is not high)
File structure:
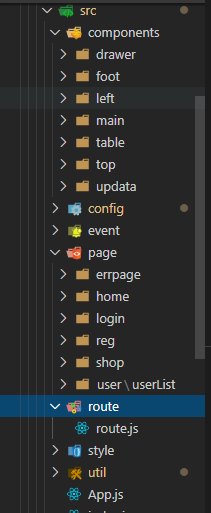
- Configure the config.js folder and create a new config.js file to store configuration constants (same as server-side config.js)
export default class Config { static Agreement = "http://"; static BaseUrl = "127.0.0.1"; static ServerUrl = ""; static ServerPort = ":1024"; static Path = "/"; static CryptoKey = "tokenkey";//加密信息关键字 static FilePath = this.Agreement + this.BaseUrl + this.ServerPort + this.Path; static ServerApi = {//接口名 token: "checkToken", user: { userLogin: "user/userLogin", } }; static StorageName = {//本地缓存localstorage名称 token: "token", userInfo: "userInfo" }; } - Create a new method in the utils file and place it in the prototype of react.component so that the inherited component can directly call
storage:import { Component } from "react"; class Utils { static saveStorage(key, val) {//添加缓存 localStorage.setItem(key, JSON.stringify(val)); } static getStorage(key) {//获取缓存 try { return JSON.parse(localStorage.getItem(key)); } catch (error) {} } static clearStorage(key) {//清除缓存 try { localStorage.removeItem(key); } catch (error) {} } } Component.prototype.$utils = Utils;axios:
import Config from "../config/config";
import Axios from "axios";
import { Component } from "react";
import { message } from "antd";
Axios.defaults.baseURL =
  Config.Agreement + Config.BaseUrl + Config.ServerPort + Config.Path;
// 添加请求拦截器
Axios.interceptors.request.use(
  function (config) {
    // 在发送请求之前做些什么
    return config;
  },
  function (error) {
    // 对请求错误做些什么
    return Promise.reject(error);
  }
);
// 添加响应拦截器
Axios.interceptors.response.use(
  function (response) {
    // 对响应数据做点什么
    if (response.data.result === -999) {
      //token验证失败
      return message.error(response.data.msg);
    }
    return response.data;
  },
  function (error) {
    console.log(error)
    // 对响应错误做点什么
    message.error("操作失败");
    return Promise.reject(error);
  }
);

Component.prototype.$axios = Axios;
Crypto:
import * as CryptoJS from "crypto-js"; import { Component } from "react"; import config from "../config/config"; const { CryptoKey } = config; class CryptoTool { /* Crypto加密方法 * @param {object} _data 对用户请求后端的参数进行加密 */ static setCrypto(_data) { let key = CryptoJS.enc.Utf8.parse(CryptoKey); let encrypted = CryptoJS.AES.encrypt(JSON.stringify(_data), key, { mode: CryptoJS.mode.ECB, padding: CryptoJS.pad.Pkcs7 }); return encrypted.toString(); } /* Crypto解密方法 * @param {string} _token 将秘文解密成对象形式 */ static getCrypto(_token) { let key = CryptoJS.enc.Utf8.parse(CryptoKey); let decrypt = CryptoJS.AES.decrypt(_token, key, { mode: CryptoJS.mode.ECB, padding: CryptoJS.pad.Pkcs7 }); return JSON.parse(CryptoJS.enc.Utf8.stringify(decrypt).toString()); } } Component.prototype.$crypto = CryptoTool; - Add these functions in index.js
import React from "react"; import ReactDOM from "react-dom"; import App from "./App"; import "./util/axios"; import "./util/utils"; import "./util/cryptoTool"; - Then add login.js in page/login, and after simply configure the login page, introduce the login page in App.js
import React from "react"; import Login from "./page/login/login" function App() { return ( <div className="App"> <Login></Login> </div> ); } export default App; - Find the login interface instance on the antd official website, copy most of them directly to the login interface, use less to fine-tune the following interface


- login.js
import React from "react"; import "./login.less"; import { Card, Form, Input, Button, Checkbox, message } from "antd"; import { UserOutlined, LockOutlined } from "@ant-design/icons"; import config from "../../config/config"; const { ServerApi, StorageName } = config; export default class Login extends React.Component { constructor(props) { super(props); this.checkToken(); //验证用户token是否过期 } render() { return ( <div className="cardBox"> <Card title="登录"> <Form name="normal_login" className="login-form" initialValues={ { remember: true }} onFinish={this.sendData} > <Form.Item name="username" rules={[ { required: true, message: "请输入用户名/邮箱", }, ]} > <Input className="infoInput" prefix={<UserOutlined className="site-form-item-icon" />} placeholder="用户名/邮箱" /> </Form.Item> <Form.Item name="password" rules={[ { required: true, message: "请输入密码", }, ]} > <Input className="infoInput" prefix={<LockOutlined className="site-form-item-icon" />} type="password" placeholder="密码" /> </Form.Item> <Form.Item> <Form.Item name="remember" valuePropName="checked" noStyle> <Checkbox>3天内免密</Checkbox> </Form.Item> <a className="login-form-forgot" href="#aaa"> 忘记密码 </a> </Form.Item> <Form.Item> <Button type="primary" htmlType="submit" className="login-form-button" > 登录 </Button> 或者<a href="#aaa">注册</a> </Form.Item> </Form> </Card> </div> ); } checkToken() { let token = this.$utils.getStorage(StorageName.token); if (!token) return; this.$axios .get(ServerApi.token, { params: { token }, }) .then((res) => { switch (res.result) { case 1: message.success(res.msg).then(() => { // this.props.history.push({ // pathname: "/admin/findshop", // query: res, // }); }); break; default: // message.warning(res.msg); break; } }) .catch((err) => { console.log(err); }); } sendData = (data) => { this.$axios .get(ServerApi.user.userLogin, { params: { crypto: this.$crypto.setCrypto(data) }, }) .then((res) => { switch (res.result) { case 1: this.$utils.saveStorage(StorageName.token, res.token); message.success(res.msg); // this.props.history.push({ // pathname: "/admin/findshop", // query: res, // }); break; default: message.warning(res.msg); break; } }) .catch((err) => { console.log(err); }); }; } - The effect is as follows:


User token verification, login function front-end + back-end basic realization
to sum up
The construction order of the front-end and back-end projects may be different, and the project cycle may be different. At this time, you need to use front-end and back-end data simulation and request simulation tools flexibly. The front-end can use easymock and mockjs to generate fake data, and the back-end is the simplest to directly put Browser url access (only for get), or use postman, SoapUI and other interface testing tools