Introduction
I wrote a small program recently, but the interface of the small program has to be accessed through https, so I forwarded it with nginx. Thinking that the Google search engine will increase the weight of the https website, I simply transformed my website to support both http and https. See effect
http access

https form access

I used LET'S ENCRYPT to generate the certificate. This should be the most used tool and it is very convenient.
I directly refer to the official document on using nginx on CentOS 7 to make the website support
https://certbot.eff.org/lets-encrypt/centosrhel7-nginx
1. Download
sudo yum install certbot python2-certbot-nginx2. Execute the command.
Modify the nginx.conf file in the /usr/local/nginx/conf directory by default
certbot --nginx -d www.erlie.ccIf you are not in this directory, you can use the parameter --nginx-server-root to specify
certbot --nginx --nginx-server-root=/yourpath -d www.erlie.cc If you want to generate for multiple domain names
-d 域名1 -d 域名2Or specify one each time and execute multiple times
. There will be two options 1 and 2 during the process
If you choose 1, you can access via HTTP and HTTPS.
If you choose 2, all requests coming through HTTP will be 301 redirected to HTTPS
You may encounter various environmental problems on the way, and Google can solve them.
I said a pit I encountered. I didn’t choose SSL module when compiling, so I had to recompile. After compiling, I restarted with the following command
nginx -s reloadAs a result, https access has been problematic, and then I realized it. The regenerated nginx in the sbin directory must be restarted to take effect.
nginx -s reload is only a hot deployment configuration file, the binary file nginx does not take effect
At this point http://www.erlie.cc and https://www.erlie.cc can be accessed
nginx.conf configuration
server {
	listen       80;
	server_name  www.erlie.cc;	#charset koi8-r;	access_log  /usr/local/nginx/logs/access.log combined;
	location = / {		root   /product/new-blog-fe/dist/view;		index  index.html;	}	location ~ .*\.html$ {		root   /product/new-blog-fe/dist/view;		index  index.html;	}	location / {		proxy_pass  http://127.0.0.1:8080/;
   }      location ~ .*\.(gif|jpeg|png|bmp|swf|flv|ico)$ {		root   /product/new-blog-fe;		if (-f $request_filename) {
		  expires 1d;
		  break;
	   }   }   location ~ .*\.(js|css)?$ {		root   /product/new-blog-fe;		if (-f $request_filename) {
		  expires 1d;
		  break;
	   }   }	#error_page  404              /404.html;
	# redirect server error pages to the static page /50x.html
	#	error_page   500 502 503 504  /50x.html;
	location = /50x.html {
		root   html;	}	listen 443 ssl; # managed by Certbot
	ssl_certificate /etc/letsencrypt/live/www.erlie.cc/fullchain.pem; # managed by Certbot	ssl_certificate_key /etc/letsencrypt/live/www.erlie.cc/privkey.pem; # managed by Certbot	include /etc/letsencrypt/options-ssl-nginx.conf; # managed by Certbot	ssl_dhparam /etc/letsencrypt/ssl-dhparams.pem; # managed by Certbot}123456789101112131415161718192021222324252627282930313233343536373839404142434445464748495051525354555657
The last 5 lines are automatically generated for you by the previous command, which is very convenient and does not need to be configured by yourself.
You can see that I forwarded all requests for the interface to the local http://127.0.0.1:8080/, you should have guessed that this is a Spring Boot project
How to write the front end?
In order to allow the front end to call the http interface when the visitor accesses it through http. Call the https interface when accessing via https, I do this
nb.js
var conf = {
    serverHot : window.location.origin};var _nb = {    request: function (param) {
        var _this = this;        $.ajax({            type       : param.method || 'get',
            url        : param.url || '',
            dataType   : param.type || 'json',
            data       : param.data || '',
            xhrFields  : {withCredentials: true},
            crossDomain: true,
            contentType: param.contentType || 'application/x-www-form-urlencoded;charset=UTF-8',
            success: function (res) {
            	typeof param.success === 'function' && param.success(res.data, res.msg);
            },            error: function (err) {
            	typeof param.error === 'function' && param.error(err.statusText);
            }        })    },    // 获取服务器地址    getServerUrl : function(path) {
        return conf.serverHot + path;
    }}module.exports = _nb;123456789101112131415161718192021222324252627282930
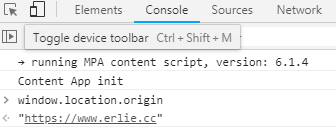
window.location.origin to get a request address like https://www.erlie.cc, you can try it yourself in the browser

user-service.js requests user-related interfaces
var _nb = require('util/nb.js');
var _user = {    // 用户登录    login : function(userInfo, resolve, reject){
        _nb.request({            url     : _nb.getServerUrl('/user/login'),
            data    : userInfo,            method  : 'POST',
            success : resolve,            error   : reject
        });    }}module.exports = _user;123456789101112131415
userInfo is the request parameter
resolve is the function executed after the call is successful
reject is the function executed after the call fails
Automatic renewal
Let's Encrypt's certificate expires in 90 days, so you have to set up an automated update script. The easiest way is to use crontab. Use the crontab -e command to add the following timing job (mandatory update every month) input
0 0 * * * certbot renew