Article Directory
Summary
"Python crawler development and project combat" by Qiye Dazhi. I have bought it for many years and learned a lot of things. Basically, crawlers are learned here. The later scrapy framework crawlers have been out of doors. I made up some time ago. The knowledge of the object below suddenly realized today! Write a note to record the learning process
1.scrapy installation
# -i参数后跟清华镜像源,加速下载,其他pip的包也可这么操作
pip install Scrapy -ihttps://pypi.tuna.tsinghua.edu.cn/simple
The test as shown below indicates that the installation is successful

Other reference methods: win7 install scrapy
2. Introduction to related commands
The scrapy command is divided into
- Global commands: global commands can be used everywhere;
- Project order: Project order is the project that can only rely on you;
2.1 Global commands
Global commands are those commands that actively jump out during the installation test in the above figure
startproject、genspider、settings、runspider、shell、fetch、view、version
There are three more commonly used:
scrapy startproject project_name # 创建项目
scrapy crawl spider_name # 运行名为spider_name的爬虫项目
# 调试网址为https://blog.csdn.net/qq_35866846的网站
scrapy shell "https://blog.csdn.net/qq_35866846"
The global command does not depend on the existence of the project, that is, you can run
it regardless of whether you have a project or a project. For example: startproject is a command to create a project, and it can be run without a project;
Detailed usage instructions:
-
start project
# 使用频次最高,用于项目创建,eg:创建一个名为:cnblogSpider的项目 scrapy strartproject cnblogSpider -
genspider
# 用于创建爬虫模板,example是spider名称,生成文件在spiders下面,也是后面写爬虫的地方
# 注意spider名称不能和项目相同
scrapy genspider example example.com
For details, please refer to the scrapy command: detailed scrapy genspider
-
settings
# 查看scray参数设置 scrapy settings --get DOWNLOAD_DELAY # 查看爬虫的下载延迟 scrapy settings --get BOT_NAME # 爬虫的名字 -
In addition to using the aforementioned scrapy crawl XX, the runspider running spider can also use: runspider;
crawl is based on project operation, and runspider is based on file operation, which
means that you have written a py file in accordance with the spider format of scrapy. If you don’t want to create a project, you can use runspider, eg: I wrote a test.py spider. You just run it directly:scrapy runspider test.py -
shell
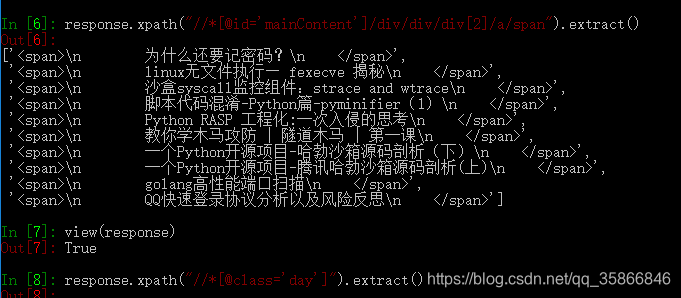
# 这个命令比较重要,主要是调试用,里面还有很多细节的命令
# 最简单常用的的就是调试,查看我们的选择器到底有木有正确选中某个元素

scrapy shell "https://www.cnblogs.com/qiyeboy/default.html?page=1"

# 然后我们可以直接执行response命令,
#比如我们要测试我们获取标题的选择器正不正确:

response.css("title").extract_first()

# 以及测试xpath路径选择是否正确
response.xpath("//*[@id='mainContent']/div/div/div[2]/a/span").extract()
-
The fetch
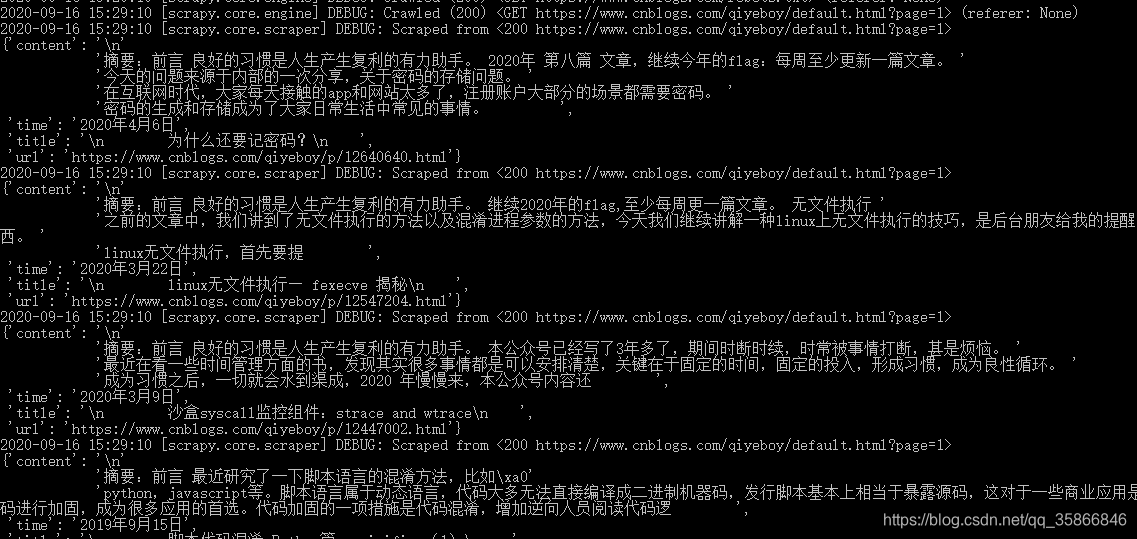
command can actually be attributed to the category of debugging commands! Its function is to simulate our spider download page, that is to say, the page downloaded with this command is the page downloaded when the spider is running. The advantage of this is that it can accurately diagnose whether the html structure we have obtained is what we see After arriving, we can adjust our crawler strategy in time! For example, we can usually see the Taobao details page, but if you can't climb it in the usual way, you are a god horse? Because it uses asynchronous transmission! Therefore, when you find that you can’t get the content, you have to be vigilant and feel like using the fetch command to take down its html code to see if there is any tag node we want, if there is no , You have to understand that we need to use technologies such as js rendering! The usage is very simple:scrapy fetch http://www.scrapyd.cnIn this way, if you want to save the downloaded page to an html file for analysis, we can use the window or linux output command. Here is how to save the downloaded page under the window as follows:
scrapy fetch http://www.scrapyd.cn >d:/3.html
As you can see, after this command, the html file downloaded by scrapy has been stored, and then you can look for the full text to see if there is a node. If there is, there is no suspense. Asynchronous loading is used! -
view
# 和fetch类似都是查看spider看到的是否和你看到的一致,便于排错
scrapy view https://blog.csdn.net/qq_35866846
- version
# 查看scrapy版本
scrapy version
2.2 Project commands
The project command is relatively simple, I feel that there is nothing to say, and I didn’t test it in detail, just
refer to this [scrapy command line: scrpay project command]
3. Introduction to scrapy framework
Scrapy is a Crawler Framework written in python. It is simple, lightweight, and very convenient. Using Twisted, a network library to handle network communication, has a clear architecture and contains various middleware interfaces, which can flexibly complete various requirements. The structure is as follows
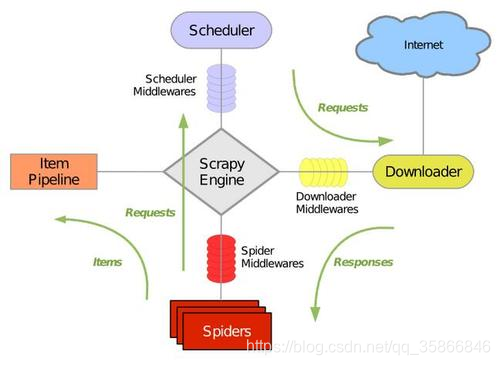
- Scrapy Engine (Engine): The engine is responsible for controlling the flow of data in all components of the system, and triggering events when corresponding actions occur;
- Scheduler (Scheduler): The scheduler receives requests from the engine and enqueues them in order to provide the engine when the engine requests a request;
- Downloader (Downloader): The downloader is responsible for obtaining page data and providing it to the engine, and then providing it to the Spider;
- Spider: Spider is a class written by Scrapy users to analyze Response and extract the Item (ie the obtained Item) or additional URL for follow-up. Each Spider is responsible for processing a specific (or some) website
- Item Pipeline: Item Pipeline is responsible for processing the Item extracted by the Spider. Typical processing includes cleaning, verification and persistence (such as storage in a database);
- Downloader middlewares: Downloader middlewares are specific hooks between the engine and the downloader, which process the Response passed by the Downloader to the engine. It provides a simple mechanism to extend Scrapy functionality by inserting custom code;
- Spider middleware (Spider middlwares): Spider middleware is a specific hook between the engine and the Spider, which handles the input (response) and output (items and request) of the Spider, which provides a simple mechanism by inserting Custom code to realize Scrapy function.
4. Circulation of data stream in Scrapy
-
The engine opens a website (open a domain), finds the spider processing the website and requests the spider the first URL to be crawled
-
The engine obtains the first URL to be crawled from the Spider and dispatches it with Request through the scheduler (Schedule)
-
The engine requests the next URL to be crawled from the scheduler
-
The scheduler returns the next URL to be crawled to the engine, and the engine down URL is forwarded to the downloader through the download middleware (request direction)
-
Once the page is downloaded, the downloader generates a response for the page and sends it to the engine through the download middleware (return (response) direction)
-
The engine receives the Response from the downloader and sends it to the Spider for processing through the Spider middleware (input direction)
-
Spider processes the Response and returns the crawled Item and (follow-up) new Request to the engine
-
The engine sends the crawled Item (returned by Spider) to the Item Pipeline, and sends the Request (returned by Spider) to the scheduler
-
(From the second step) Repeat until there are no more Requests in the scheduler and the engine closes the website
5. The first scrapy crawler
The case project of Seven Nights Boss "", because the book was bought earlier, it still uses python2
to do it yourself in the python3 environment.
5.1 Create Project
# 创建一个名为cnblogSpider 的Scrapy项目
scrapy startproject cnblogSpider

After the project is created, open it directly with pycharm and continue to work. The
structured file is automatically generated and the frame is filled.

- scrapy.cfg: project deployment file
- cnblogSpider/: Python module for the project, you can add code here later
- cnblogSpider/items.py: Item file in the project
- cnblogSpider/pipelines.py: Pipelines file in the project
- cnblogSpider/settings.py: project configuration file
- cnblogSpider/spiders/: The directory where Spider code is placed
5.2 Create a crawler module
from ..items import CnblogspiderItem
class CnblogsSpider(scrapy.Spider):
    name = "cnblogs"  # 爬虫的名称
    allowed_domains = ["cnblogs.com"]  # 允许的域名
    start_urls = [
        "https://www.cnblogs.com/qiyeboy/default.html?page=1"
    ]

    def parse(self, response):
        # 实现网页解析
        # 首先抽取所有文章
        papers = response.xpath("//*[@class='day']")
        # 从每篇文章中抽取数据
        for paper in papers:
            url = paper.xpath(".//*[@class='postTitle']/a/@href").extract()[0]
            title = paper.xpath(".//*[@class='postTitle']/a/span/text()").extract()[0]
            time = paper.xpath(".//*[@class='dayTitle']/a/text()").extract()[0]
            content = paper.xpath(".//*[@class='postCon']/div/text()").extract()[0]
            # print(url, title, time, content)
            item = CnblogspiderItem(url=url, title=title, time=time, content=content)
            yield item
        next_page = Selector(response).re(u'<a href="(\S*)">下一页</a>')
        if next_page:
            yield scrapy.Request(url=next_page[0], callback=self.parse)
5.3 define item
# Define here the models for your scraped items
#
# See documentation in:
# https://docs.scrapy.org/en/latest/topics/items.html

import scrapy


class CnblogspiderItem(scrapy.Item):
    # define the fields for your item here like:
    # name = scrapy.Field()
    url = scrapy.Field()
    time = scrapy.Field()
    title = scrapy.Field()
    content = scrapy.Field()


class newCnblogsItem(CnblogspiderItem):
    body = scrapy.Field()
    # title = scrapy.Field(CnblogspiderItem.Fields['title'], serializer = my_serializer)
5.4 Build Item Pipeline
# Define your item pipelines here
#
# Don't forget to add your pipeline to the ITEM_PIPELINES setting
# See: https://docs.scrapy.org/en/latest/topics/item-pipeline.html


# useful for handling different item types with a single interface
from itemadapter import ItemAdapter
import json
from scrapy.exceptions import DropItem
from .items import CnblogspiderItem


class CnblogspiderPipeline(object):
    def __init__(self):
        self.file = open('papers.json', 'w', encoding='UTF-8')

    def process_item(self, item, spider):
        if item['title']:
            line = json.dumps(dict(item)) + '\n'
            # print(type(line))
            # self.file.write(line.encode())
            # 注意open "wb" 写入的是字节流,“w”写入的是str
            # 使用decode 和 encode进行字节流和str的相互转化
            self.file.write(line)
            return item
        else:
            raise DropItem(f"Missing title in {item}")
5.5 Activate Item Pipeline
After customizing the Item Pipeline, it cannot work and needs to be activated. To enable an Item Pipeline component,
you must add its class to the ITEM_PIPELINES variable in settings.py
The automatically created Scrapy can directly uncomment the line in settings.py
There are many Item Pipeline components that can be configured in the TEM_PIPELINES variable. The integer value assigned to each class determines their running order. The item passes through the Item Pipeline in the order of numbers from low to high, with a value range of 0 ~ 1000
ITEM_PIPELINES = {


   'cnblogSpider.pipelines.CnblogspiderPipeline': 300,
}
After activation, switch the command line to the project directory to execute
scrapy crawl cnblogs
Reference
[1] The book "python crawler development and project combat" and the book code
[2] scrapy1.5 Chinese document