minicom is a command line serial port tool under linux system.
Open the terminal and enter the installation command:
sudo apt-get install minicom
Open minicom after installation
sudo minicom
Press ctrl-a x or ctrl-a q to exit minicom
Configuration
Enter sudo minicom -s, and note that sudo must be added in the front, otherwise the permission issue of "cannot write to /etc/minicom/minirc.dfl" will appear after we configure!
The following setting interface pops up
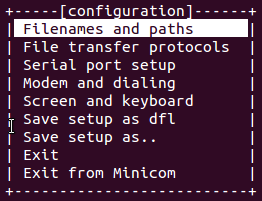
Use the arrow keys to select Serial port setup, press Enter to enter the setting environment, as shown in the figure below

Enter a or A, select the serial device
After configuring the serial device, press Enter, then enter E, configure the baud rate, and press the default configuration to be 115200 8N1 (Baud rate: 115200, data bits: 8, parity bit: N none, stop bit: 1 ).
After configuring the baud rate, press Enter, then enter F, configure hardware flow control, and select NO
Then continue to configure the software flow control, and select NO. After all configurations are completed, press Enter to return to the previous interface, select save setup as dfl (that is, save the default configuration), and then select Exit to close minicom.
use
Enter the command sudo minicom again, the configuration just now takes effect, you can see the serial port output information
When using minicom to view the log, today I found that I could not enter the command line mode to enter the command. I found that the key point is in the configuration of the serial port. The serial port setup-->Hardware Flow Contorl option was changed to Yes. , So that the keyboard is useless and cannot accept any input. Just change him to No. The specific modification operation is as follows: allen@allen-ubuntu:~$ sudo minicom /dev/ttyUSB0 (After the modification, the saving permission problem requires root permission)
After entering minicom, press Ctrl+A and then press the letter key O to enter the configure Minicom interface and enter the Serial port setup interface. At this time, the F-Hardware Flow Contorl item is Yes, and press the F key to change it to No, that is, close the hardware flow control, and return Return to the upper menu and select Save setup as _dev_ttyUSB0 to save the configuration modification. Then you can enter commands.
The usage of the key combination is: first press the Ctrl+A key combination, then release the two keys, and then press the Z key. There are also some commonly used key combinations.
(1) S key: send files to the target system;
(2) W key: automatic scrolling. When the displayed content exceeds one line, the following content is automatically wrapped. This feature is useful when viewing the boot information of the kernel.
(3) C key: clear the display content on the screen;
(4) B key: browse the history display of minicom;
(5) X key: exit mInicom, it will prompt to confirm exit.
3、配置文件所在目录
Ctrl + A --> O
+-----[configuration]------+
| Filenames and paths |
| File transfer protocols -|
| Serial port setup |
| Modem and dialing |
| Screen and keyboard |
| Save setup as dfl |
| Save setup as.. |
| Exit |
+--------------------------+
选择"Filenames and paths"
+-----------------------------------------------------------------------+
| A - Download directory : /home/crliu |
| B - Upload directory : /tmp |
| C - Script directory : |
| D - Script program : runscript |
| E - Kermit program : |
| F - Logging options |
| |
| Change which setting? |
+-----------------------------------------------------------------------+
(1) A-download The storage location of the downloaded file (development board ---> PC)
The files on the development board will be transferred to the /home/crliu directory on the PC.
(2) B-upload Read the uploaded file from here (PC ---> development board) The
PC sends files to the development board. The files to be sent are in the /tmp directory (the directory on the PC). After doing this configuration, every time you send a file to the development board, you only need to enter the file name instead of the absolute path of the directory where the file is located.