**hadoop搭建集群**1. Turn off the firewall
1) Check the firewall status
firewall-cmd --state
2) Stop the firewall
systemctl stop firewalld.service
3) Disable the firewall from starting up
systemctl disable firewalld.service
2. Time synchronization
command line input: yum install ntp Download the ntp plugin,
After the download is complete, enter the command line: ntpdate -u ntp1.aliyun.com
and then enter the command line: date
If the following conditions appear, the configuration is successful: 
3. Configure the server (here I take 4 as an example)
1 master node: doop1 ( 192.168.0.103), 2 (slave) child nodes, doop2 (192.168.0.104), doop3 (192.168.0.105), doop4 (192.168.0.106)
2. Configure the master node name (192.168.0.103)
at the command line and enter: vi / etc / sysconfig / network
add content:
NETWORKING = yes
HOSTNAME = doop1
configure three child node names (192.168.0.104), (192.168.0.105), (192.168.0.106):
vi / etc / sysconfig / network
add content:
NETWORKING = yes
HOSTNAME = doop2
vi / etc / sysconfig / network
add content:
NETWORKING = yes
HOSTNAME = doop3
vi / etc / sysconfig / network
add content:
NETWORKING = yes
HOSTNAME = doop4
4. Configure hosts to
open the hosts file of the master node Comment out two lines (comment the information of the current host) and add all the host information of the hadoop cluster in the file.
Enter in the command line: vi / etc / hosts
add the node name information of 3 servers
192.168.0.103 doop1
192.168.0.104 doop2
192.168.0.105 doop3
192.168.0.106 doop4
save, copy the hosts of the master node to the other two sub-node
commands Enter the following lines:
scp / etc / hosts [email protected]: / etc /
scp / etc / hosts [email protected]: / etc /
scp / etc / hosts [email protected]: / etc /
and then execute ( (Restart the server without executing the following statement): / bin / hostname hostsname
5, configure ssh passwordless access to
generate a public key key pair
Execute on each node separately:
Command line input: ssh-keygen -t rsa and
press Enter until the generation is completed. After the
execution is completed, two files id_rsa and id_rsa are generated in the /root/.ssh/ directory on each node. pub
The former is the private key, and the latter is the public key
executed on the master node:
scp /root/.ssh/id_rsa.pub root @ doop2: /root/.ssh/
scp /root/.ssh/id_rsa.pub root @ doop3: /root/.ssh/
scp /root/.ssh/id_rsa.pub root @ doop4: /root/.ssh/Enter
the following command in all sessions of the xshell window: 
cd /root/.ssh/
cp id_rsa.pub authorized_keys
Finally, test whether the configuration is successful.
Run
ssh doop2 on doop1 and
ssh doop3
can jump to the operation interface of the two child nodes correctly. Similarly, you can log in to the master node and other child nodes in the same way in each child node without password. It means the configuration is successful.
6. Install jdk (all four machines must be installed)
Install in the same location /usl/local/jdk1.8.0_191
Download JDK: https://www.oracle.com/technetwork/java/javase/downloads/jdk8-downloads- 2133151.html
Unzip the JDK: tar -zxvf /usr/local/jdk-8u73-linux-x64.gz
Configure environment variables, edit the profile file:
vi / etc / profile
Add the following code at the end of the profile file:
export JAVA_HOME = / usr / local / jdk1 .8.0_191
export PATH = $ JAVA_HOME / bin: $ PATH
export CLASSPATH = $ JAVA_HOME / lib: $ JAVA_HOME / jre / lib to
save the file you just edited: source / etc / profile to
test whether the installation was successful: java -version
7. Install hadoop. The
installation location is customized. For example, install it under the / usr / local directory to
download the hadoop package:
https://www.apache.org/dyn/closer.cgi/hadoop/common/hadoop-2.7.7/hadoop- 2.7.7.tar.gz is
placed in the / usr / local directory, extract the hadoop
tar -zxvf hadoop-2.7.7.tar.gz
to generate the hadoop-2.7.7 directory under usr.
Configure the environment variables:
vi / etc / profile
in Add at the end:
export HADOOP_HOME = / usr / local / hadoop-2.7.7
export PATH = $ PATH: $ HADOOP_HOME / bin: $ HADOOP_HOME / sbin
Save the newly edited profile to take effect:
source / etc / profile
8. Configure hadoop
configuration hadoop configuration
file The location of the file to be configured is / usr / local / hadoop -2.7.7 / etc / hadoop, the following files need to be modified:
hadoop-env.sh
yarn-env.sh
core-site.xml
hdfs-site.xml
mapred-site.xml
yarn-site.xml
slaves
masters
In both hadoop-env.sh and yarn-env.sh, add the jdk environment variable
hadoop-env.sh and
add the following code:
export JAVA_HOME = / usr / local / jdk1.8.0_191 to the following location: 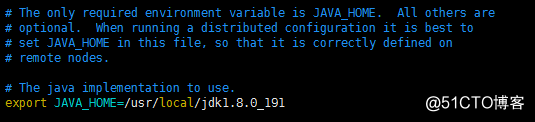
yarn-env.
Add the following code in sh :
export JAVA_HOME = / usr / local / jdk1.8.0_191 to the following location: add the following code 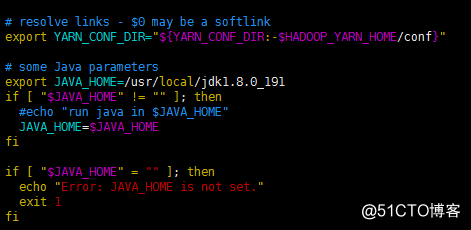
in core-site.xml
:
<configuration>
<!-Data transmission port- >
<property>
<name>fs.defaultFS</name>
<value>hdfs://doop1:9000</value>
</property>
<property>
<name>io.file.buffer.size</name>
<value>131072</value>
</property>
<!--hadoop临时目录,fsimage临时文件也会存在这个目录,数据不能丢-->
<property>
<name>hadoop.tmp.dir</name>
<value>file:/usr/temp</value>
</property>
<property>
<name>hadoop.proxyuser.root.hosts</name>
<value></value>
</property>
<property>
<name>hadoop.proxyuser.root.groups</name>
<value></value>
</property><configuration>:hdfs-site.xmlAdd the following code to.Note: The temp folder under the path after file in the above code needs to be created by himself
</ configuration>
<!--secondary namenode配置-->
<property>
<name>dfs.namenode.secondary.http-address</name>
<value>doop4:50090</value>
</property>
<property>
<name>dfs.namenode.secondary.https-address</name>
<value>doop4:50091</value>
</property>
<property>
<name>dfs.namenode.name.dir</name>
<value>file:/usr/dfs/name</value>
</property>
<property>
<name>dfs.datanode.data.dir</name>
<value>file:/usr/dfs/data</value>
</property>
<property>
<name>dfs.replication</name>
<value>2</value>
</property>
<property>
<name>dfs.webhdfs.enabled</name>
<value>true</value>
</property>
<property>
<name> dfs.permissions </ name>
<value> false </ value>
</ property>
<property>
<name> dfs.web.ugi </ name>
<value> supergroup </ value>
</ property>
</ configuration> The
configuration of the DataNode host name in slaves is
modified to:
doop2
doop3
doop4
masters The configuration of SecondaryNameNode host name is
modified to:
doop4 in
mapred-site.xml
(note that mapred-site.xml.template should be renamed to .xml File mv mapred-site.xml.template mapred-site.xml)
add the following code:
<configuration>
<property>
<name> mapreduce.framework.name </ name>
<value> yarn </ value>
</ property>
<property>
<name>mapreduce.jobhistory.address</name>
<value>doop1:10020</value>
</property>
<property>
<name>mapreduce.jobhistory.webapp.address</name>
<value>doop1:19888</value>
</property>
</configuration>
yarn-site.xml中
添加如下代码:
<configuration>
<property>
<name>yarn.nodemanager.aux-services</name>
<value>mapreduce_shuffle</value>
</property>
<property>
<name>yarn.nodemanager.aux-services.mapreduce.shuffle.class</name>
<value>org.apache.hadoop.mapred.ShuffleHandler</value>
</property>
<property>
<name>yarn.resourcemanager.address</name>
<value>doop1:8032</value>
</property>
<property>
<name>yarn.resourcemanager.scheduler.address</name>
<value>doop1:8030</value>
</property>
<property>
<name>yarn.resourcemanager.resource-tracker.address</name>
<value>doop1:8031</value>
</property>
<property>
<name>yarn.resourcemanager.admin.address</name>
<value>doop1:8033</value>
</property>
<property>
<name>yarn.resourcemanager.webapp.address</name>
<value>doop1:8088</value>
</property>
</configuration>
拷贝hadoop安装文件到子节点
主节点上执行:
rm -rf /usr/local/hadoop-2.7.7/share/doc/
scp -r /usr/local/hadoop-2.7.7 root@doop2:/usr/local/
scp -r /usr/local/hadoop-2.7.7 root@doop3:/usr/local/
scp -r /usr/local/hadoop-2.7.7 root @ doop4: / usr / local /
Copy the profile to the
master node of the child node and execute:
scp / etc / profile root @ doop2: / etc /
scp / etc / profile root @ doop3: / etc /
scp / etc / profile root @ doop4: / etc /
validate the new profile on the three child nodes:
source / etc / profile
Configure the Hadoop environment variable
vi ~ / .bash_profile
at the end and add:
export HADOOP_HOME = / usr / local / hadoop-2.7.7
export PATH = $ PATH: $ HADOOP_HOME / bin: $ HADOOP_HOME / sbin
scp ~/.bash_profile root@doop2:/root/
scp ~/.bash_profile root@doop3:/root/
scp ~/.bash_profile root@doop4:/root/
加载配置
source ~/.bash_profile
Format the namenode of the masternode
, enter the hadoop directory on the masternode and execute:
hdfs namenode -format
Tip: Successfully formatted indicates successful formatting
Start the Hadoop
master node and execute it in the Hadoop directory:
start-all.sh
stop Hadoop
stop-all.sh
The jps process on the master node is as follows: The jps process on each child node of the
NameNode
ResourceManager
is as follows:
DataNode
NodeManager
doop will have multiple processes
SecondaryNameNode.
If this means that the Hadoop cluster configuration is successful
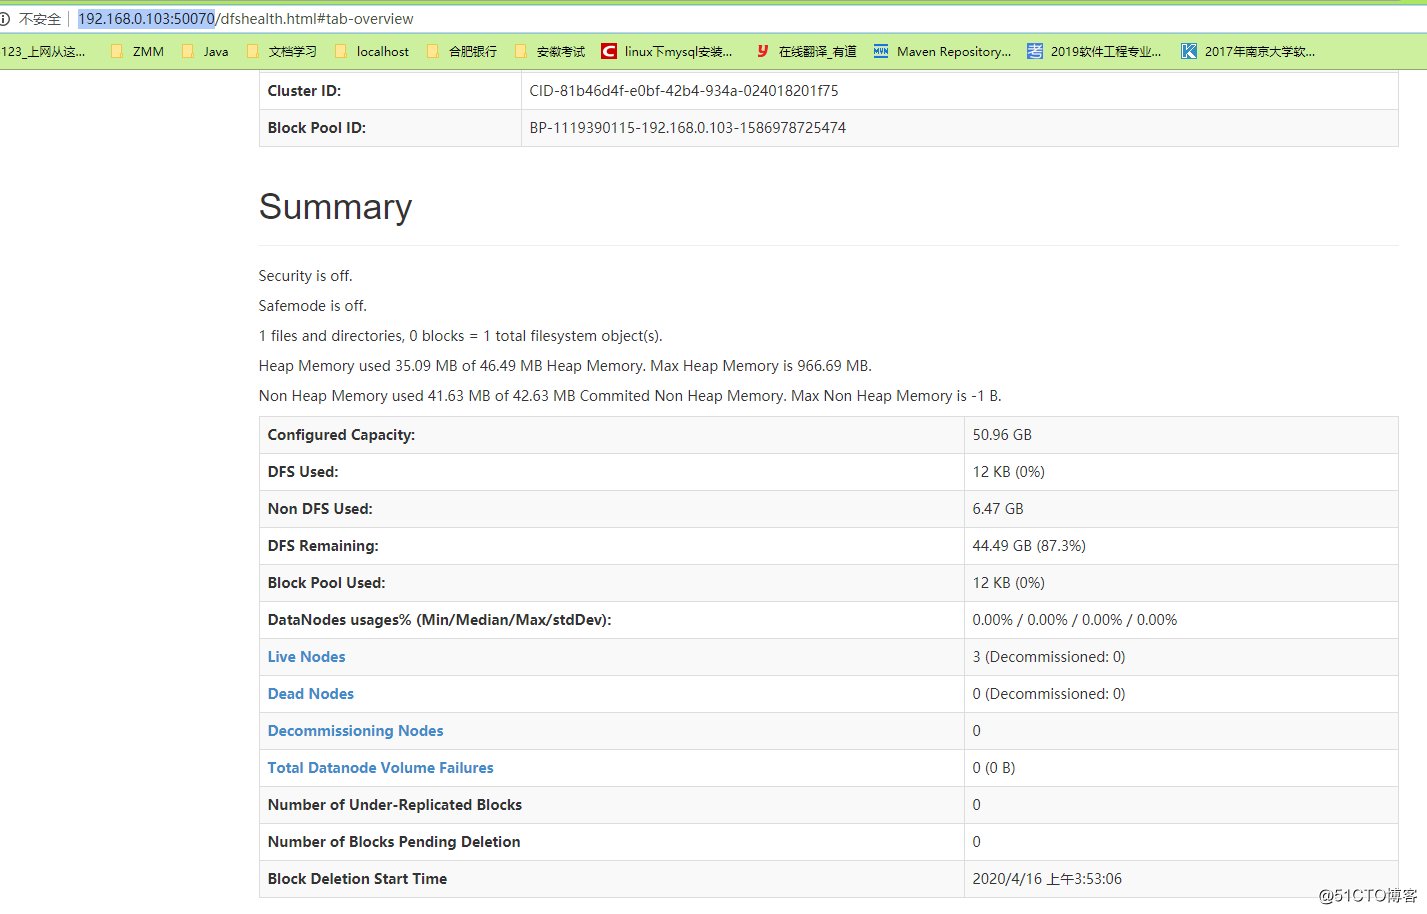
Access address http://192.168.0.103:50070/
If you want to access by host name, you need to configure the Windows host file
and then look at the page