@
- introduction
- 1. Introduction of HttpRunner
- Second, the design concept of HttpRunner
- 3. The core features of HttpRunner
- Fourth, the HttpRunner framework process
- Five, HttpRunner quickly get started
- Six, HttpRunner project structure
- Seven, HttpRunner test case organization
- Nine, HttpRunner test case layering
- Ten, HttpRunner hook mechanism
- 11. More exploration
introduction
There are many implementation schemes for interface automation testing. Those without programming foundation can use Postman + Newman or Jmeter + Ant to implement, and those with programming foundation can be combined with automated testing framework. Python-based test frameworks are: Unittest, HttpRunner, Robot Framework, Pytest, etc. This article mainly explains HttpRunner, which is a popular and practical framework at the moment, which can realize various tests such as automated testing, performance testing, online monitoring, continuous integration, etc. demand.
Note:
This article is longer, mainly showing the framework features, process, structure, use case organization and quick start tutorial of HttpRunner. If you digest the content of this article, you can basically get started, the next step is to continue a lot of practice
1. Introduction of HttpRunner
HttpRunner is a general testing framework for the HTTP (S) protocol. You only need to write and maintain a YAML / JSON script to achieve various testing needs such as automated testing, performance testing, online monitoring, and continuous integration.
Second, the design concept of HttpRunner
1. Pursue not to reinvent the wheel
2. Follow the rule that convention is greater than configuration
3. Pursue input-output ratio
3. The core features of HttpRunner
1. Inherit all the characteristics of Requests
2. Use YAML / JSON to describe test scenarios to ensure the uniformity and maintainability of test case descriptions
3. With helper functions (debugtalk.py), easily implement complex dynamics in test scripts Computational logic
4. Support perfect test case layering mechanism to fully realize test case reuse
5. Support perfect hook mechanism before and after testing
6. Response results support rich check mechanism
7. Implement interface recording and use case generation based on HAR (Har2case)
8. Combined with the Locust framework, distributed performance testing can be achieved without additional work.
9. The execution method uses CLI calls, which can be perfectly combined with continuous integration tools such as Jenkins.
10. The test result statistical report is concise and clear, with detailed statistical information And log records
11. Extremely extensible, easily realize secondary development and Web platformization
Fourth, the HttpRunner framework process

Five, HttpRunner quickly get started
1. Environmental preparation
1. Operating environment: Python 3.4 or above is recommended
2. Installation method: pip install httprunner
3. Installation verification: open cmd, enter the following command to verify, and the version number indicates successful installation
C:\Users\luoluo>hrun -V
2.5.7
C:\Users\luoluo>har2case -V
0.3.1
2. Script recording
In order to simplify the writing of test cases, interface capture can be done through packet capture tools, such as Fiddler, Charles, etc., and then exported to the standard and universal HAR format (HTTP Archive), and then the HAR format data packets are converted to YAML / JSON through HttpRunner The format of the test case file, the corresponding conversion tool is: har2case
The following uses Fiddler as an example to perform script recording and export.
Operation steps:
Select the interface to be converted (multiple choice or all choice), click Flie-> Export Sessions in the menu -> Selected session (select HTTP Archive v1.1 type) can be saved locally


The method of recording with Charles is almost the same. The operation steps are: select the interface to be converted (multiple selection or all selection), right-click, click [Export ...] in the suspended menu directory, and select HTTP Archive (.har) as the format ) And save it
3. Script generation
1. Convert HAR to the default JSON script, the conversion command is: har2case filename.har
C:\Users\luoluo\Desktop>har2case test1.har
INFO:root:Start to generate testcase.
INFO:root:dump testcase to JSON format.
INFO:root:Generate JSON testcase successfully: test1.json
2. Convert HAR to YAML script, the conversion command is: har2case -2y filename.har
C:\Users\luoluo\Desktop>har2case -2y test1.har
INFO:root:Start to generate testcase.
INFO:root:dump testcase to YAML format.
INFO:root:Generate YAML testcase successfully: test1.yml
At this point, you can see that the file in the corresponding format has been generated locally.

Let's open it and take a look at the content. Due to privacy issues, the actual domain name has been temporarily modified:
The following code is in .json format.
{
    "config": {
        "name": "testcase description",
        "variables": {}
    },
    "teststeps": [
        {
            "name": "/api/trend/webinfo/getnavs",
            "request": {
                "url": "{{HOST}}/api/trend/webinfo/getnavs",
                "params": {
                    "gender_id": "72105",
                    "no_cache": "1"
                },
                "method": "GET",
                "headers": {
                    "Sec-Fetch-Dest": "empty",
                    "Authorization": "",
                    "User-Agent": "Mozilla/5.0 (Windows NT 10.0; Win64; x64) AppleWebKit/537.36 (KHTML, like Gecko) Chrome/80.0.3987.132 Safari/537.36",
                    "Content-Type": "application/json;charset=utf-8;",
                    "Sec-Fetch-Site": "cross-site",
                    "Sec-Fetch-Mode": "cors",
                    "If-None-Match": "W/\"9b200f8fd6b4e23ffd2c77a44e50ba275fdb123c\""
                }
            },
            "validate": [
                {
                    "eq": [
                        "status_code",
                        200
                    ]
                },
                {
                    "eq": [
                        "headers.Content-Type",
                        "application/json"
                    ]
                },
                {
                    "eq": [
                        "content.status_code",
                        200
                    ]
                },
                {
                    "eq": [
                        "content.message",
                        "ok"
                    ]
                }
            ]
        },
        {
            "name": "/api/trend/search/get-recommand",
            "request": {
                "url": "{{HOST}}/api/trend/search/get-recommand",
                "params": {
                    "gender_id": "72105"
                },
                "method": "GET",
                "headers": {
                    "Sec-Fetch-Dest": "empty",
                    "Authorization": "",
                    "User-Agent": "Mozilla/5.0 (Windows NT 10.0; Win64; x64) AppleWebKit/537.36 (KHTML, like Gecko) Chrome/80.0.3987.132 Safari/537.36",
                    "Content-Type": "application/json;charset=utf-8;",
                    "Sec-Fetch-Site": "cross-site",
                    "Sec-Fetch-Mode": "cors",
                    "If-None-Match": "W/\"c404d82a8ca9667a6e891907cc6ac7f17edc5143\""
                }
            },
            "validate": [
                {
                    "eq": [
                        "status_code",
                        200
                    ]
                },
                {
                    "eq": [
                        "headers.Content-Type",
                        "application/json"
                    ]
                },
                {
                    "eq": [
                        "content.status_code",
                        200
                    ]
                },
                {
                    "eq": [
                        "content.message",
                        "ok"
                    ]
                }
            ]
        },
    ]
}
The following is in .yml format:
config:
    name: testcase description
    variables: {}
teststeps:
-   name: /api/trend/webinfo/getnavs
    request:
        headers:
            Authorization: ''
            Content-Type: application/json;charset=utf-8;
            If-None-Match: W/"9b200f8fd6b4e23ffd2c77a44e50ba275fdb123c"
            Sec-Fetch-Dest: empty
            Sec-Fetch-Mode: cors
            Sec-Fetch-Site: cross-site
            User-Agent: Mozilla/5.0 (Windows NT 10.0; Win64; x64) AppleWebKit/537.36
                (KHTML, like Gecko) Chrome/80.0.3987.132 Safari/537.36
        method: GET
        params:
            gender_id: '72105'
            no_cache: '1'
        url: ${ENV(HOST)}/api/trend/webinfo/getnavs
    validate:
    -   eq:
        - status_code
        - 200
    -   eq:
        - headers.Content-Type
        - application/json
    -   eq:
        - content.status_code
        - 200
    -   eq:
        - content.message
        - ok
-   name: /api/trend/search/get-recommand
    request:
        headers:
            Authorization: ''
            Content-Type: application/json;charset=utf-8;
            If-None-Match: W/"c404d82a8ca9667a6e891907cc6ac7f17edc5143"
            Sec-Fetch-Dest: empty
            Sec-Fetch-Mode: cors
            Sec-Fetch-Site: cross-site
            User-Agent: Mozilla/5.0 (Windows NT 10.0; Win64; x64) AppleWebKit/537.36
                (KHTML, like Gecko) Chrome/80.0.3987.132 Safari/537.36
        method: GET
        params:
            gender_id: '72105'
        url: ${ENV(HOST)}/api/trend/search/get-recommand
    validate:
    -   eq:
        - status_code
        - 200
    -   eq:
        - headers.Content-Type
        - application/json
    -   eq:
        - content.status_code
        - 200
    -   eq:
        - content.message
        - ok
It can be seen that the yaml format looks more concise
4. Execute the script
The command to execute the script is: hrun filename.json or hrun filename.yml
The following is the execution status. Due to privacy issues, the actual domain name has been temporarily modified:
C:\Users\luoluo\Desktop>hrun test1.yml
INFO     HttpRunner version: 2.5.7
INFO     Start to run testcase: testcase description
/api/trend/webinfo/getnavs
INFO     GET https://{{HOST}}/api/trend/webinfo/getnavs
INFO     status_code: 200, response_time(ms): 524.28 ms, response_length: 5357 bytes

.
/api/trend/search/get-recommand
INFO     GET https://{{HOST}}//api/trend/search/get-recommand
INFO     status_code: 200, response_time(ms): 62.19 ms, response_length: 232 bytes

.

----------------------------------------------------------------------
Ran 2 tests in 0.600s

OK
INFO     Start to render Html report ...
INFO     Generated Html report: C:\Users\luoluo\Desktop\reports\20200414T125709.244873.html
Sentry is attempting to send 0 pending error messages
Waiting up to 2 seconds
Press Ctrl-Break to quit

C:\Users\luoluo\Desktop>
5. View the report
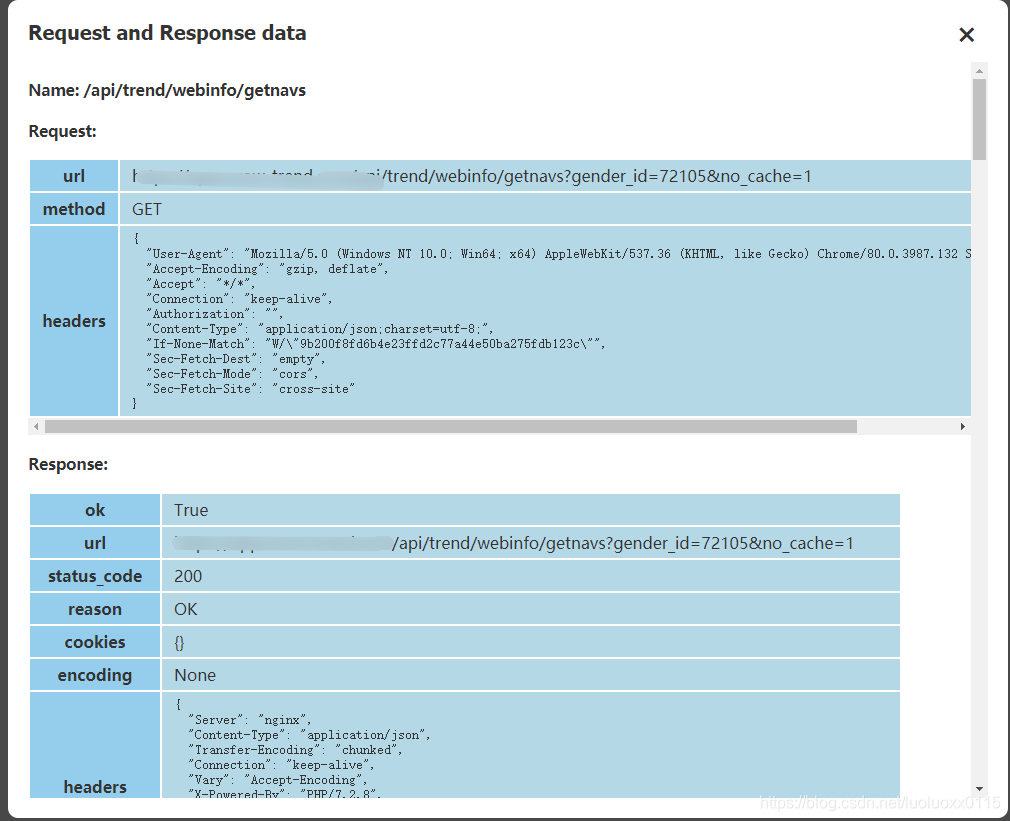
We can directly copy the above report address to view the test report. The report content is very detailed:

click the log button to view the request and return data of a specific interface
6. Create a project
At this point, you can start to create a new project for more practical operations.
Create project command: hrun --startproject new project name
C:\Users\luoluo\Desktop>hrun --startproject myobject
Start to create new project: myobject
CWD: C:\Users\luoluo\Desktop
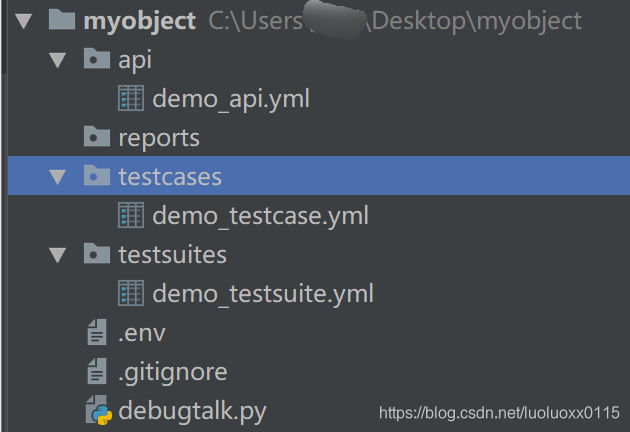
created folder: myobject
created folder: myobject\api
created folder: myobject\testcases
created folder: myobject\testsuites
created folder: myobject\reports
created file: myobject\api\demo_api.yml
created file: myobject\testcases\demo_testcase.yml
created file: myobject\testsuites\demo_testsuite.yml
created file: myobject\debugtalk.py
created file: myobject\.env
created file: myobject\.gitignore
C:\Users\luoluo\Desktop>
The file organization structure of the project is as follows:
- Here is the dividing line from top to bottom ============================================== ==============================
The above content is mainly to quickly open the door of HttpRunner for you through recording. I believe that at this stage, you will definitely want to optimize and modify the recorded script to better meet your testing needs. For example, because the token will be obtained after login, and all subsequent interfaces need to pass this token, you need to set global variables; when the test steps are unchanged, but different request parameters need to be passed in, you need to make the request parameters You need to make assertion optimizations on the response results; you also need ...
How do you solve these problems? The following content will take you deep into the process structure of the HttpRunner test framework, clarify the organization of test cases, and refine the scripting of each file ...
Let us start the exploration journey of HttpRunner!
Six, HttpRunner project structure
1. Project file structure
The following is a sample project file directory:
myobject
├── .env
├── data
│ ├── acount.csv
├── api
│ ├── demo_api.yml
├── debugtalk.py
├── reports
│ ├── 1550999327.html
├── testcases
│ ├──
demo_testcase.yml └── testsuites
│ ├── demo_testsuite.yml
2. File type description
-
.env : Project environment variables, used to store sensitive information
Writing format: key = value
Reference method: In the YAML / JSON script, use the built-in function ENV reference directly, that is $ {ENV (key)} -
debugtalk.py : Auxiliary functions for logical operations in the project
① Write common functions and business-related functions, so that test cases can refer to functions to implement some dynamic calculation logic, such as obtaining time stamps, generating random numbers, processing signatures, etc.
② writing hooks Function, so that the hook function can be called before and after the execution of the test case, to achieve test preparation and cleanup, such as initializing a certain request parameter, modifying a certain value of the response result, etc.Reference method: In the test case in YAML / JSON format, reference is made by way of $ {func ()}
Note:
① When the file exists, the directory where it is located is regarded as the project project root directory
② When the file does not exist, the test is run The path is regarded as the root directory of the project -
api : interface definition description
-
testcases : store test cases
-
testsuites : store test suites
-
data : store test data
-
reports : store test reports
Seven, HttpRunner test case organization
1. Write interface description (api)
(1) Sample template demo_api.yml
name: demo api
variables:
    var1: value1
    var2: value2
request:
    url: /api/path/${var1}
    method: POST
    headers:
        Content-Type: "application/json"
    json:
        key: ${var2}
validate:
    - eq: ["status_code", 200]
(2) Template description
- name : The name of the interface, which can be named at will, and has no effect
- variables : variable information, the format is key: value (note that there is a space after the colon, this is the format specified by the ymal file)
- request : request information
url : request address
method : request method
header : request header
json : request parameter, format is key: value, value generally refers to variable or function, format: $ {var},
$ {func ()} - validate : result assertion
2. Write test cases (testcases)
(1) Template sample demo_testcase.yml
config:
    name: "demo testcase"
    variables:
        device_sn: "ABC"
        username: ${ENV(USERNAME)}
        password: ${ENV(PASSWORD)}
    base_url: "http://127.0.0.1:5000"

teststeps:
-
    name: demo step 1
    api: path/to/api1.yml
    variables:
        user_agent: 'iOS/10.3'
        device_sn: $device_sn
    extract:
        - token: content.token
    validate:
        - eq: ["status_code", 200]
-
    name: demo step 2
    api: path/to/api2.yml
    variables:
        token: $token
(2) Template description
- config : the global configuration of the entire test case
name : the name of the test case, the test report will show the name
variable : global variable
base_url : access address, generally write the domain name host - teststeps : test steps, one or more test steps are written in the form of a list below, and each test step is preceded by a '-'
name : test step name, the test report will show the name
api : reference interface description file, relative path from the root Contents start
variables : local variables, takes precedence over the global variable, if here to fill a local variable, the variable will be global variables in the config covered
extract : extracting parameters from the response results, and save it to a variable reference to other test procedures
validate : Result assertion
(3) Test case description
① Each test case is an independent use case, in principle does not depend on other test cases, regardless of the order of execution
② extract results assertion fields are: status_code, content, text, json, cookies, elapsed, headers, reason, enconding, ok , url
if the result json response format, can be acquired by content.xxx.0.id id (content in response to the content, and the id of XXX dictionary key, 0 the first bit array);
if the result is responsive xml / html, The result parameters can be obtained through regular expressions
③ Validators are: eq (=), lt (<), le (<=), gt (>), ge (> =), ne (! =), Str_eq, len_eq, len_gt, len_ge, len_lt, len_le, contains, contained_by, type_match, regex_match, startswith, endswith
3. Write test suites
(1) Template sample demo_testsuite.yml
config:
    name: "demo testsuite"
    variables:
        device_sn: "XYZ"
    base_url: "http://127.0.0.1:5000"

testcases:
-
    name: call demo_testcase with data 1
    parameters:
    	phone-password: ${P(data/acount.csv)}
    testcase: path/to/demo_testcase.yml
    variables:
        device_sn: $device_sn
-
    name: call demo_testcase with data 2
    testcase: path/to/demo_testcase.yml
    variables:
        device_sn: $device_sn
(2) Template description
- config : global configuration item
name : the name of the test case set - testcases : a collection of test cases
name : test case names
parameters : parameterized, there are multiple implementations, specific reference to the following parameterized data drive (data)
testcase : reference test case files, relative path from the root directory
variables : environment variable
(3) Description of test case set
The testcases of the test case set is an array. Each value of the array is 1 test case. Generally, there are two parameters, name and testcase. In addition, it can also be parameterized data driven
Special note : yml files must follow strict indentation, it doesn't matter how many indents, as long as the keys at the same level are aligned
8. HttpRunner's parameterized data driver (data)
1. Parameterization
There are three ways, the following takes login as an example:
(1), directly specify the parameter list in YAML / JSON: this method is the most simple and easy to use, suitable for the case where the parameter list is relatively small
config:
    name: "login testsuites"
testcases:
-
    name: login_with_account by raw_list
    parameters:
    	phone-password:
    		- ['1342388xxxx',123456]
    		- ['1342388yyyy',654321]
    testcase: path/to/demo_testcase.yml
(2) CSV file is referenced through the built-in parameterize (can be abbreviated as P) function: This method requires the preparation of a CSV data file, which is suitable for the case where the amount of data is relatively large
config:
    name: "login testsuites"
testcases:
-
    name: login_with_account by csv_file
    parameters:
    	phone-password: ${P(data/account.csv)}
    testcase: path/to/demo_testcase.yml
The contents of the account.csv file are as follows:
phone,password
1342388xxxx,123456
1342388yyyy,654321
(3) Call the custom function in debugtalk.py to generate the parameter list: This method is the most flexible, and the data-driven mechanism of any scene can be realized through custom Python functions. This method is also required when the parameter list needs to be dynamically generated
config:
    name: "login testsuites"
testcases:
-
    name: login_with_account by custom_function
    parameters:
    	phone-password: ${get_account()}
    testcase: path/to/demo_testcase.yml
The custom functions in the debugtalk.py file are as follows:
def get_account():
    return [
        {"phone":"1342388xxxx","password":"123456"},
        {"phone":"1342388yyyy","password":"654321"},
    ]
Nine, HttpRunner test case layering
In the field of automated testing, the maintainability of automated test cases is an extremely important factor. The core of the test case layering mechanism is to separate the interface definition, test steps, test cases, and test scenarios, and describe and maintain them separately, so as to maximize Several core concepts to reduce the maintenance cost of automated test cases

:
① Test cases (testcase) should be complete and independent, each test case should be able to run independently
② Test cases are an ordered collection of test steps (teststep), each test step corresponds to an API request description
③ Test A test suite is an unordered collection of test cases. The test cases in the collection should be independent of each other, and there is no dependency. If there is a dependency, then the dependency processing needs to be completed in the test case.
Ten, HttpRunner hook mechanism
The concept of the hook mechanism of HttpRunner is equivalent to the front (setUp) and post (tearDown) processors in the Unittest framework, that is: the front setup_hooks and post teardown_hooks functions
1. Write a hook function
(1), test case level (testcase)
setup_hooks: trigger the hook function before the entire use case starts execution, mainly used for preparation work
teardown_hooks: trigger the hook function after the entire use case ends execution, mainly used for clean-up work after the test
(2) Test level
setup_hooks: execute the hook function before HTTP request is sent, which is mainly used for preparation; it can also be used to preprocess the request content of the request
teardown_hooks: execute the hook function after the HTTP request is sent, which is mainly used for testing After the clean-up work; you can also modify the response of the response, such as encryption and decryption and other processing
Write the hook function in the debugtalk.py file:
import time

def sleep(n_secs):
    time.sleep(n_secs)
2. Call the hook function
The definition of the hook function is placed in the debugtalk.py of the project. Calling the hook function in YAML / JSON takes the form of $ {func (a)}, where a is a variable in the function.
The following code uses the setup_hooks and teardown_hooks keywords to call the sleep function in the debugtalk.py file to determine whether it is at the test case level or test step level according to the location, to achieve pre- and post-operations
config:
    name: "demo testcase"
    variables:
        device_sn: "ABC"
        username: ${ENV(USERNAME)}
        password: ${ENV(PASSWORD)}
    base_url: "http://127.0.0.1:5000"
    # 测试用例层面,实现测试用例执行前等待10秒,执行后等待10秒的操作
    setup_hooks:
        - ${sleep(10)}
    teardown_hooks:
        - ${sleep(10)}

teststeps:
-
    name: demo step 1
    api: path/to/api1.yml
    variables:
        user_agent: 'iOS/10.3'
        device_sn: $device_sn
    # 测试步骤层面,实现测试步骤执行前等待10秒,执行后等待10秒的操作
    setup_hooks:
        - ${sleep(5)}
    teardown_hooks:
        - ${sleep(5)}
    extract:
        - token: content.token
    validate:
        - eq: ["status_code", 200]
-
    name: demo step 2
    api: path/to/api2.yml
    variables:
        token: $token
11. More exploration
It is said that the HtttpRunner test framework is written by a domestic test Daniel, and there are Chinese usage documents. The official documents can be consulted: https://cn.httprunner.org/