1. Bota de mola
1.1.O que é SpringBoot
SpringBoot é um subprojeto do projeto Spring . É um produto Spring como o Spring-framework com o qual estamos familiarizados

O Spring Boot facilita a criação de aplicativos independentes baseados em Spring de nível de produção que você pode "simplesmente executar".
Temos uma visão opinativa da plataforma Spring e das bibliotecas de terceiros para que você possa começar com o mínimo de barulho. A maioria dos aplicativos Spring Boot precisa de muito pouca configuração Spring.
traduzir:
Com o Spring Boot, você só precisa " executar " para criar facilmente aplicativos Spring independentes em nível de produção .
Fornecemos um método de uso fixo para a plataforma Spring e bibliotecas dependentes de terceiros, para que você possa começar a desenvolver seus aplicativos facilmente. A maioria dos aplicativos Spring Boot requer muito pouca configuração.
Na verdade, as pessoas chamam o Spring Boot de andaime para a construção de programas . Sua principal função é nos ajudar a construir rapidamente grandes projetos Spring e reduzir ao máximo todas as configurações xml , para que possa ser usado imediatamente e iniciado rapidamente , permitindo-nos focar nos negócios e não na configuração.
Podemos usar SpringBoot para criar um aplicativo java e iniciá-lo usando java –jar para obter um projeto web em nível de produção .
1.2. Por que aprender SpringBoot
Java sempre foi criticado por ser inchado e problemático. Quando ainda estamos trabalhando duro para construir o projeto, os programadores Python podem já ter escrito as funções.As razões se devem principalmente a dois pontos:
- Configuração complexa
As diversas configurações do projeto são na verdade uma perda durante o desenvolvimento , pois é necessário alternar entre pensar na configuração dos recursos do Spring e resolver problemas de negócios, portanto, escrever configurações leva tempo para escrever a lógica do aplicativo.
- Gerenciamento de dependência caótica
O gerenciamento de dependências do projeto também é uma tarefa ingrata. Decidir quais bibliotecas usar em seu projeto já é uma dor de cabeça, mas saber quais versões dessas bibliotecas não entrarão em conflito com outras bibliotecas também é um problema complicado. Além disso, o gerenciamento de dependências também é uma espécie de perda: adicionar dependências não é escrever código de aplicativo. Depois de escolher a versão dependente errada, os problemas de incompatibilidade resultantes serão, sem dúvida, um assassino de produtividade.
E o SpringBoot faz de tudo isso coisa do passado!
1.3.Recursos do SpringBoot
Os principais recursos do Spring Boot são :
- Crie um aplicativo Spring independente
- Incorporar diretamente Tomcat, Jetty e Undertow ( não há necessidade de empacotar em pacote de guerra para implantação )
- Fornece uma configuração " inicial " fixa para simplificar a configuração da compilação
- Configure automaticamente bibliotecas Spring e de terceiros, tanto quanto possível
- Fornece funções em nível de produto, como: indicadores de segurança, monitoramento de integridade e configuração externalizada, etc.
- Absolutamente nenhum código é gerado ( ou seja, nenhum código é injetado ) e nenhumaconfiguração XML é necessária
Resumindo, o Spring Boot fornece a todos os desenvolvedores Spring uma experiência de nível básico pronta para uso , muito rápida e amplamente aceita.
Para mais detalhes, você pode conferir o site oficial .
2. Início rápido
A seguir, vamos usar o SpringBoot para construir um projeto web e experimentar o charme do SpringBoot !
Requerimentos ambientais:

2.1.Criar projeto
Vamos primeiro criar um novo projeto de demonstração vazio , como segue:


Criar módulo e : _


Preencha as informações das coordenadas:
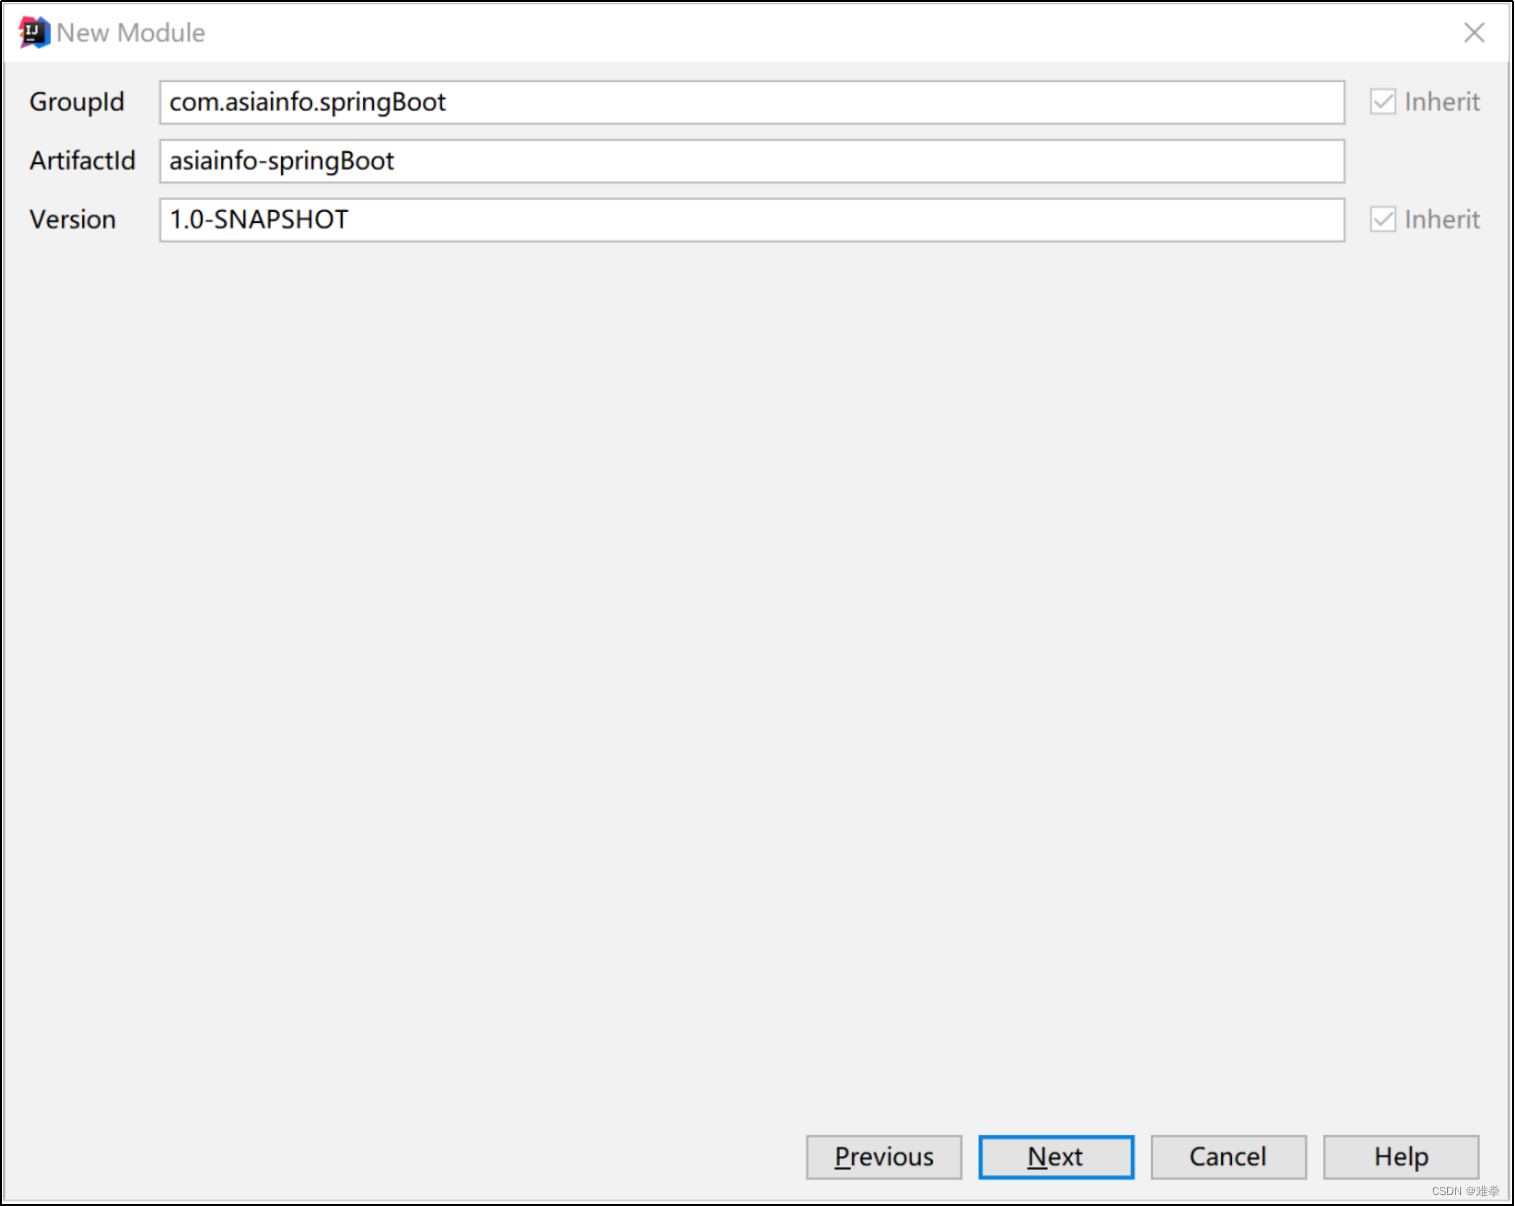
Estrutura de diretório:

Estrutura de diretórios após a criação:

2.2.Introduzindo dependências
Muitos estudantes ficarão confusos depois de ver isso. Como mencionado anteriormente, um dos problemas do desenvolvimento tradicional é a confusão do gerenciamento de dependências. Por que ainda precisamos gerenciar dependências aqui? O SpringBoot não nos ajuda a gerenciar isso?
Não se preocupe, nosso projeto ainda não tem nada a ver com SpringBoot . SpringBoot fornece um projeto chamado spring-boot-starter-parent , que já gerencia as versões de várias dependências comumente usadas ( não todas ) . Nosso projeto precisa usar este projeto como o projeto pai, para que não precisemos nos preocupar com dependências. Há um problema de versão. Quais dependências são necessárias? Basta introduzir as coordenadas diretamente!
2.2.1. Adicionar projeto pai
| < pai > < groupId > org.springframework.boot </ grupoId > < artefatoId > spring-boot-starter-parent </ artefatoId > < versão > 2.0.6.RELEASE </ versão > </ pai > |
2.2.2. Adicionar iniciador
Para que o SpringBoot nos ajude a completar várias configurações automáticas, devemos introduzir as dependências de configuração automática fornecidas pelo SpringBoot , que chamamos de starters . O projeto spring-boot-starter-parent declara dependências como um ou mais starters. Podemos introduzir starters correspondentes de acordo com os requisitos do projeto. Como somos um projeto web , aqui apresentamos o web starter :
| < dependências > |
Observe que não especificamos informações de versão aqui. Porque o projeto pai do SpringBoot já gerencia a versão .
Neste momento, descobriremos que existem muitas dependências no projeto:
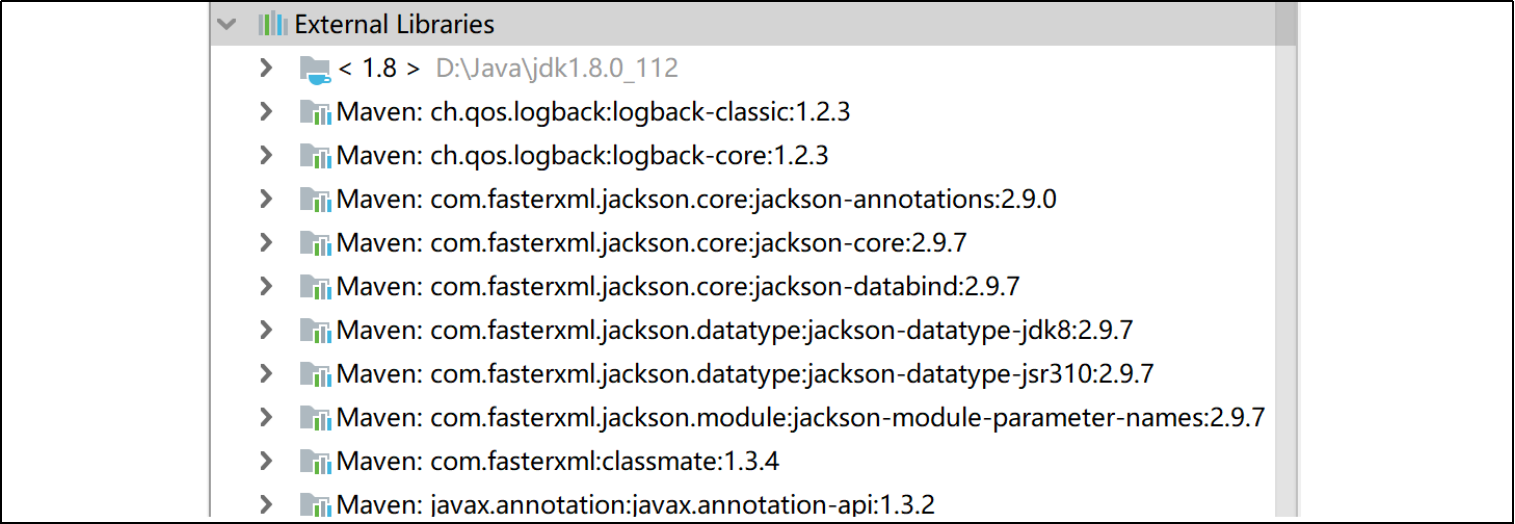
Eles são introduzidos automaticamente pelo SpringBoot com base na dependência spring-boot-starter-web e todas as versões foram gerenciadas sem conflitos.
resumo:
- versão de gerenciamento de projeto pai spring-boot-starter-parent
- spring-boot-starter-web spring starter
2.2.3. POM completo
| <? versão xml= "1.0" codificação= "UTF-8" ?> |
2.3.Escreva HelloController

Código:
| @RestController |
2.4. Comece o teste


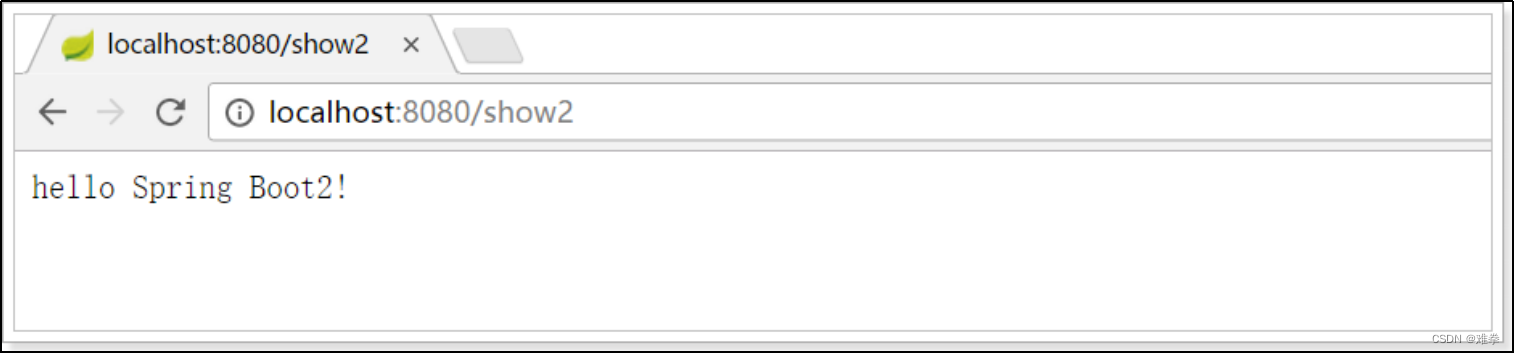
Bingo ! Acesso com sucesso!
| Anotações Springboot |
explicar |
| @RestController |
Equivalente à anotação @Controller mais @ResponseBody |
| @EnableAutoConfiguration |
Inicie a configuração automática do Springboot |
| static ConfigurableApplicationContext run(Class<?> primarySource,String... args) |
springboot配置应用上下文 自动配置启动器需要的配置 |
| SpringApplication.run(HelloController.class,args) |
启动配置类到springboot中 |
| @SpringBootApplication |
Springboot组合注解 |
| @ComponentScan |
配置组件扫描指令 |
2.5.@EnableAutoConfiguration
关于这个注解,官网上有一段说明:
Enable auto-configuration of the Spring Application Context, attempting to guess and configure beans that you are likely to need. Auto-configuration classes are usually applied based on your classpath and what beans you have defined.
简单翻译以下:
开启spring应用程序的自动配置,SpringBoot基于你所添加的依赖和你自己定义的bean,试图去猜测并配置你想要的配置。比如我们引入了spring-boot-starter-web,而这个启动器中帮我们添加了tomcat、SpringMVC的依赖。此时自动配置就知道你是要开发一个web应用,所以就帮你完成了web及SpringMVC的默认配置了!
总结,SpringBoot内部对大量的第三方库或Spring内部库进行了默认配置,这些配置是否生效,取决于我们是否引入了对应库所需的依赖,如果有那么默认配置就会生效。
所以,我们使用SpringBoot构建一个项目,只需要引入所需依赖,配置就可以交给SpringBoot处理了。
2.6.@EntityScan@EnableJpaRepositories
在Springboot应用开发中使用JPA时,通常在主应用程序所在包或者其子包的某个位置定义我们的Entity和Repository,这样基于Springboot的自动配置,无需额外配置我们定义的Entity和Repository即可被发现和使用。但有的时候我们需要定义Entity和Repository不在应用程序所在包及其子包,那么这时候就需要使用@EntityScan和@EnableJpaRepositories了。
上面提到的Entity和Repository指的是通过类似下面的方式定义的Entity和Repository :
| @Entity |
@EntityScan用来扫描和发现指定包及其子包中的Entity定义。其用法如下:
| @EntityScan(basePackages = { "com.department.entities","come.employee.entities"}) |
如果多处使用@EntityScan,它们的basePackages集合能覆盖所有被Repository使用的Entity即可,集合有交集也没有关系。但是如果不能覆盖被Repository使用的Entity,应用程序启动是会出错,比如:
Not a managed type: com.customer.entities.Customer
@EnableJpaRepositories用来扫描和发现指定包及其子包中的Repository定义。其用法如下:
| @EnableJpaRepositories(basePackages = { "com.department.repositories","come.employee.repositories"}) |
如果多处使用@EnableJpaRepositories,它们的basePackages集合不能有交集,并且要能覆盖所有需要的Repository定义。
如果有交集,相应的Repository会被尝试反复注册,从而遇到如下错误:
The bean ‘OrderRepository’, defined in xxx, could not be registered. A bean with that name has already been defined in xxx and overriding is disabled.
如果不能覆盖所有需要的Repository定义,会遇到启动错误:
Parameter 0 of method setCustomerRepository in com.service.CustomerService required a bean of type ‘come.repo.OrderRepository’ that could not be found
2.5.优化入门程序
现在工程中只有一个Controller,可以这么玩;那么如果有多个Controller,怎么办呢?
添加Hello2Controller:

代码:
| @RestController |
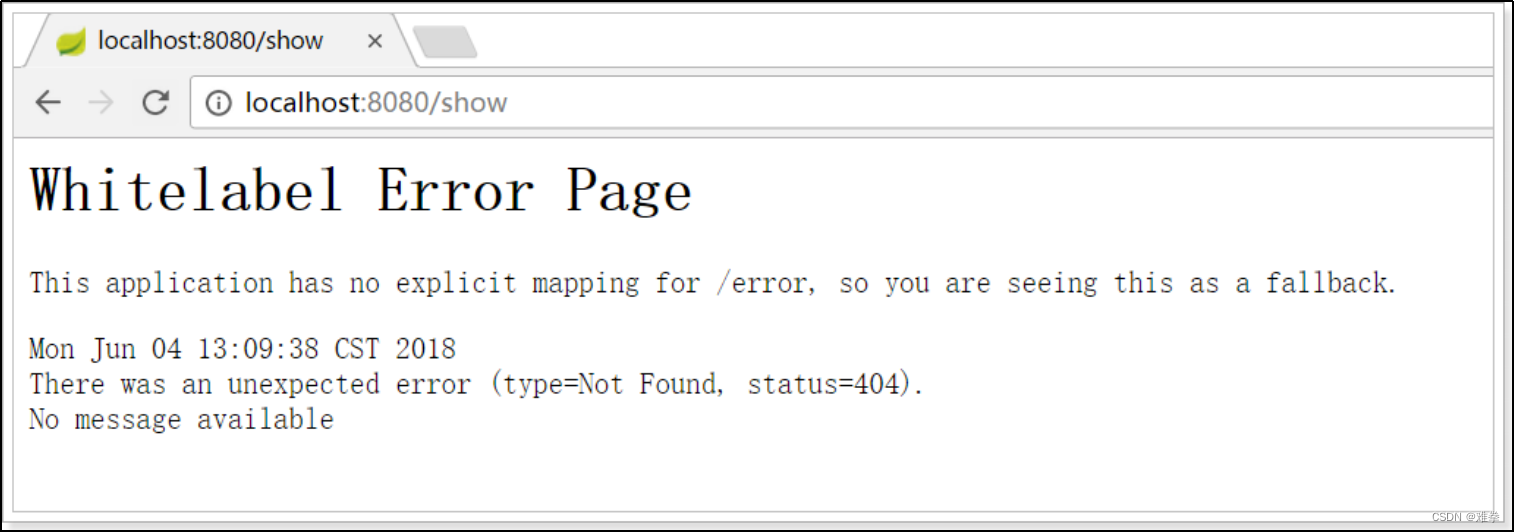
启动重新启动,访问show2测试,失败:

难道要在每一个Controller中都添加一个main方法和@EnableAutoConfiguration注解,这样启动一个springboot程序也太麻烦了。即使,这样也无法同时启动多个Controller,因为每个main方法都监听8080端口。所以,一个springboot程序应该只有一个springboot的main方法。
所以,springboot程序引入了一个全局的引导类。
2.5.1.添加引导类
在springboot的程序的基包下,创建TestApplication.class:

内容如下:
| @EnableAutoConfiguration |
并修改HelloController,去掉main方法及@EnableAutoConfiguration:
| @RestController |
启动引导类,访问show或者show2测试:
发现所有的Controller都不能访问,为什么?
回想以前程序,我们在配置文件中添加了注解扫描,它能扫描指定包下的所有Controller,而现在并没有。怎么解决——@ComponentScan注解
2.5.2.@ComponentScan
spring框架除了提供配置方式的注解扫描<context:component-scan />,还提供了注解方式的注解扫描@ComponentScan。
在TestApplication.class中,使用@ComponentScan注解:
| @EnableAutoConfiguration |
重新启动,访问show或者show2:

我们跟进该注解的源码,并没有看到什么特殊的地方。我们查看注释:

大概的意思:
配置组件扫描的指令。提供了类似与<context:component-scan>标签的作用
通过basePackageClasses或者basePackages属性来指定要扫描的包。如果没有指定这些属性,那么将从声明这个注解的类所在的包开始,扫描包及子包
而我们的@ComponentScan注解声明的类就是main函数所在的启动类,因此扫描的包是该类所在包及其子包。一般启动类会放在一个比较浅的包目录中。
2.5.3.@SpringBootApplication
我们现在的引导类中使用了@EnableAutoConfiguration和@ComponentScan注解,有点麻烦。springboot提供了一种简便的玩法:@SpringBootApplication注解
使用@SpringBootApplication改造TestApplication:
| //@EnableAutoConfiguration |
点击进入,查看源码:
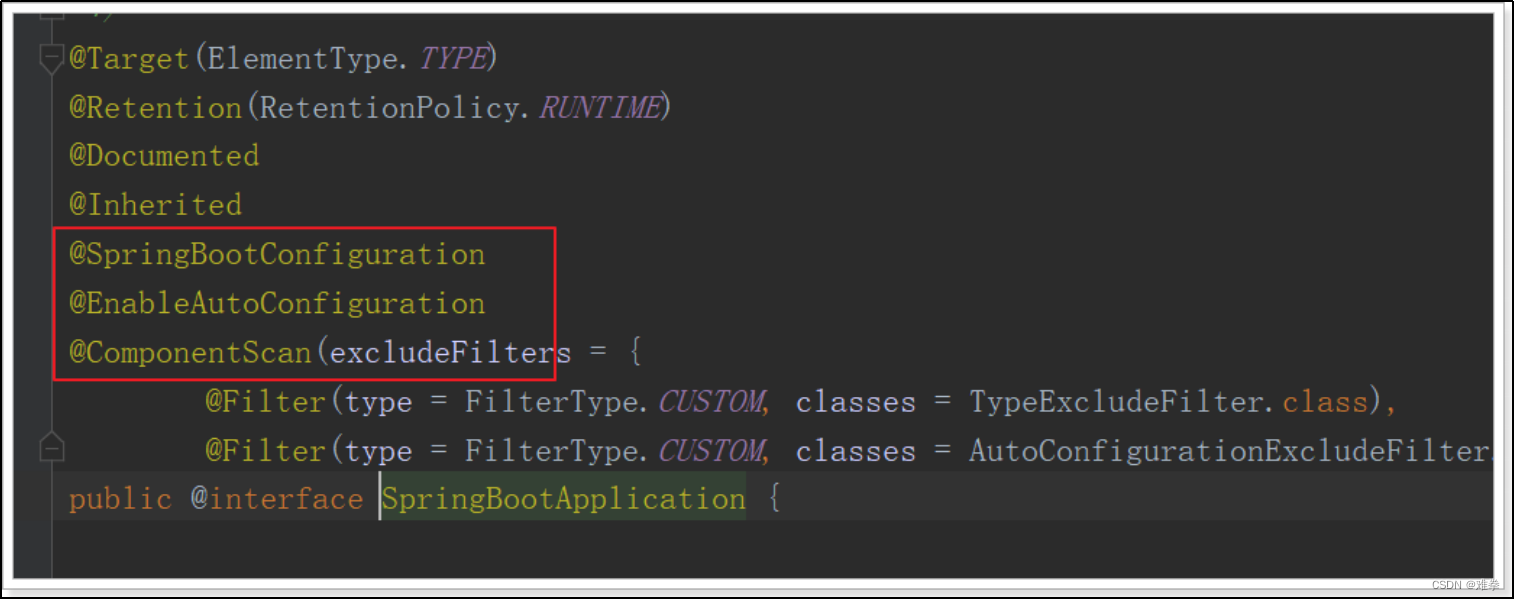
发现@SpringBootApplication其实是一个组合注解,这里重点的注解有3个:
@SpringBootConfiguration
@EnableAutoConfiguration:开启自动配置
@ComponentScan:开启注解扫描
2.5.4.@SpringBootConfiguration
@SpringBootConfiguration注解的源码:
我们继续点击查看源码:

通过这段我们可以看出,在这个注解上面,又有一个@Configuration注解。通过上面的注释阅读我们知道:这个注解的作用就是声明当前类是一个配置类,然后Spring会自动扫描到添加了@Configuration的类,并且读取其中的配置信息。而@SpringBootConfiguration是来声明当前类是SpringBoot应用的配置类,项目中只能有一个。所以一般我们无需自己添加。
2.6.Spring-Boot演变
一:快速入门
| @RestController |
二:分离引导类
| @EnableAutoConfiguration |
三:简化引导类注解
| @SpringBootApplication |
3.默认配置原理
springboot的默认配置方式和我们之前玩的配置方式不太一样,没有任何的xml。那么如果自己要新增配置该怎么办?比如我们要配置一个数据库连接池,以前会这么玩:
| <!-- 配置连接池 --> <bean id="dataSource" class="com.alibaba.druid.pool.DruidDataSource" init-method="init" destroy-method="close"> <property name="url" value="${jdbc.url}" /> <property name="username" value="${jdbc.username}" /> <property name="password" value="${jdbc.password}" /> </bean> |
现在该怎么做呢?
3.1.回顾历史
事实上,在Spring3.0开始,Spring官方就已经开始推荐使用java配置来代替传统的xml配置了,我们不妨来回顾一下Spring的历史:
- Spring1.0时代
在此时因为jdk1.5刚刚出来,注解开发并未盛行,因此一切Spring配置都是xml格式,想象一下所有的bean都用xml配置,细思极恐啊,心疼那个时候的程序员2秒
- Spring2.0时代
Spring引入了注解开发,但是因为并不完善,因此并未完全替代xml,此时的程序员往往是把xml与注解进行结合,貌似我们之前都是这种方式。
- Spring3.0及以后
3.0以后Spring的注解已经非常完善了,因此Spring推荐大家使用完全的java配置来代替以前的xml,不过似乎在国内并未推广盛行。然后当SpringBoot来临,人们才慢慢认识到java配置的优雅。
有句古话说的好:拥抱变化,拥抱未来。所以我们也应该顺应时代潮流,做时尚的弄潮儿,一起来学习下java配置的玩法。
3.2.尝试java配置
java配置主要靠java类和一些注解来达到和xml配置一样的效果,比较常用的注解有:
@Configuration:声明一个类作为配置类,代替xml文件
@Bean:声明在方法上,将方法的返回值加入Bean容器,代替<bean>标签
@Value:属性注入
@PropertySource:指定外部属性文件。
我们接下来用java配置来尝试实现连接池配置
3.2.1.引入依赖
首先引入Druid连接池依赖:
| <dependency> |
3.2.2.添加jdbc.properties
| jdbc.driverClassName=com.mysql.jdbc.Driver |
3.2.3.配置数据源
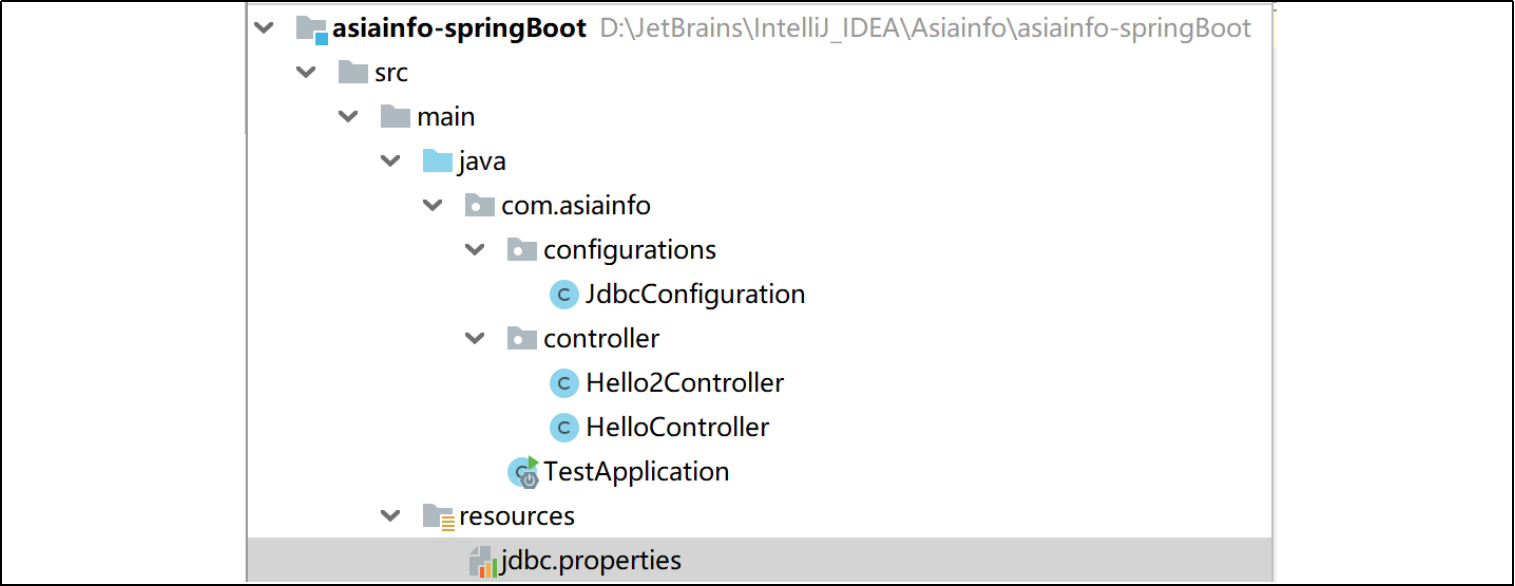
创建JdbcConfiguration类:
| @Configuration |
解读:
@Configuration:声明JdbcConfiguration是一个配置类。
@PropertySource:指定属性文件的路径是:classpath:jdbc.properties
通过@Value为属性注入值。
通过@Bean将 dataSource()方法声明为一个注册Bean的方法,Spring会自动调用该方法,将方法的返回值加入Spring容器中。相当于以前的bean标签
然后就可以在任意位置通过@Autowired注入DataSource了!
我们在HelloController中测试:
| @RestController |
然后Debug运行并查看:

属性注入成功了!
3.3.SpringBoot的属性注入
在上面的案例中,我们实验了java配置方式。不过属性注入使用的是@Value注解。这种方式虽然可行,但是不够强大,因为它只能注入基本类型值。
在SpringBoot中,提供了一种新的属性注入方式,支持各种java基本数据类型及复杂类型的注入。
1)新建JdbcProperties,用来进行属性注入:
代码:
| @ConfigurationProperties(prefix = "jdbc") |
在类上通过@ConfigurationProperties注解声明当前类为属性读取类prefix="jdbc"读取属性文件中,前缀为jdbc的值。
在类上定义各个属性,名称必须与属性文件中jdbc.后面部分一致,并且必须具有getter和setter方法需要注意的是,这里我们并没有指定属性文件的地址,SpringBoot默认会读取文件名为application.properties的资源文件,所以我们把jdbc.properties名称改为application.properties
2)在JdbcConfiguration中使用这个属性:
通过@EnableConfigurationProperties(JdbcProperties.class)来声明要使用JdbcProperties这个类的对象
然后你可以通过以下方式在JdbcConfiguration类中注入JdbcProperties:
- @Autowired注入
| @Configuration |
- 构造函数注入
| @Configuration |
- @Bean方法的参数注入
| @Configuration |
本例中,我们采用第三种方式。
3)测试结果: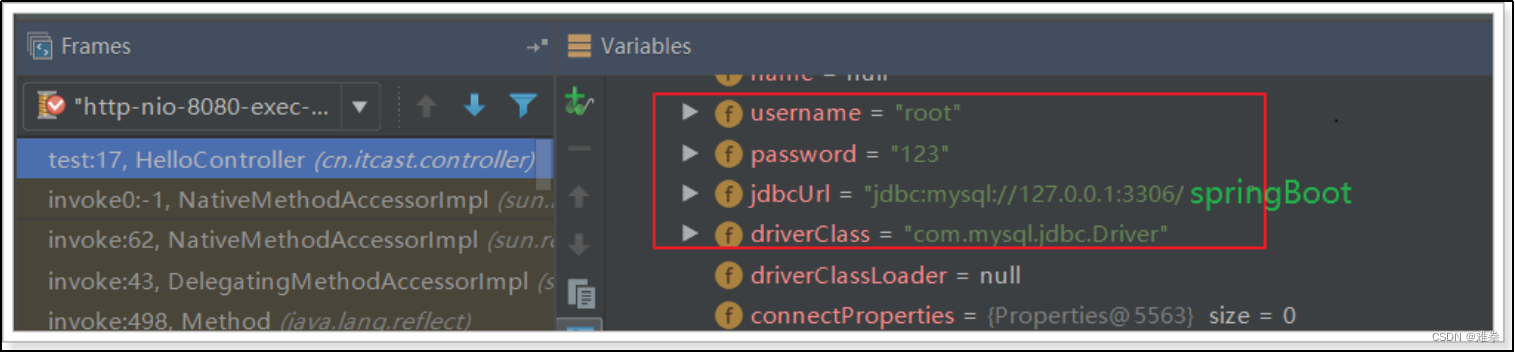
大家会觉得这种方式似乎更麻烦了,事实上这种方式有更强大的功能,也是SpringBoot推荐的注入方式。两者对比关系: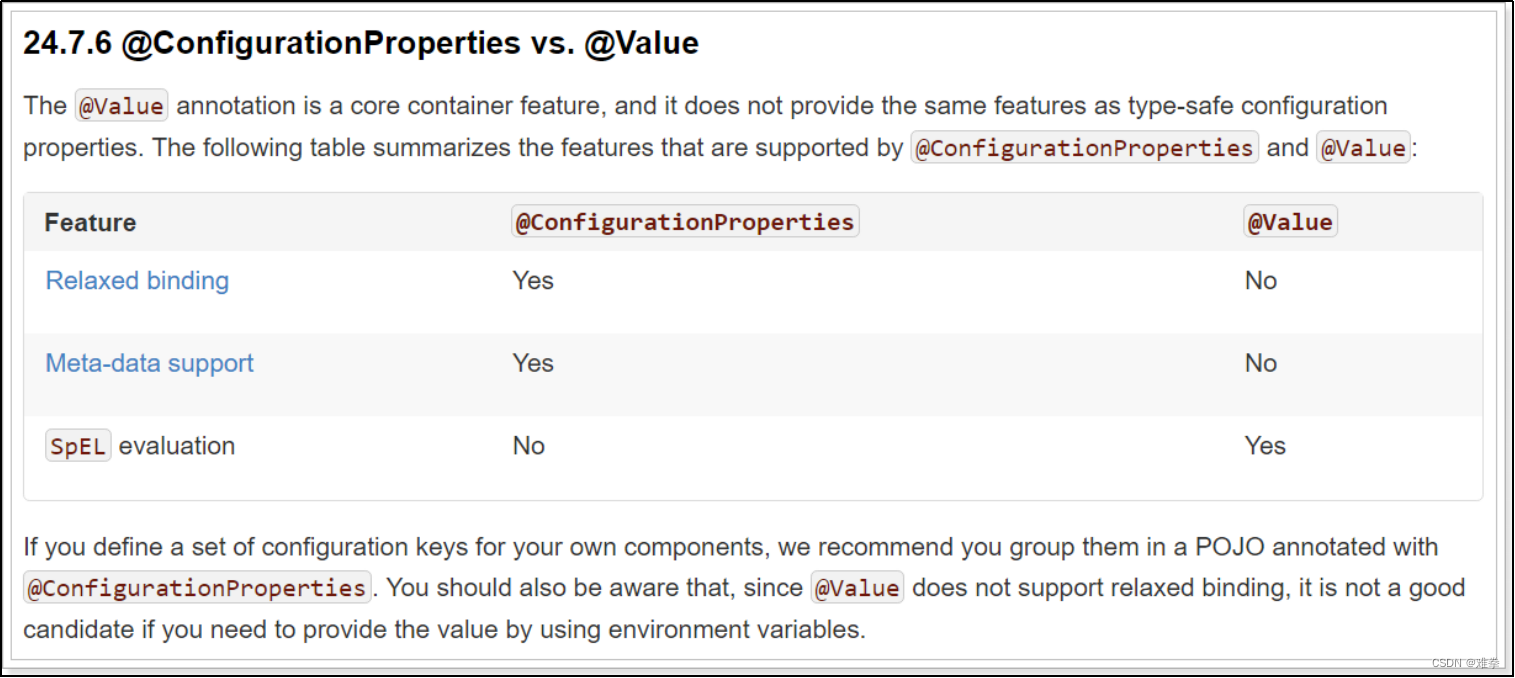
优势:
Relaxed binding:松散绑定
不严格要求属性文件中的属性名与成员变量名一致。支持驼峰,中划线,下划线等等转换,甚至支持对象引导。比如:user.friend.name:代表的是user对象中的friend属性中的name属性,显然friend也是对象。@value注解就难以完成这样的注入方式。
meta-data support:元数据支持,帮助IDE生成属性提示(写开源框架会用到)。
3.4.更优雅的注入
事实上,如果一段属性只有一个Bean需要使用,我们无需将其注入到一个类(JdbcProperties)中。而是直接在需要的地方声明即可:
| @Configuration |
我们直接把@ConfigurationProperties(prefix = "jdbc")声明在需要使用的@Bean的方法上,然后SpringBoot就会自动调用这个Bean(此处是DataSource)的set方法,然后完成注入。使用的前提是:该类必须有对应属性的set方法!
我们将jdbc的url改成:/boot,再次测试:
3.5.SpringBoot中的默认配置
通过刚才的学习,我们知道@EnableAutoConfiguration会开启SpringBoot的自动配置,并 且根据你引入的依赖来生效对应的默认配置。那么问题来了:
这些默认配置是怎么配置的,在哪里配置的呢?
为何依赖引入就会触发配置呢?
这些默认配置的属性来自哪里呢?
其实在我们的项目中,已经引入了一个依赖:spring-boot-autoconfigure,其中定义了大量自动配置类:
还有:

非常多,几乎涵盖了现在主流的开源框架,例如:
redis、jms、amqp、jdbc、jackson、mongodb、jpa、solr、elasticsearch ... 等等
我们来看一个我们熟悉的,例如SpringMVC,查看mvc 的自动配置类:

打开WebMvcAutoConfiguration:
我们看到这个类上的4个注解:
@Configuration:声明这个类是一个配置类
@ConditionalOnWebApplication(type = Type.SERVLET) ConditionalOn,翻译就是在某个条件下,此处就是满足项目的类是Type.SERVLET类型,也就是一个普通web工程,显然我们就是。
@ConditionalOnClass({ Servlet.class, DispatcherServlet.class, WebMvcConfigurer.class })这里的条件是OnClass,也就是满足以下类存在:Servlet、DispatcherServlet、WebMvcConfigurer,其中Servlet只要引入了tomcat依赖自然会有,后两个需要引入SpringMVC才会有。这里就是判断你是否引入了相关依赖,引入依赖后该条件成立,当前类的配置才会生效!
@ConditionalOnMissingBean(WebMvcConfigurationSupport.class)这个条件与上面不同,OnMissingBean,是说环境中没有指定的Bean这个才生效。其实这就是自定义配置的入口,也就是说,如果我们自己配置了一个WebMVCConfigurationSupport的类,那么这个默认配置就会失效!
接着,我们查看该类中定义了什么:
视图解析器:
处理器适配器(HandlerAdapter):
还有很多,这里就不一一截图了。
另外,这些默认配置的属性来自哪里呢?
我们看到,这里通过@EnableAutoConfiguration注解引入了两个属性:WebMvcProperties和ResourceProperties。
我们查看这两个属性类:
找到了内部资源视图解析器的prefix和suffix属性。
ResourceProperties中主要定义了静态资源(.js,.html,.css等)的路径: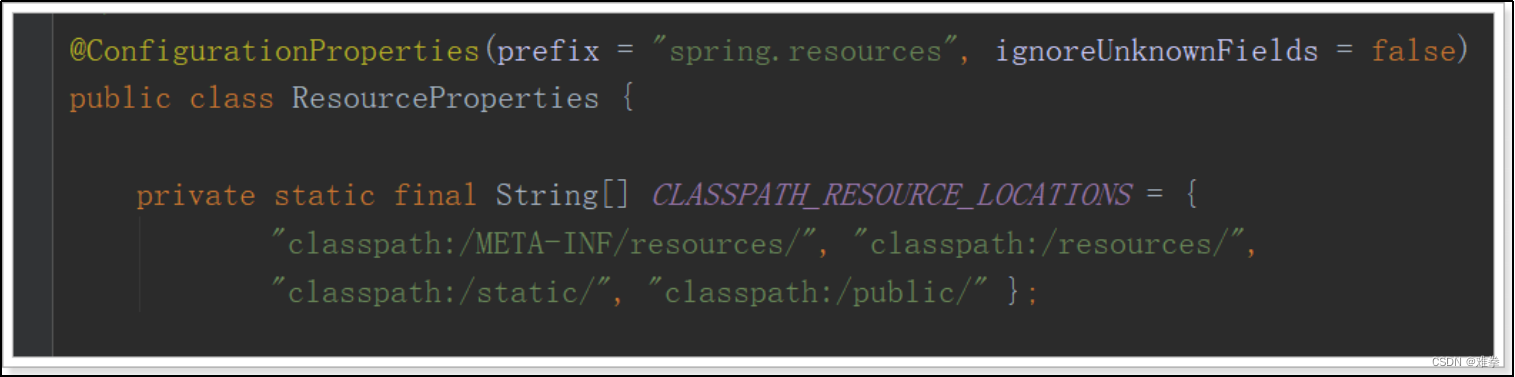
如果我们要覆盖这些默认属性,只需要在application.properties中定义与其前缀prefix和字段名一致的属性即可。
3.6.总结
SpringBoot为我们提供了默认配置,而默认配置生效的条件一般有两个:
1.你引入了相关依赖
2.你自己没有配置
1)启动器
之所以,我们如果不想配置,只需要引入依赖即可,而依赖版本我们也不用操心,因为只要引入了SpringBoot提供的stater(启动器),就会自动管理依赖及版本了。
因此,玩SpringBoot的第一件事情,就是找启动器,SpringBoot提供了大量的默认启动器,参考附件《SpringBoot启动器》
2)全局配置
另外,SpringBoot的默认配置,都会读取默认属性,而这些属性可以通过自定义application.properties文件来进行覆盖。这样虽然使用的还是默认配置,但是配置中的值改成了我们自定义的。
因此,玩SpringBoot的第二件事情,就是通过application.properties来覆盖默认属性值,形成自定义配置。我们需要知道SpringBoot的默认属性key,非常多,参考附件:《SpringBoot全局属性》
2)注解说明
| 注解 |
说明 |
| @RestController |
相当于@Controller加@ResponseBody注解 |
| @EnableAutoConfiguration |
启动Springboot自动配置 |
| @ComponentScan |
配置组件扫描指令 |
| @SpringBootApplication |
组合注解 @EnableAutoConfiguration+@ComponentScan |
| @ConfigurationProperties(prefix = "jdbc") |
声明当前类为属性读取类 prefix = "jdbc"读取属性文件中前缀为jdbc的值 |
| @PropertySource(value = { "classpath:druid.properties" }) |
加载.properties配置 |
| @EnableConfigurationProperties(Bean.class) |
声明要使用Bean这个类的对象 |
4.SpringBoot实践
接下来,我们来看看如何用SpringBoot来玩转以前的SSM,我们沿用之前讲解SSM用到的数据库tb_user和实体类User
User:
| public class User implements Serializable {
|
tb_user(oracle):
| create table tb_user( id number(8) primary key, user_name varchar2(16), password varchar2(16), name varchar2(16), age number(8), sex number(2), birthday Date, created Date default sysdate, updated Date default sysdate, note varchar2(32) ); insert into tb_user values(1,'zhangsan','******','张三',30,1,to_date('1984-08-08','yyyy-MM-dd'),sysdate,sysdate,''); insert into tb_user values(2,'lisi','******','李四',21,2,to_date('1991-01-01','yyyy-MM-dd'),sysdate,sysdate,''); insert into tb_user values(3,'wangwu','******','王五',22,2,to_date('1989-01-01','yyyy-MM-dd'),sysdate,sysdate,''); insert into tb_user values(4,'zhangwei','******','张伟',20,1,to_date('1988-09-01','yyyy-MM-dd'),sysdate,sysdate,''); insert into tb_user values(5,'lina','******','李娜',28,1,to_date('1985-01-01','yyyy-MM-dd'),sysdate,sysdate,''); insert into tb_user values(6,'lilei','******','李磊',23,1,to_date('1988-08-08','yyyy-MM-dd'),sysdate,sysdate,''); insert into tb_user values(7,'tangwei','******','汤唯',23,2,to_date('1986-11-08','yyyy-MM-dd'),sysdate,sysdate,''); insert into tb_user values(8,'liuyan','******','柳岩',21,2,to_date('1995-08-07','yyyy-MM-dd'),to_date('2020-09-20','yyyy-MM-dd'), to_date('2020-09-20','yyyy-MM-dd'),'柳岩同学在学习表演'); |
tb_user(mysql):
| create table tb_user( id int(8) primary key, user_name varchar(16), password varchar(16), name varchar(16), age int(8), sex int(2), birthday Date, created Date, updated Date, note varchar(32) ); insert into tb_user values(1,'zhangsan','******','张三',30,1,'1984-08-08',now(),now(),''); insert into tb_user values(2,'lisi','******','李四',21,2,'1991-01-01',now(),now(),''); insert into tb_user values(3,'wangwu','******','王五',22,2,'1989-01-01',now(),now(),''); insert into tb_user values(4,'zhangwei','******','张伟',20,1,'1988-09-01',now(),now(),''); insert into tb_user values(5,'lina','******','李娜',28,1,'1985-01-01',now(),now(),''); insert into tb_user values(6,'lilei','******','李磊',23,1,'1988-08-08',now(),now(),''); insert into tb_user values(7,'tangwei','******','汤唯',23,2,'1986-11-08',now(),now(),''); insert into tb_user values(8,'liuyan','******','柳岩',21,2,'1995-08-07','2020-09-20','2020-09-20','柳岩同学在学习表演'); |
4.0.整合Jsp
spring boot官方不推荐使用jsp,因为jsp相对于一些模板引擎,性能都比较低,官方推荐使用thymeleaf,但是Spring boot整合jsp的过程已经完成,在这里记录一下。
引入必备依赖:
| <!-- jstl标签库 --> |
application.yml配置Jsp模板路径
| server: |
JSP页面示例:
index.jsp
| <%@ page contentType="text/html;charset=UTF-8" language="java" %> |
page.jsp
| <%@ page contentType="text/html;charset=UTF-8" language="java" %> |
controller
| @Controller |
SpringBoot启动类:略。
4.1.整合SpringMVC
虽然默认配置已经可以使用SpringMVC了,不过我们有时候需要进行自定义配置。
4.1.1.修改端口
查看SpringBoot的全局属性可知,端口通过以下方式配置:
| # 映射端口 server.port=80 |
重启服务后测试:
4.1.2.访问静态资源
现在,我们的项目是一个jar工程,那么就没有webapp,我们的静态资源该放哪里呢?
回顾我们上面看的源码,有一个叫做ResourceProperties的类,里面就定义了静态资源的默认查找路径: 
默认的静态资源路径为:
| classpath:/META-INF/resources/ classpath:/resources/ classpath:/static/ classpath:/public/ |
只要静态资源放在这些目录中任何一个,SpringMVC都会帮我们处理。
我们习惯会把静态资源放在classpath:/static/目录下。我们创建目录,并且添加一些静态资源:
重启项目后测试:
4.1.3.过滤器
过滤器与拦截器的区别:
1.过滤器和拦截器触发时机不一样,过滤器是在请求进入容器后,但请求进入servlet之前进行预处理的。请求结束返回也是,是在servlet处理完后,返回给前端之前。
2.拦截器可以获取IOC容器中的各个bean,而过滤器就不行,因为拦截器是spring提供并管理的,spring的功能可以被拦截器使用,在拦截器里注入一个service,可以调用业务逻辑。而过滤器是JavaEE标准,只需依赖servlet api,不需要依赖spring。
3.过滤器的实现基于回调函数。而拦截器(代理模式)的实现基于反射。
4.Filter是依赖于Servlet容器,属于Servlet规范的一部分,而拦截器则是独立存在的,可以在任何情况下使用。
5.Filter的执行由Servlet容器回调完成,而拦截器通常通过动态代理(反射)的方式来执行。
6.Filter的生命周期由Servlet容器管理,而拦截器则可以通过IoC容器来管理,因此可以通过注入等方式来获取其他Bean的实例,因此使用会更方便。
过滤器和拦截器非常相似,但是它们有很大的区别,最简单明了的区别就是过滤器可以修改request,而拦截器不能;过滤器需要在servlet容器中实现,拦截器可以适用于javaEE,javaSE等各种环境;拦截器可以调用IOC容器中的各种依赖,而过滤器不能;过滤器只能在请求的前后使用,而拦截器可以详细到每个方法。
总的来说,过滤器就是筛选出你要的东西,比如requeset中你要的那部分;拦截器在做安全方面用的比较多,比如终止一些流程。

过滤器(Filter):可以拿到原始的http请求,但是拿不到你请求的控制器和请求控制器中的方法的信息。
拦截器(Interceptor):可以拿到请求的控制器和方法,却拿不到请求方法的参数。
切片(Aspect):可以拿到方法的参数,但是却拿不到http请求和响应的对象。
过滤器有两种实现方式:
1.使用spring boot提供的FilterRegistrationBean注册Filter。
| import javax.servlet.*; import org.springframework.boot.web.servlet.FilterRegistrationBean; |
2.使用原生servlet注解定义Filter。
| import org.springframework.stereotype.Component; |
这里直接用@WebFilter就可以进行配置,同样,可以设置url匹配模式,过滤器名称等。这里需要注意一点的是@WebFilter这个注解是Servlet 3.0的规范,并不是Spring boot提供的。除了这个注解以外,我们还需在启动类中加另外一个注解:@ServletComponetScan,指定扫描的包。
两种方式的本质都是一样的,都是去FilterRegistrationBean注册自定义Filter。
过滤器应用场景:
• 过滤敏感词汇(防止sql注入)。
• 设置字符编码。
• URL级别的权限访问控制。
• 压缩响应信息。
4.1.4.拦截器
拦截器也是我们经常需要使用的,在SpringBoot中该如何配置呢?
拦截器不是一个普通属性,而是一个类,所以就要用到java配置方式了。在SpringBoot官方文档中有这么一段说明:
If you want to keep Spring Boot MVC features and you want to add additional MVC configuration (interceptors, formatters, view controllers, and other features), you can add your own @Configuration class of type WebMvcConfigurer but without @EnableWebMvc. If you wish to provide custom instances of RequestMappingHandlerMapping, RequestMappingHandlerAdapter, or ExceptionHandlerExceptionResolver, you can declare a WebMvcRegistrationsAdapter instance to provide such components.
If you want to take complete control of Spring MVC, you can add your own @Configuration annotated with @EnableWebMvc.
翻译:
如果你想要保持Spring Boot 的一些默认MVC特征,同时又想自定义一些MVC配置(包括:拦截器,格式化器, 视图控制器、消息转换器 等等),你应该让一个类实现WebMvcConfigurer,并且添加@Configuration注解,但是千万不要加@EnableWebMvc注解。如果你想要自定义HandlerMapping、HandlerAdapter、ExceptionResolver等组件,你可以创建一个WebMvcRegistrationsAdapter实例 来提供以上组件。
如果你想要完全自定义SpringMVC,不保留SpringBoot提供的一切特征,你可以自己定义类并且添加@Configuration注解和@EnableWebMvc注解
总结:通过实现WebMvcConfigurer并添加@Configuration注解来实现自定义部分SpringMvc配置。
实现如下: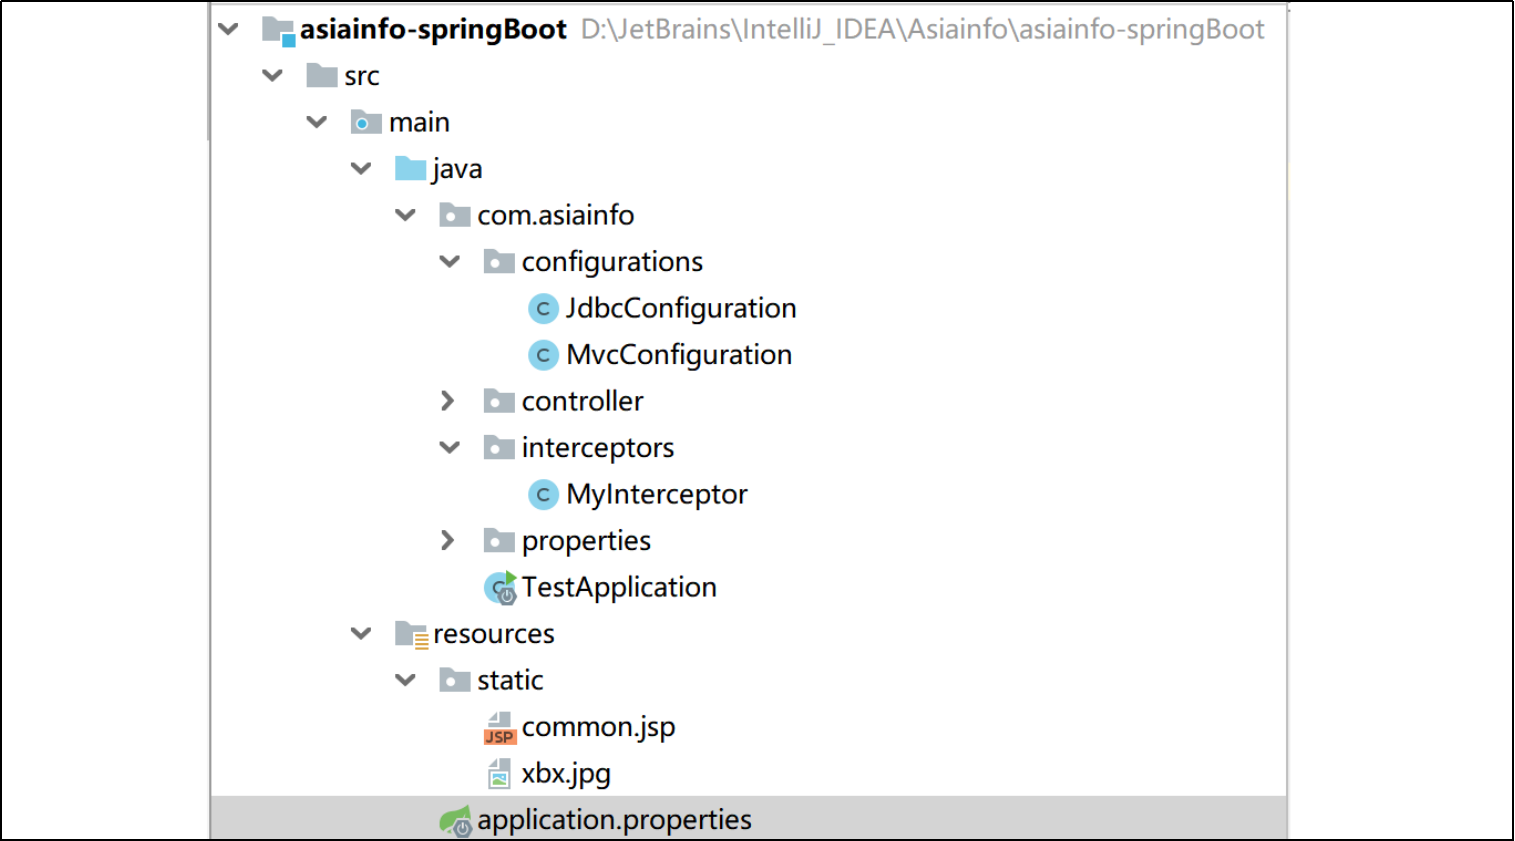
首先我们定义一个拦截器:
| @Component |
然后,我们定义配置类,注册拦截器:
| @Configuration |
接下来运行并查看日志:
| preHandle method is running! postHandle method is running! afterCompletion method is running! |
你会发现日志中只有这些打印信息,springMVC的日志信息都没有,因为springMVC记录的log级别是debug,springboot默认是显示info以上,我们需要进行配置。
SpringBoot通过logging.level.*=debug来配置日志级别,*填写包名(在application.properties添加)
| # 设置org.springframework包的日志级别为debug logging.level.org.springframework=debug |
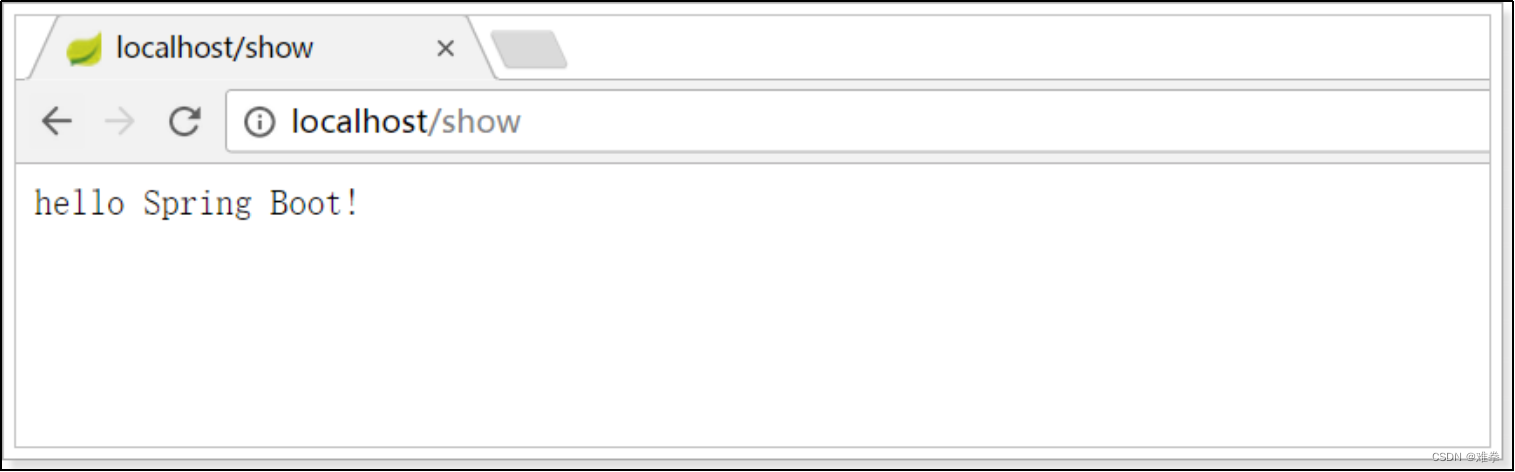
再次运行查看:
| 2018-06-04 22:58:53.692 DEBUG 49672 --- [p-nio-80-exec-8] s.w.s.m.m.a.RequestMappingHandlerMapping : Looking up handler method for path /show 2018-06-04 22:58:53.695 DEBUG 49672 --- [p-nio-80-exec-8] s.w.s.m.m.a.RequestMappingHandlerMapping : Returning handler method [public java.lang.String cn.itcast.controller.HelloController.test()] 2018-06-04 22:58:53.696 DEBUG 49672 --- [p-nio-80-exec-8] o.s.b.f.s.DefaultListableBeanFactory : Returning cached instance of singleton bean 'helloController' 2018-06-04 22:58:53.696 DEBUG 49672 --- [p-nio-80-exec-8] o.s.web.servlet.DispatcherServlet : Last-Modified value for [/show] is: -1 preHandle method is running! 2018-06-04 22:58:53.748 DEBUG 49672 --- [p-nio-80-exec-8] m.m.a.RequestResponseBodyMethodProcessor : Written [hello Spring Boot!] as "text/html" using [org.springframework.http.converter.StringHttpMessageConverter@4315e9af] postHandle method is running! 2018-06-04 22:58:53.749 DEBUG 49672 --- [p-nio-80-exec-8] o.s.web.servlet.DispatcherServlet : Null ModelAndView returned to DispatcherServlet with name 'dispatcherServlet': assuming HandlerAdapter completed request handling afterCompletion method is running! 2018-06-04 22:58:53.749 DEBUG 49672 --- [p-nio-80-exec-8] o.s.web.servlet.DispatcherServlet : Successfully completed request |
拦截器本质上是面向切面编程(AOP),符合横切关注点的功能都可以放在拦截器中来实现,主要的应用场景包括:
• 登录验证,判断用户是否登录。
• 权限验证,判断用户是否有权限访问资源,如校验token。
• 日志记录,记录请求操作日志(用户ip,访问时间等),以便统计请求访问量。
• 处理cookie、本地化、国际化、主题等。
• 性能监控,监控请求处理时长等。
• 通用行为:读取cookie得到用户信息并将用户对象放入请求,从而方便后续流程使用,还有如提取Locale、Theme信息等,只要是多个处理器都需要的即可使用拦截器实现)
4.2.整合连接池
4.2.1.配置
jdbc连接池是spring配置中的重要一环,在SpringBoot中该如何处理呢?
答案是不需要处理,我们只要找到SpringBoot提供的启动器即可:

在pom.xml中引入jdbc的启动器:
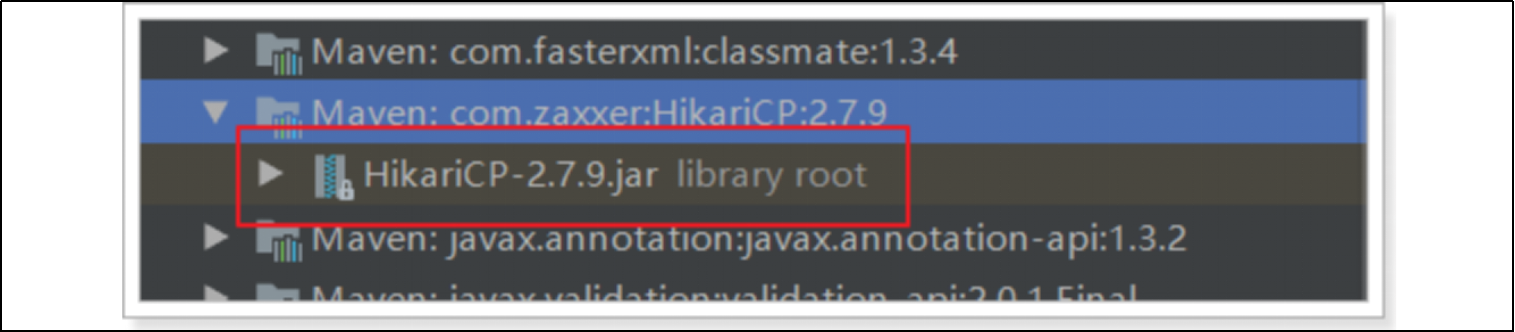
| <!-- 默认使用HikariCP连接池 --> |
SpringBoot已经自动帮我们引入了一个连接池:
HikariCP应该是目前速度最快的连接池了,我们看看它与c3p0的对比:
因此,我们只需要指定连接池参数即可:
| # 连接四大参数 |
当然,如果你更喜欢Druid连接池,也可以使用Druid官方提供的启动器:
| <!-- Druid连接池 --> |
而连接信息的配置与上面是类似的,只不过在连接池特有属性上,方式略有不同:
| #初始化连接数 |
4.2.2.连接池Hikari
| spring: |
• pool-name:该属性表示连接池的用户定义名称,主要出现在日志记录和JMX管理控制台中,以识别池和池配置。 默认值:自动生成。
• auto-commit:此属性控制从池返回的连接的默认自动提交行为。它是一个布尔值。 默认值:true。
• connection-timeout:此属性控制客户端(即您)等待来自池的连接的最大毫秒数。如果超过此时间而没有可用的连接,则会抛出SQLException。可接受的最低连接超时为250 ms。 默认值:30000(30秒)。
• connectionTestQuery:如果您的驱动程序支持JDBC4,我们强烈建议不要设置此属性。这是针对不支持JDBC4的"旧版"驱动程序的Connection.isValid() API。这是将在从池中为您提供连接之前执行的查询,以验证与数据库的连接仍然有效。同样,尝试运行不带该属性的池,如果驱动程序不兼容JDBC4,HikariCP将记录错误。 默认值:无。
• maximum-pool-size:此属性控制允许池达到的最大大小,包括空闲和使用中的连接。基本上,此值将确定到数据库后端的最大实际连接数。合理的值最好由您的执行环境确定。当池达到此大小并且没有空闲连接可用时,对getConnection()的调用将在超时之前最多阻塞connection-timeout毫秒。请阅读有关池大小的信息。 默认值:10。建议配置连接数为cpu核心数*2 + 磁盘数量。
• minimum-idle:此属性控制HikariCP尝试在池中维护的最小空闲连接数。如果空闲连接下降到该值以下,并且池中的总连接数少于maximum-pool-size,则HikariCP将尽最大努力快速而有效地添加其他连接。但是,为了获得最佳性能和对峰值需求的响应能力,我们建议不要设置此值,而应让HikariCP充当固定大小的连接池。 默认值:与maximum-pool-size相同。
• idle-timeout:此属性控制允许连接在池中保持空闲状态的最长时间。仅当定义为小于minimum-idle(最小空闲连接)时,此设置才适用maximum-pool-size。池达到连接后,空闲连接将不会退出minimum-idle。连接是否以空闲状态退役,最大变化为+30秒,平均变化为+15秒。在此超时之前,连接永远不会因为闲置而退役。值必须比max-lifetime小。值为0表示永远不会从池中删除空闲连接。最小允许值为10000ms(10秒)。 默认值:600000(10分钟)。
• max-lifetime:此属性控制池中连接的最大生存期。使用中的连接永远不会停止使用,只有在关闭连接后才将其删除。在逐个连接的基础上,应用较小的负衰减以避免池中的质量消灭。 我们强烈建议设置此值,它应该比任何数据库或基础结构施加的连接时间限制短几秒钟。 值0表示没有最大寿命(无限寿命),当然要遵守该idle-timeout设置。最小允许值为30000ms(30秒)。 默认值:1800000(30分钟)。
• metric-registry:此属性仅可通过编程配置或IoC容器使用。此属性允许您指定池将用于记录各种指标的Codahale / Dropwizard 的实例MetricRegistry。有关详细信息,请参见Metrics Wiki页面。 默认值:无。
• health-check-registry:此属性仅可通过编程配置或IoC容器使用。此属性允许您指定池将用于报告当前健康信息的Codahale / Dropwizard 的实例HealthCheckRegistry。有关 详细信息,请参见运行状况检查Wiki页面。 默认值:无。
很少使用的配置:
• initializationFailTimeout:此属性控制如果无法为初始连接成功播种池,则池是否将"快速失败"。任何正数都是尝试获取初始连接的毫秒数;在此期间,应用程序线程将被阻止。如果在此超时发生之前无法获取连接,则将引发异常。此超时被应用后的connectionTimeout 期。如果该值为零(0),则HikariCP将尝试获取并验证连接。如果获得连接,但验证失败,则将引发异常并且池不启动。但是,如果无法获得连接,则池将启动,但是以后获得连接的努力可能会失败。小于零的值将绕过任何初始连接尝试,并且池将在尝试在后台获取连接时立即启动。因此,以后获得连接的努力可能会失败。 默认值:1。
• isolateInternalQueries:此属性确定HikariCP是否在其自己的事务中隔离内部池查询,例如连接活动测试。由于这些通常是只读查询,因此几乎没有必要将它们封装在自己的事务中。此属性仅在autoCommit禁用时适用。 默认值:false。
• allowPoolSuspension:此属性控制是否可以通过JMX暂停和恢复池。这对于某些故障转移自动化方案很有用。当池被暂停,调用 getConnection()将不会超时,将一直保持到池恢复。 默认值:false。
• read-only: 此属性控制默认情况下从池获得的连接是否处于只读模式。请注意,某些数据库不支持只读模式的概念,而另一些数据库在将Connection设置为只读时提供查询优化。是否需要此属性在很大程度上取决于您的应用程序和数据库。 默认值:false。
• registerMbeans:此属性控制是否注册JMX管理Bean("MBean")。 默认值:false。
• catalog:该属性设置默认目录为支持目录的概念数据库。如果未指定此属性,则使用JDBC驱动程序定义的默认目录。 默认值:驱动程序默认值。
• connectionInitSql:此属性设置一个SQL语句,该语句将在每次创建新连接后执行,然后再将其添加到池中。如果此SQL无效或引发异常,它将被视为连接失败,并且将遵循标准的重试逻辑。 默认值:无。
• driverClassName:HikariCP将尝试仅通过来通过DriverManager解析驱动程序jdbcUrl,但对于某些较旧的驱动程序,driverClassName也必须指定。除非获得明显的错误消息,表明未找到驱动程序,否则请忽略此属性。 默认值:无。
• transactionIsolation:此属性控制从池返回的连接的默认事务隔离级别。如果未指定此属性,则使用JDBC驱动程序定义的默认事务隔离级别。仅当您具有所有查询通用的特定隔离要求时,才使用此属性。此属性的值是从不断的名称Connection 类,如TRANSACTION_READ_COMMITTED,TRANSACTION_REPEATABLE_READ等 默认值:驱动程序默认。
• validation-timeout:此属性控制将测试连接的活动性的最长时间。此值必须小于connection-timeout。可接受的最低验证超时为250毫秒。 默认值:5000。
• leakDetectionThreshold:此属性控制在记录表示可能的连接泄漏的消息之前,连接可以离开池的时间。值为0表示禁用泄漏检测。启用泄漏检测的最低可接受值为2000(2秒)。 默认值:0。
• dataSource:此属性仅可通过编程配置或IoC容器使用。通过此属性,您可以直接设置DataSource要由池包装的的实例,而不必让HikariCP通过反射来构造它。这在某些依赖项注入框架中可能很有用。指定此属性后,dataSourceClassName将忽略该属性和所有特定于DataSource的属性。 默认值:无。
• schema:该属性设置的默认模式为支持模式的概念数据库。如果未指定此属性,则使用JDBC驱动程序定义的默认模式。 默认值:驱动程序默认值。
• threadFactory:此属性仅可通过编程配置或IoC容器使用。此属性允许您设置的实例,该实例java.util.concurrent.ThreadFactory将用于创建池使用的所有线程。在某些只能通过ThreadFactory应用程序容器提供的线程创建线程的受限执行环境中,需要使用它。 默认值:无。
• scheduledExecutor:此属性仅可通过编程配置或IoC容器使用。此属性允许您设置的实例,该实例java.util.concurrent.ScheduledExecutorService将用于各种内部计划的任务。如果向HikariCP提供ScheduledThreadPoolExecutor 实例,则建议使用该实例setRemoveOnCancelPolicy(true)。 默认值:无。
4.3.整合mybatis
4.3.1.mybatis
SpringBoot官方并没有提供Mybatis的启动器,不过Mybatis官方自己实现了:
| <!--mybatis --> |
配置,基本没有需要配置的:
| # mybatis 别名扫描 |
需要注意,这里没有配置mapper接口扫描包,因此我们需要给每一个Mapper接口添加@Mapper注解,才能被识别。

| @Mapper |
4.3.2.通用mapper
通用Mapper的作者也为自己的插件编写了启动器,我们直接引入即可:
| <!-- 通用mapper --> |
不需要做任何配置就可以使用了。
| @Mapper |
至于如何使用,自己百度,用法类似于spring Date JPA。
4.3.3.配置mybatis映射
通用Mapper虽然方便,但是灵活性差,代码执行效率低,我们来使用配置文件配置mybatis
mybatis配置需求:
mapper.xml文件位置:SpringBoot yml配置文件中配置
mapper.xml对象别名扫描:SpringBoot yml配置文件中配置
驼峰映射:解决办法是在配置文件中加上开启驼峰映射的配置信息。根据配置文件的类型分为以下两种:
1.在properties文件中添加:
| #但如果已经在.properties中配置了 |
2.在mybatis的配置文件,如mybatis-config.xml中进行配置:
| <?xml version="1.0" encoding="UTF-8" ?> |
3.YML配置:
| mybatis: |
4.Mapper接口扫描:需要在SpringBoot启动类上配置Mapper接口扫描路径=>@MapperScan("com.example.mapper")
| @SpringBootApplication |
4.4.整合事务
其实,我们引入jdbc或者web的启动器,就已经引入事务相关的依赖及默认配置了。

至于事务,SpringBoot中通过注解来控制。就是我们熟知的@Transactional
| @Service |
4.5.整合Jpa
4.5.1.Jpa依赖注入
| <!--spring-boot-jpa--> |
至于如何使用,自己百度,用法类似于Hibernate JPA。
4.6.启动测试
添加UserController

内容:
| @Controller @Controller |
我们启动项目,查看:

5.Thymeleaf快速入门
SpringBoot并不推荐使用jsp,但是支持一些模板引擎技术:

以前大家用的比较多的是Freemarker,但是我们今天的主角是Thymeleaf!
5.1.什么是Thymeleaf?
简单说,Thymeleaf 是一个跟 Velocity、FreeMarker 类似的模板引擎,它可以完全替代 JSP 。相较于其他的模板引擎,它有如下四个极吸引人的特点:
动静结合:Thymeleaf 在有网络和无网络的环境下皆可运行,即它可以让美工在浏览器查看页面的静态效果,也可以让程序员在服务器查看带数据的动态页面效果。这是由于它支持 html 原型,然后在 html 标签里增加额外的属性来达到模板+数据的展示方式。浏览器解释 html 时会忽略未定义的标签属性,所以 thymeleaf 的模板可以静态地运行;当有数据返回到页面时,Thymeleaf 标签会动态地替换掉静态内容,使页面动态显示。
开箱即用:它提供标准和spring标准两种方言,可以直接套用模板实现JSTL、 OGNL表达式效果,避免每天套模板、改jstl、改标签的困扰。同时开发人员也可以扩展和创建自定义的方言。
多方言支持:Thymeleaf 提供spring标准方言和一个与 SpringMVC 完美集成的可选模块,可以快速的实现表单绑定、属性编辑器、国际化等功能。
与SpringBoot完美整合,SpringBoot提供了Thymeleaf的默认配置,并且为Thymeleaf设置了视图解析器,我们可以像以前操作jsp一样来操作Thymeleaf。代码几乎没有任何区别,就是在模板语法上有区别。
接下来,我们就通过入门案例来体会Thymeleaf的魅力:
5.2.提供数据
编写一个controller方法,返回一些用户数据,放入模型中,将来在页面渲染
| @GetMapping("/all") |
5.3.引入启动器
直接引入启动器:
| <!-- thymeleaf --> |
SpringBoot会自动为Thymeleaf注册一个视图解析器:
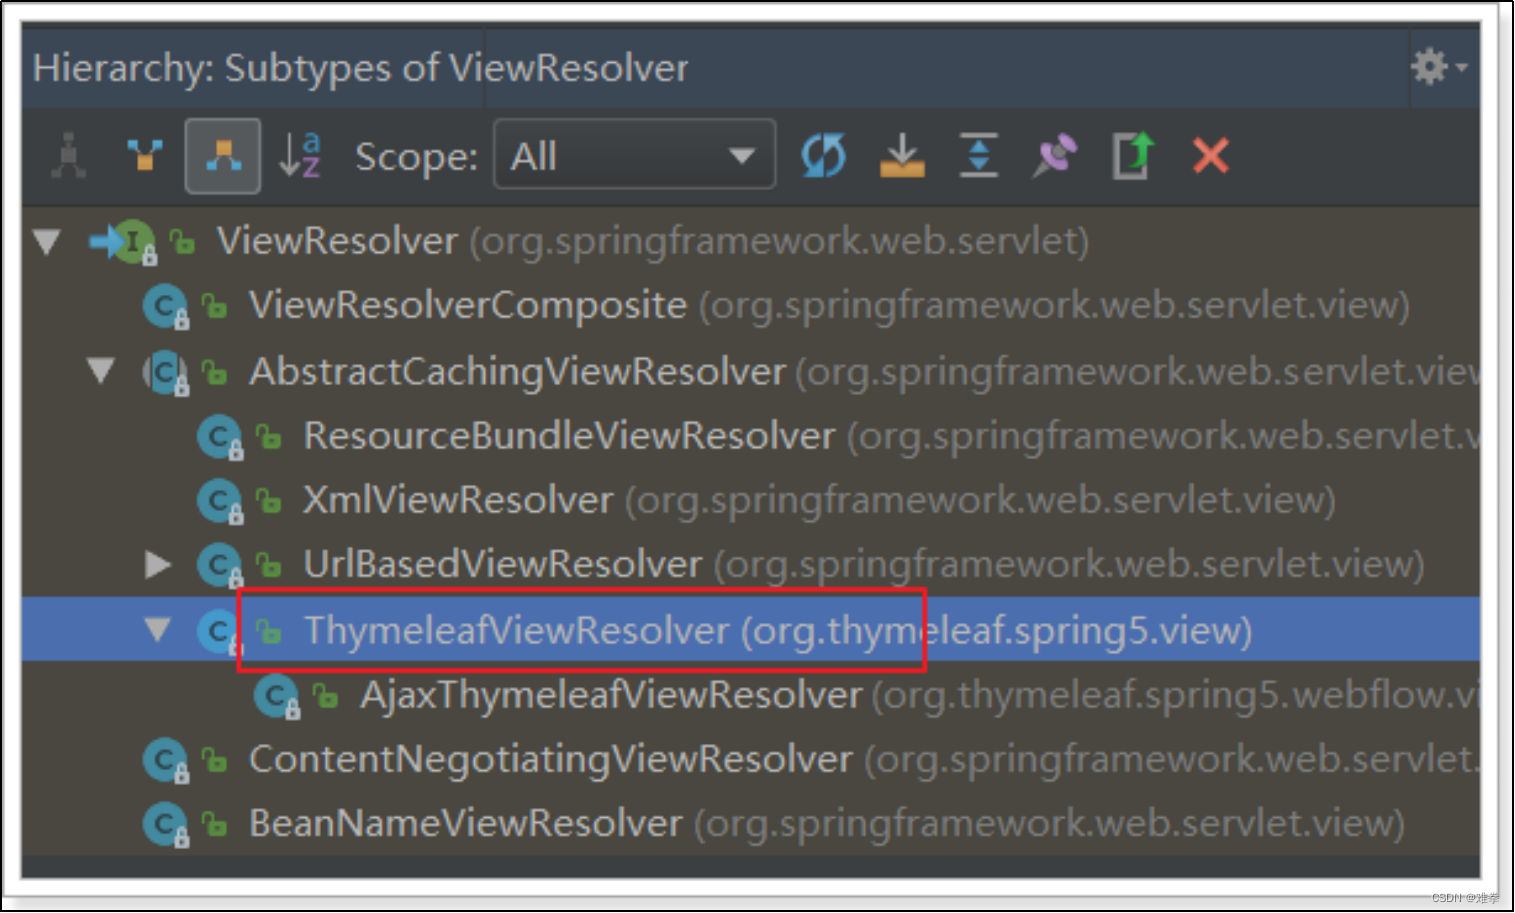
与解析JSP的InternalViewResolver类似,Thymeleaf也会根据前缀和后缀来确定模板文件的位置:

默认前缀:classpath:/templates/
默认后缀:.html
所以如果我们返回视图:users,会指向到 classpath:/templates/users.html
一般我们无需进行修改,默认即可。
5.4.静态页面
根据上面的文档介绍,模板默认放在classpath下的templates文件夹,我们新建一个html文件放入其中:

编写html模板,渲染模型中的数据:
注意,把html 的名称空间,改成:xmlns:th="http://www.thymeleaf.org" 会有语法提示。
| <!DOCTYPE html> |
我们看到这里使用了以下语法:
${} :这个类似与el表达式,但其实是ognl的语法,比el表达式更加强大
th-指令:th-是利用了Html5中的自定义属性来实现的。如果不支持H5,可以用data-th-来代替
th:each:类似于c:foreach 遍历集合,但是语法更加简洁
th:text:声明标签中的文本
例如<td th-text='${user.id}'>1</td>,如果user.id有值,会覆盖默认的1
如果没有值,则会显示td中默认的1。这正是thymeleaf能够动静结合的原因,模板解析失败不影响页面的显示效果,因为会显示默认值!
5.5.测试
接下来,我们打开页面测试一下:

5.6.模板缓存
Thymeleaf会在第一次对模板解析之后进行缓存,极大的提高了并发处理能力。但是这给我们开发带来了不便,修改页面后并不会立刻看到效果,我们开发阶段可以关掉缓存使用:
| # 开发阶段关闭thymeleaf的模板缓存 |
注意:
在Idea中,我们需要在修改页面后按快捷键:`Ctrl + Shift + F9` 对项目进行rebuild才可以。
eclipse中没有测试过。
我们可以修改页面,测试一下。
6.MySQL数据源时区
Spring-boot-MySQL时区异常
Spring-boot连接高版本MySQL数据库,报错:
| java.sql.SQLException: The server time zone value '???ú±ê×??±??' is unrecognized or represents more than one time zone. |
出现这个的原因是因为 mysql返回的时间总是有问题,比实际时间要早8小时。
| #链接的mysql |
解决办法
在jdbc连接的url后面加上serverTimezone=GMT即可解决问题,如果需要使用gmt+8时区,需要写成GMT%2B8问题就会解决。
7.SpringBoot工程部署Tomcat中运行
前期准备
首先需要搭建一个SpringBoot项目,这里我使用的是IDEA搭建SpringBoot+maven项目。
部署SpringBoot项目
首先需要修改SpringBoot项目的启动类,在使用SpringBoot直接启动的时候,启动类的代码如下:
| @SpringBootApplication |
而现在如果我们想要部署到外部tomcat上面,就需要修改一下这个启动类,修改后的启动类如下:
| @SpringBootApplication public class InterfaceTransmissionApplication extends SpringBootServletInitializer {
|
在修改了启动类之后,我们还需要在pom.xml文件中引入tomcat依赖,如下:
| <!--spring-web--> |
接下来就要将该项目打包成war了,IDEA打包项目:点击Build->Build Artifacts-,然后进行build即可,生成的war包会放到对应的项目根目录下的target目录下面
最后将该war包移动到tomcat/webapps目录下即可,然后启动tomcat,打开浏览器输入网址:localhost:port/war包名/在SpringBoot中RequestMapping设置的url请求,即可进入到对应的页面或者返回结果
8.理解 Spring ApplicationListener
ApplicationContext事件机制是观察者设计模式的实现,通过ApplicationEvent类和ApplicationListener接口,可以实现ApplicationContext事件处理。
如果容器中有一个ApplicationListener Bean,每当ApplicationContext发布ApplicationEvent时,ApplicationListener Bean将自动被触发。这种事件机制都必须需要程序显示的触发。
其中spring有一些内置的事件,当完成某种操作时会发出某些事件动作。比如监听ContextRefreshedEvent事件,当所有的bean都初始化完成并被成功装载后会触发该事件,实现ApplicationListener<ContextRefreshedEvent>接口可以收到监听动作,然后可以写自己的逻辑。
同样事件可以自定义、监听也可以自定义,完全根据自己的业务逻辑来处理。
内置事件
| Spring 内置事件 & 描述 |
|
| 1 |
ContextRefreshedEvent ApplicationContext 被初始化或刷新时,该事件被发布。这也可以在 ConfigurableApplicationContext接口中使用 refresh() 方法来发生。此处的初始化是指:所有的Bean被成功装载,后处理Bean被检测并激活,所有Singleton Bean 被预实例化,ApplicationContext容器已就绪可用 |
| 2 |
ContextStartedEvent 当使用 ConfigurableApplicationContext (ApplicationContext子接口)接口中的 start() 方法启动 ApplicationContext 时,该事件被发布。你可以调查你的数据库,或者你可以在接受到这个事件后重启任何停止的应用程序。 |
| 3 |
ContextStoppedEvent 当使用 ConfigurableApplicationContext 接口中的 stop() 停止 ApplicationContext 时,发布这个事件。你可以在接受到这个事件后做必要的清理的工作。 |
| 4 |
ContextClosedEvent 当使用 ConfigurableApplicationContext 接口中的 close() 方法关闭 ApplicationContext 时,该事件被发布。一个已关闭的上下文到达生命周期末端;它不能被刷新或重启。 |
| 5 |
RequestHandledEvent 这是一个 web-specific 事件,告诉所有 bean HTTP 请求已经被服务。只能应用于使用DispatcherServlet的Web应用。在使用Spring作为前端的MVC控制器时,当Spring处理用户请求结束后,系统会自动触发该事件。 |
业务方监听事件举例
比如要监听ContextRefreshedEvent的时可以实现ApplicationListener接口,并且传入要监听的事件
| @Component public class TestApplicationListener implements ApplicationListener<ContextRefreshedEvent>{ @Override public void onApplicationEvent(ContextRefreshedEvent contextRefreshedEvent) { System.out.println(contextRefreshedEvent); System.out.println("TestApplicationListener............................"); } } |
自定义事件
可以自定义事件,然后做完业务处理后手动发出。同上集成某个监听接口,接收到事件后进行业务处理
事件定义:
| public class EmailEvent extends ApplicationEvent{ private String address; private String text; public EmailEvent(Object source, String address, String text){ super(source); this.address = address; this.text = text; } public EmailEvent(Object source) { super(source); } //......address和text的setter、getter } |
监听定义
| public class EmailNotifier implements ApplicationListener{ public void onApplicationEvent(ApplicationEvent event) { if (event instanceof EmailEvent) { EmailEvent emailEvent = (EmailEvent)event; System.out.println("邮件地址:" + emailEvent.getAddress()); System.our.println("邮件内容:" + emailEvent.getText()); } else { System.our.println("容器本身事件:" + event); } } } |
业务触发
| public class SpringTest { public static void main(String args[]){ ApplicationContext context = new ClassPathXmlApplicationContext("bean.xml"); //创建一个ApplicationEvent对象 EmailEvent event = new EmailEvent("hello","[email protected]","This is a test"); //主动触发该事件 context.publishEvent(event); } } |
不管是内置监听还是外部自定义监听一定要把实现ApplicationListener的类定义成一个bean才行,可以是通过注解@Component等也可以通过xml的方式去执行。
springboot自启动加载数据库数据&初始化加载线程☟
自启动加载数据库数据到项目内存中:
1.应用场景:其实一般来说配置中心就可以解决很多自启动的一些配置参数等等。但是有的比较大的内容放配置文件中去读感觉不是很合理。目前我自己的应用场景就是把一些需要的参数装载到自己的静态全局变量中。方便使用。
2.步骤-(个人建议新建一个包。我的命名就叫start,方便后面查看)
| //定义Spring管理Bean @Component //实现ApplicationRunner接口-实现初始化加载该类 public class XxStart implements ApplicationRunner { //这里是你注入你操作数据库的方法 也可以在下面业务代码中自己写,看你们用的框架了 @Autowired private XxService xxService;
@Override public void run(ApplicationArguments args) throws Exception { try{ 这里是你的业务代码 }catch(Exception e){ 这里是异常 } } } |
初始化加载线程:
1.应用场景:这个就看每个人自己的业务需求了。。。
第一步:
| public class XxStartup implements ApplicationListener<ContextRefreshedEvent> { /** * 业务代码 */ @Override public void onApplicationEvent(ContextRefreshedEvent event) { ApplicationContext ac = event.getApplicationContext(); //把你需要的线程先加载进来 springboot初始化装配之后直接启动。 ServerExceptionThread serverExceptionThread = ac.getBean(XxThread.class); Thread thread = new Thread(serverExceptionThread); thread.start(); } } |
第二步:自己的线程类 该干嘛干嘛。。。
第三步:
| @SpringBootApplication public class XxApplication {
public static void main(String[] args) { SpringApplication springApplication = new SpringApplication(XxApplication.class); //Adiciona na inicialização springApplication.addListeners( new XxStartup()); springApplication.run(args); } } |