Artigo Diretório
-
- Prefácio
-
-
- 1. Defina o arquivo de configuração do banco de dados
- 2. Entre no banco de dados para criar uma conta escrava
- 3. Verifique o log binlog gerado e registre o nome do log e a posição inicial.
- 4. Entre no banco de dados para as configurações de leitura do escravo, especifique o endereço, usuário, senha, log, etc. da biblioteca de serviço principal a ser lida
- 5. Comece a copiar e verifique.
-
Prefácio
Ambiente:
banco de dados Centos7 : Mysql5.7
library 1 address: 10.8.161.9
library 2 address: 10.8.161.18
1. Defina o arquivo de configuração do banco de dados
Biblioteca 1:
vim /etc/my.cnf
[mysql] 下添加如下
server-id=1 #任意自然数n,只要保证两台MySQL主机不重复就可以
log_bin=master-bin #开启二进制日志
auto_increment_increment=2 #步进值auto_imcrement。一般有n台主MySQL就填n
auto_increment_offset=1 #起始值。一般填第n台主MySQL。此时为第一台主MySQL
binlog-ignore=mysql #忽略mysql库
binlog-ignore=information_schema #忽略information_schema库
replicate-do-db=test #要同步的数据库,默认所有库
Biblioteca 2
vim /etc/my.cnf
[mysqld]下添加如下
server-id=2 #任意自然数n,只要保证两台MySQL主机不重复就可以
log_bin=master-bin #开启二进制日志
auto_increment_increment=2 #步进值auto_imcrement。一般有n台主MySQL就填n
auto_increment_offset=2 #起始值。一般填第n台主MySQL。此时为第一台主MySQL
binlog-ignore=mysql #忽略mysql库
binlog-ignore=information_schema #忽略information_schema库
replicate-do-db=test #要同步的数据库,默认所有库
2. Entre no banco de dados para criar uma conta escrava
Biblioteca 1:
进入数据库创建
mysql > grant replication slave on *.*  to  'test(#用户名)'@'10.8.161.18(#指定库2的地址访问)'  identified by 'aA123.com(#密码)';
mysql > exit
systemctl restart mysqld    # 重启数据库 (目的:刷新新创的用户、刷新刚刚的配置文件,例如开启了日志文件)
Biblioteca 2:
进入数据库创建
mysql > grant replication slave on *.*  to  'test(#用户名)'@'10.8.161.9(#指定库1的地址访问)'  identified by 'aA123.com(#密码)';
mysql > exit
systemctl restart mysqld    # 重启数据库 (目的:刷新新创的用户、刷新刚刚的配置文件,例如开启了日志文件)
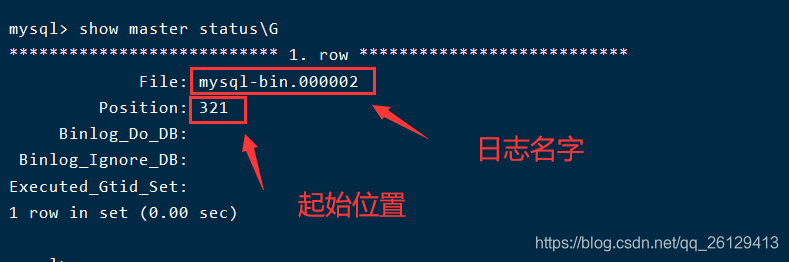
3. Verifique o log binlog gerado e registre o nome do log e a posição inicial.
Biblioteca 1:
进入数据库
mysql> show master status\G
Biblioteca 2:
进入数据库
mysql> show master status\G

4. Entre no banco de dados para as configurações de leitura do escravo, especifique o endereço, usuário, senha, log, etc. da biblioteca de serviço principal a ser lida
Biblioteca 1:
mysql> \e
CHANGE MASTER TO
MASTER_HOST='10.8.161.18',    # 指定库2的地址
MASTER_USER='tese',           # 指定库2创建的用户名
MASTER_PASSWORD='aA123com',   # 指定库2创建的密码
MASTER_LOG_FILE='mysql-bin.000002',    # 指定库2的日志文件名
MASTER_LOG_POS=301;                    # 指定库2的日志起始位置307
    -> ;
Biblioteca 2:
mysql> \e
CHANGE MASTER TO
MASTER_HOST='10.8.161.9',     # 指定库1的地址
MASTER_USER='tese',           # 指定库1创建的用户名
MASTER_PASSWORD='aA123com',   # 指定库1创建的密码
MASTER_LOG_FILE='mysql-bin.000002',    # 指定库1的日志文件名
MASTER_LOG_POS=321;                    # 指定库1的321
    -> ;
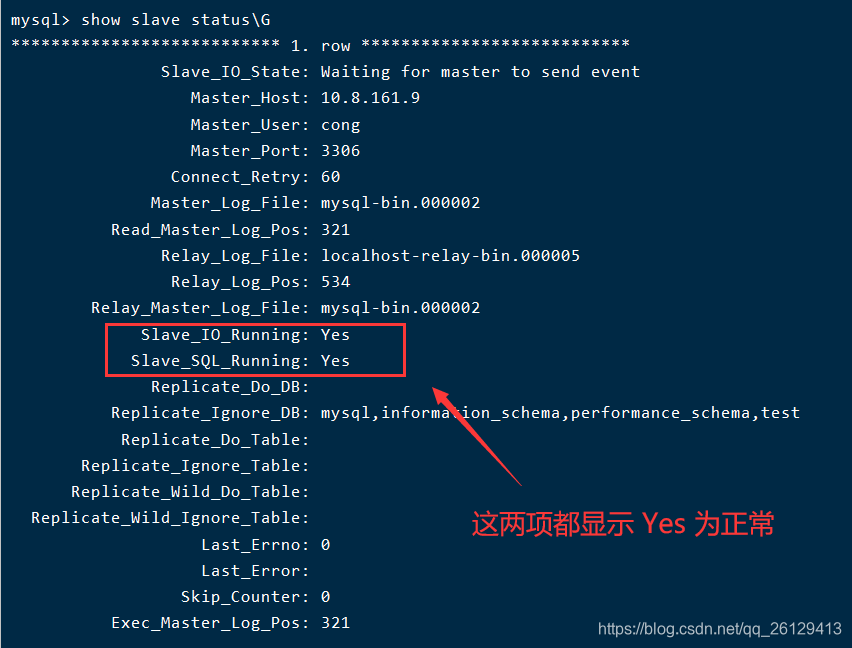
5. Comece a copiar e verifique.
Biblioteca 1:
mysql >  start slave;    #启动
mysql > show slave status\G     #查看

Biblioteca 2:
mysql >  start slave;    #启动
mysql > show slave status\G     #查看
========================================================== ====================================================== == ===================================================== === ==================================================== ==== =================================================== ===== ================================================
Navegar e assistir, se correto Você é útil , goste (σ ゚ ∀ ゚) σ…: * ☆