ELK + Redis plataforma de análise de log de construção
ELK + Redis plataforma de análise de log de construção
1.ELK Perfil
ELKStack Isso ElasticSearch + Logstash + Kibana. Log monitoramento e análise para garantir o funcionamento estável do negócio, que desempenhou um papel muito importante. Esse acompanhamento nginx análise de log, há nginx arquivo de log, o status de cada pedido tem registros do arquivo de log semelhante, pode ser analisado através da leitura do arquivo de log; Redis apenas uma estrutura de lista usado como uma fila, logstash para armazenar a transmissão de dados de registo. Então ElasticSearch pode ser analisado e investigado.
Este artigo é construir um sistema de recolha e análise de log distribuído. agente logstash e indexador tem dois papéis. Para o papel do agente em um web separada acima da máquina, em seguida, o agente de ler continuamente nginx arquivo de log sempre que lê as novas informações após o log, o log será transferido para a fila em uma rede Redis. Para estes registos não tratados na fila, existem vários indexador logstash diferente recebe e análises. Depois de analisar a análise busca ElasticSearch armazenado. Em seguida, exibir a interface web, entrando Kibana unificada.
intermediar geralmente escolhem Redis. Mas eu já vi um monte de utilização para nenhuma cena logstash sucesso como um shipper (também o agente do conceito), ou não usar ElasticSearch como um armazenamento de dados que não é indexador. Então, nós realmente não precisa desses conceitos. Só precisa aprender como usar e processo configure logstash e depois aplicá-lo à sua infra-estrutura de gerenciamento de log em seu local mais adequado é o suficiente.
2. Ambiente de software
jdk 1.8.0_20
Redis-2.8.20.tar.gz
ElasticSearch-1.7.1.tar.gz
logstash-1.5.3.tar.gz
Kibana-4.1.1-linux-x64.tar.gz
instalação 3.Redis
Instalação para executar os passos de:
| #tar zxvf redis-2.8.20.tar.gz #cd repeat-2.8.20 #faço #make instalar |
Início:
nohup redis-servidor /etc/redis/redis.conf> /etc/redis/nohup.out &
instalação 4.Elasticserach
ElasticSearch padrão HTTP porta de serviços externos é 9200, a interação entre os nós é a porta TCP 9300, nota a porta TCP aberta.
instalação 4.1Elasticsearch
Baixar a versão mais recente do pacote tar do site oficial e instalá-lo:
| # Wget https://download.elastic.co/elasticsearch/elasticsearch/elasticsearch-1.7.1.tar.gz # Mkdir / usr / / alces locais # Tar zxf ElasticSearch-1.7.1.tar.gz -C / usr / local / Elk / # Ln -s /usr/local/elk/elasticsearch-1.7.1/bin/elasticsearch / usr / bin |
4.2 arquivos de configuração
O arquivo de configuração está localizado ElasticSearch: <elasticsearch_dir> /config/elasticsearch.yml
O padrão é (sem qualquer modificação pode ser utilizada normalmente) anotação completa, modificado como se segue:
| cluster.name = es_cluster node.name = node0 path.data = / dados / ElasticSearch / dados path.logs = / dados / ElasticSearch / logs
# O nome do host atual ou IP, aqui está meus alces network.host = elk network.port = 9200 |
perfis detalhados
| cluster.name:elasticsearch ↑ es conjunto de configuração nome, o padrão é ElasticSearch, ES ES automaticamente descobre no mesmo segmento de rede, se houver vários clusters no mesmo segmento de rede, você pode usar essa propriedade para distinguir entre diferentes clusters. node.name:"FranzKafka” ↑ nome do nó, o nome padrão aleatoriamente atribuídos a um nome da lista, a lista de arquivos de configuração es pasta name.txt no pacote jar, que adicionam um monte de nomes interessantes. node.master: true ↑ especificar se o nó está qualificado para ser eleito como o nó, o padrão é verdade, es é o padrão aglomerado primeira máquina para o mestre, se esta máquina será ligada à re-eleição de mestre. node.data:true ↑ especificar se o nó armazenar os dados do índice, o padrão é verdadeiro. index.number_of_shards: 5 ↑ número de índice fatia das configurações padrão, o padrão é cinco. index.number_of_replicas: 1 ↑ Defina o número padrão de cópias do índice, o padrão é uma cópia. path.conf: caminho / / a / conf ↑ configurações são armazenadas caminho para o arquivo de configuração, o padrão é o arquivo de configuração na pasta do diretório raiz es. path.data:/path/to/data ↑ Conjunto caminho de armazenamento de dados de índice, arquivo de dados na pasta raiz padrão es pode ser fornecida uma pluralidade de caminhos de armazenamento, separados por vírgulas, por exemplo: path.data:/path/to/data1,/path/to/data2 path.work:/path/to/work ↑ configurações são armazenadas caminho dos arquivos temporários, arquivos de trabalho padrão na pasta diretório raiz es. path.logs: caminho / / a / logs ↑ definir o caminho de armazenamento do arquivo de log, o padrão é os arquivos de log na pasta de diretórios raiz es path.plugins: caminho / / a / plugins ↑ configurações de caminho de armazenamento widget padrão plugins arquivos na pasta do diretório raiz es bootstrap.mlockall: true ↑ Ajustado para true para bloquear a memória. Porque quando JVM começa a trocar eficiência es será reduzida, de modo a garantir que ele não faz swap, e pode ES_MIN_MEM dois ES_MAX_MEM variável de ambiente para o mesmo valor, e para assegurar que a máquina tem suficiente memória atribuída es. Mas também permite que um ElasticSearch processo pode bloquear memória, em Linux podem `comando ulimit-lunlimited`. network.bind_host: 192.168.0.1 ↑设置绑定的ip地址,可以是ipv4或ipv6的,默认为0.0.0.0。network.publish_host:192.168.0.1 设置其它节点和该节点交互的ip地址,如果不设置它会自动判断,值必须是个真实的ip地址。 network.host:192.168.0.1 ↑这个参数是用来同时设置bind_host和publish_host上面两个参数。 transport.tcp.port:9300 ↑设置节点间交互的tcp端口,默认是9300。 transport.tcp.compress:true ↑设置是否压缩tcp传输时的数据,默认为false,不压缩。 http.port:9200 ↑设置对外服务的http端口,默认为9200。 http.max_content_length:100mb ↑设置内容的最大容量,默认100mb http.enabled:false ↑是否使用http协议对外提供服务,默认为true,开启。 gateway.type:local ↑gateway的类型,默认为local即为本地文件系统,可以设置为本地文件系统,分布式文件系统,hadoop的HDFS,和amazon的s3服务器,其它文件系统的设置方法下次再详细说。 gateway.recover_after_nodes:1 ↑设置集群中N个节点启动时进行数据恢复,默认为1。 gateway.recover_after_time:5m ↑设置初始化数据恢复进程的超时时间,默认是5分钟。 gateway.expected_nodes:2 ↑设置这个集群中节点的数量,默认为2,一旦这N个节点启动,就会立即进行数据恢复。 cluster.routing.allocation.node_initial_primaries_recoveries:4 ↑初始化数据恢复时,并发恢复线程的个数,默认为4。 cluster.routing.allocation.node_concurrent_recoveries:2 ↑添加删除节点或负载均衡时并发恢复线程的个数,默认为4。 indices.recovery.max_size_per_sec:0 ↑设置数据恢复时限制的带宽,如入100mb,默认为0,即无限制。 indices.recovery.concurrent_streams:5 ↑设置这个参数来限制从其它分片恢复数据时最大同时打开并发流的个数,默认为5。 discovery.zen.minimum_master_nodes:1 ↑设置这个参数来保证集群中的节点可以知道其它N个有master资格的节点。默认为1,对于大的集群来说,可以设置大一点的值(2-4) discovery.zen.ping.timeout:3s ↑设置集群中自动发现其它节点时ping连接超时时间,默认为3秒,对于比较差的网络环境可以高点的值来防止自动发现时出错。 discovery.zen.ping.multicast.enabled:false ↑设置是否打开多播发现节点,默认是true。 discovery.zen.ping.unicast.hosts:[“host1″,”host2:port”,”host3[portX-portY]”] ↑设置集群中master节点的初始列表,可以通过这些节点来自动发现新加入集群的节点 |
4.3安装插件(可选)
可以在线安装Head插件:
#cd <elasticsearch_dir>
#./bin/plugin install mobz/elasticsearch-head
Elasticsearch-kopf插件可以查询Elasticsearch中的数据:
#./bin/plugin install lmenezes/elasticsearch-kopf
4.4启动
# elasticsearch start -d
4.5测试
出现200返回码表示ok
| # elasticsearch start -d # curl -X GET http://localhost:9200 { "status" : 200, "name" : "Wasp", "cluster_name" : "elasticsearch", "version" : { "number" : "1.7.1", "build_hash" : "b88f43fc40b0bcd7f173a1f9ee2e97816de80b19", "build_timestamp" : "2015-07-29T09:54:16Z", "build_snapshot" : false, "lucene_version" : "4.10.4" }, "tagline" : "You Know, for Search" } |
5.Logstash安装
Logstash默认的对外端口是9292,如果防火墙开启了要打开tcp端口。
5.1源码安装
执行如下命令进行安装:
| # wget https://download.elastic.co/logstash/logstash/logstash-1.5.3.tar.gz # tar -zxf logstash-1.5.3.tar.gz -C /usr/local/elk # mkdir /usr/local/elk/logstash-1.5.3/etc |
5.2yum安装
还可以采用yum的方式安装
| # rpm --import https://packages.elasticsearch.org/GPG-KEY-elasticsearch #download public key # vi /etc/yum.repos.d/CentOS-Base.repo [logstash-1.5] name=Logstash repository for 1.5.x packages baseurl=http://packages.elasticsearch.org/logstash/1.5/centos gpgcheck=1 gpgkey=http://packages.elasticsearch.org/GPG-KEY-elasticsearch enabled=1 # yum install logstash #yum安装会安装在/opt目录下 |
5.3测试
| # cd <logstash_dir> #./bin/logstash -e 'input{stdin{}}output{stdout{codec=>rubydebug}}' |
然后你会发现终端在等待你的输入。
敲入 Hello World,回车,然后看看会返回什么结果!
| Hello World { "message" => "Hello World", "@version" => "1", "@timestamp" => "2017-03-21T06:45:59.349Z", "host" => "localhost.localdomain" } |
5.4设置日志格式
本次要监控nginx和apache,需要修改nginx.conf和httpd.conf,设置日志格式。
修改nginx.conf
| # cd <nginx_dir>/conf # vi nginx.conf #设置log_format,去掉注释 log_format main '$remote_addr - $remote_user [$time_local] "$request" ' '$status $body_bytes_sent "$http_referer" ' '"$http_user_agent" "$http_x_forwarded_for"'; access_log logs/host.access.log main; #设置access日志,有访问时自动写入此文件 # nginx -s reload |
修改httpd.conf
| # cd <apache_dir>/conf # vi httpd.conf #设置如下日志格式 LogFormat "%h %l %u %t %D \"%r\" %>s %b \"%{Referer}i\" \"%{User-Agent}i\" \"%{Cookie}i\" \"%{Set-Cookie}o\"" combined |
5.5配置logstash agent
5.5.1配置文件
logstash agent负责收集日志信息传送到redis队列上。本次收集apache,nginx两处日志:
# cd /usr/local/elk/logstash-1.5.3/
# mkdir etc
# vi logstash_agent.conf
加入如下内容:
| input { file { type => "apache" path => ["/log/access_log"] #↑多个源可以写成path => ["/var/log/messages","/var/log/*.log"] }
file { type => "nginx" path => ["/usr/share/nginx/logs/access.log"] } } output { redis { host => "127.0.0.1" #redis server data_type => "list" key => "logstash:redis" } } |
5.5.2input常用字段
input file部分还有如下可选字段:
| input { file { #↓监听文件的路径 path => ["/var/log/*","/log/test.log"] #排除不想监听的文件 exclude => "1.log" #↓设置多长时间扫描目录,发现新文件 discover_interval => 15 #↓设置多长时间检测文件是否修改 stat_interval => 1 #↓监听文件的起始位置,默认是end start_position => beginning
#↓监听文件读取信息记录的位置 sincedb_path => "/log/add.log" #↓设置多长时间会写入读取的位置信息 sincedb_write_interval => 15 } } |
5.5.3启动
启动logstash agent:
# nohup /usr/local/elk/logstash-1.5.3/bin/logstash -f /usr/local/elk/logstash-1.5.3/etc/logstash_agent.conf &
5.6配置logstash indexer
5.6.1配置文件
indexer负责将redis里的日志导入到elasticsearch里进行搜索:
#cd /usr/local/elk/logstash-1.5.3/etc
#vi logstash_indexer.conf
加入如下内容:
| input { #↓定义源为redis redis { host => "127.0.0.1" data_type => "list" key => "logstash:redis" type => "redis-input" } }
#filter部分通过if语句根据不同的type进行匹配不同的grok规则. filter { if [type] == "apache" { #↓定义apache日志的索引规则,type:apache已在logstash_agent.conf文件中定义. grok { match => [ "message", "%{IPORHOST:http_host} (%{IPORHOST:client_ip}|-) - \"(?:%{WORD:http_verb} %{NOTSPACE:http_request} (?: HTTP/%{NUMBER:http_version})?|%{DATA:raw_http_request})\" %{NUMBER:http_status_code} (?:%{NUMBER:bytes_read}|-) %{QS:referrer} %{QS:agent} %{QS:cookie_in} (%{QS:cookie_out}|-)"] } }
if [type] == "nginx" { #↓定义nginx日志的索引规则,type:nginx已在logstash_agent.conf文件中定义. grok { match => [ "message", "%{IPORHOST:http_host} - - \"(?:%{WORD:http_verb} %{NOTSPACE:http_request} HTTP/%{NUMBER:http_version}\" %{NUMBER:http_status_code} (?:%{NUMBER:bytes_read}|-)) %{QS:referrer} %{QS:agent} %{QS:forwarded}"] } } }
#↓output部分通过if语句根据不同的type输出成不同的索引,该索引需要在kibana中进行创建,见后续部分. output { if [type] == "apache" { elasticsearch { embedded => false protocol => "http" host => "localhost" port => "9200" index => "apache_access" } }
if [type] == "nginx" { elasticsearch { embedded => false protocol => "http" host => "localhost" port => "9200" index => "nginx_access" } } } |
注意:
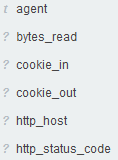
grok规则编写时要注意字段要和日志格式一一对应。定义成功的才会在kibana中显示定义的字段,不成功则不会显示。如下为定义成功的apache的部分规则。
5.6.2启动
启动logstash indexer
nohup /usr/local/elk/logstash-1.5.3/bin/logstash -f /usr/local/elk/logstash-1.5.3/etc/logstash_indexer.conf &
6.Kibana安装
kibana本质上是elasticsearch web客户端,是一个分析和可视化elasticsearch平台,可通过kibana搜索、查看和与存储在elasticsearch的索引进行交互。可以很方便的执行先进的数据分析和可视化多种格式的数据,如图表、表格、地图等。
6.1下载安装
kibana负责将elasticsearch搜索的结果进行展示。
# wget https://download.elastic.co/kibana/kibana/kibana-4.1.1-linux-x64.tar.gz
# tar -zxvf kibana-4.1.1-linux-x64.tar.gz
# mv kibana-4.1.1-linux-x64 /usr/local/elk
# 启动
# cd /usr/local/elk/kibana/bin
# ./kibana &
kibana监听的端口为5601.
6.2配置文件
kibana的配置文件位于<kibana_dir>/config/kibana.yml
可自定义IP、端口、elasticsearch_url等。
| # Kibana is served by a back end server. This controls which port to use. port: 5601
# The host to bind the server to. host: "0.0.0.0"
# The Elasticsearch instance to use for all your queries. elasticsearch_url: "http://localhost:9200"
# preserve_elasticsearch_host true will send the hostname specified in `elasticsearch`. If you set it to false, # then the host you use to connect to *this* Kibana instance will be sent. elasticsearch_preserve_host: true
# Kibana uses an index in Elasticsearch to store saved searches, visualizations # and dashboards. It will create a new index if it doesn't already exist. kibana_index: ".kibana"
# If your Elasticsearch is protected with basic auth, this is the user credentials # used by the Kibana server to perform maintence on the kibana_index at statup. Your Kibana # users will still need to authenticate with Elasticsearch (which is proxied thorugh # the Kibana server) # kibana_elasticsearch_username: user # kibana_elasticsearch_password: pass
# If your Elasticsearch requires client certificate and key # kibana_elasticsearch_client_crt: /path/to/your/client.crt # kibana_elasticsearch_client_key: /path/to/your/client.key
# If you need to provide a CA certificate for your Elasticsarech instance, put # the path of the pem file here. # ca: /path/to/your/CA.pem
# The default application to load. default_app_id: "discover"
# Time in milliseconds to wait for elasticsearch to respond to pings, defaults to # request_timeout setting # ping_timeout: 1500
# Time in milliseconds to wait for responses from the back end or elasticsearch. # This must be > 0 request_timeout: 300000
# Time in milliseconds for Elasticsearch to wait for responses from shards. # Set to 0 to disable. shard_timeout: 0
# Time in milliseconds to wait for Elasticsearch at Kibana startup before retrying # startup_timeout: 5000
# Set to false to have a complete disregard for the validity of the SSL # certificate. verify_ssl: true
# SSL for outgoing requests from the Kibana Server (PEM formatted) # ssl_key_file: /path/to/your/server.key # ssl_cert_file: /path/to/your/server.crt
# Set the path to where you would like the process id file to be created. # pid_file: /var/run/kibana.pid
# If you would like to send the log output to a file you can set the path below. # This will also turn off the STDOUT log output. # log_file: ./kibana.log
# Plugins that are included in the build, and no longer found in the plugins/ folder bundled_plugin_ids: - plugins/dashboard/index - plugins/discover/index - plugins/doc/index - plugins/kibana/index - plugins/markdown_vis/index - plugins/metric_vis/index - plugins/settings/index - plugins/table_vis/index - plugins/vis_types/index - plugins/visualize/index |
7.ELK+redis测试
如果ELK+redis都没启动,以下命令启动:
| #启动redis #nohup redis-server /etc/redis/redis.conf >/etc/redis/nohup.out &
#启动elasticsearch #elasticsearch start -d
#启动agent #cd /usr/local/elk/logstash-1.5.3 nohup ./bin/logstash -f ./etc/logstash_agent.conf > agent.out &
#启动indexer #cd /usr/local/elk/logstash-1.5.3 nohup ./bin/logstash -f ./etc/logstash_indexer.conf >indexer.out&
#启动kibana #cd /usr/local/elk/kibana nohup ./bin/kibana >kibana.out & |
打开kibana页面:http://192.168.100.191:5601,即可看到界面。
转载于:https://blog.51cto.com/showing/1927173
