このトピックでは、デフォルトで表示する方法を示しリストビューを XAFアプリケーションでピボットテーブルとして:
- ピボットグリッドモジュールを追加
- リストビューのリストエディタを変更
- チャートの設定を指定
- アプリケーションの実行
このトピックでは、どのようにピボットテーブルビューのショーのためのアプリケーションリストでXAFのデフォルトに示します。
- ピボットグリッドモジュールを追加します。
- 変更リストエディタリストビュー
- チャート設定を指定します。
- アプリケーションを実行します。
記事では、サンプル使用して注文 ビジネスオブジェクトと顧客、製品名、製品カテゴリ、価格、および単位購入のフィールドを。
ここでサンプル注文ビジネス・オブジェクト、「顧客、製品名、製品カテゴリ、価格、および購入単位」フィールドを使用されるように。

あなたは、表示することができます注文 リストビューを追加することで、ピボットテーブルとピボットグリッドモジュールをアプリケーションに、デフォルトの交換グリッドリストエディタをピボットグリッドリストエディタで。スクリーンショットは、以下の結果を示しています。
アプリケーション・モジュールにデータを追加することで遠近グリッドとグリッドのデフォルトリストエディタがピボットテーブルのリストとして表示することができる「ピボットグリッドリストエディタ」ビューの注文に置き換えられています。スクリーンショットは、以下の結果を示しています。
あなたにはピボットグリッドリストエディタでの例を見ることができますFeatureCenterの XAFに同梱のデモ。フィーチャーセンターのデモがにインストールされている%PUBLIC%を\ドキュメント\ DevExpress社のデモ19.2 \コンポーネント\ eXpressApp Frameworkの\ FeatureCenterデフォルトで。このデモのASP.NETのバージョンは、オンラインで入手可能ですhttp://demos.devexpress.com/XAF/FeatureCenter/
您可以在 XAF 附带的功能中心演示中查看具有枢轴网格列表编辑器的示例。功能中心演示安装在%PUBLIC%\Documents\DevExpress Demos 19.2\Components\eXpressApp Framework\FeatureCenter by default. The ASP.NET version of this demo is available online at http://demos.devexpress.com/XAF/FeatureCenter/
.
Note 注意
Mobile applications do not support the Pivot Grid module.
移动应用程序不支持枢轴网格模块。
Add the Pivot Grid Module
添加枢轴网格模块
- Double click the Module.Win project's WinModule.cs file to invoke the Module Designer for this project.
-
Drag the PivotGridWindowsFormsModule item from the Toolbox onto the Required Modules panel.
- 双击 Module.Win 项目的WinModule.cs文件以调用此项目的模块设计器。
- 将"透视网格"Windows 窗体模块项目从"工具箱"拖到"必需模块"面板上。
-

- Double click the Module.Web project's WebModule.cs file to invoke the Module Designer for this project.
-
Drag the PivotGridAspNetModule item from the Toolbox onto the Required Modules panel.
-
双击模块.Web 项目的WebModule.cs文件以调用此项目的模块设计器。
-
将"透视网格"AspNet 模块项目从"工具箱"拖到"必需模块"面板上。

- Save the changes.
- Rebuild your solution.
- 保存更改。
- 重建解决方案。
Change the List View's List Editor
更改列表视图的列表编辑器
- Double-click the Module.Win project's Model.DesignedDiffs.xafml file to invoke the Model Editor for this project.
-
Navigate to the Views | Order_ListView node. In the EditorType (IModelListView.EditorType) property's drop-down, select "DevExpress.ExpressApp.PivotGrid.Win.PivotGridListEditor" instead of XAF's default List Editor.
-
双击 Module.Win 项目的模型.设计Diffs.xafml 文件以调用此项目的模型编辑器。
-
导航到视图 |Order_ListView节点。在编辑器类型 (IModelListView.编辑器类型) 属性的下拉列表中,选择"DevExpress.ExpressApp.PivotGrid.Win.PivotGridListEditor",而不是 XAF 的默认列表编辑器。

- Double-click the Module.Web project's Model.DesignedDiffs.xafml file to invoke the Model Editor for this project.
-
Navigate to the Views | Order_ListView node. In the EditorType property's drop-down, select "DevExpress.ExpressApp.PivotGrid.Web.ASPxPivotGridListEditor" instead of XAF's default List Editor.
-
双击模块.Web 项目的模型.设计Diffs.xafml文件以调用此项目的模型编辑器。
-
导航到视图 |Order_ListView节点。在编辑器类型属性的下拉列表中,选择"DevExpress.ExpressApp.PivotGrid.Web.ASPxPivotGridListEditor",而不是 XAF 的默认列表编辑器。

Specify Pivot Grid Settings
指定枢轴网格设置
- Invoke the Model Editor from the Module.Win project.
-
Navigate to the Views | Order_ListView_PivotGrid | PivotSettings node.
-
从模块.Win 项目中调用模型编辑器。
-
导航到视图 |Order_ListView_PivotGrid |透视设置节点。

- Set the IPivotSettings.ShowChart property value to true and IPivotSettings.CustomizationEnabled to false.
-
Select the IPivotSettings.Settings property and click its ellipsis button (
 ) to invoke the PivotGrid Designer.
 -
将 IPivotSettings.ShowChart 属性值设置为 true 和 IPivotSettings.自定义启用为 false。
-
选择 IPivotSettings.Settings 属性,然后单击其省略号按钮(椭圆按钮)以调用数据透视网格设计器。

-
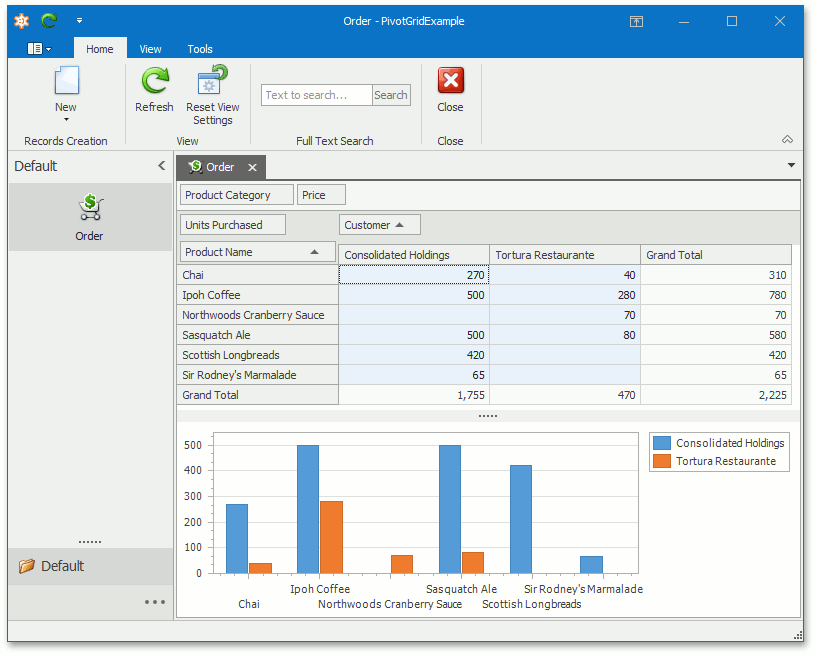
In the PivotGrid Designer, navigate to Main | Layout. Place the Product Name field in the Row Header Area, the Customer field in the Column Header Area area, and the Units Purchased field into the Data Header Area – as shown in the screenshot. Drag the Product Category and Price fields onto the Filter Header Area area to exclude them from the pivot table. This yields a pivot grid table summarizing sales arranged by customer.
-
在数据透视网格设计器中,导航到主 |布局。将"产品名称"字段放在"行头区域"中,在"列标题区域"区域中放置"客户"字段,将"购买的单位"字段放入数据头区域, 如屏幕截图所示。将"产品类别"和"价格"字段拖到"筛选器标题区域"区域,以将其从数据透视表中排除。这将生成一个数据透视网格表,汇总按客户安排的销售额。

- Similarly, specify the Pivot Grid Module's settings in your Module.Web project.
- 同样,在 Module.Web 项目.stomer 中指定数据透视网格模块的设置。
Run the Application
运行应用程序
-
Run the WinForms application and select the OrderNavigation Item to display the pivot table.
-
运行 WinForms 应用程序并选择订单导航项以显示数据透视表。

-
Run the ASP.NET application and check that the Order pivot table is also available.
-
运行ASP.NET应用程序,并检查订单数据透视表是否也可用。

Tip 提示
ピボットテーブルでの作業の詳細については、ピボットグリッドコントロールの記事を参照してください(リサイズ / ASP.NET)とDevExpress社ピボットグリッドを見る:(はじめにリサイズ
ピボットテーブルの使用方法の詳細については、ピボットグリッドコントロールの記事(リサイズ/ ASP.NET)を参照してください、とDevExpress社グリッドの展望を見てください。(リサイズ)はじめに