はじめに:
使用springMvcは3年が経ちましたが、内装は非常に理解し、そしてServletConetxt ApplicationContextの大きな頭を参照してください、だけで、関連する知識の下で学び、学ぶために、これらの日を利用していないされていました。
1.ServletContext
まず、私たちがするServletContextについて話す、のServletContextはWebアプリケーションのグローバルな文脈で、グローバル変数、Webアプリケーション全体として理解することができ、すべてのメソッドは、プロジェクトがのServletContextを得ることができます。
ServletContextを言えば、それはすべてのWebプロジェクトをweb.xmlに来て、我々は最初のweb.xmlの構成の以下の部分を投稿しました:

  <コンテキスト-PARAM>
    <param-name>のcontextConfigLocation </ PARAM名>
    <param-value>のクラスパス:applicationContext.xmlを</ PARAM値>
  </コンテキスト-param>の
  <コンテキスト-PARAM>
    <param-name>のlog4jConfigLocation </ PARAM名>
    <param-value>のクラスパス:log4j.properties </ PARAM値>
  </コンテキスト-param>の
  <聞き手>
    <リスナークラス> org.springframework.web.util.IntrospectorCleanupListener </リスナクラス>
  </リスナー>
  <聞き手>
    <リスナークラス> org.springframework.web.context.ContextLoaderListener </リスナクラス>
  </リスナー>
  <聞き手>
    <リスナークラス> listener.SessionListener </リスナクラス>
  </リスナー>
  <フィルタ>
    <フィルタ名> encodingFilter </フィルタ名>
    <フィルタクラス> org.springframework.web.filter.CharacterEncodingFilter </フィルタクラス>
    <init-param>の
      <param-name>のエンコーディング</ PARAM名>
      <param-value>のUTF-8 </ PARAM値>
    </ initの-param>の
    <init-param>の
      <param-name>のforceEncoding </ PARAM名>
      <param-value>の真</ PARAM値>
    </ initの-param>の
  </フィルタ>
  <のfilter-mapping>
    <フィルタ名> encodingFilter </フィルタ名>
    <url-pattern> *。行う</のurl-pattern>
  </フィルタマッピング>
  <フィルタ>
    <フィルタ名> sessionFilter </フィルタ名>
    <フィルタクラス> web.filter.SessionFilter </フィルタクラス>
  </フィルタ>
  <のfilter-mapping>
    <フィルタ名> sessionFilter </フィルタ名>
    <url-pattern> *。行う</のurl-pattern>
  </フィルタマッピング>
  <servlet>
    <servlet-name>のspringmvc </サーブレット名>
    <servlet-class>のorg.springframework.web.servlet.DispatcherServlet </サーブレットクラス>
    <load-on-startup> 1 </のload-on-startup>
  </サーブレット>
  <のservlet-mapping>
    <servlet-name>のspringmvc </サーブレット名>
    <url-pattern> *。行う</のurl-pattern>
  </のservlet-mapping>
上記掲載のweb.xmlは、私たちの最初のWebプロジェクトを説明するロード順序が始まった構成の一部です:
Tomcatに例えば、その後、Tomcatを起動し、最初のweb.xmlファイルをロードします。
A)コンテナは、最初の<context-param>のweb.xmlの内容と<リスナー>タグの設定項目の設定を読み取られます。
B)その後のServletContextオブジェクトがインスタンス化され、そして<コンテキストPARAM>コンテンツ構成のServletContextは、変換キーに送信されます。
C)<リスナー>コンフィギュレーション・リスナーのインスタンスを作成し、リスニング開始。
D)リスナーcontextInitialized(ServletContextEvent引数)法のServletContext = ServletContextEvent.getServletContext()への後続の呼び出し。
この時点で、あなたがするServletContextコンテンツとコンテキストのparamの設定を変更することができますを介して取得することができ、その後、開始Tomcatが完全に終了していません。
E)フィルタ構成の後続のロード様々な種類;
F)最後にサーブレットをロードします。
最終的な結論は次のとおり負荷順序web.xml構成項目はコンテキストPARAM =>リスナー=>フィルタ=>サーブレット、設定項目であり、ロード順序を変更しないため、しかし設定項目の同じタイプの配列をロードすることができます、サーブレットは、負荷のload-on-startupの順序で指定することができます。
ServletContext属性は、すべてのサーブレットがサーブレットコンテキストを使用することができます。
2.ApplicationContext
最初のApplicationContextに導入、ApplicationContextのはたBeanFactory実装クラスの春です。
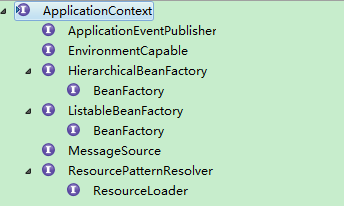
上のスクリーンショットのように継承ApplicationContextのインタフェース我々がここで参照する前に、ApplicationContextのは、それを生産する方法のweb.xmlです
  <聞き手>
    <リスナークラス> org.springframework.web.context.ContextLoaderListener </リスナクラス>
  </リスナー>
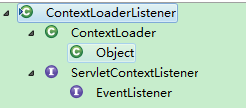 相続として残さ
私たちは、初期化する方法を見て
公共WebApplicationContext initWebApplicationContext(のServletContextのServletContext){
        もし(servletContext.getAttribute(WebApplicationContext.ROOT_WEB_APPLICATION_CONTEXT_ATTRIBUTE)!= NULL){
            (新しいIllegalStateExceptionがスロー
                    +  - 「すでにルートアプリケーションコンテキストの存在があるため、コンテキストを初期化できません」
                    「あなたはweb.xmlに複数ContextLoaderの*の定義を持っているかどうかを確認!」);
        }

        ログロガー= LogFactory.getLog(ContextLoader.class)。
        servletContext.log( "初期春のルートWebApplicationContext");
        IF(logger.isInfoEnabled()){
            logger.info( "ルートWebApplicationContext:初期化が開始");
        }
        長いのstartTime =にSystem.currentTimeMillis();

        {試します
            ローカルインスタンス変数に//ストアコンテキスト、ことを保証します
            //それはのServletContextシャットダウン時に使用可能です。
            IF(this.context ==ヌル){
                this.context = createWebApplicationContext(のServletContext)。
            }
            IF(ConfigurableWebApplicationContext instanceofのthis.context){
                ConfigurableWebApplicationContextのcwac =(ConfigurableWebApplicationContext)this.context。
                (もし!cwac.isActive()){
                    //コンテキストは、まだリフレッシュされていない - >などのサービスを提供します
                    //など、親コンテキストを設定するアプリケーションコンテキストIDを設定します
                    IF(cwac.getParent()== NULL){
                        //コンテキストインスタンスは、明示的に親なしに注入しました - >
                        いずれの場合//、ルートWebアプリケーションコンテキストの親を決定します。
                        ApplicationContextの親= loadParentContext(のServletContext)。
                        cwac.setParent(親)。
                    }
                    configureAndRefreshWebApplicationContext(cwac、のServletContext)。
                }
            }
           servletContext.setAttribute(C、この.context)。

            クラスローダCCL =にThread.currentThread()getContextClassLoader()。
            IF(CCL == ContextLoader.class.getClassLoader()){
                currentContext = this.context。
            }
            それ以外(CCL!= null)の場合は{
                currentContextPerThread.put(CCL、this.context)。
            }

            IF(logger.isDebugEnabled()){
                logger.debug(「名前のサーブレットコンテキスト属性として公開されたルートWebApplicationContext [」+
                        WebApplicationContext.ROOT_WEB_APPLICATION_CONTEXT_ATTRIBUTE + "]");
            }
            IF(logger.isInfoEnabled()){
                長い経過時間=にSystem.currentTimeMillis() - のstartTime。
                logger.info( "ルートWebApplicationContext:で完了初期化" +経過時間+ "MS")。
            }

            this.context返します。
        }
        キャッチ(のRuntimeExceptionのEX){
            logger.error( "コンテキストの初期化に失敗しました"、EX);
            servletContext.setAttribute(WebApplicationContext.ROOT_WEB_APPLICATION_CONTEXT_ATTRIBUTE、EX);
            EXを投げます。
        }
        キャッチ(誤差err){
            logger.error(ERR、 "コンテキストの初期化に失敗しました");
            servletContext.setAttribute(WebApplicationContext.ROOT_WEB_APPLICATION_CONTEXT_ATTRIBUTE、ERR)。
            ERRを投げます。
        }
    }
太字部分のコードがWebApplicationContext WebApplicationContext.ROOT_WEB_APPLICATION_CONTEXT_ATTRIBUTEはServletContextへの鍵として保存話すことであるので、我々はでrequest.getSessionによると、取得する必要があるときは()。
getAttribute( "WebApplicationContext.ROOT_WEB_APPLICATION_CONTEXT_ATTRIBUTE")来获取WebApplicationContext。
だから、WebApplicationContextは、ApplicationContextの店のすべての春の豆のServletContextに依存し、
ApplicationContextのはのApplciationContext applicationContext.xmlを呼び出すことができますspringmvcしかし、一般的な存在applicationContext.xmlをspringmvc.xmlに加えて、当社の定期的なSpringmvcプロジェクトは、2つのプロファイルは、2のApplicationContextに対応させていただきます。
3.いくつかの方法で取得するのWebApplication
A)でrequest.getSession()。のgetServletContext()。のgetAttribute( "org.springframework.web.context.WebApplicationContext.ROOT")
b)のインタフェースを実装ApplicationContextAware
 パブリックインターフェースApplicationContextAware {

         空setApplicationContext(ApplicationContextのApplicationContextのは)BeansExceptionをスローします。

}

はじめに:
使用springMvcは3年が経ちましたが、内装は非常に理解し、そしてServletConetxt ApplicationContextの大きな頭を参照してください、だけで、関連する知識の下で学び、学ぶために、これらの日を利用していないされていました。
1.ServletContext
まず、私たちがするServletContextについて話す、のServletContextはWebアプリケーションのグローバルな文脈で、グローバル変数、Webアプリケーション全体として理解することができ、すべてのメソッドは、プロジェクトがのServletContextを得ることができます。
ServletContextを言えば、それはすべてのWebプロジェクトをweb.xmlに来て、我々は最初のweb.xmlの構成の以下の部分を投稿しました:
  <コンテキスト-PARAM>
    <param-name>のcontextConfigLocation </ PARAM名>
    <param-value>のクラスパス:applicationContext.xmlを</ PARAM値>
  </コンテキスト-param>の
  <コンテキスト-PARAM>
    <param-name>のlog4jConfigLocation </ PARAM名>
    <param-value>のクラスパス:log4j.properties </ PARAM値>
  </コンテキスト-param>の
  <聞き手>
    <リスナークラス> org.springframework.web.util.IntrospectorCleanupListener </リスナクラス>
  </リスナー>
  <聞き手>
    <リスナークラス> org.springframework.web.context.ContextLoaderListener </リスナクラス>
  </リスナー>
  <聞き手>
    <リスナークラス> listener.SessionListener </リスナクラス>
  </リスナー>
  <フィルタ>
    <フィルタ名> encodingFilter </フィルタ名>
    <フィルタクラス> org.springframework.web.filter.CharacterEncodingFilter </フィルタクラス>
    <init-param>の
      <param-name>のエンコーディング</ PARAM名>
      <param-value>のUTF-8 </ PARAM値>
    </ initの-param>の
    <init-param>の
      <param-name>のforceEncoding </ PARAM名>
      <param-value>の真</ PARAM値>
    </ initの-param>の
  </フィルタ>
  <のfilter-mapping>
    <フィルタ名> encodingFilter </フィルタ名>
    <url-pattern> *。行う</のurl-pattern>
  </フィルタマッピング>
  <フィルタ>
    <フィルタ名> sessionFilter </フィルタ名>
    <フィルタクラス> web.filter.SessionFilter </フィルタクラス>
  </フィルタ>
  <のfilter-mapping>
    <フィルタ名> sessionFilter </フィルタ名>
    <url-pattern> *。行う</のurl-pattern>
  </フィルタマッピング>
  <servlet>
    <servlet-name>のspringmvc </サーブレット名>
    <servlet-class>のorg.springframework.web.servlet.DispatcherServlet </サーブレットクラス>
    <load-on-startup> 1 </のload-on-startup>
  </サーブレット>
  <のservlet-mapping>
    <servlet-name>のspringmvc </サーブレット名>
    <url-pattern> *。行う</のurl-pattern>
  </のservlet-mapping>
上記掲載のweb.xmlは、私たちの最初のWebプロジェクトを説明するロード順序が始まった構成の一部です:
Tomcatに例えば、その後、Tomcatを起動し、最初のweb.xmlファイルをロードします。
A)コンテナは、最初の<context-param>のweb.xmlの内容と<リスナー>タグの設定項目の設定を読み取られます。
B)その後のServletContextオブジェクトがインスタンス化され、そして<コンテキストPARAM>コンテンツ構成のServletContextは、変換キーに送信されます。
C)<リスナー>コンフィギュレーション・リスナーのインスタンスを作成し、リスニング開始。
D)リスナーcontextInitialized(ServletContextEvent引数)法のServletContext = ServletContextEvent.getServletContext()への後続の呼び出し。
この時点で、あなたがするServletContextコンテンツとコンテキストのparamの設定を変更することができますを介して取得することができ、その後、開始Tomcatが完全に終了していません。
E)フィルタ構成の後続のロード様々な種類;
F)最後にサーブレットをロードします。
最終的な結論は次のとおり負荷順序web.xml構成項目はコンテキストPARAM =>リスナー=>フィルタ=>サーブレット、設定項目であり、ロード順序を変更しないため、しかし設定項目の同じタイプの配列をロードすることができます、サーブレットは、負荷のload-on-startupの順序で指定することができます。
ServletContext属性は、すべてのサーブレットがサーブレットコンテキストを使用することができます。
2.ApplicationContext
最初のApplicationContextに導入、ApplicationContextのはたBeanFactory実装クラスの春です。
上のスクリーンショットのように継承ApplicationContextのインタフェース我々がここで参照する前に、ApplicationContextのは、それを生産する方法のweb.xmlです
  <聞き手>
    <リスナークラス> org.springframework.web.context.ContextLoaderListener </リスナクラス>
  </リスナー>
相続として残さ
私たちは、初期化する方法を見て
公共WebApplicationContext initWebApplicationContext(のServletContextのServletContext){
        if (servletContext.getAttribute(WebApplicationContext.ROOT_WEB_APPLICATION_CONTEXT_ATTRIBUTE) != null) {
            throw new IllegalStateException(
                    "Cannot initialize context because there is already a root application context present - " +
                    "check whether you have multiple ContextLoader* definitions in your web.xml!");
        }

        Log logger = LogFactory.getLog(ContextLoader.class);
        servletContext.log("Initializing Spring root WebApplicationContext");
        if (logger.isInfoEnabled()) {
            logger.info("Root WebApplicationContext: initialization started");
        }
        long startTime = System.currentTimeMillis();

        try {
            // Store context in local instance variable, to guarantee that
            // it is available on ServletContext shutdown.
            if (this.context == null) {
                this.context = createWebApplicationContext(servletContext);
            }
            if (this.context instanceof ConfigurableWebApplicationContext) {
                ConfigurableWebApplicationContext cwac = (ConfigurableWebApplicationContext) this.context;
                if (!cwac.isActive()) {
                    // The context has not yet been refreshed -> provide services such as
                    // setting the parent context, setting the application context id, etc
                    if (cwac.getParent() == null) {
                        // The context instance was injected without an explicit parent ->
                        // determine parent for root web application context, if any.
                        ApplicationContext parent = loadParentContext(servletContext);
                        cwac.setParent(parent);
                    }
                    configureAndRefreshWebApplicationContext(cwac, servletContext);
                }
            }
            servletContext.setAttribute(c, this.context);

            ClassLoader ccl = Thread.currentThread().getContextClassLoader();
            if (ccl == ContextLoader.class.getClassLoader()) {
                currentContext = this.context;
            }
            else if (ccl != null) {
                currentContextPerThread.put(ccl, this.context);
            }

            if (logger.isDebugEnabled()) {
                logger.debug("Published root WebApplicationContext as ServletContext attribute with name [" +
                        WebApplicationContext.ROOT_WEB_APPLICATION_CONTEXT_ATTRIBUTE + "]");
            }
            if (logger.isInfoEnabled()) {
                long elapsedTime = System.currentTimeMillis() - startTime;
                logger.info("Root WebApplicationContext: initialization completed in " + elapsedTime + " ms");
            }

            return this.context;
        }
        catch (RuntimeException ex) {
            logger.error("Context initialization failed", ex);
            servletContext.setAttribute(WebApplicationContext.ROOT_WEB_APPLICATION_CONTEXT_ATTRIBUTE, ex);
            throw ex;
        }
        catch (Error err) {
            logger.error("Context initialization failed", err);
            servletContext.setAttribute(WebApplicationContext.ROOT_WEB_APPLICATION_CONTEXT_ATTRIBUTE, err);
            throw err;
        }
    }
代码中加粗的部分就是讲WebApplicationContext以WebApplicationContext.ROOT_WEB_APPLICATION_CONTEXT_ATTRIBUTE为key保存到ServletContext中,所以我们在需要获取时,可以根据request.getSession().
getAttribute("WebApplicationContext.ROOT_WEB_APPLICATION_CONTEXT_ATTRIBUTE")来获取WebApplicationContext.
所以WebApplicationContext依赖于ServletContext,ApplicationContext存储了Spring中所有的Bean,
但是我们常规的Springmvc项目一般除了applicationContext.xml之外还有springmvc.xml,两个配置文件会对应两个ApplicationContext,springmvc的ApplicationContext中可以调用applicationContext.xml的ApplciationContext。
3.获取WebApplication的几种方式
a)request.getSession().getServletContext().getAttribute("org.springframework.web.context.WebApplicationContext.ROOT")
b)实现ApplicationContextAware接口
 public interface ApplicationContextAware {

         空setApplicationContext(ApplicationContextのApplicationContextのは)BeansExceptionをスローします。

}