Table of contents
(2) Copy, paste and cut operations
(3) Undoing and canceling undo operations
(4) Quick cursor movement operation
(5) Quick cursor column movement operation
(6) Editing related operations
(3) Turn on the line number or cancel the line number
(4) Split screen related operations
Preface
I think you all have some understanding of vim. It doesn’t matter if you don’t know much. This chapter will take you to learn the basic use of vim;
1. What is vim
vim is an editor software under Linux. Note that the editor mentioned here is similar to Notepad. We can use vim to edit code under the Linux system. Some friends here are confused, can't we use it? Software such as vscode? Yes, we can directly use software such as vscode, and the efficiency may be higher, but there are some situations where we may need to edit the code under a pure Linux system, which may not have a graphical interface, so Vim is our best choice. ;
2. Vim editor mode
The vim editor has many modes. For novices, there is no need to figure out each mode. This article mainly introduces the following four modes, namely normal mode (default mode), insert mode, bottom line mode, and replacement mode; these four modes have been It meets most needs and is sufficient for daily use. For readers who want to improve vim, they can improve their knowledge system later. This article is only an introductory article to vim;

1. Insert mode
(1) Open the file with vim
When we use vim to open a file, we enter the default mode by default; we can use the following command to open a file with vim;
vim test.cWhere test.c is the file name, you can choose another name yourself. If the file does not exist, a file will be automatically created in the current directory;

(2) Enter insert mode
We can enter insert mode by pressing i on the keyboard. After entering insert mode, the normal in our lower left corner becomes insert, as shown in the figure below;
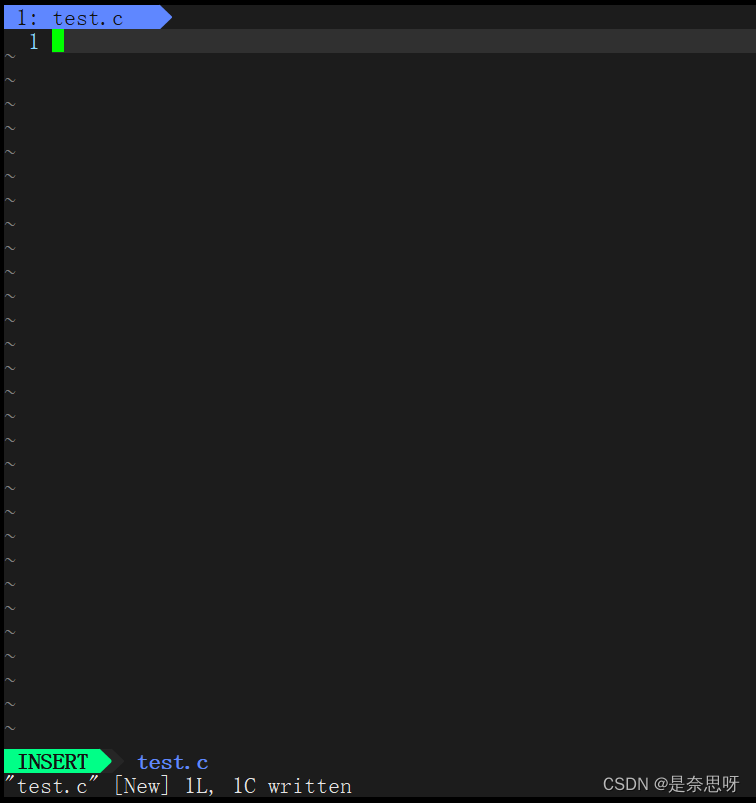
We press the Esc key in the upper left corner of the keyboard to exit the insert mode and enter our normal mode. In the insert mode, we can edit the code; for novices, it is enough to understand the insert mode at this step. Basic editing code;
2.Default mode
(1) Cursor movement
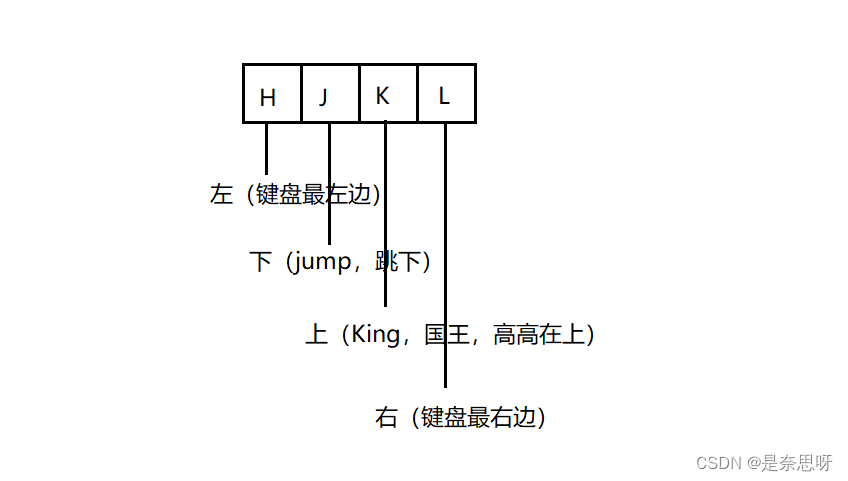
In the default mode, we can move the cursor through the up, down, left, and right keys on the keyboard, or we can move the cursor through H, J, K, and L. The use of the latter is more recommended. We can remember these four through the picture below. key;
(2) Copy, paste and cut operations
copy:
yy: copy the current line
nyy: Copy n lines starting from the current line selected by the cursor
Paste:
p: paste once starting from the next line selected by the cursor
np: Paste n times starting from the next line selected by the cursor
Cut (delete):
dd: Cut (delete) the current line
ndd: Cut (delete) n lines starting from the current line
(3) Undoing and canceling undo operations
Cancel:
u: Undo the last operation
Cancel Undo:
ctrl + r: Undo the previous undo operation
(4) Quick cursor movement operation
shift + g: move the cursor to the last line
gg: Move the cursor to the first line
n shift + g: quickly move to the nth line (n is a number)
(5) Quick cursor column movement operation
shift + 4: quickly move to the last column of the current row
shift + 6: quickly move to the first column of the current row
w: Quickly move forward in the current line in word units
b: Quickly move backward in the current line in word units
(6) Editing related operations
shift + ~: switch between upper and lower case
r + character to replace: replace the current character
n r + character to replace: replace n characters starting from the current character
x: Delete the character currently pointed by the cursor
n x: Delete n characters starting from the character position currently pointed by the cursor
3. Bottom row mode
(1) Enter bottom row mode
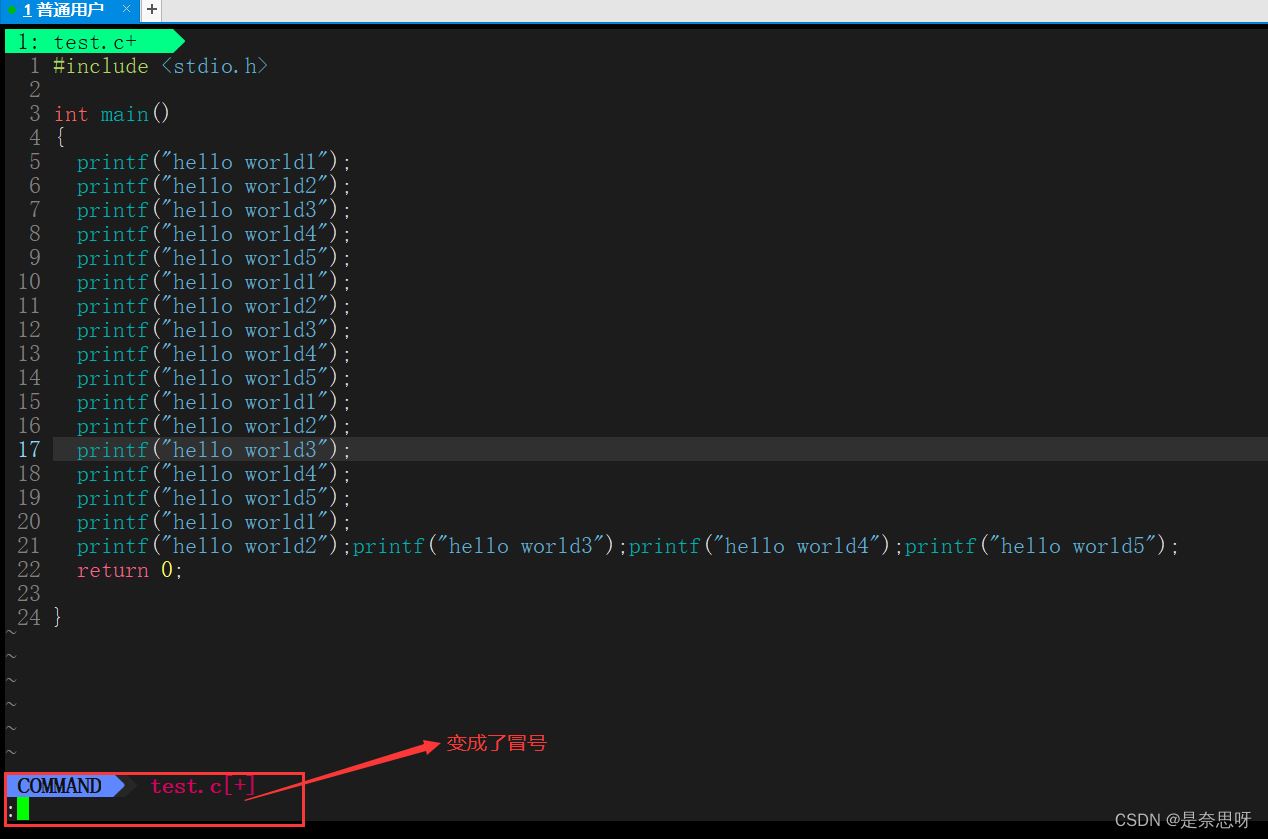
shift +: (colon): shift plus colon (semicolon) to enter the bottom row mode. All the operations described below are based on the operations in the bottom row mode. The bottom row mode has been entered by default; the following is the interface for entering the bottom row mode. ;
(2) Exit and save
q: Exit only
q! : force quit
w: save only
w! : force save
wq! : Force save and exit
(3) Turn on the line number or cancel the line number
set nu: open line number
set nonu: cancel line number
(4) Split screen related operations
vs file name: split the screen to pop out another file. If the file does not exist, create the file
ctrl + w + w: perform cursor switching (the switching here refers to switching between these two files)
(5) Other operations
! cmd: Execute the corresponding command without exiting vim (often combined with compile, run, man instructions, etc.)
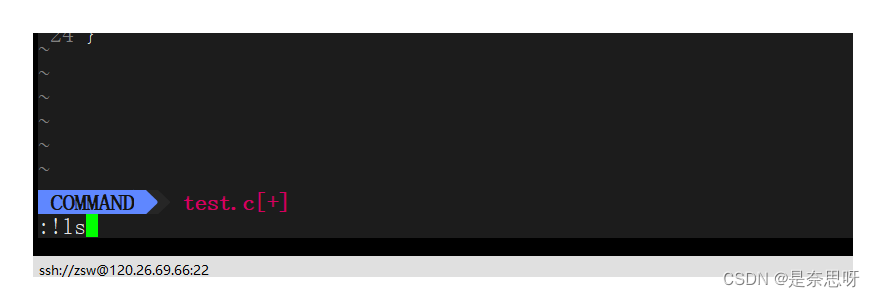

As shown in the picture above, we can check what files are in the current directory without exiting the vim editor;
4. Replacement mode
shift + r: Enter replacement mode, where input replacement can be performed;
Note:We don’t need to know too much about the replacement mode. Once we learn the above commands, we can complete most of the editing tasks in the vim editor;