1 角丸ソリューションの概要
UGUI で画像の角丸効果を実現するには、通常、マスク、シェーダー、カスタム頂点データの 3 つの方法があります。最初の 2 つと比較して、カスタム頂点データの使用はより柔軟であり、DrawCall を削減できますが、頂点と三角形が増加します。 。 量。実際の状況に応じて最終的な実施計画を選択でき、水深は深くなく、自分で制御できます。
2 実施計画
1 頂点データを変更する
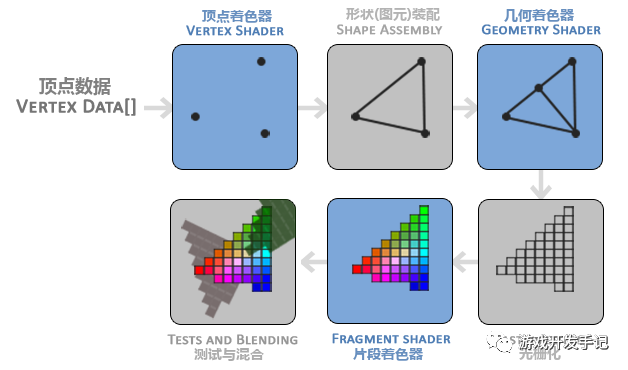
レンダリング プロセスについてはここでは詳しく説明しませんが、レンダリング パイプラインの各ステージを簡単に確認できます。
変更したいのは GPU に送信される頂点データであり、Unity の Image コンポーネントでは OnPopulateMesh 関数を使用して頂点データを変更できます。
OnPopulateMesh については、前回の必須初心者ガイドでも紹介しましたので、ここで再掲します。
API:
protected virtual void OnPopulateMesh(VertexHelper vh);
UI 要素が頂点を生成する必要がある場合のコールバック関数は、通常、UI 要素のレンダリングをカスタマイズするために使用されます。このメソッドをオーバーライドすることで、カスタマイズされた UI 要素のレンダリング効果を実現できます。
vh パラメーターは VertexHelper タイプのオブジェクトで、グリッド データの生成に使用されます。このメソッドでは、VertexHelper メソッドを呼び出してメッシュ データを生成することで、頂点、三角形、色などの情報を追加できます。
このメソッドをオーバーライドする場合は、次の点に注意する必要があります。
-
メソッドに頂点、三角形、色などの情報を追加する場合、生成されたメッシュ データが正しいことを保証するために、特定の順序で情報を追加する必要があります。
-
メソッドに頂点、三角形、色などの情報を追加する場合は、生成されたメッシュ データが UI 要素の位置およびサイズと一致するように、座標系の変換に注意する必要があります。
-
メソッドに頂点、三角形、色などの情報を追加する場合は、パフォーマンスの問題に注意し、レンダリング効率を向上させるために大量のメッシュ データが生成されないようにする必要があります。
2つの塗りつぶされた三角形

長方形を 3 つの長方形 (左、中央、右) と 4 つの扇形 (4 隅) に分割します。
まず、すべての頂点を VertexHelper に入れます。
vh.Clear();

// 0 1 2 3
vh.AddVert(new Vector3(left, top), color32, new Vector2(outerUV.x, outerUV.w));
vh.AddVert(new Vector3(left, top - r), color32, new Vector2(outerUV.x, outerUV.w - uvRadiusY));
vh.AddVert(new Vector3(left, bottom + r), color32, new Vector2(outerUV.x, outerUV.y + uvRadiusY));
vh.AddVert(new Vector3(left, bottom), color32, new Vector2(outerUV.x, outerUV.y));

// 4 5 6 7
vh.AddVert(new Vector3(left + r, top), color32, new Vector2(outerUV.x + uvRadiusX, outerUV.w));
vh.AddVert(new Vector3(left + r, top - r), color32,
    new Vector2(outerUV.x + uvRadiusX, outerUV.w - uvRadiusY));
vh.AddVert(new Vector3(left + r, bottom + r), color32,
    new Vector2(outerUV.x + uvRadiusX, outerUV.y + uvRadiusY));
vh.AddVert(new Vector3(left + r, bottom), color32, new Vector2(outerUV.x + uvRadiusX, outerUV.y));

// 8 9 10 11
vh.AddVert(new Vector3(right - r, top), color32, new Vector2(outerUV.z - uvRadiusX, outerUV.w));
vh.AddVert(new Vector3(right - r, top - r), color32,
    new Vector2(outerUV.z - uvRadiusX, outerUV.w - uvRadiusY));
vh.AddVert(new Vector3(right - r, bottom + r), color32,
    new Vector2(outerUV.z - uvRadiusX, outerUV.y + uvRadiusY));
vh.AddVert(new Vector3(right - r, bottom), color32, new Vector2(outerUV.z - uvRadiusX, outerUV.y));

// 12 13 14 15
vh.AddVert(new Vector3(right, top), color32, new Vector2(outerUV.z, outerUV.w));
vh.AddVert(new Vector3(right, top - r), color32, new Vector2(outerUV.z, outerUV.w - uvRadiusY));
vh.AddVert(new Vector3(right, bottom + r), color32, new Vector2(outerUV.z, outerUV.y + uvRadiusY));
vh.AddVert(new Vector3(right, bottom), color32, new Vector2(outerUV.z, outerUV.y));
3 つの長方形を組み立てると、対応する 6 つの三角形は (2, 5, 1)、(2, 5, 6)、(7, 8, 4)、(7, 8, 11)、(10, 13 , 9) になります。 、(10、13、14)
// 左边矩形
vh.AddTriangle(2, 5, 1);
vh.AddTriangle(2, 5, 6);
// 中间矩形
vh.AddTriangle(7, 8, 4);
vh.AddTriangle(7, 8, 11);
// 右边矩形
vh.AddTriangle(10, 13, 9);
vh.AddTriangle(10, 13, 14);
4 つのセクター、つまり (1,5,4)、(2,6,7)、(8,9,13)、(11,10,14) を組み立てます。各セクターは、いくつかの三角形でシミュレートする必要があります。三角形の数が多いほどエッジは滑らかになりますが、それに対応するコストも大きくなります
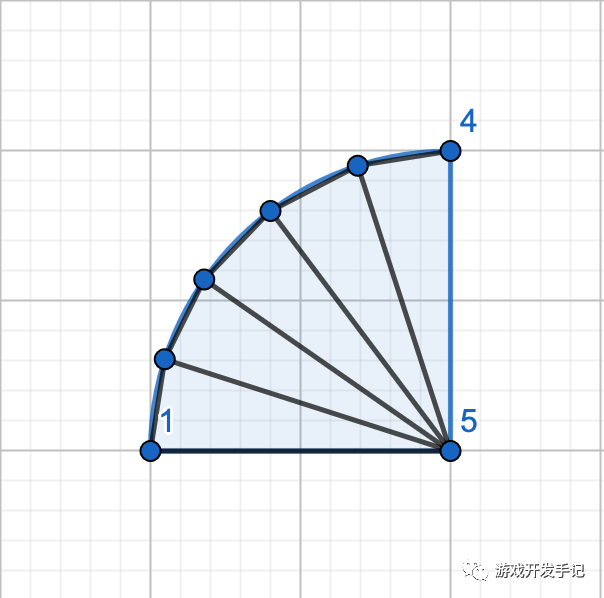
List<Vector2> positionList = new List<Vector2>();
List<Vector2> uvList = new List<Vector2>();
List<int> vertexList = new List<int>();

// 右上角圆心
positionList.Add(new Vector2(right - r, top - r));
uvList.Add(new Vector2(outerUV.z - uvRadiusX, outerUV.w - uvRadiusY));
vertexList.Add(9);

// 左上角的圆心
positionList.Add(new Vector2(left + r, top - r));
uvList.Add(new Vector2(outerUV.x + uvRadiusX, outerUV.w - uvRadiusY));
vertexList.Add(5);

// 左下角圆心
positionList.Add(new Vector2(left + r, bottom + r));
uvList.Add(new Vector2(outerUV.x + uvRadiusX, outerUV.y + uvRadiusY));
vertexList.Add(6);

// 右下角圆心
positionList.Add(new Vector2(right - r, bottom + r));
uvList.Add(new Vector2(outerUV.z - uvRadiusX, outerUV.y + uvRadiusY));
vertexList.Add(10);

// 每个三角形角度
float degreeDelta = Mathf.PI / 2 / this.cornerSegments;

// 当前的角度
float degree = 0;
for (int i = 0; i < vertexList.Count; i++)
{
    int currentVertCount = vh.currentVertCount;
    for (int j = 0; j <= this.cornerSegments; j++)
    {
        float cos = Mathf.Cos(degree);
        float sin = Mathf.Sin(degree);
        Vector3 position = new Vector3(positionList[i].x + cos * r, positionList[i].y + sin * r);
        Vector3 uv0 = new Vector2(uvList[i].x + cos * uvRadiusX,
            uvList[i].y + sin * uvRadiusY);
        vh.AddVert(position, color32, uv0);
        degree += degreeDelta;
    }

    degree -= degreeDelta;
    for (int j = 0; j <= this.cornerSegments - 1; j++)
    {
        vh.AddTriangle(vertexList[i], currentVertCount + j + 1, currentVertCount + j);
    }
}
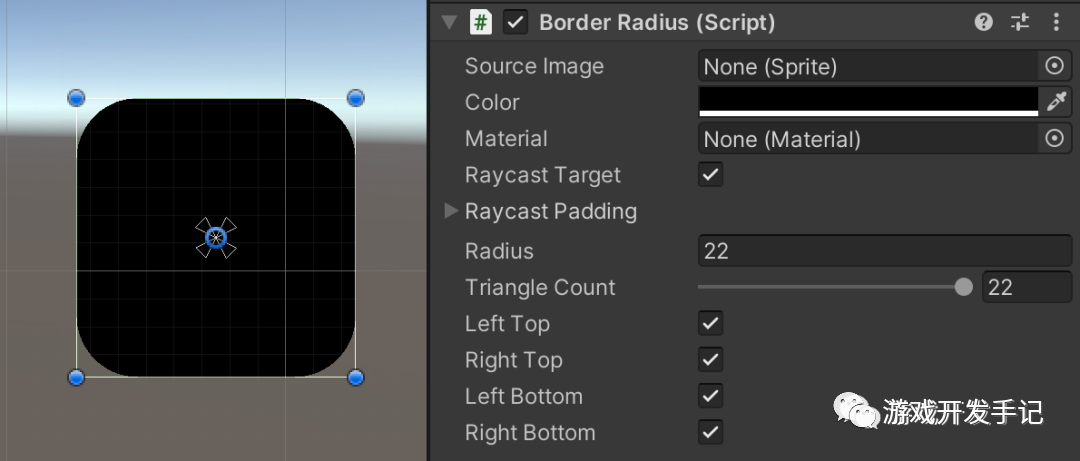
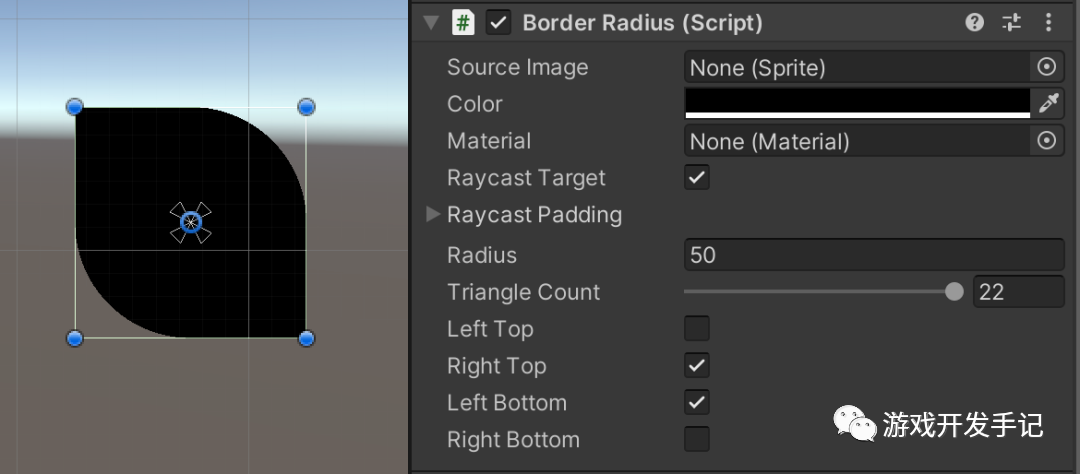
3 インスペクターを拡張する
スクリプトは Image を直接継承するため、スクリプトで定義されたパブリック変数は [インスペクター] パネルに表示されないため、パラメーターの調整を容易にするためにパネルを自分で拡張する必要があります。
#if UNITY_EDITOR
[CustomEditor(typeof(BorderRadius), true)]
public class BorderRadiusEditor : ImageEditor
{
    SerializedProperty _sprite;
    SerializedProperty _cornerRadius;
    SerializedProperty _cornerSegments;

    protected override void OnEnable()
    {
        base.OnEnable();

        this._sprite = this.serializedObject.FindProperty("m_Sprite");
        this._cornerRadius = this.serializedObject.FindProperty("cornerRadius");
        this._cornerSegments = this.serializedObject.FindProperty("cornerSegments");
    }

    public override void OnInspectorGUI()
    {
        this.serializedObject.Update();

        this.SpriteGUI();
        this.AppearanceControlsGUI();
        this.RaycastControlsGUI();
        bool showNativeSize = this._sprite.objectReferenceValue != null;
        this.m_ShowNativeSize.target = showNativeSize;
        this.MaskableControlsGUI();
        this.NativeSizeButtonGUI();
        EditorGUILayout.PropertyField(this._cornerRadius);
        EditorGUILayout.PropertyField(this._cornerSegments);
        this.serializedObject.ApplyModifiedProperties();
    }
}
#endif
丸い角の効果:
4 カスタマイズされた丸い角
視覚的にわかりやすくするため、ほとんどの場合、長方形の 4 つの角は丸くありません。この効果を実現するには、丸い角の頂点を計算するときに角が丸くないかどうかを判断し、直接塗りつぶすだけで済みます。セクターに対応する長方形:
if (i == 0 && !this.rightTop)
{
    vh.AddTriangle(vertexList[i], 8, 12);
    vh.AddTriangle(vertexList[i], 12, 13);
    continue;
}

if (i == 1 && !this.leftTop)
{
    vh.AddTriangle(vertexList[i], 0, 4);
    vh.AddTriangle(vertexList[i], 0, 1);
    continue;
}

if (i == 2 && !this.leftBottom)
{
    vh.AddTriangle(vertexList[i], 3, 2);
    vh.AddTriangle(vertexList[i], 3, 7);
    continue;
}

if (i == 3 && !this.rightBottom)
{
    vh.AddTriangle(vertexList[i], 15, 14);
    vh.AddTriangle(vertexList[i], 15, 11);
    continue;
}
左上と右上の丸みのない角:
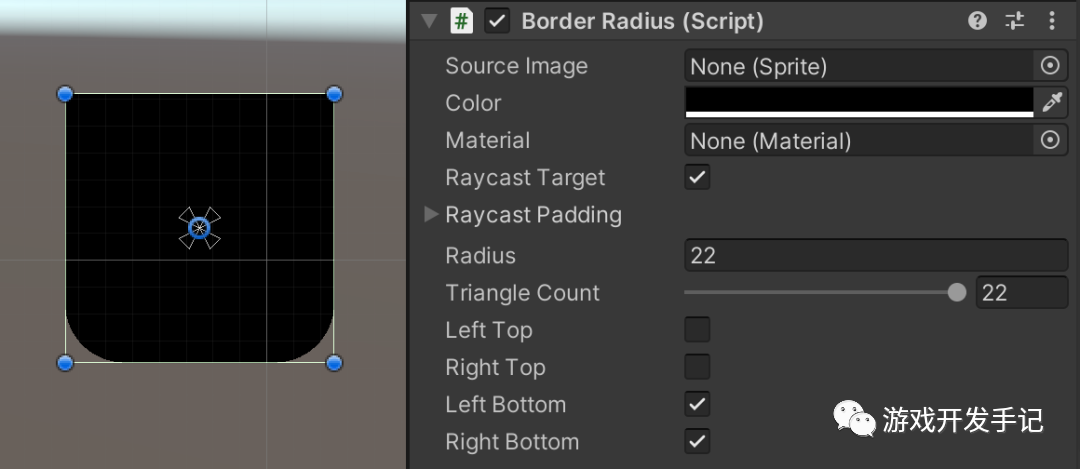
左下と右上の丸みのない角:
「公開アカウントの完全なコード返信: 角丸長方形」
❝
ソースコードの詳細については、コードをスキャンして入手してください。
❞