1. プロジェクトの構築
ElementUI の紹介
ElementUI は、Vue.js 2.0 に基づくデスクトップ コンポーネント ライブラリです。テーブル、フォーム、ポップアップ、ボタン、メニュー、その他の一般的なコンポーネントを含む、豊富な UI コンポーネントのセットを提供します。使いやすさ、美しさ、効率性と柔軟性が向上し、Web アプリケーションの開発効率が大幅に向上します。ElementUI のドキュメントは非常に詳細で、例が豊富で、簡単に始めることができ、カスタム テーマもサポートされており、開発者は独自のニーズに合わせて調整できます。ElementUI はオンデマンド読み込みもサポートしているため、プロジェクト サイズを削減し、Web ページの読み込み速度を向上させることができます。使いやすさと効率性により、ElementUI は Vue.js 開発に推奨される UI コンポーネント ライブラリの 1 つになりました。
2.ElementUIをインストールする
ElementUI をインストールするには、vue-cli ツールを使用する必要があります。お持ちでない場合は、私の前回のブログをご覧ください。
プロジェクトをビルドしたら、npm を介して element-ui をインストールします。
cd プロジェクト ルート パス #新しいプロジェクトのルート ディレクトリを入力します。
npm install element-ui -S #element-ui モジュールをインストールします。
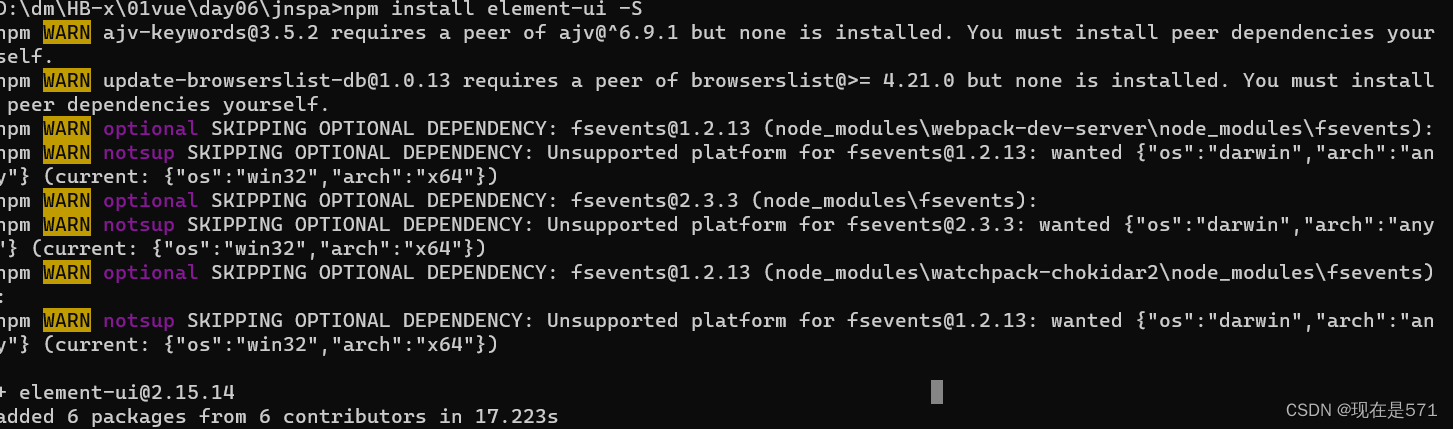
ダウンロード後、プロジェクトに入り、package.json をチェックして成功したかどうかを確認します (誰かが cmd ウィンドウをダウンロードしても、ダウンロードが成功したことを示すメッセージが表示されなかったためです)。

3. コンポーネントをインポートする
src ディレクトリの main.js を開きます。このファイルはプロジェクトのエントリ ファイルなので、ここでインポートします。他のコンポーネントは使用できるため、再度インポートする必要はありません。
import Vue from 'vue'

//新添加1
import ElementUI from 'element-ui'
//新增加2,避免后期打包样式不同,要放在import App from './App';之前
import 'element-ui/lib/theme-chalk/index.css'

import App from './App'
import router from './router'

Vue.use(ElementUI)   //新添加3
Vue.config.productionTip = false
4. ログインおよび登録インターフェイスを作成する
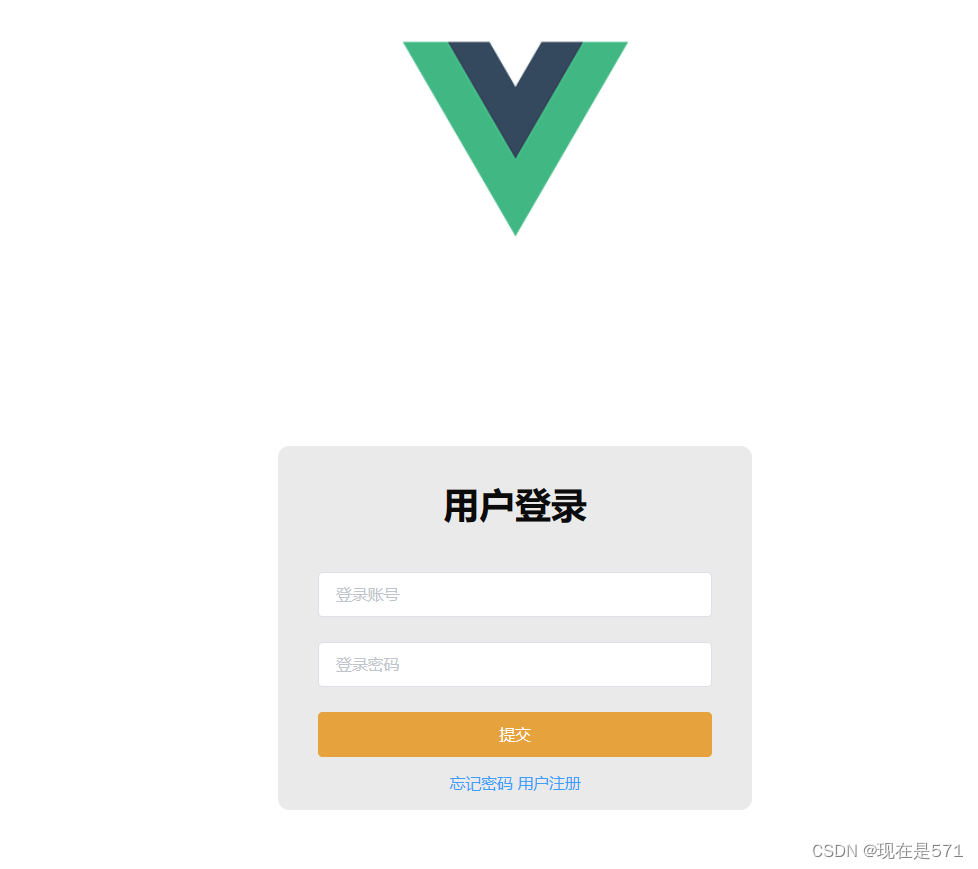
ディレクトリに新しいビューが作成され、いくつかのインターフェイス コンポーネントが保存されます。インターフェイスは次のように自分で設計できます。
ログインインターフェース:
<template>
  <div class="login-wrap">
    <el-form class="login-container">
      <h1 class="title">用户登录</h1>
      <el-form-item label="">
        <el-input type="text" v-model="username" placeholder="登录账号" autocomplete="off"></el-input>
      </el-form-item>
      <el-form-item label="">
        <el-input type="password" v-model="password" placeholder="登录密码" autocomplete="off"></el-input>
      </el-form-item>
      <el-form-item>
        <el-button type="warning" style="width:100%;" @click="doSubmit()">提交</el-button>
      </el-form-item>
      <el-row style="text-align: center;margin-top:-10px">
        <el-link type="primary">忘记密码</el-link>
        <el-link type="primary" @click="gotoRegister()">用户注册</el-link>
      </el-row>
    </el-form>
  </div>
</template>

<script>
  export default {
    name: 'Login',
    data() {
      return {
        username: '',
        password: ''
      }
    },
    methods: {
      gotoRegister() {
        this.$router.push("/Register");
      }
    }
  }
</script>

<style scoped>
  .login-wrap {
   box-sizing: border-box;
   width: 100%;
   height: 100%;
   padding-top: 10%;

   /* background-color: #3b7cf5; */
   background-repeat: no-repeat;
   background-position: center right;
   background-size: 100%;
  }

  .login-container {
   border-radius: 10px;
   margin: 0px auto;
   width: 350px;
   padding: 30px 35px 15px 35px;
   border: 1px solid #eaeaea;
   text-align: left;
   background-color: rgba(229, 229, 229, 0.8);
  }

  .title {
    margin: 0px auto 40px auto;
    text-align: center;
    color: #0b0b0b;
  }
</style>
登録インターフェース:
<template>
  <div class="login-wrap">
    <el-form class="login-container">
      <h1 class="title">用户注册</h1>
      <el-form-item label="">
        <el-input type="text" v-model="username" placeholder="注册账号" autocomplete="off"></el-input>
      </el-form-item>
      <el-form-item label="">
        <el-input type="password" v-model="password" placeholder="注册密码" autocomplete="off"></el-input>
      </el-form-item>
      <el-form-item>
        <el-button type="warning" style="width:100%;" @click="doSubmit()">提交</el-button>
      </el-form-item>
      <el-row style="text-align: center;margin-top:-10px">
        <el-link type="primary">忘记密码</el-link>
        <el-link type="primary" @click="gotoLogin()">用户注册</el-link>
      </el-row>
    </el-form>
  </div>
</template>

<script>
  export default {
    name: 'Register',
    data() {
      return {
        username: '',
        password: ''
      }
    },
    methods: {
      gotoLogin() {
        this.$router.push("/");
      }
    }
  }
</script>

<style scoped>
  .login-wrap {
    box-sizing: border-box;
    width: 100%;
    height: 100%;
    padding-top: 10%;
;
    /* background-color: #3b7cf5; */
    background-repeat: no-repeat;
    background-position: center right;
    background-size: 100%;
  }

  .login-container {
    border-radius: 10px;
    margin: 0px auto;
    width: 350px;
    padding: 30px 35px 15px 35px;
    border: 1px solid #eaeaea;
    text-align: left;
    background-color: rgba(229, 229, 229, 0.8);
  }

  .title {
    margin: 0px auto 40px auto;
    text-align: center;
    color: #0b0b0b;
  }
</style>
注 1: <stylescoped>
vue コンポーネントで、scoped 属性を style タグに追加して、そのスタイルが現在のモジュールに作用することを示し、これによりスタイルのプライベート化の目的が達成されます。注 2: auto-complete="off"
autocomplete 属性は HTML5 の新しい属性で、off-----オートコンプリートを無効にします。
5ルーティングの設定
import Vue from 'vue'
import Router from 'vue-router'
import HelloWorld from '@/components/HelloWorld'
// 导入Login登录组件
import Login from '@/views/Login'
// 导入Register注册组件
import Register from '@/views/Register'

Vue.use(Router)

export default new Router({
  routes: [
    {
      path: '/',
      name: 'Login',
      component: Login
    },{
      path: '/Register',
      name: 'Register',
      component: Register
    }
  ]
})
効果:
プロジェクトのルートディレクトリでnpm run dev コマンドを実行します 。
2. バックグラウンドインタラクション
1.axiosの導入
axios は vue2 が提唱する ajax の軽量版です。これは、Promise ベースの HTTP ライブラリです。ブラウザから XMLHttpRequest を作成し、Vue とうまく連携します。
ヒント: vue.js には、vue-router、vuex、vue-resource という有名なファミリー バケット シリーズに加えて、完全な vue プロジェクトのコア コンポーネントである構築ツール vue-cli があります。このうち、vue-resource は Vue.js のプラグインであり、XMLHttpRequest または JSONP を通じてリクエストを開始し、応答を処理できますが、vue が 2.0 に更新された後、作者は vue-resource を更新しないことを発表しました。でもaxiosをお勧めします。
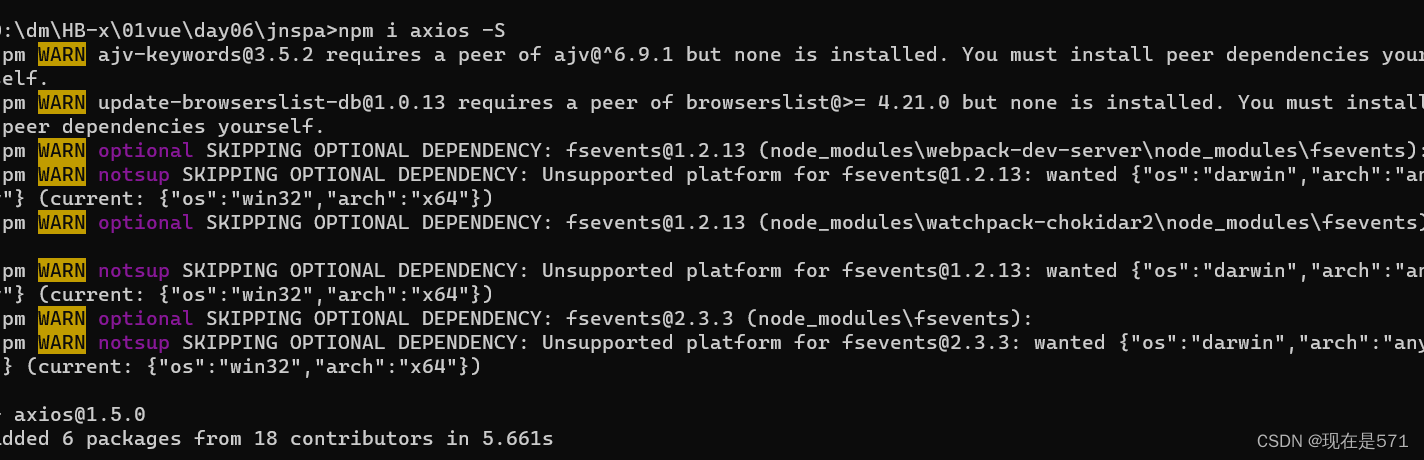
インストール手順:
npm i axios -S
2 vue-axios のグローバル設定を追加します
Axios は、ブラウザーおよび Nodejs 用の Promise に基づいた HTTP クライアントであり、本質的にはネイティブ XHR のカプセル化ですが、Promise の実装バージョンであり、最新の ES 仕様に準拠しています。
vue-axios は axios をベースに拡張されたプラグインで、Vue.prototype プロトタイプの $http やその他の属性を拡張して、axios を使いやすくします。
vue-axios を通じて axios の軽量カプセル化を実装します。
1. vue-axiosおよびqsライブラリをダウンロードしてインストールします
npm i vue-axios -S
qs ライブラリは、 POST リクエストの問題を解決するために使用されます。これは、POST によって送信されるパラメータの形式がリクエスト ペイロードであるため、バックグラウンドでデータを取得できないためです。
npm install qs -S2. API モジュールをインポートし、axios のグローバル設定を追加します
SPA プロジェクトの src ディレクトリに API モジュールを追加します。API モジュールには、action.js (バックグラウンド リクエスト インターフェイスのカプセル化定義) と http.js ( axios のグローバル設定) の 2 つのファイルが含まれています。
.action.js
/**
 * 对后台请求的地址的封装,URL格式如下:
 * 模块名_实体名_操作
 */
export default {
	'SERVER': 'http://localhost:8080/ssm_vue', //服务器
	'SYSTEM_USER_DOLOGIN': '/user/userLogin', //登陆
	'SYSTEM_USER_DOREG': '/user/userRegister', //注册
	'getFullPath': k => { //获得请求的完整地址,用于mockjs测试时使用
		return this.SERVER + this[k];
	}
}
バックグラウンドで要求されたアドレスのカプセル化、URL 形式: モジュール名エンティティ名操作
http.js
/**
 * vue项目对axios的全局配置
 */
import axios from 'axios'
import qs from 'qs'

//引入action模块,并添加至axios的类属性urls上
import action from '@/api/action'
axios.urls = action

// axios默认配置
axios.defaults.timeout = 10000; // 超时时间
// axios.defaults.baseURL = 'http://localhost:8080/j2ee15'; // 默认地址
axios.defaults.baseURL = action.SERVER;

//整理数据
// 只适用于 POST,PUT,PATCH,transformRequest` 允许在向服务器发送前,修改请求数据
axios.defaults.transformRequest = function(data) {
  data = qs.stringify(data);
  return data;
};


// 请求拦截器
axios.interceptors.request.use(function(config) {
  return config;
}, function(error) {
  return Promise.reject(error);
});

// 响应拦截器
axios.interceptors.response.use(function(response) {
  return response;
}, function(error) {
  return Promise.reject(error);
});

//最后,代码通过export default语句将axios导出,以便在其他地方可以引入和使用这个axios实例。
export default axios;
3.
main.js 設定の変更 vue-axios
api モジュールと vue-axios モジュールを main.js ファイルに導入すると、axios を使用して Vue プロジェクトで HTTP リクエストを簡単に作成できるようになります。また、VueAxios プラグインによって提供される関数を使用して処理を簡素化し、 HTTPリクエストの管理。
import axios from '@/api/http'
import VueAxios from 'vue-axios'
Vue.use(VueAxios,axios)3.ssmプロジェクトの準備(バックエンド)
以前に書いたコードを使用したデモンストレーションとして:
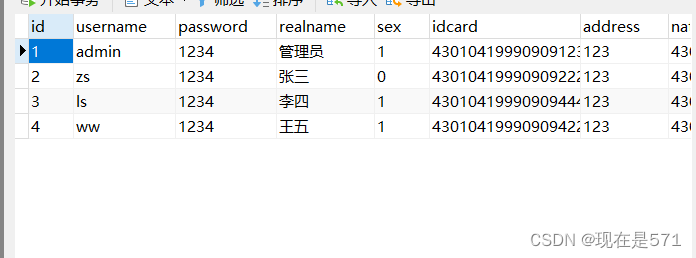
1. データシートを準備する
コントローラーを書く
package com.zking.ssm.controller;

import com.zking.ssm.service.IUserService;
import com.zking.ssm.util.JsonResponseBody;
import com.zking.ssm.util.PageBean;
import com.zking.ssm.vo.UserVo;
import org.springframework.beans.factory.annotation.Autowired;
import org.springframework.stereotype.Controller;
import org.springframework.web.bind.annotation.RequestMapping;
import org.springframework.web.bind.annotation.ResponseBody;

import javax.servlet.http.HttpServletRequest;
import javax.servlet.http.HttpServletResponse;
import java.util.HashMap;
import java.util.List;
import java.util.Map;
import com.zking.ssm.jwt.*;

@Controller
@RequestMapping("/user")
public class UserController {

    @Autowired
    private IUserService userService;

    //登录方法
    @RequestMapping("/userLogin")
    @ResponseBody
    public JsonResponseBody<?> userLogin(UserVo userVo, HttpServletResponse response) {
        if (userVo.getUsername().equals("xzs") && userVo.getPassword().equals("123")) {
            //私有要求claim
//            Map<String,Object> json=new HashMap<String,Object>();
//            json.put("username", userVo.getUsername());
            //生成JWT,并设置到response响应头中
//            String jwt=JwtUtils.createJwt(json, JwtUtils.JWT_WEB_TTL);
//            response.setHeader(JwtUtils.JWT_HEADER_KEY, jwt);
            return new JsonResponseBody<>("用户登陆成功!", true, 0, null);
        } else {
            return new JsonResponseBody<>("用户名或密码错误!", false, 0, null);
        }
    }

    //注册方法
    @RequestMapping("/userRegister")
    @ResponseBody
    public JsonResponseBody<?> userRegister(UserVo user, HttpServletResponse response) {
        int i = userService.insertSelective(user);
        if (i > 0) {
            return new JsonResponseBody<>("用户注册成功!", true, 0, null);
        } else {
            return new JsonResponseBody<>("用户注册失败!", false, 0, null);
        }
    }
}
フロントエンドライティング
1. Login.vue送信ボタンの listen 関数にget リクエストを送信するコードを追加します。
<script>
  export default {
    name: 'Login',
    data() {
      return {
        username: '',
        password: ''
      }
    },
    methods: {
      gotoRegister() {
        this.$router.push("/Register");
      },
      doSubmit() {
        //定义后台登录方法连接地址
        let url = this.axios.urls.SYSTEM_USER_DOLOGIN;
        //获取数据
        let params = {
          username: this.username,
          password: this.password
        };
        /* get请求进行参数传递 */
        this.axios.get(url, {params:params}).then(r => {
          console.log(r);
           //判断是否登录成功
           if (r.data.success) {
             //利用ElementUI信息提示组件返回登录信息
             this.$message({
               message: r.data.msg,
               type: 'success'
             });
             //登陆成功,返回指定界面
             this.$route.push('主界面');
           } else {
             //弹出登录失败信息
             this.$message.error(r.data.msg);
           }
         }).catch(e => {
           //异常信息
         });

        /* post请求方式 */
        /* this.axios.post(url, params).then(r => {
          console.log(r);
          //判断是否登录成功
          if (r.data.success) {
            //利用ElementUI信息提示组件返回登录信息
            this.$message({
              message: r.data.msg,
              type: 'success'
            });
            //登陆成功,返回指定界面
            this.$route.push('主界面');
          } else {
            //弹出登录失败信息
            this.$message.error(r.data.msg);
          }
        }).catch(function(error) {
          console.log(error);
        }); */
      }
    }
  }
</script>
2. Register.vue送信ボタンのリッスン関数に投稿リクエストを送信するコードを追加します。
<script>
  export default {
    name: 'Register',
    data() {
      return {
        username: '',
        password: ''
      }
    },
    methods: {
      gotoLogin() {
        this.$router.push("/");
      },
      doSubmit() {
        //定义后台注册方法连接地址
        let url = this.axios.urls.SYSTEM_USER_DOREG;
        //获取数据
        let params = {
          username: this.username,
          password: this.password
        };

        /* post请求方式 */
        this.axios.post(url, params).then(r => {
          //判断是否注册成功
          if (r.data.success) {
            //利用ElementUI信息提示组件返回登录信息
            this.$message({
              message: r.data.msg,
              type: 'success'
            });
            //注册成功,返回指定界面
            //this.$route.push('主界面');
          } else {
            //弹出注册失败信息
            this.$message.error(r.data.msg);
          }
        }).catch(function(error) {
          console.log(error);
        });
      }
    },
  }
</script>
テスト:
1. ssm プロジェクトを開始し、tomcat サーバーをデプロイします
2. vue プロジェクトを実行します - コマンド: npm run dev
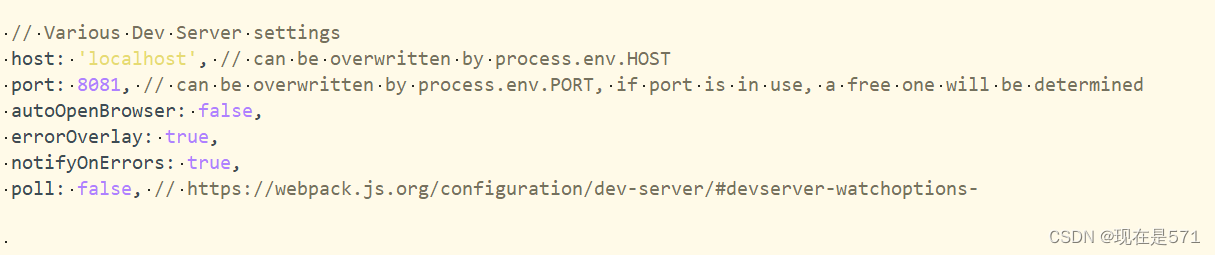
注:プロジェクトは、実行時にデフォルトでポート 8080 を使用します。他のプログラムもこのポートを使用すると、競合が発生します。Tomcat もデフォルトでポート 8080 を使用する場合、競合を避けるためにポート番号を変更する必要があります。
プロジェクト ディレクトリ内の config/index.js ファイルを開き、dev 部分のポートを変更します。