目次
1. プロジェクトをビルドする
1.1 Element-UIのインストール
まず、 vue-cli スキャフォールディング ツールがインストールされていることを確認してください。
プロジェクトをビルドしたら、npm を介して element-ui をインストールします。
cd 项目根路径                               #进入新建项目的根目录
npm install element-ui -S                  #安装element-ui模块
1.2 コンポーネントのインポート
src ディレクトリの main.js を開きます。このファイルはプロジェクトのエントリ ファイルなので、ここでインポートします。他のコンポーネントは使用できるため、再度インポートする必要はありません。
import Vue from 'vue'

//新添加1
import ElementUI from 'element-ui'
//新增加2,避免后期打包样式不同,要放在import App from './App';之前
import 'element-ui/lib/theme-chalk/index.css'

import App from './App'
import router from './router'

Vue.use(ElementUI)   //新添加3
Vue.config.productionTip = false
1.3 ログインおよび登録インターフェイスの作成
いくつかのインターフェイス コンポーネントを保存するために src ディレクトリに新しいビューを作成しました。インターフェイスは自分で設計できます。以下は私が書いたものです:
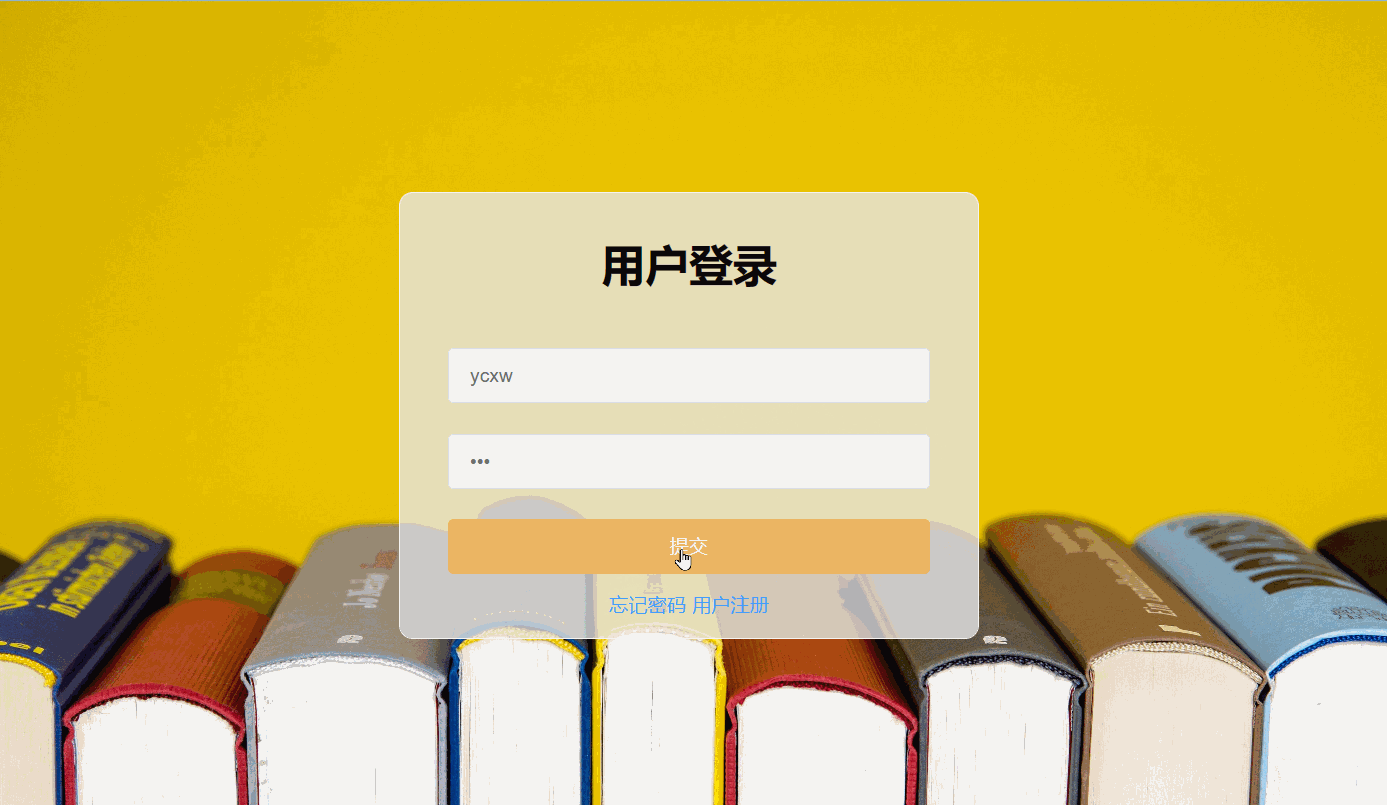
1. ユーザーログインコンポーネントを作成するLogin.vue
<template>
  <div class="login-wrap">
    <el-form class="login-container">
      <h1 class="title">用户登录</h1>
      <el-form-item label="">
        <el-input type="text" v-model="username" placeholder="登录账号" autocomplete="off"></el-input>
      </el-form-item>
      <el-form-item label="">
        <el-input type="password" v-model="password" placeholder="登录密码" autocomplete="off"></el-input>
      </el-form-item>
      <el-form-item>
        <el-button type="warning" style="width:100%;" @click="doSubmit()">提交</el-button>
      </el-form-item>
      <el-row style="text-align: center;margin-top:-10px">
        <el-link type="primary">忘记密码</el-link>
        <el-link type="primary" @click="gotoRegister()">用户注册</el-link>
      </el-row>
    </el-form>
  </div>
</template>

<script>
  export default {
    name: 'Login',
    data() {
      return {
        username: '',
        password: ''
      }
    },
    methods: {
      gotoRegister() {
        this.$router.push("/Register");
      }
    }
  }
</script>

<style scoped>
  .login-wrap {
   box-sizing: border-box;
   width: 100%;
   height: 100%;
   padding-top: 10%;
   background-image: url('/static/imgs/books2.jpg');
   /* background-color: #3b7cf5; */
   background-repeat: no-repeat;
   background-position: center right;
   background-size: 100%;
  }

  .login-container {
   border-radius: 10px;
   margin: 0px auto;
   width: 350px;
   padding: 30px 35px 15px 35px;
   border: 1px solid #eaeaea;
   text-align: left;
   background-color: rgba(229, 229, 229, 0.8);
  }

  .title {
    margin: 0px auto 40px auto;
    text-align: center;
    color: #0b0b0b;
  }
</style>
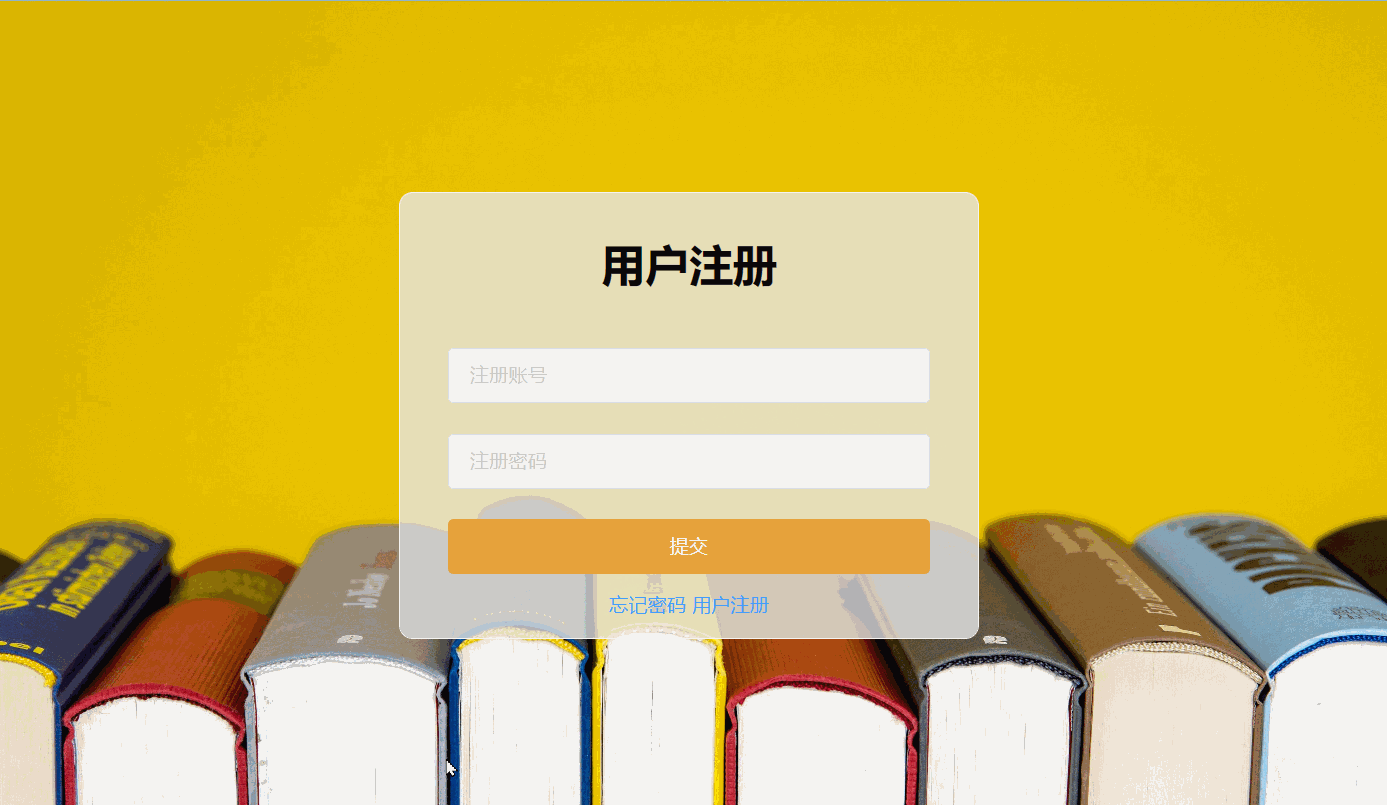
ユーザー登録コンポーネントの作成 登録.vue
<template>
  <div class="login-wrap">
    <el-form class="login-container">
      <h1 class="title">用户注册</h1>
      <el-form-item label="">
        <el-input type="text" v-model="username" placeholder="注册账号" autocomplete="off"></el-input>
      </el-form-item>
      <el-form-item label="">
        <el-input type="password" v-model="password" placeholder="注册密码" autocomplete="off"></el-input>
      </el-form-item>
      <el-form-item>
        <el-button type="warning" style="width:100%;" @click="doSubmit()">提交</el-button>
      </el-form-item>
      <el-row style="text-align: center;margin-top:-10px">
        <el-link type="primary">忘记密码</el-link>
        <el-link type="primary" @click="gotoLogin()">用户注册</el-link>
      </el-row>
    </el-form>
  </div>
</template>

<script>
  export default {
    name: 'Register',
    data() {
      return {
        username: '',
        password: ''
      }
    },
    methods: {
      gotoLogin() {
        this.$router.push("/");
      }
    }
  }
</script>

<style scoped>
  .login-wrap {
    box-sizing: border-box;
    width: 100%;
    height: 100%;
    padding-top: 10%;
    background-image: url('/static/imgs/books2.jpg');
    /* background-color: #3b7cf5; */
    background-repeat: no-repeat;
    background-position: center right;
    background-size: 100%;
  }

  .login-container {
    border-radius: 10px;
    margin: 0px auto;
    width: 350px;
    padding: 30px 35px 15px 35px;
    border: 1px solid #eaeaea;
    text-align: left;
    background-color: rgba(229, 229, 229, 0.8);
  }

  .title {
    margin: 0px auto 40px auto;
    text-align: center;
    color: #0b0b0b;
  }
</style>
注 1: <stylescoped>
vue コンポーネントで、scoped 属性を style タグに追加して、そのスタイルが現在のモジュールに作用することを示し、これによりスタイルのプライベート化の目的が達成されます。注 2: auto-complete="off"
autocomplete 属性は HTML5 の新しい属性で、off-----オートコンプリートを無効にします。
2. ルーティングを設定する
import Vue from 'vue'
import Router from 'vue-router'
import HelloWorld from '@/components/HelloWorld'
// 导入Login登录组件
import Login from '@/views/Login'
// 导入Register注册组件
import Register from '@/views/Register'

Vue.use(Router)

export default new Router({
  routes: [
    {
      path: '/',
      name: 'Login',
      component: Login
    },{
      path: '/Register',
      name: 'Register',
      component: Register
    }
  ]
})
3. 運用上の効果
プロジェクトのルート ディレクトリでnpm run devコマンドを実行します
。インターフェイスの効果:

2. バックグラウンドインタラクション
2.1 axios の紹介
axios は vue2 が提唱する ajax の軽量版です。これは、Promise ベースの HTTP ライブラリです。ブラウザから XMLHttpRequest を作成し、Vue とうまく連携します。
ヒント: vue.js には、vue-router、vuex、vue-resource という有名なファミリー バケット シリーズに加えて、完全な vue プロジェクトのコア コンポーネントである構築ツール vue-cli があります。このうち、vue-resource は Vue.js のプラグインであり、XMLHttpRequest または JSONP を通じてリクエストを開始し、応答を処理できますが、vue が 2.0 に更新された後、作者は vue-resource を更新しないことを発表しました。でもaxiosをお勧めします。
インストール手順:
npm i axios -S
2.2 vue-axios のグローバル設定を追加する
Axios は、ブラウザーおよび Nodejs 用の Promise に基づいた HTTP クライアントであり、本質的にはネイティブ XHR のカプセル化ですが、Promise の実装バージョンであり、最新の ES 仕様に準拠しています。
vue-axios は axios をベースに拡張されたプラグインで、Vue.prototype プロトタイプの $http やその他の属性を拡張し、axios を使いやすくします。
vue-axios を通じて axios の軽量カプセル化を実装します。
ステップ 1: vue-axiosおよびqsライブラリをダウンロードしてインストールする
npm i vue-axios -S
qs ライブラリは、 POST リクエストの問題を解決するために使用されます。これは、POST によって送信されるパラメータの形式がリクエスト ペイロードであるため、バックグラウンドでデータを取得できないためです。
npm install qs -S
ステップ 2: API モジュールをインポートし、axios のグローバル構成を追加する
SPA プロジェクトの src ディレクトリに API モジュールを追加します。API モジュールには、action.js (バックグラウンド リクエスト インターフェイスのカプセル化定義) と http.js ( axios のグローバル設定) の 2 つのファイルが含まれています。
-
アクション.js
/**
 * 对后台请求的地址的封装,URL格式如下:
 * 模块名_实体名_操作
 */
export default {
	'SERVER': 'http://localhost:8080/ssm_vue', //服务器
	'SYSTEM_USER_DOLOGIN': '/user/userLogin', //登陆
	'SYSTEM_USER_DOREG': '/user/userRegister', //注册
	'getFullPath': k => { //获得请求的完整地址,用于mockjs测试时使用
		return this.SERVER + this[k];
	}
}
バックグラウンドで要求されたアドレスのカプセル化、URL 形式: モジュール名エンティティ名操作
-
http.js
/**
 * vue项目对axios的全局配置
 */
import axios from 'axios'
import qs from 'qs'

//引入action模块,并添加至axios的类属性urls上
import action from '@/api/action'
axios.urls = action

// axios默认配置
axios.defaults.timeout = 10000; // 超时时间
// axios.defaults.baseURL = 'http://localhost:8080/j2ee15'; // 默认地址
axios.defaults.baseURL = action.SERVER;

//整理数据
// 只适用于 POST,PUT,PATCH,transformRequest` 允许在向服务器发送前,修改请求数据
axios.defaults.transformRequest = function(data) {
  data = qs.stringify(data);
  return data;
};


// 请求拦截器
axios.interceptors.request.use(function(config) {
  return config;
}, function(error) {
  return Promise.reject(error);
});

// 响应拦截器
axios.interceptors.response.use(function(response) {
  return response;
}, function(error) {
  return Promise.reject(error);
});

//最后,代码通过export default语句将axios导出,以便在其他地方可以引入和使用这个axios实例。
export default axios;
ステップ 3: main.js を変更して vue-axios を構成する
api モジュールと vue-axios モジュールを main.js ファイルに導入すると、axios を使用して Vue プロジェクトで HTTP リクエストを簡単に作成できるようになります。また、VueAxios プラグインによって提供される関数を使用して処理を簡素化し、 HTTPリクエストの管理。
import axios from '@/api/http'
import VueAxios from 'vue-axios'
Vue.use(VueAxios,axios)2.2 ssm プロジェクトの準備 (バックエンド)
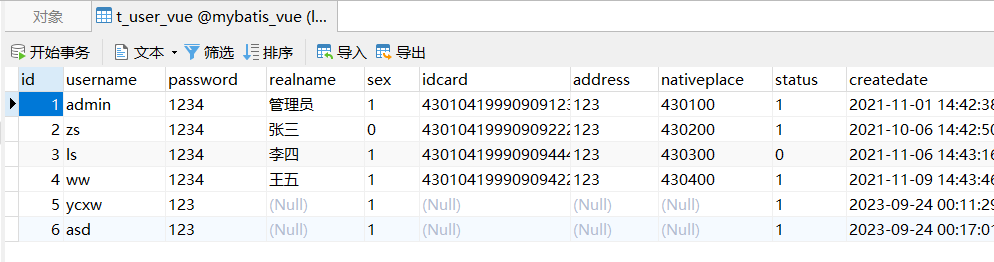
2.2.1 データシートの準備

2.2.2 ssmプロジェクトのインポート
新しいプロジェクトを作成してデータベースに接続し、コードを自動的に生成したり、jdk および maven のパスを変更したりできます。

2.2.3 コントローラーの作成
package com.zking.ssm.controller;

import com.zking.ssm.service.IUserService;
import com.zking.ssm.util.JsonResponseBody;
import com.zking.ssm.util.PageBean;
import com.zking.ssm.vo.UserVo;
import org.springframework.beans.factory.annotation.Autowired;
import org.springframework.stereotype.Controller;
import org.springframework.web.bind.annotation.RequestMapping;
import org.springframework.web.bind.annotation.ResponseBody;

import javax.servlet.http.HttpServletRequest;
import javax.servlet.http.HttpServletResponse;
import java.util.HashMap;
import java.util.List;
import java.util.Map;
import com.zking.ssm.jwt.*;

@Controller
@RequestMapping("/user")
public class UserController {

    @Autowired
    private IUserService userService;

    //登录方法
    @RequestMapping("/userLogin")
    @ResponseBody
    public JsonResponseBody<?> userLogin(UserVo userVo, HttpServletResponse response){
        if(userVo.getUsername().equals("ycxw")&&userVo.getPassword().equals("123")){
            //私有要求claim
//            Map<String,Object> json=new HashMap<String,Object>();
//            json.put("username", userVo.getUsername());
            //生成JWT,并设置到response响应头中
//            String jwt=JwtUtils.createJwt(json, JwtUtils.JWT_WEB_TTL);
//            response.setHeader(JwtUtils.JWT_HEADER_KEY, jwt);
            return new JsonResponseBody<>("用户登陆成功!",true,0,null);
        }else{
            return new JsonResponseBody<>("用户名或密码错误!",false,0,null);
        }
    }

    //注册方法
    @RequestMapping("/userRegister")
    @ResponseBody
    public JsonResponseBody<?> userRegister(UserVo user, HttpServletResponse response) {
        int i = userService.insertSelective(user);
        if (i > 0) {
            return new JsonResponseBody<>("用户注册成功!", true, 0, null);
        } else {
            return new JsonResponseBody<>("用户注册失败!", false, 0, null);
        }
    }

}
2.3 フロントエンドの書き込み
1. Login.vue送信ボタンの listen 関数にget リクエストを送信するコードを追加します。
<script>
  export default {
    name: 'Login',
    data() {
      return {
        username: '',
        password: ''
      }
    },
    methods: {
      gotoRegister() {
        this.$router.push("/Register");
      },
      doSubmit() {
        //定义后台登录方法连接地址
        let url = this.axios.urls.SYSTEM_USER_DOLOGIN;
        //获取数据
        let params = {
          username: this.username,
          password: this.password
        };
        /* get请求进行参数传递 */
        this.axios.get(url, {params:params}).then(r => {
          console.log(r);
           //判断是否登录成功
           if (r.data.success) {
             //利用ElementUI信息提示组件返回登录信息
             this.$message({
               message: r.data.msg,
               type: 'success'
             });
             //登陆成功,返回指定界面
             this.$route.push('主界面');
           } else {
             //弹出登录失败信息
             this.$message.error(r.data.msg);
           }
         }).catch(e => {
           //异常信息
         });

        /* post请求方式 */
        /* this.axios.post(url, params).then(r => {
          console.log(r);
          //判断是否登录成功
          if (r.data.success) {
            //利用ElementUI信息提示组件返回登录信息
            this.$message({
              message: r.data.msg,
              type: 'success'
            });
            //登陆成功,返回指定界面
            this.$route.push('主界面');
          } else {
            //弹出登录失败信息
            this.$message.error(r.data.msg);
          }
        }).catch(function(error) {
          console.log(error);
        }); */
      }
    }
  }
</script>
2. Register.vue送信ボタンのリッスン関数に投稿リクエストを送信するコードを追加します。
<script>
  export default {
    name: 'Register',
    data() {
      return {
        username: '',
        password: ''
      }
    },
    methods: {
      gotoLogin() {
        this.$router.push("/");
      },
      doSubmit() {
        //定义后台注册方法连接地址
        let url = this.axios.urls.SYSTEM_USER_DOREG;
        //获取数据
        let params = {
          username: this.username,
          password: this.password
        };

        /* post请求方式 */
        this.axios.post(url, params).then(r => {
          //判断是否注册成功
          if (r.data.success) {
            //利用ElementUI信息提示组件返回登录信息
            this.$message({
              message: r.data.msg,
              type: 'success'
            });
            //注册成功,返回指定界面
            //this.$route.push('主界面');
          } else {
            //弹出注册失败信息
            this.$message.error(r.data.msg);
          }
        }).catch(function(error) {
          console.log(error);
        });
      }
    },
  }
</script>
2.4 ログインテスト
1. ssm プロジェクトを開始し、tomcat サーバーをデプロイします
2. vue プロジェクトを実行します - コマンド: npm run dev
注:プロジェクトは、実行時にデフォルトでポート 8080 を使用します。他のプログラムもこのポートを使用すると、競合が発生します。Tomcat もデフォルトでポート 8080 を使用する場合、競合を避けるためにポート番号を変更する必要があります。
プロジェクト ディレクトリ内の config/index.js ファイルを開き、dev 部分のポートを変更します。

3. エラーテスト

4. 正しくテストする
バックエンドはパラメータを受け取ります。

2.5 テストに登録する
データベースを表示します。
3. CORS クロスドメイン
3.1 クロスドメインリクエストの問題
フロントエンドとバックエンドの開発に分離方法を使用しているため、フロントエンドとバックエンドは別のサーバー上にあり、セキュリティ上の考慮事項に基づいて、ブラウザーには同一オリジン ポリシーが適用されているため、クロスドメインの問題が発生します。
同一生成元ポリシー [同一生成元ポリシー] はブラウザのセキュリティ機能であり、異なる生成元のクライアント スクリプトは、明示的な承認なしに相互にリソースを読み書きすることはできません。同一生成元ポリシーはブラウザのセキュリティの基礎です。
注: axios クロスドメインの問題では、
常に次のエラーが報告されます: 「http://127.0.0.1:8848' は CORS ポリシーによってブロックされています: No 'Access-Control-Allow-Origin' header」 -end は、クロスドメイン アクセスを開発するために分離されています。
3.2 クロスドメインの問題の処理
解決策:
クロスドメイン アクセスを許可するように Tomcat を構成する必要があります。Tomcat のクロスドメイン構成方法は多数ありますが、最も簡単な方法は、CorsFilter フィルターを自分で作成し、応答ヘッダー Access-Control-Allow-Origin を追加することです。
package com.zking.ssm.util;

import java.io.IOException;

import javax.servlet.Filter;
import javax.servlet.FilterChain;
import javax.servlet.FilterConfig;
import javax.servlet.ServletException;
import javax.servlet.ServletRequest;
import javax.servlet.ServletResponse;
import javax.servlet.http.HttpServletResponse;

/**
 * 配置tomcat允许跨域访问
 *
 * @author Administrator
 *
 */
public class CorsFilter2 implements Filter {

	@Override
	public void init(FilterConfig filterConfig) throws ServletException {
	}

	@Override
	public void doFilter(ServletRequest servletRequest, ServletResponse servletResponse, FilterChain filterChain)
			throws IOException, ServletException {
		HttpServletResponse httpResponse = (HttpServletResponse) servletResponse;

		// Access-Control-Allow-Origin就是我们需要设置的域名
		// Access-Control-Allow-Headers跨域允许包含的头。
		// Access-Control-Allow-Methods是允许的请求方式
		httpResponse.setHeader("Access-Control-Allow-Origin", "*");// *,任何域名
		httpResponse.setHeader("Access-Control-Allow-Headers", "responseType,Origin, X-Requested-With, Content-Type, Accept");
		httpResponse.setHeader("Access-Control-Allow-Methods", "POST, GET, PUT, DELETE");

		//允许客户端处理一个新的响应头jwt
		//httpResponse.setHeader("Access-Control-Expose-Headers", "jwt,Content-Disposition");
		filterChain.doFilter(servletRequest, servletResponse);
	}

	@Override
	public void destroy() {

	}
}
上記のコードを web.xml に設定し、すべてのリクエストをインターセプトして、クロスドメインの問題を解決します。
  <!--CrosFilter跨域过滤器-->
  <filter>
    <filter-name>corsFilter</filter-name>
    <filter-class>com.zking.ssm.util.CorsFilter2</filter-class>
  </filter>
  <filter-mapping>
    <filter-name>corsFilter</filter-name>
    <url-pattern>/*</url-pattern>
  </filter-mapping>