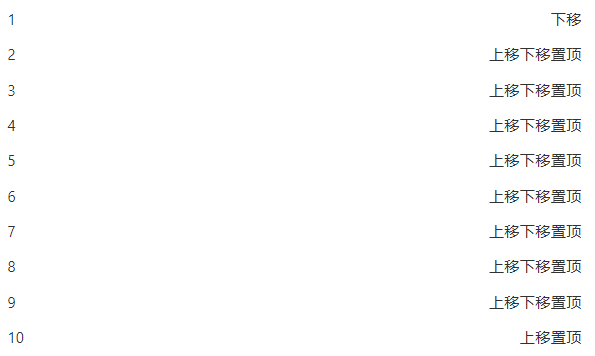
1.プレビューを実装する
2. 実装分析
- 実装では、配列要素の位置を変更します。
- 実装方法 1: 変数を使用して、ある位置の要素を受け取り、その後、現在の位置を変更し、受け取った変数を使用して、変更された位置の値を置き換えます。
- 実装方法 2、配列のスプライス メソッドを使用します。
- 3 番目の方法は、es6 の構造化割り当てを使用することです。
3. HTMLインフラストラクチャ
- v-if="index != 0" は、データの最初の行がすでに先頭にあると判断するため、それを上に移動して先頭にすることはできません。
- v-if="index != nums.length - 1" は、データの最終行がすでに最下位にあると判断するため、下に移動して最下位にすることはできません。
<div class="rui-flex-ac" v-for="item,index in nums" :key="item">
    <div class="rui-fg">{

   {item}}</div>
    <div class="rui-fa" v-if="index != 0" @click="moveUp(index)">上移</div>
    <div class="rui-fa" v-if="index != nums.length - 1" @click="moveDown(index)">下移</div>
    <div class="rui-fa" v-if="index != 0" @click="moveTop(index)">置顶</div>
</div>
4. 方法1:変数の受け取り
- 上または下に移動するには、temp 変数を使用して現在の位置にある要素を取得します。
- 現在の位置は、[前または次の位置の要素] の方向に移動する必要がある要素を取得します。
- 移動方向位置の温度変数の値を取得して要素の交換を完了します。
- 最上位は、変数 temp を使用して現在の位置要素を取得し、その他の変数を使用して他の位置要素の値を取得します。
- スプライシング温度などは、ここで unshift、concat などを使用して実現できます。
    // 上移
    moveUp(index){
      let nums = this.nums;
      let temp = nums[index]
      nums[index] = nums[index - 1]
      nums[index - 1] = temp;
      this.nums = [...nums];
    },
    // 下移
    moveDown(index){
      let nums = this.nums;
      let temp = nums[index]
      nums[index] = nums[index + 1]
      nums[index + 1] = temp;
      this.nums = [...nums];
    },
    // 置顶
    moveTop(index){
      let nums = [...this.nums]
      let temp = nums[index]
      let other = nums.filter((item,idx) => index != idx)
      this.nums = [temp,...other]
    },
5. 方法2:エレメント交換を実現する二重接続
- 最初のステップは nums.splice(index - 1, 1, nums[index]) で、index - 1 の要素を nums[index] に置き換えます。
- 注: splice は置換された要素のリストを返すため、返された要素をインデックス位置に置き換えることで要素の位置を交換できます。
- 2 番目のステップ nums.splice(index, 1, ...nums.splice(index - 1, 1, nums[index])) は、最初のステップの戻り値をインデックス位置の要素に置き換えます。
- 先頭の splice によって返された値を取得し、それを配列の位置 0 に置きます。
    // 上移
    moveUp(index){
      let nums = this.nums;
      nums.splice(index, 1, ...nums.splice(index - 1, 1, nums[index]))
      this.nums = [...nums];
    },
    // 下移
    moveDown(index){
      let nums = this.nums;
      nums.splice(index, 1, ...nums.splice(index + 1, 1, nums[index]))
      this.nums = [...nums];
    },
    // 置顶
    moveTop(index){
      let nums = [...this.nums]
      this.nums = [...nums.splice(index,1),...nums]
    },
6. 方法 3: 要素交換を実現する単一のスプライス
このメソッドとメソッド 2 の違いはさらに大きく、メソッド 2 は 2 番目の置換値にスプライスを使用しますが、メソッド 3 は最初のスプライスの戻り値を現在位置に直接割り当てます。
    // 上移
    moveUp(index){
      let nums = this.nums;
      nums[index] = nums.splice(index - 1, 1, nums[index])[0]
      this.nums = [...nums];
    },
    // 下移
    moveDown(index){
      let nums = this.nums;
      nums[index] = nums.splice(index + 1, 1, nums[index])[0]
      this.nums = [...nums];
    },
    // 置顶
    moveTop(index){
      let nums = [...this.nums]
      this.nums = [...nums.splice(index,1),...nums]
    },
7. 方法 4: ES6 の構造化代入
- 構造化代入によって直接、2 つの位置の要素が交換されます。
    // 上移
    moveUp(index){
      let nums = this.nums;
      [nums[index], nums[index - 1]] = [nums[index - 1], nums[index]]
      this.nums = [...nums];
    },
    // 下移
    moveDown(index){
      let nums = this.nums;
      [nums[index], nums[index + 1]] = [nums[index + 1], nums[index]]
      this.nums = [...nums];
    },
    // 置顶
    moveTop(index){
      let nums = [...this.nums]
      this.nums = [...nums.splice(index,1),...nums]
    }
8.誘導
     move(type, nums, index, row={}){
      if(!Array.isArray(nums)){
        return nums
      }
      switch(type){
        case 'up':
          [nums[index], nums[index - 1]] = [nums[index - 1], nums[index]]
          break;
        case 'down':
          [nums[index], nums[index + 1]] = [nums[index + 1], nums[index]]
          break;
        case 'top':
          nums = [...nums.splice(index,1), ...nums]
          break;
        case 'bottom':
          let val = nums.splice(index,1)[0]
          nums = [...nums, val]
          break;
      }
      return [...nums]
    },
    // 上移[up]、下移[down]、置顶[top]
    moveRow(type, index, item = {}){
      this.nums = this.move(type, this.nums, index, item)
    },
9. まとめ
- 上下移動、追加、削除などの操作を1つのツール機能に集約し、集中操作を容易にします。
- これを実現するにはさまざまな方法がありますが、ここでは私が仕事でよく使用する方法の概要を示します。