次にお話ししたいのは、ログインインターフェイスで注意を払う必要のあるいくつかの問題です。アプリのログインインターフェースには、通常、パスワードログイン、確認コードログイン、パスワード忘れ、アカウント登録など、いくつかのモジュールがあります。私はプロのUIデザイナーではないので、機能の実装は比較的簡単で、主に詳細のデザインがあります。主に機能実現の部分を中心に、デザインの仕方や見栄えの良さについてはお話しできません。
デモでは、主にアカウントログイン、確認コードログイン、パスワード忘れの3つの機能を行いました。実際、確認コードログイン、パスワード忘れ、アカウント登録の3つの機能モジュールで実装されているコードは類似しており、機能を再利用できます。これについては、以下で説明します。
アカウントパスワードログインインターフェイスによって実装されるロジックには、主に1.アカウントパスワードの合法性のローカル検証、2。ログインが成功したかどうかを判断するためにバックグラウンドに送信し、成功した場合はメインインターフェイスに入ります。それ以外の場合は、再度ログインしてください。
2つのテキストボックスはTextFieldによって実装され、各テキストボックスはデコレータを使用していくつかのプロンプト関数を実行します。上記のコードは以下のコードの一部です。
 TextEditingController passwordController = new TextEditingController();

Widget PasswordField()
        {
            return new TextField(
                            textAlign: TextAlign.left,
                            style: new TextStyle(fontSize: 20),
                            controller:passwordController,
                            obscureText: isObscure,
                            //autovalidate: validataPassword,
                            //focusNode: passwordFocus,
                            onChanged: (text) => { setState(() => password = text); },
                            //validator: (value) => { return value.Trim().Length > 0 ? null : "密码不能为空"; },
                            decoration: new InputDecoration(
                                hintText: "请输入密码",
                                hintStyle: new TextStyle(color: Color.fromARGB(255, 221, 221, 221),fontSize:15),
                                suffixIcon: password == "" ? null :
                                new Container(child:new Row(
                                    mainAxisSize: MainAxisSize.min,
                                    children: PasswordIcon()))

                                )
                            );
        }
List<Widget> PasswordIcon()
{
            return new List<Widget> {
             new GestureDetector(child: new Icon(isObscure?Icons.visibility_off:Icons.visibility),
             onTap: () => { setState(()=> { isObscure=!isObscure; }); }),
             new GestureDetector(child: new Icon(Icons.clear),onTap: () => { setState(()=> { passwordController.text = ""; }); })};
}このコードは、主にパスワードボックスの実現を実現します。これには、主に非表示またはパスワードの実現、パスワードのクリア、およびユーザーにこれらの機能の入力を求めるプロンプトが含まれます。UIコンポーネントを直接ドラッグアンドドロップするUGUIとは異なり、UIWidgetsのすべてのコンポーネントは、自分で作成する必要があります。作成プロセスは面倒ですが、自由度は非常に大きくなります。すべてのコンポーネントのほぼすべての属性を編集できます。スキルそうであれば、多くの機能コンポーネントを再利用でき、カスタムコンポーネントライブラリのセットを作成できます。
ログインボタンは、主にログイン検証のために、ユーザー入力に応じて色を変更するRaisedButtonで実装されます。、
new Container(
     height: 48,
     constraints: new BoxConstraints(minWidth: float.PositiveInfinity, maxHeight: float.PositiveInfinity),
     child: new RaisedButton(
     shape:new RoundedRectangleBorder(borderRadius:BorderRadius.circular(5)),
     color: password != "" && accountController.text != "" ? Colors.blue : Color.fromARGB(255, 85, 85, 85),
      child: new Text("登录", style: new TextStyle(color: Color.white, fontSize: 15)),
                  onPressed: () => {

                  if (password == "" || account == "")
                  {
                  // ShowMessage("账号或密码不能为空");

                   }
                   else
                   {
                    Login(account, password);
                     }

})),まず、RaisedButtonの親ノードとしてコンテナを使用し、子ノードの塗りつぶしを設定するために、ボタンのサイズを設定する必要がないようにし、親ノードに従って直接塗りつぶします。同時に、形状を使用してボタンを丸くし、アカウントのパスワードが空かどうかを判断してボタンの色を変更します。ボタンをクリックすると、最初にローカルで検証されます。検証が失敗した場合はボックスがポップアップし、それ以外の場合はバックグラウンド判定を入力します。
次に、確認コードのログインについて話し、パスワード機能を忘れましょう

確認コードのログイン、パスワードを忘れた場合、アカウント登録機能を含め、基本的には携帯電話やメールを取得し、アプリケーションをバックグラウンドインターフェイスに送信し、確認コードを使用して自分の操作かどうかを判断します。 、ログイン、パスワードの変更、アカウントの登録を行うために、これらの3つの機能。
確認コードを送信するためのこのインターフェースの設計は、パスワードログインの設計と似ています。ほとんどのアプリの検証コード入力インターフェースは単純なテキストではないため、主に注意すべき点は、検証コードを受け取った後に入力されるモジュールです。ボックスに入力しますが、見栄えの良いスタイルを使用してユーザー入力をガイドします。現時点では、この効果を実現するために、いくつかのコンポーネント機能の組み合わせを開発する必要があります。
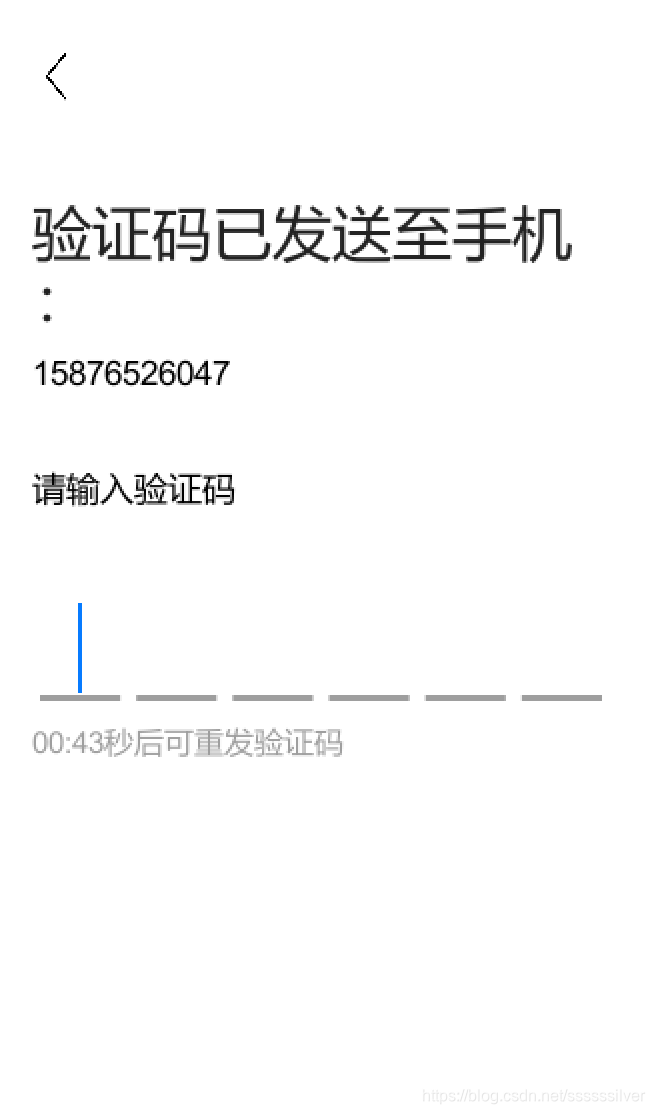
たとえば、このテキストボックスの実現は、Container、Row、TextField、およびimageを使用して実際に実現されます。この効果は、ブロガーのフラッター記事を参照することによって実際に書き直されます。アドレスはここにあります。一般的な実装原則は、非表示のTextFieldを使用することです。 、入力するとすぐにフォーカスが取得されます。確認コードの入力ボックスは、このTextFieldで取得されたデータに基づいて、実際に1つずつインターセプトされ、対応するボックスに表示されます。最後の文字を入力すると、自動的に送信されます。ボックスのフォーカスプロンプトの点滅は、実際にはgifの点滅で実現され、テキストの横のテキストボックスで自動的に点滅します。次のコードの上部の実装コード
Widget VerificationBox()
        {
            return new Container(
                height: 60,
                child:new Stack(
                    children:new List<Widget> {
                        new Row(
                            mainAxisAlignment:MainAxisAlignment.center,
                            crossAxisAlignment:CrossAxisAlignment.center,
                            children: GetInputCell()
                            ),
                        new Container(
                            height:60,
                            width:float.PositiveInfinity,
                            child:new TextField(
                                keyboardType:TextInputType.number,
                                inputFormatters:new List<TextInputFormatter>{ new LengthLimitingTextInputFormatter(cellCount) },
                                decoration:new InputDecoration(border:InputBorder.none),
                                cursorWidth:0,
                                style:new TextStyle(color:Colors.transparent),
                                controller:controller,
                                autofocus:true,

                                onChanged:(str)=>
                                {
                                    setState(()=>
                                    {
                                        code=str;
                                        if(str.Length==cellCount)
                                        {
                                             Debug.Log("提交检测")
                                            }
                                    });
                                }
                                )
                            )
                    }
                    )
                );
        }

        string MidStrEx(string sourse, string startstr, string endstr)
        {
            string result = string.Empty;
            int startindex, endindex;
            try
            {
                startindex = sourse.IndexOf(startstr);
                if (startindex == -1)
                    return result;
                string tmpstr = sourse.Substring(startindex + startstr.Length);
                endindex = tmpstr.IndexOf(endstr);
                if (endindex == -1)
                    return result;
                result = tmpstr.Remove(endindex);
            }
            catch (Exception ex)
            {
                Debug.Log("MidStrEx Err:" + ex.Message);
            }
            return result;
        }


        List<Widget> GetInputCell()
        {
            List<Widget> list = new List<Widget>();
            for (int i = 0; i < cellCount; i++)
            {
                list.Add(new Expanded(
                    flex: 1,
                    child: new Center(child: new Container(
                        width: 50,
                        height: 50,
                        margin: EdgeInsets.only(left: 5, right: 5),
                        alignment: Alignment.center,
                        child: GetFoucus(i),
                        decoration:new BoxDecoration(border: new Border(bottom: new BorderSide(width:1,color: Colors.grey)))
                        //decoration:new BoxDecoration(border:Border.all(color:Colors.grey,width:1))
                            )
                        ))
                    );
            }


            return list;
        }

        Widget GetFoucus(int index)
        {
            if (code.Length  == index)
            {
                return new Container(width: 45, height: 45, child: Image.network(Application.streamingAssetsPath + "/Icons/flash.gif"));
            }
            else
            {
                return new Text(
                data: GetIndexChar(index),
                style: new TextStyle(fontSize: 40, color: Colors.black, fontWeight: FontWeight.w900)
                );
            }
        }


        string GetIndexChar(int index)
        {
            if (code == null || string.IsNullOrEmpty(code))
            {
                return "";
            }
            if (code.Length > index)
            {
                return code[index].ToString();
            }
            else
            {
                return "";
            }
        }

    }
パスワードを忘れた場合は、アカウント登録やSMSログインに似ているため、ここでは説明しません。