Artículo anterior: yolo v7 a rknn
Este artículo:
1. Es una conversión del modelo de detección. Se estima que la clasificación, la pose y el segmento se escribirán más adelante;
2.☆Cuantificación del soporte. Se resolvió que la confianza será 0 después de la cuantificación
3. Se resolvieron algunos mensajes de error que aparecieron durante el proceso de conversión. Principalmente el problema es que el tamaño del eje de la matriz excede el límite.
1. Entrenamiento
1.Cambiar versión
ultralíticos-8.0.186
git clone https://github.com/ultralytics/ultralytics
cd ultralytics
git checkout eb976f5ad20d7779e82f733af4ebe592beaa89b5
2.Entrenamiento
Para la capacitación v8, consulte: xxx (aún no está escrito, el trabajo manual es divertido).
La introducción en el sitio web oficial también es muy detallada y publicaré una aquí.
2. pt2onnx
Nota, opset_version=12
imgsz=(h, w)Presta atención al orden de h y w.。
from ultralytics import YOLO

def yolov8_export():
    # Load a model
    model = YOLO(model="./runs/detect/bbb2/weights/best.pt")
    model.export(format='onnx', imgsz=(608, 608), opset=12, simplify=True)
3. onnx2rknn
1.Configuración del entorno virtual RK3588
rknn-toolkit2 1.5.0
git clone https://github.com/rockchip-linux/rknn-toolkit2
cd rknn-toolkit2
conda create -n rknn-toolkit2 python=3.6
conda activate rknn-toolkit2
pip install doc/requirements_cp36-*.txt
pip install packages/rknn_toolkit2-*-cp36-*.whl
Si desea utilizar la última versión de whl, https://eyun.baidu.com/s/3eTDMk6Y extraiga la contraseña: rknn
RK_NPU_SDK -> RK_NPU_SDK_1.5.0 -> desarrollar -> rknn-toolkit2-1.5.1b24 ->
descargar paquetes último whl Simplemente baje e instálelo.
2. Convertir + probar una sola imagen
El código completo es el siguiente:
# -*- coding: utf-8 -*-
"""
@Time   : 2023/8/17 13:44:51
@Author : tm1
@IDE    : PyCharm
@Project: onnx2rknn_YOLOv8
@Disc   : 手动选择onnx的输出节点。
          区别:1.被舍弃的部分onnx后处理需要手动实现;
               2.可以量化。
"""

import cv2
import numpy as np
import yaml
from rknn.api import RKNN

ONNX_MODEL = './onnx_model/VisDrone2019/best.onnx'
RKNN_MODEL = './onnx_model/VisDrone2019/best.rknn'
DATASET = './onnx_model/VisDrone2019/quantize.txt'
dataset = './onnx_model/VisDrone2019/VisDrone2019.yaml'

QUANTIZE_ON = True

# CLASSES = {0: "hogcote"}  # 训练时的类别

CLASSES = {

    }  # 训练时的类别
if CLASSES == {

    }:
    with open(dataset, 'r') as f:
        CLASSES = yaml.safe_load(f)['names']

nmsThresh = 0.45  # 值越大,代表允许重叠的面积越大。
objectThresh = 0.5

# 注意调整为onnx模型的大小。
model_h = 608
model_w = 608

color_palette = np.random.uniform(0, 255, size=(len(CLASSES), 3))


def letterbox(im, new_shape=(640, 640), color=(114, 114, 114)):
    # Resize and pad image while meeting stride-multiple constraints
    shape = im.shape[:2]  # current shape [height, width]
    if isinstance(new_shape, int):
        new_shape = (new_shape, new_shape)

    # Scale ratio (new / old)
    r = min(new_shape[0] / shape[0], new_shape[1] / shape[1])

    # Compute padding
    ratio = r, r  # width, height ratios
    new_unpad = int(round(shape[1] * r)), int(round(shape[0] * r))
    dw, dh = new_shape[1] - new_unpad[0], new_shape[0] - new_unpad[1]  # wh padding

    dw /= 2  # divide padding into 2 sides
    dh /= 2

    if shape[::-1] != new_unpad:  # resize
        im = cv2.resize(im, new_unpad, interpolation=cv2.INTER_LINEAR)
    top, bottom = int(round(dh - 0.1)), int(round(dh + 0.1))
    left, right = int(round(dw - 0.1)), int(round(dw + 0.1))
    im = cv2.copyMakeBorder(im, top, bottom, left, right, cv2.BORDER_CONSTANT, value=color)  # add border
    return im, ratio, (dw, dh)


def draw_detections(img, box, score, class_id):
    """
    Draws bounding boxes and labels on the input image based on the detected objects.

    Args:
        img: The input image to draw detections on.
        box: Detected bounding box.
        score: Corresponding detection score.
        class_id: Class ID for the detected object.

    Returns:
        None
    """

    # Extract the coordinates of the bounding box
    x1, y1, w, h = box

    # Retrieve the color for the class ID
    color = color_palette[class_id]

    # Draw the bounding box on the image
    cv2.rectangle(img, (int(x1), int(y1)), (int(x1 + w), int(y1 + h)), color, 2)

    # Create the label text with class name and score
    label = f'{

      CLASSES[class_id]}: {

      score:.2f}'

    # Calculate the dimensions of the label text
    (label_width, label_height), _ = cv2.getTextSize(label, cv2.FONT_HERSHEY_SIMPLEX, 0.5, 1)

    # Calculate the position of the label text
    label_x = x1
    label_y = y1 - 10 if y1 - 10 > label_height else y1 + 10

    # Draw a filled rectangle as the background for the label text
    cv2.rectangle(img, (label_x, label_y - label_height), (label_x + label_width, label_y + label_height), color,
                  cv2.FILLED)

    # Draw the label text on the image
    cv2.putText(img, label, (label_x, label_y), cv2.FONT_HERSHEY_SIMPLEX, 0.5, (0, 0, 0), 1, cv2.LINE_AA)


def sigmoid(x):
    return 1 / (1 + np.exp(-x))


def postprocess(input_image, outputs):
    img_h, img_w = input_image.shape[:2]
    boxes0 = np.transpose(np.squeeze(outputs[0]))
    scores0 = np.transpose(np.squeeze(outputs[1]))

    if len(scores0.shape) == 1:
        scores0 = np.expand_dims(scores0, axis=1)
    scores = sigmoid(scores0)
    max_scores = np.max(scores, axis=1)  # 多个类别时,最大的分数。
    max_indices = np.argmax(scores, axis=1)

    t = np.where(max_scores >= objectThresh)[0]  # 元组

    boxes = boxes0[t]
    scores = max_scores[t]
    class_ids = max_indices[t]

    # 根据分数从高到低排序
    sorted_indices = np.argsort(scores)[::-1]
    boxes = boxes[sorted_indices]
    scores = scores[sorted_indices]
    class_ids = class_ids[sorted_indices]

    print(boxes)
    print(scores)
    print(class_ids)

    # Get the number of rows in the outputs array
    rows = boxes.shape[0]

    # Lists to store the bounding boxes, scores, and class IDs of the detections
    boxes_ = []
    scores_ = []
    class_ids_ = []

    # Calculate the scaling factors for the bounding box coordinates
    x_factor = img_w / model_w
    y_factor = img_h / model_h

    # Iterate over each row in the outputs array
    for i in range(rows):
        # Extract the class scores from the current row
        classes_scores = scores[i]

        # Find the maximum score among the class scores
        max_score = np.amax(classes_scores)

        # If the maximum score is above the confidence threshold
        if max_score >= objectThresh:
            # Get the class ID with the highest score
            class_id = np.argmax(classes_scores)

            # Extract the bounding box coordinates from the current row
            x, y, w, h = boxes[i]

            # Calculate the scaled coordinates of the bounding box
            left = int((x - w / 2) * x_factor)
            top = int((y - h / 2) * y_factor)
            width = int(w * x_factor)
            height = int(h * y_factor)

            # Add the class ID, score, and box coordinates to the respective lists
            class_ids_.append(class_id)
            scores_.append(max_score)
            boxes_.append([left, top, width, height])

    print(boxes_)
    print(scores_)
    print(class_ids_)

    # Apply non-maximum suppression to filter out overlapping bounding boxes
    indices = cv2.dnn.NMSBoxes(boxes_, scores_, score_threshold=objectThresh, nms_threshold=nmsThresh)

    # Iterate over the selected indices after non-maximum suppression
    for i in indices:
        # Get the box, score, and class ID corresponding to the index
        box = boxes_[i]
        score = scores_[i]
        class_id = class_ids_[i]

        # Draw the detection on the input image
        draw_detections(input_image, box, score, class_id)
    return input_image


def export_rknn():
    rknn = RKNN(verbose=True)

    rknn.config(
        # see:ultralytics/yolo/data/utils.py
        mean_values=[[0, 0, 0]],
        std_values=[[255, 255, 255]],
        # TODO:使用下面均值、方差后,效果更差:
        # mean_values=[[123.675, 116.28, 103.53]],  # IMAGENET_MEAN = 0.485, 0.456, 0.406
        # std_values=[[58.395, 57.12, 57.375]],  # IMAGENET_STD = 0.229, 0.224, 0.225
        quantized_algorithm='normal',
        quantized_method='channel',
        # optimization_level=2,
        compress_weight=False,  # 压缩模型的权值,可以减小rknn模型的大小。默认值为False。
        # single_core_mode=True,
        # model_pruning=False,  # 修剪模型以减小模型大小,默认值为False。
        target_platform='rk3588'
    )
    rknn.load_onnx(
        model=ONNX_MODEL,
        outputs=[
            '/model.22/Mul_2_output_0', '/model.22/Split_output_1',
        ]
    )
    rknn.build(do_quantization=QUANTIZE_ON, dataset=DATASET, rknn_batch_size=1)
    rknn.export_rknn(RKNN_MODEL)

    # # 精度分析
    # rknn.accuracy_analysis(
    #     inputs=['/home/tm1/D/workspace/onnx2rknn_YOLOv8/onnx_model/official/zidane.jpg'],
    #     output_dir="./snapshot",
    #     target=None
    # )

    rknn.init_runtime()
    return rknn


if __name__ == '__main__':
    # 数据准备
    img_path = 'onnx_model/VisDrone2019/img.png'
    orig_img = cv2.imread(img_path)
    # img = cv2.cvtColor(orig_img, cv2.COLOR_BGR2RGB)
    img = orig_img
    img_h, img_w = img.shape[:2]
    resized_img, ratio, (dw, dh) = letterbox(img, new_shape=(model_h, model_w))  # padding resize
    # resized_img = cv2.resize(img, (model_w, model_h), interpolation=cv2.INTER_LINEAR) # direct resize
    input = np.expand_dims(resized_img, axis=0)

    # 转换模型
    rknn = export_rknn()

    # 推理
    outputs = rknn.inference(inputs=[input], data_format="nhwc")

    # 后处理
    result_img = postprocess(resized_img, outputs)

    # 保存结果
    cv2.imwrite('./onnx_model/VisDrone2019/img_result.jpg', result_img)

    # 释放
    rknn.release()
3. Explicación de partes clave del código.
3.1 En la función export_rknn()
    rknn.load_onnx(
        model=ONNX_MODEL,
        outputs=[
            '/model.22/Mul_2_output_0', '/model.22/Split_output_1',
        ]
    )
El origen de los nodos /model.22/Mul_2_output_0 y /model.22/Split_output_1:
use este sitio web para abrir el modelo onnx convertido
y luego llévelo al final:
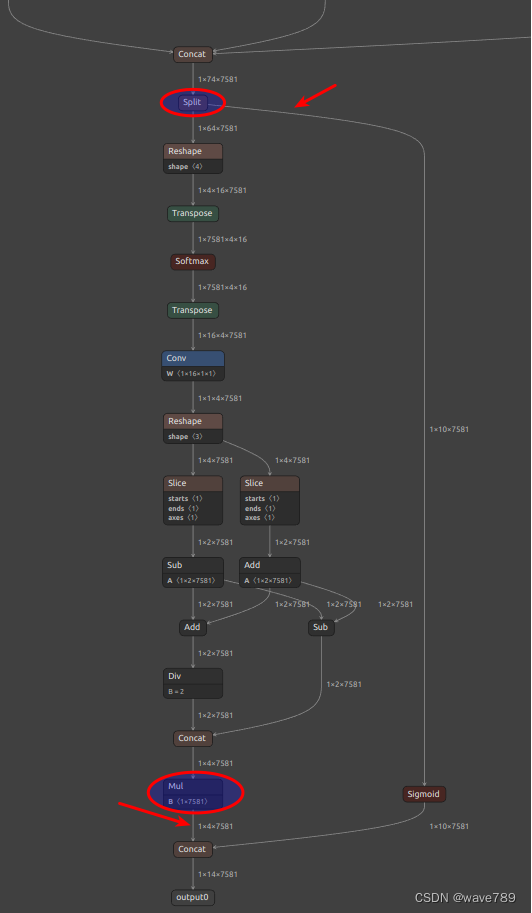
3.2 En la función postproceso()
Como puede ver en la imagen de arriba, se ha eliminado el sigmoide detrás de node/model.22/Split_output_1.
¿Por qué las cuantificaciones de confianza son todas 0? El rango de valores de sigmoide es (0,1), que es 0 después de cuantificar int8. Así que elimina el sigmoideo.
Referencia 1 , Referencia 2
3.3 El problema de que el tamaño del eje de la matriz excede el límite
Como puede ver en la imagen de arriba, el tamaño del eje de las operaciones Reshape, Softmax y Transpose es 7581 (=76 76+38 38+19*19). Mi imagen de entrada es 608 x 608. Si la imagen es más grande, excederá el límite de rk.
Las restricciones de rk son las siguientes:
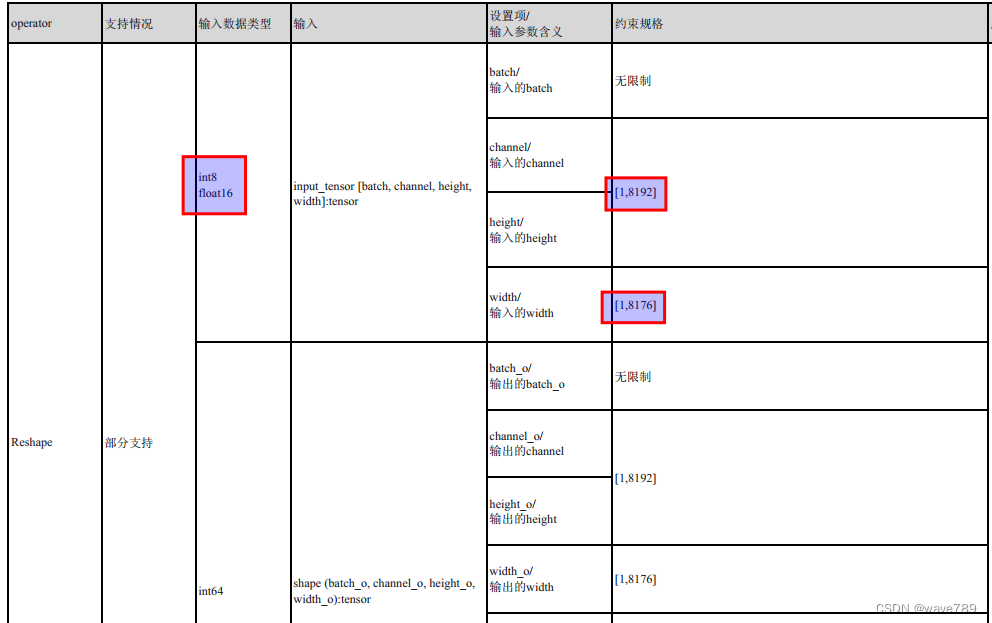
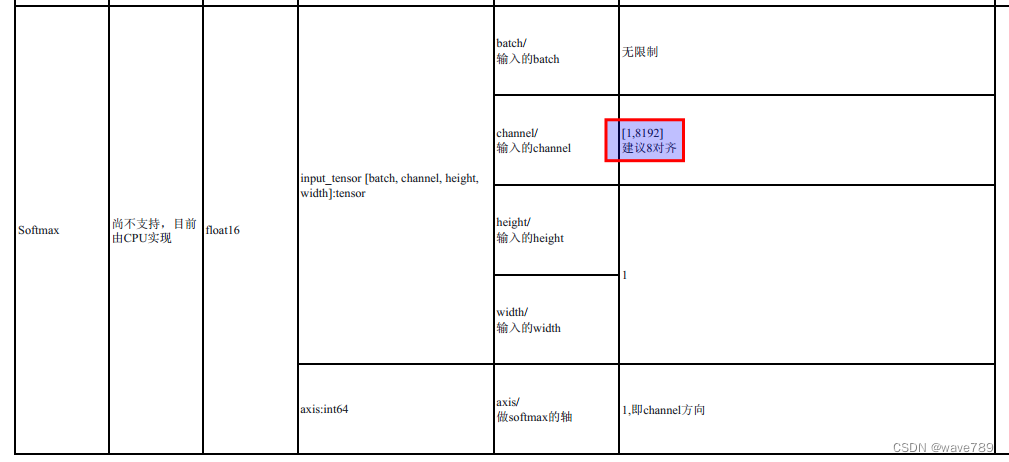
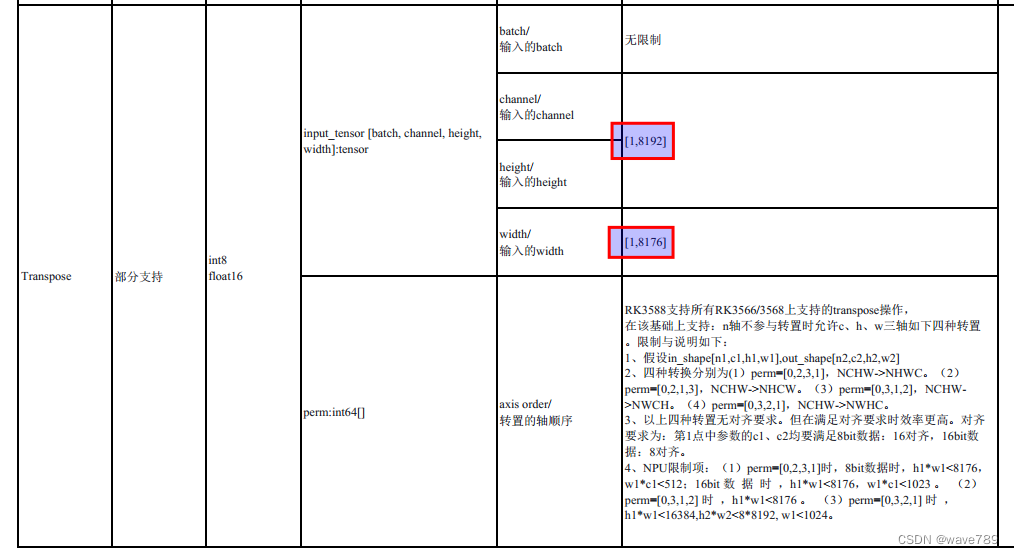
Para obtener más información, consulte rknn-toolkit2/doc/RKNN_Compiler_Support_Operator_List_v1.5.0.pdf